|
|

This chapter describes how to enter users into the Cisco IPeXchange Monitor and how to specify access controls. The chapter contains the following sections:
The monitor provides two ways to control access to the Internet: site access controls and group access controls. Unless they are members of a group, users have access according to the site access control profile. In addition, NetWare users that have not been entered into the monitor are also subject to site access controls.
One user can be a member of more than one group. The permissions of all groups are combined to form the permissions for a user. The most liberal permissions apply. For example, if a user is a member of two groups, and during normal work hours one group allows access to internal IP addresses only while the other group allows FTP connections to all IP addresses, the user can use FTP to connect to any IP address during work hours.
Users that are not logged into NetWare or that are using earlier versions of the gateway client software (before version 1.5) can use the monitor. When the user accesses the gateway, an ANYBODY user is assigned to that user. By default, ANYBODY has site access controls. However, you can create an ANYBODY user (if one does not exist) and change the access controls to anything you want.
To use the Access Manager, from the monitor main window, click Access Manager. Or you can click an Access Manager link at the bottom of some windows.
The Access Manager window appears.
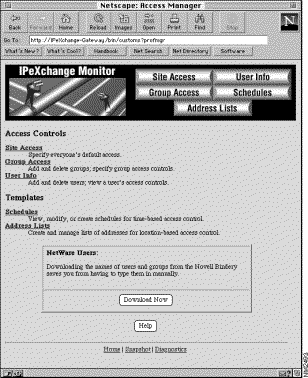
You can save time by taking the users and groups directly from the NetWare Bindery instead of entering them manually. To do so, click Download Now.
 | Caution If you delete one or more users from a NetWare group in the monitor, then download the NetWare groups and users again, the users are moved back into the group. If possible, your NetWare groups should match your monitor groups to avoid this problem. For example, if in the monitor you delete a user FRED from a the NetWare group ENG, FRED will be added back to the group if you download again. However, if in the monitor you add FRED to the NetWare group SALES, FRED will stay in SALES if you download again. Users not entered into the monitor are subject to site access controls. |
 | Caution Any new groups added to the monitor with the NetWare download feature will initially have unrestricted access controls. To specify the access controls for a group, see a later section "Working with Group Access Controls." After a NetWare group has been assigned access controls in the monitor, subsequent NetWare downloads will not erase the access controls. |
You need to define the site access controls for all users that are not members of a group. This applies to users entered into the monitor, and users that are not known by the monitor but are on the IPX network. If you want to control access according to specific times or address lists, you need to specify schedules and address lists before you can specify access controls. For more information, refer to the sections "Working with Schedules" and "Working with Address Lists" later in this chapter.
Follow these steps to define access controls for a site:
The Site Access window appears.
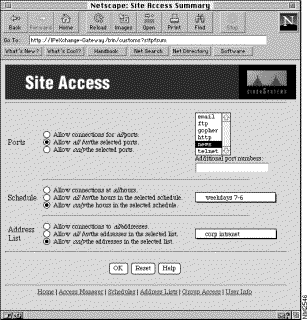
Step 2 Select a Ports access control option, and select or type the ports, if needed.
Following are the meanings of the different options:
Allow connections for all ports. This option does not restrict port access.
Allow all but the selected ports. This option denies access to the ports you have selected in the list and have typed in the Additional port numbers field.
Allow only the selected ports. This option allows access only to the ports you have selected in the list and have typed in the Additional port numbers field.
Shift-click to select multiple items in the list. Delimit port numbers with a space or comma (,).
Step 3 Select a Schedule access control option.
Following are the meanings of the different options:
Allow connections at all times. This option does not restrict access by time.
Allow all but the times in the selected schedule. This option denies access at the times in the schedule selected in the pull-down menu.
Allow only the times in the selected schedule. This option allows access only at the times in the schedule selected in the pull-down menu.
Step 4 Select an Address List access control option.
Following are the meanings of the different options:
Allow connections to all addresses. This option does not restrict access by location.
Allow all but the addresses in the selected list. This option denies access to the locations in the address list selected in the pull-down menu.
Allow only the addresses in the selected list. This option allows access to only the locations in the address list selected in the pull-down menu. For example, you could create an intranet of corporate addresses only.
Step 5 Click OK to accept the changes, or click Reset to cancel the changes.
The Site Access window is still displayed.
This section describes the following tasks:
Before you can define group access, you need to create a group of a certain name. Remember that you can download NetWare groups and users to save time, as described in the earlier section "Populating the Monitor with NetWare Users and Groups."
Follow these steps to create a group:
The Group Access window appears.
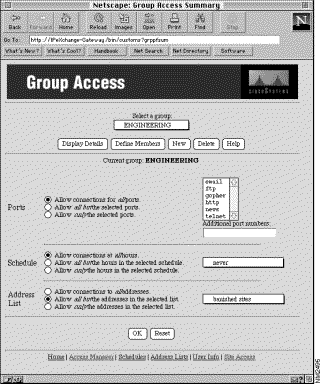
If you have not yet entered any group names, the following window appears instead.
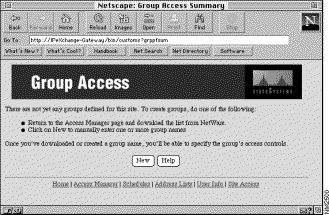
Step 2 Click New to add a new group.
Step 3 Type the name of the group in the Group name field.
The name can contain any ASCII characters and spaces.
Step 4 Click OK to add the group, or click Cancel to cancel the operation.
The Group Access window appears. If you clicked OK, the group appears in the Select a group pull-down menu.
A new group has no members, and the default access control is unrestricted access. The following sections describe how to specify members and access controls.
Follow these steps to add users to a group or to remove users from a group:
 | Caution If you delete one or more users from a NetWare group in the monitor, then download the NetWare groups and users again, the users are moved back into the group. If possible, your NetWare groups should match your monitor groups to avoid this problem. For example, if in the monitor you delete a user FRED from a the NetWare group ENG, FRED will be added back to the group if you download again. However, if in the monitor you add FRED to the NetWare group SALES, FRED will stay in SALES if you download again. |
The Group Access window appears.
Step 2 Choose the group from the Select a group pull-down menu.
Step 3 Click Define Members.
The Define the Members of a Group window appears.
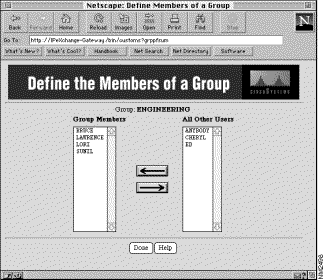
Step 4 Add or remove users from the Group Members list.
To add a user, select a user in the All Other Users list, and click the left-pointing arrow to move the user to the Group Members list.
To remove a user, select a user in the Group Members list, and click the right-pointing arrow to move the user to the All Other Users list.
Step 5 Click Done to return to the Group Access window.
After you have downloaded or entered a group name, you can define the access controls for the group. If you want to control access according to specific times or address lists, you need to specify schedules and address lists before you can specify access controls. Refer to the sections "Working with Schedules" and "Working with Address Lists" later in this chapter for more information.
Follow these steps to define access controls for a group.
The Group Access window appears.

Step 2 Select the group from the Select a group pull-down menu. Then click Display Details.
The access control profile of the group appears in the Group Access window.
Step 3 Select a Ports access control option, and select or type the ports, if needed.
Following are the meanings of the different options:
Allow connections for all ports. This option does not restrict port access.
Allow all but the selected ports. This option denies access to the ports you have selected in the list and have typed in the Additional port numbers field.
Allow only the selected ports. This option allows access to only the ports you have selected in the list and have typed in the Additional port numbers field.
Shift-click to select multiple items in the list. Delimit port numbers with a comma (,).
Step 4 Select a Schedule access control option.
Following are the meanings of the different options:
Allow connections at all times. This option does not restrict access by time.
Allow all but the times in the selected schedule. This option denies access at the times in the schedule selected in the pull-down menu.
Allow only the times in the selected schedule. This option allows access only at the times in the schedule selected in the pull-down menu.
Step 5 Select an Address List access control option.
Following are the meanings of the different options:
Allow connections to all addresses. This option does not restrict access by location.
Allow all but the addresses in the selected list. This option denies access to the locations in the address list selected in the pull-down menu.
Allow only the addresses in the selected list. This option allows access to only the locations in the address list selected in the pull-down menu. For example, you could create an intranet of corporate addresses only.
Step 6 Click OK to accept the changes, or click Reset to cancel the changes.
The Group Access window is still displayed.
When you select the group from the Select a group pull-down menu, the group access controls do not automatically appear in the Group Access window. Follow these steps to view group access controls:
The Group Access window appears.
Step 2 Select the group from the Select a group pull-down menu.
Step 3 Click Display Details.
The group access controls appear in the Group Access window.
Follow these steps to delete a group:
The Group Access window appears.
Step 2 Select the group from the Select a group pull-down menu.
Step 3 Click Delete to delete the group.
The group no longer appears in the pull-down menu. (Note that clicking Reset does not undo the deletion.)
Individual users get access controls from the site or their group memberships. After you have entered a new user name, the user has the site access controls. To specify different access controls, you can put the user into one or more groups. When the user has become a member of the group, the site access controls no longer apply. If a user is in more than one group, the user gets the permissions of all the groups. For example, if a user is a member of two groups, and during normal work hours one group allows access to internal IP addresses only while the other group allows FTP connections to all IP addresses, the user can use FTP to connect to any IP address during work hours. Note that NetWare users that are not entered into the monitor but that use the gateway for Internet access are governed by site access controls.
Users that are not logged into NetWare or that are using earlier versions of the gateway client software (before version 1.5) can use the monitor. When the user accesses the gateway, an ANYBODY user is assigned to that user. By default, ANYBODY has site access controls. However, you can create an ANYBODY user (if one does not exist) and change the access controls to anything you want.
This section describes the following tasks:
Before you can define user access by putting a user into one or more groups, you need to enter a user name into the monitor. Remember that you can download NetWare groups and users to save time, as described in the earlier section "Populating the Monitor with NetWare Users and Groups." The monitor uses the same user name as NetWare.
Follow these steps to add a user:

If you have not yet entered any user names, the following window appears instead.
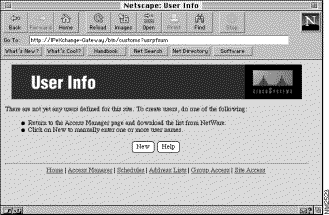
Step 2 Click New to add a new user.
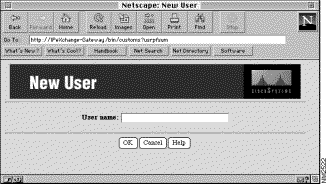
Step 3 Type the name of the user in the User name field.
The name can contain any ASCII characters and spaces.
Step 4 Click OK to add the user, or click Cancel to not add the user.
The User Info window appears. If you clicked OK, the user appears in the Select a user pull-down menu.
A new user is not a member of any group, but is governed by site access controls. The following section describes how to specify group membership.
Follow these steps to add users to a group or to remove users from a group:
 | Caution If you delete one or more users from a NetWare group in the monitor, then download the NetWare groups and users again, the users are moved back into the group. If possible, your NetWare groups should match your monitor groups to avoid this problem. For example, if in the monitor you delete a user FRED from a the NetWare group ENG, FRED will be added back to the group if you download again. However, if in the monitor you add FRED to the NetWare group SALES, FRED will stay in SALES if you download again. |
The User Info window appears.
Step 2 Select the user from the Select a user pull-down menu.
Step 3 Click Define Group Memberships.
A Define a User's Group Memberships window appears.
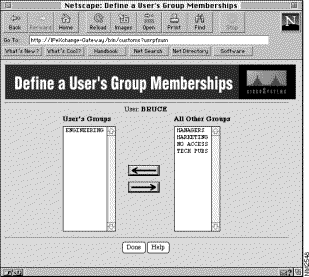
Step 4 Add or remove groups as needed.
To add a group, select a group in the All Other Groups list, and click the left-pointing arrow to move the group to the User's Groups list.
To remove a group, select a group in the User's Groups list, and click the right-pointing arrow to move the user to the All Other Groups list.
Step 5 Click Done to return to the User Info window.
When you select a user from the Select a user pull-down menu, the group memberships do not automatically appear in the User Info window. Follow these steps to view group memberships:
The User Info window appears.
Step 2 Select the user from the Select a user pull-down menu.
Step 3 Click Display Details.
The group memberships appear in the User Info window.
Follow these steps to delete a user:
The User Info window appears.
Step 2 Select the user from the Select a user pull-down menu.
Step 3 Click Delete to delete the user.
The user no longer appears in the pull-down menu. (Note that you cannot undo the deletion.)
This section describes the following tasks:
Follow these steps to create a new schedule:
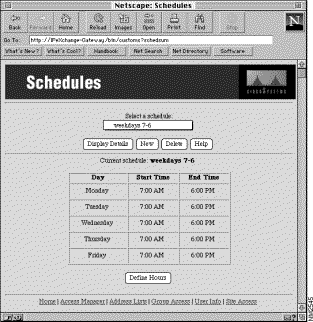
If you have not yet entered any schedule names, the following window appears instead.
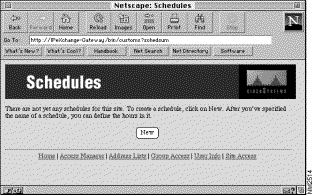
Step 2 Click New to add a new schedule.
The New Schedule window appears.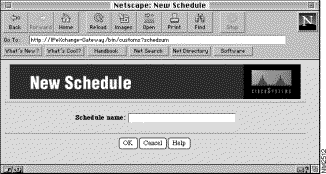
Step 3 Type the name of the schedule in the Schedule name field.
The name can contain any ASCII characters and spaces.
Step 4 Click OK to add the schedule, or click Cancel to cancel the operation.
The Schedules window appears. If you clicked OK, the schedule appears in the pull-down menu.
A new schedule does not specify any times. Follow the steps in the next section to specify times.
Follow these steps to define the times in a schedule:
The Schedules window appears.
Step 2 Click Define Hours to define the times in a schedule.
A Define Schedule window appears.
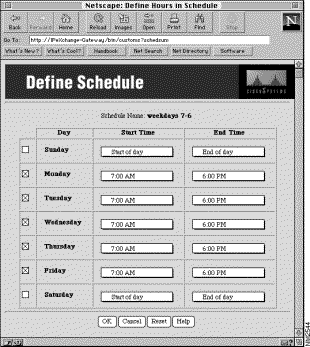
Step 3 For each day of the week you want to include, click the check box to select it. Then choose a Start Time and Stop Time from the pull-down menus.
Select Start of day and End of day to specify an entire 24-hour day. 12:00 AM is the same as Start of day.
Step 4 Click OK to accept the changes, click Cancel to cancel the changes, or click Reset to cancel changes without leaving the window.
If you clicked OK or Cancel, the Schedules window appears.
When you select a schedule from the pull-down menu, the times do not automatically appear in the Schedules window. Follow these steps to view details about a schedule:
The Schedules window appears.
Step 2 Select the schedule from the pull-down menu.
Step 3 Click Display Details.
The Schedules window is updated.
Follow these steps to delete a schedule:
 | Caution If you delete a schedule that the site or one or more groups use, the access controls default to permitting all times. |
The Schedules window appears.
Step 2 Select the schedule from the pull-down menu.
Step 3 Click Delete to delete the schedule.
The schedule no longer appears in the pull-down menu. (Note that you cannot undo the deletion.)
This section describes the following tasks:
Follow these steps to create a new address list:
The Address Lists window appears.
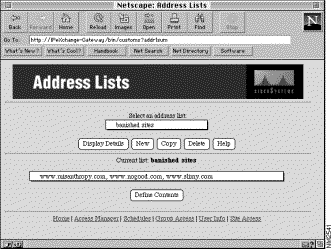
If you have not yet entered any schedule names, the following window appears instead.
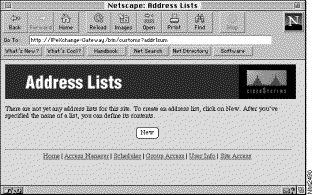
Step 2 Click New to add a new address list.
The New Address List window appears.
Step 3 Type the name of the address list in the List name field.
The name can contain any ASCII characters and spaces.
Step 4 Click OK to add the list, or click Cancel to cancel the operation.
The Address Lists window appears. If you clicked OK, the address list appears in the pull-down menu.
A new address list does not specify any addresses. Follow the steps in the next section to specify addresses.
You can define an address list from the beginning, or copy an existing address list, then modify it. Follow these steps to define the locations in an address list:
The Address Lists window appears.
Step 2 Select the address list from the pull-down menu.
Step 3 Click Define Contents to define the addresses in a list.
A Define Address List Contents window appears.
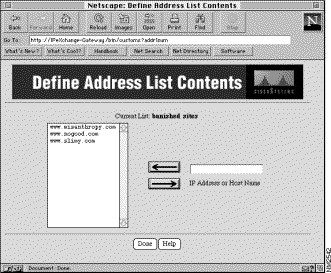
Step 4 Type an IP address or host name in the IP Address or Host Name field.
Remember that an IP address is made of four integers separated by a period—for example, 123.45.67.89 is a valid IP address. Use a comma (,) to delimit multiple entries.
Step 5 Click OK to accept the changes, click Cancel to cancel the changes, or click Reset to cancel the changes without leaving the window.
If you clicked OK or Cancel, the Address Lists window appears.
You can copy an existing address list, then modify it as needed. Follow these steps to copy an address list:
The Address Lists window appears.
Step 2 Select the address list from the pull-down menu. Then click Display Details.
Step 3 Click Copy.
The Copy an Address List window appears.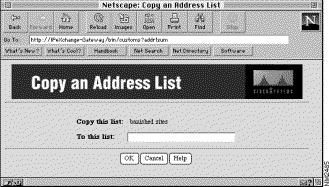
Step 4 Type the new address list name.
Step 5 Click OK to add the address list, or click Cancel to cancel the operation.
The Address Lists window appears. If you clicked OK, the new address list appears in the pull-down menu.
You can modify the address list as described in the previous section.
When you select an address list from the pull-down menu, the locations do not automatically appear in the Address Lists window. Follow these steps to view details about an address list:
The Address Lists window appears.
Step 2 Select the address list from the pull-down menu.
Step 3 Click Display Details.
The Address Lists window is updated.
Follow these steps to delete an address list:
 | Caution If you delete an address list that the site or one or more groups uses, the access controls permits all locations. |
The Address Lists window appears.
Step 2 Select the address list from the pull-down menu.
Step 3 Click Delete to delete the address list.
The address list no longer appears in the pull-down menu. (Note that you cannot undo the operation.)
![]()
![]()
![]()
![]()
![]()
![]()
![]()
![]()
Posted: Sun May 6 20:01:21 PDT 2001
All contents are Copyright © 1992--2001 Cisco Systems, Inc. All rights reserved.
Important Notices and Privacy Statement.