|
|

This chapter describes how to install the Windows NT software version of the Cisco IPeXchange Internet Gateway and includes the following sections:
Installing IPeXchange gateway software before installing the IPeXchange clients simplifies verification and troubleshooting.
To install the IPeXchange NT version, we recommend the following:
For Internet access, make the following additional preparations:
NWLINK is the Windows NT implementation of IPX. If you have not already done so, follow these steps to configure NWLINK:
Step 1 In the Main group, open the Control Panel and click the Network icon.
The Network Settings window appears.
Step 2 If NWLINK IPX/SPX Compatible Transport appears in the Installed Network Software list, skip to Step 4. If NWLINK IPX/SPX Compatible Transport does not appear in the Installed Network Software List, click Add Software.
Step 3 Select NWLink IPX/SPX Compatible Transport from the Network Software list. Click Continue to return to the Network Settings window.
Step 4 Select NWLink IPX/SPX Compatible Transport and click Configure.
Step 5 Configure IPX/SPX for your network adapter and frame type.
Step 6 Click OK to return to the Network Settings Menu.
Step 7 Click OK to save the configuration.
Follow these steps to enable the IPeXchange gateway computer to broadcast SAP messages so that IPeXchange clients can find it:
Step 1 Open the Network Settings window and look at the Installed Network Software list.
Step 2 If the SAP Agent is included in the Installed Network Software list, click Cancel to close the window. Skip to the following section, "Verifying Network Services."
Step 3 If the SAP Agent is not included in the Installed Network Software list, click Add Software.
Step 4 Select SAP Agent from the Add Network Software window and click Continue to return to the Network Settings window.
Step 5 Click OK to save the configuration.
If you do not have an external router, you can use RAS to dial out to your Internet service provider. Using RAS requires only one IP address and, in most cases, this address is provided by your service provider.
To configure RAS, from the Windows Main Program group, double-click Control Panel then Network, then click Add Network Software and Remote Access Service. For detailed information, refer to your Microsoft documentation.
Before you install the IPeXchange gateway, you need to verify that TCP/IP and IPX network services are running.
To verify that TCP/IP is running, go to an MS-DOS window and ping a host. The PING command attempts to connect with a specified computer and return information to you about its status. It accepts a host name, IP address, or domain name as an argument. With a connection to the Internet, you can check your connection to any external domain name.
For example, to check the connection to cisco.com, enter the following command at the MS-DOS prompt:
ping cisco.com
If TCP/IP is running, PING responds with the status of your connection to the Cisco host computer.
If there is a NetWare server on the network, follow these steps to verify that NWLINK IPX/SPX is running:
Step 1 Open the Control Panel and double-click the CSNW (Client Services for NetWare) or GSNW (Gateway Services for NetWare) icon.
Step 2 In the new window, view the servers listed under Select Preferred Server.
If one or more NetWare servers are listed, NWLINK IPX/SPX is working.
The setup program does the following for you:
The setup program asks for your license key, which can be found on the install diskette envelope. Entering an invalid key causes the license to default to two users.
From the PC you will use as your IPeXchange gateway, follow these steps to install the IPeXchange NT version software.
Step 1 Insert the install diskette, called Cisco IPeXchange Windows NT Version, in a drive of your PC.
Step 2 From the Windows Program Manager, choose Run from the File menu.
Step 3 Run the setup program by entering this command:
A welcome dialog appears. 
Step 4 Click Next.
A dialog listing gateway installation options appears. 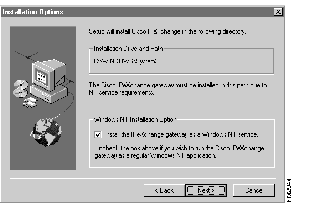
Step 5 If you do not want the IPeXchange gateway to be installed as an NT service, deselect the checkbox.
By default, the IPeXchange gateway is installed as an NT service, which will automatically be started whenever the PC is rebooted. If you deselect the checkbox, you will have to start the IPeXchange gateway manually.
Step 6 Click Next.
A dialog listing monitor installation options appears.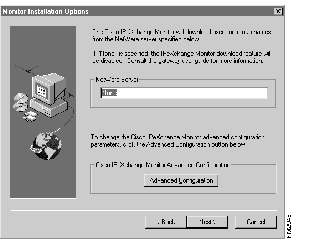
Step 7 Type the name of your NetWare server, if applicable.
The IPeXchange Monitor feature allows you to control Internet access based on user groups. If your site has a NetWare server, you can download the NetWare user and group lists of the server into the IPeXchange Monitor database -- just by clicking a button. To do so, you need to type the name of one NetWare server in the Monitor Installation Options dialog. (The name must be one word, with no spaces or tabs in it.)
If None is specified, the IPeXchange Monitor download feature is disabled. You will then have to manually enter user and group names into the monitor, control access at the site level only, or choose not to control Internet access at all.
If your site does not have a NetWare server, use None.
Step 8 If you want to configure advanced monitor options, click Advanced Configuration.
A dialog listing advanced monitor configuration parameters appears. 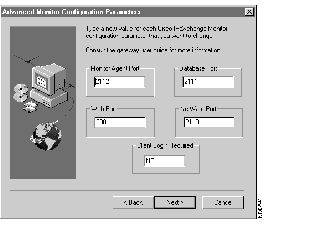
Step 9 Type new values for any monitor configuration parameters that you want to change. Then click Next.
The IPeXchange Monitor uses four different IP port numbers. The port numbers for the Monitor Agent, Database, and NetWare daemon are arbitrary. However, there is no reason to change them from their defaults unless one or more of these port choices are in conflict with another application that you run.
The Web Port is the port you connect to from your Internet browser (for example, Netscape). Port 8001 was selected as the default so it would not conflict with other web servers that use port 80 and sometimes port 8000. If you keep the default port, you will have to specify it when connecting to the IPeXchange monitor from your browser. The URL will be:
If you know that your NT machine does not run another web server and you prefer to use the standard browser port, change the Web Port to 80. Then the URL to reach the IPeXchange Monitor is simply:
The Client Login Required option controls user name authentication. If its value is YES, only users logged into NetWare will be allowed to use Internet services through the IPeXchange gateway. This is the most secure option, because it uses NetWare to authenticate user names.
The default value of NO for Client Login Required should be chosen in the following situations:
Step 10 Click Next.
A dialog that lets you select a folder appears. 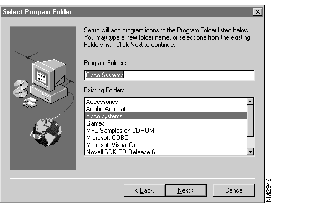
Step 11 If you want to specify a different program folder, select it in the list box or type a folder name.
The IPeXchange gateway and related files will be installed in this folder. If you type the name of a folder that does not exist, the setup program creates it for you.
Step 12 Click Next.
A dialog prompting you for the serial number appears. 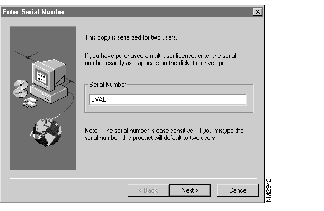
Step 13 Type the serial number.
The serial number is found on the envelope that contained the install diskette. Remember that the serial number is case-sensitive.
 | Caution If you type an incorrect serial number, the IPeXchange gateway license defaults to two users. You would have to reinstall the software from the beginning and retype the serial number to get the correct license. |
Step 14 To install the software, click Next.
If the IPeXchange NT version software is already installed in this location, the files of the previous version are stored with a .SAV extension.
After the installation is complete, a Setup Complete dialog appears. The README file checkbox should be selected so you can read this file next.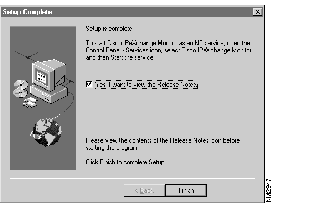
Step 15 Click Finish.
If you checked the box in the previous dialog, the README file appears.
If you chose to install the IPeXchange gateway as an NT service, it will be started automatically every time you reboot your PC.
To manually start the IPeXchange gateway, double-click the Cisco IPeXchange gateway icon in the Program Manager or the IPEXCHNG.EXE program in the File Manager. This program will be in the WINDOWS/SYSTEM32 folder, unless you put your Windows NT 32-bit libraries in another location.
To check the status of the IPeXchange gateway, double-click the Cisco IPeXchange gateway icon. The IPeXchange screen appears.
Click the Status menu item. A line similar to the following appears:
IPX bcast packet counts: in:0, out:4
This line displays the count of inbound and outbound IPX broadcast packets. A gateway regularly broadcasts SAP messages, so if the count of outbound packets is greater than zero, the IPeXchange gateway is broadcasting its presence.
This procedure removes IPeXchange gateway files and the Program Manager group called Cisco Systems. Follow these steps:
Step 1 Open the Program Manager group called Cisco Systems.
Step 2 Double-click the Uninstall Cisco IPeXchange icon.
Step 3 Follow the instructions to confirm the removal of IPeXchange.
You have now installed IPeXchange gateway software. To install IPeXchange clients, continue with the chapter "Installing the IPeXchange Client Software."
|
|