|
|

This chapter describes:
The following are the minimum system requirements to install the CDDM, Cisco Server Suite 1000, or DNM browser:
This section describes how to install the CDDM, Cisco Server Suite 1000, or DNM Browser.
Some planning and forethought are necessary before installing the software. Before installing, follow the procedure below:
Step 1 Read the Cisco DNS/DHCP Manager Concepts and Planning Guide.
Configuration of the various services and management of your DNS zone files requires planning. Reading the Cisco DNS/DHCP Manager Concepts and Planning Guide before installation gives you the background necessary to make informed decisions.
Step 2 Decide which servers you want to start automatically.
During the installation, you are asked which services you want to start automatically. Services configured to start automatically are started when the NetControl master server is started. CDDM includes all of the following services; Cisco Server Suite 1000 includes all but the DNM service:
Step 3 Disable currently active services.
If you are already running other versions of the services you plan to install, you must first disable the services you are running before starting the Cisco version of these services. You can install the Cisco version of the service, but you cannot run two versions of the same service. To disable an active service, see the "Disabling an Active Service" section.
If you do not disable the services you are running, the installation program detects them and will not start the newly installed Cisco services.
Step 4 Decide if you want to load your existing zone files into the DNM service.
If you install the DNM service, the installation program gives you the option of loading your existing zone files into the DNM service. If you choose to do this, you will need to know which zone files you want to load and where they are located.
General directions are given below for disabling a service that is running on your system; however, it is recommended that you refer to your operation system documentation.
Step 1 Log in as root.
Step 2 Mount the Cisco Server Suite CD-ROM.
Step 3 If desired, set your DISPLAY environment variable to take advantage of the X-based configuration utility. If you do not set the DISPLAY variable, a command-line configuration utility will start instead.
Step 4 Make sure the directory in which you are installing the software already exists.
Step 5 Enter the command:
/mount_point/unix/operating_system/install
replacing mount_point with the name of the directory where the CD-ROM was mounted and replacing operating_system with either solaris, hpux, or aix, depending on your operating system.
Step 6 When prompted, select the product you want to install:
For descriptions of these products, see the Cisco DNS/DHCP Manager Concepts and Planning Guide.
Step 7 When prompted, enter the directory where the installation files are found. If you are installing directly from the CD-ROM, enter the following or select the default:
/mount_point/unix/operating_system/
If you copied the files from the CD-ROM to a directory on your hard disk, enter the name of that directory.
Step 8 When prompted, enter the directory on your hard disk where you want to install the software. The directory must already exist.
Step 9 The installation program unpacks and copies the software to the specified directory.
Step 10 When prompted, enter the license number for the product you installed. The license is included with the Cisco Server Suite CD-ROM.
Step 11 To configure services, enter y at the prompt and continue to the next step.
If you do not want to configure services at this time, enter n. In that case, the installation is complete, but you will not be able to run any of the services. See the note at the end of this section for information about configuring services at a later time.
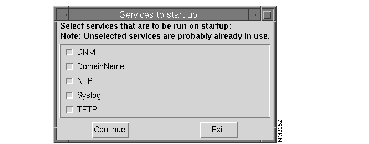
Step 12 If the DISPLAY environment variable is defined, the X-based configuration window appears on your X display. 
Select the servers you want to start automatically, and click on Continue.
Step 13 If you are using the command-line configuration, you are prompted to specify which services you want to start automatically.
Answer Yes to each service you want to start automatically, No to those you do not want to start automatically.
Step 14 If you installed the CDDM, but do not choose to configure DNM service at this time, you are done with the configuration.
Step 15 If you choose to configure the DNM service:
(a) When prompted, enter the initial user name and initial password for the DNM service.
(b) When prompted, answer whether you would like to load zone information from an existing zone file.
(c) If you chose not to load existing zone information, the configuration of the DNM service is finished.
(d) If you chose to load existing zone information, you are asked to supply the zone file name and domain name. When prompted, enter the file name and domain name of the zone files you want to load.
Step 16 When prompted to start NetControl, answer Yes. The installation is now complete.
For ease in using services that are controlled from the command line, it is recommended that you add the pathname of CDDM commands to your search path (for example, to the PATH environment variable). CDDM commands are located in the MultiNet/bin directory under your installation directory.
|
|