|
|

An important component of efficient network management is the ability to collect and analyze performance information on a large network of many devices. This performance information can assist you to manage your network elements and troubleshoot network problems.
The Cisco EMF Performance Manager is a powerful, flexible tool that enables you to view general and performance specific attributes in one application and in a variety of formats (for example, graphs and tables). You define the attributes or parameters, choose the objects you want to view, choose the date and time of the view, and set the summary interval.
This chapter:
 |
Note Further information is available in the Cisco Element Management Framework User Guide, when required. |
The Cisco 6400 SCM application collects a variety of performance information. The performance information collected can be viewed "real time" as it happens (on a number of Element Manager windows), or as historical information using Performance Manager.
Table 5-8 summarizes the real time performance information available using the various Element Manager windows used in the Cisco 6400 SCM application.
Table 7-1 describes the historical performance information that can be collected using the Cisco 6400 SCM application and then viewed using the Performance Manager application.
| Cisco 6400 Network Object | Attribute Description | Switch Polling On and Off |
CPU% performance | Performance logging can be switched on or off globally (that is, for all NSP, NRP and NLC modules and all ports/interfaces) from the Chassis Configuration window by pressing the Start/Stop buttons. See the "Chassis Configuration Window" section for further details. Module performance logging can be switched on/off on a per module basis from the Module Performance window. See the "Module Performance Window" section for further details. Port or interface performance logging can be switched on/off on a per port/interface basis from the Interface Performance window. See the "Interface Performance Window" section for further details. | |
CPU performance averaged over 5 minutes | ||
CPU performance averaged over 1 minute | ||
Transmit bandwidth utilization | ||
Receive bandwidth utilization | ||
Number of cells received | ||
Number of cells transmitted | ||
Number of VCL cells in | Performance logging can be switched on/off for a selected service uplink object (that is, on a per PVC basis) from the Service Uplink Bandwidth Utilization window. See the "Service Uplink Bandwidth Utilization" section for further details. | |
Number of VCL cells out | ||
Transmit bandwidth utilization | ||
Receive bandwidth utilization | ||
Number of VCL cells in | Performance logging can be switched on/off for a selected subscriber connection object (that is, on a per PVC basis) from the Service/Subscriber Connection Bandwidth Utilization window. See the "Service/Subscriber Connection Bandwidth Utilization" section for further details. | |
Number of VCL cells out | ||
Transmit bandwidth utilization | ||
Receive bandwidth utilization |
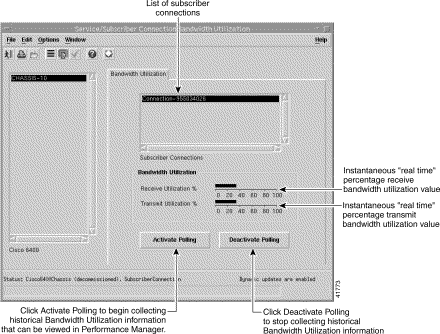
The Service Uplink Bandwidth Utilization window displays the instantaneous (or "real-time") percentage (receive and transmit) bandwidth utilization for a selected service uplink. The Activate Polling and Deactivate Polling buttons allow you to start or stop performance polling for the selected service uplink. This historical performance information can then be viewed using the Performance Manager application. See the "Viewing Performance Statistics" section for details on how to view historical performance information.
|
Note PVC polling imposes a high overhead on both the Cisco 6400 network elements as well as the Cisco EMF service. Polling is deactivated (that is, switched off) by default. |
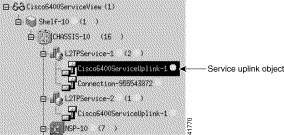
From a relevant service uplink object icon in the Cisco 6400 Service View, right-click Cisco 6400 UAC > Bandwidth Utilization option. Figure 7-1 shows a sample service uplink object.
The Service Uplink Bandwidth Utilization window appears with the Bandwidth Utilization tab displayed (Figure 7-2).

To activate service uplink bandwidth utilization polling, follow these steps:
Step 2 Choose a relevant Chassis from the Cisco 6400 chassis list displayed at the left side of the window.
Step 3 Choose an appropriate Service Instance and Service Uplink from the appropriate lists displayed.
Step 4 Click Activate Polling to begin polling.
|
Note The Bandwidth Utilization panel displays the instantaneous (or "real-time") percentage (receive and transmit) bandwidth utilization for the selected service/subscriber connection. The Activate Polling and Deactivate Polling buttons allow you to start or stop performance polling for the selected service/subscriber connection. Performance polling information is automatically saved and this historical information can then be viewed using the Performance Manager application. |
Step 5 Click Close from the File menu to close the Service Uplink Bandwidth Utilization window.
|
Note See the "Viewing Performance Statistics" section for details on viewing historical performance information. |
To deactivate bandwidth utilization polling for a selected service uplink, follow these steps:
Step 2 Choose a relevant Chassis from the Cisco 6400 chassis list displayed at the left side of the window.
Step 3 Choose an appropriate Service Instance and Service Uplink from the appropriate list.
Step 4 Click Deactivate Polling to stop polling.
Step 5 Click Close from the File menu to close the Service Uplink Bandwidth Utilization window.
The Service/Subscriber Connection Bandwidth Utilization window display the instantaneous (or real-time) percentage (receive and transmit) bandwidth utilization for a selected service/subscriber connection in the Bandwidth Utilization panel. The Activate Polling and Deactivate Polling buttons allow you to start or stop performance polling for the selected service/subscriber connection. This historical performance information can then be viewed using the Performance Manager application. See the "Viewing Performance Statistics" section for details on how to view historical performance information.
|
Note Polling imposes a high overhead on both the Cisco 6400 network elements as well as the Cisco EMF service. Polling is deactivated (that is, switched off) by default. |
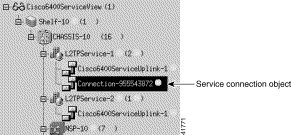
From a relevant connection object icon in the Cisco 6400 Service View, right-click Cisco 6400 UAC > Subscriber > Bandwidth Utilization option. Figure 7-3 shows a sample service connection object.
The Service/Subscriber Connection Bandwidth Utilization window appears with the Bandwidth Utilization tab displayed (Figure 7-4).
To activate bandwidth utilization polling for a selected subscriber connection, follow these steps:
Step 2 Choose a relevant Chassis from the Cisco 6400 chassis list displayed at the left side of the window.
Step 3 Choose an appropriate Subscriber Connection from the list.
Step 4 Click Activate Polling to begin the polling.
|
Note The Bandwidth Utilization panel displays the instantaneous (or "real-time") percentage (receive and transmit) bandwidth utilization for the selected service/subscriber connection. The Activate Polling and Deactivate Polling buttons allow you to start or stop performance polling for the selected service/subscriber connection. Performance polling information is automatically saved and this historical information can then be viewed using the Performance Manager application. |
Step 5 Click Close from the File menu to close the Service/Subscriber Connection Bandwidth Utilization window.
|
Note See the "Viewing Performance Statistics" section for details on how to view historical performance information. |
To deactivate bandwidth utilization polling for a selected subscriber connection, follow these steps:
Step 2 Choose a relevant Chassis from the Cisco 6400 chassis list displayed at the left side of the window.
Step 3 Choose an appropriate subscriber connection from the Subscriber Connections list.
Step 4 Click Deactivate Polling to stop polling.
Step 5 Click Close from the File menu to close the Service/Subscriber Connection Bandwidth Utilization window.
From a relevant object icon using the c6400Manager view, right-click Tools > Performance Manager option. Table 7-2 lists the objects that allow you to launch the Performance Manager window.
| Objects (that can be selected) to Open the Performance Manager Window | Menu Options to Select to Open Window | |||||||||
| Site | Shelf | Chassis | NSP | NRP and NRP2 | NRP ATM Port | Node Line Card (NLC) | Line Card ATM Port | Service Uplink | Connection | |
No | No | Yes | Yes | Yes | Yes | Yes | Yes | Yes | Yes | Tools, Performance Manager. |
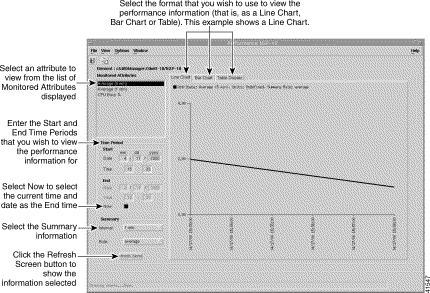
The Performance Manager window appears (Figure 7-5).
The Performance Manager window allows you to:
|
Note Cisco EMF provides a command line utility (history Admin) that allows mass export of performance history data. Refer to the Cisco Element Management Framework User Guide for further information. |
To view performance statistics, follow these steps:
Step 2 Choose the attributes you wish to monitor from the Monitored Attributes list. Table 7-1 lists the attributes that can be monitored using the Cisco 6400 SCM application.
|
Note You can choose multiple attributes in a list by holding down the Shift key and selecting attributes in the list. You can choose multiple individual attributes by holding down the Ctrl key and clicking individual items. The information for all selected attributes is shown in the Table Display. Only the first selected attribute is shown in the Line Chart or Bar Chart. |
Step 3 Enter the date and time to start viewing the performance statistics in the Start panels. Use the mm/dd/yyyy format.
Step 4 Enter the date and time to stop viewing the performance statistics in the Stop panel. To set the End time you have two options:
|
Note Now is the current time, and remains current. |
Step 5 Choose the summary interval you wish to use in the Interval drop down list.
|
Note The Bar Chart tab disappears from the Performance Manager window when the the raw option is selected from the Interval drop down list (in the Summary panel) and the Refresh Screen button is clicked. |
Step 6 Choose the summary rule.
Step 7 Click Refresh Screen. The Refresh Screen button is grayed out when not available. The Refresh Screen button is available for selection when Now is selected, or when any criteria has changed and you have moved the cursor away from the changed value by clicking the Tab key or by using the mouse.
The performance information appears as a line chart by default. You can view performance information as either a line chart, or a bar chart (except when the raw option is selected from the Interval drop down list).
The performance information corresponds to the attributes' value returned during the raw sampling period. When a summary period other than raw is selected, the information appears according to the summary rule.
|
Note In some circumstances (possibly due to the Cisco 6400 SCM being shut down or a heavy network load), polls can be missed. Performance Manager deals with this problem by displaying missed polls in red. The missed poll value is replaced by the last valid value collected. |
You can zoom in, zoom out, and move around the displayed charts using the key presses detailed in Table 7-3. You must first choose the chart before using the key presses detailed in Table 7-3.
| Press | Action |
|---|---|
Right arrow key | Moves the chart one unit to the right |
Left arrow key | Moves the chart one unit to the left |
Up arrow key | Moves the chart to the bottom |
Down arrow key | Moves the chart to the top |
Shift and Z key | Zooms in on the chart's x axis |
Shift and U key | Zooms out on the chart's x axis |
Z key | Zooms in on the chart's y axis |
U key | Zooms out on the chart's y axis |
Shift and F key | Fits all information on the x axis in window |
F key | Fits all information on the y axis in window |
You can print performance statistics from the Performance Manager, either as a chart or as a table. A chart prints out the information which can be seen in the window, and a table prints out all of the performance statistics in a plain text format.
The output is printed by the default printer set up on your network.
To print performance statistics, follow these steps:
Step 2 From the File menu, click Print.
Step 3 Click As Chart or As Table.
Performance data is stored in the Cisco EMF database. It is not exported to ASCII file by default. To save performance data, follow these steps:
Step 2 From the File menu, click Export to File
or
click the Save As icon  on the Toolbar.
Step 3 The File Chooser window appears. The left panel displays the directories and the right panel displays the files. Use the scroll bars to locate the desired file. Click Filter to expand the list of options.
Step 4 Choose the file. The full path name of the selected file displays in the File Filter box, as well as the Choice box.
|
Note You can save the data to a new location or to a new file. Type in the new names as required in the Choice boxes. |
Step 5 Click Apply to save the file or Cancel to return to the Performance Manager window.
Collected data is archived each day. The applied file name is generated automatically using the format mm-dd-yyyy.log. When entries are archived, they are purged from the database. By default, only raw data is archived.
|
Note If more than one purge is carried out in a day, the original log file is overwritten and the information stored is lost. After a purge, only the information in the current sample period is available for display. |
Refer to the Cisco Element Management Framework User Guide for further details.
|
Note Cisco EMF contains a utility called historyAdmin. HistoryAdmin enables you to selectively export performance data for groups in an automated manner. Refer to the Cisco Element Management Framework User Guide for further details. |
![]()
![]()
![]()
![]()
![]()
![]()
![]()
![]()
Posted: Tue May 29 10:35:22 PDT 2001
All contents are Copyright © 1992--2001 Cisco Systems, Inc. All rights reserved.
Important Notices and Privacy Statement.