|
|

This chapter describes the typical tasks you should complete to begin using the Cisco 6400 Service Connection Manager (SCM). See Figure 3-1 for further details.
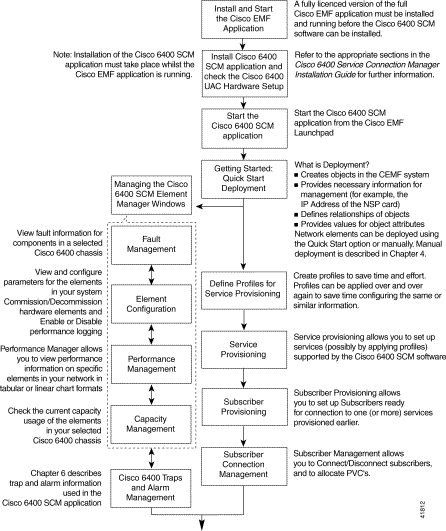
Refer to the Cisco Element Management Framework Installation and Licensing Guide for further information.
Before you can launch the Cisco 6400 Service Connection Manager (SCM) application, you must start a Cisco Element Management Framework (EMF) user session. Launch the Cisco 6400 SCM application from the Cisco EMF Launchpad. Each active Cisco EMF session uses a single Cisco EMF user license.
 |
Note Cisco EMF should already be running. If you start the application and then you receive a message that Cisco EMF is not running, contact your system administrator or refer to the Cisco Element Management Framework User Guide for further details. |
To start a Cisco EMF user session, follow these steps:
<CEMF_ROOT>/bin/CEMF session
 |
Note <CEMF_ROOT> is the Cisco EMF installation root directory (by default, this is /opt/CEMF). |
The Login window appears (Figure 3-2).
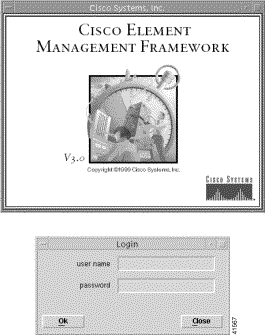
Step 2 Enter your user name and password.
Step 3 Click Ok to proceed.
When an unknown user name or password is entered, an error displays. Click Ok, then enter a valid user name and password.
 |
Note You have three chances to enter a valid user name and password. If you do not enter a valid user name and password after three attempts, the session does not start and the Login window closes. |
When you enter a valid user name and password, the session starts and the Cisco EMF Launchpad window appears (Figure 3-3).
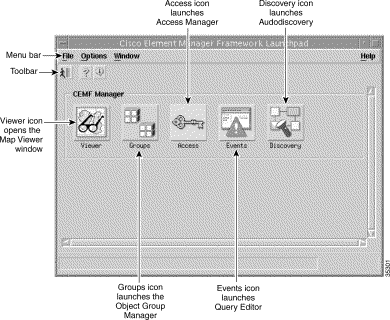
The icons displayed in the Cisco EMF Manager panel on the Launchpad represent applications that are provided by this Cisco EMF installation. Extra icons might appear when additional packages are installed. The icons (Figure 3-3) represent the standard Cisco EMF tools.
The Cisco EMF MapViewer (or Viewer) application allows you flexibility in viewing, building, and monitoring your network using graphical representations of network elements.
MapViewer is the primary entry point into the Cisco 6400 SCM. When you launch the MapViewer application, a window appears corresponding to the highlighted map icon in the hierarchy pane.
You can:
Click the Viewer icon (Figure 3-4) to launch the MapViewer application or select Map Viewer from a pop-up menu if you are using other Cisco EMF applications. To access the pop-up menu, right-click a selected object.

Refer to the Cisco Element Management Framework User Guide for further details about the Cisco EMF MapViewer application.
You can build object groups manually or by building a query. Some Cisco EMF subsystems might also build object groups which are visible and usable by the Cisco EMF user.
Click the Groups icon (Figure 3-5) to launch the Cisco EMF Object Group Manager application or select Groups from a pop-up menu if you are using other Cisco EMF applications. To access the pop-up menu, right-click a selected object.

Refer to the Cisco Element Management Framework User Guide for further details on the Cisco EMF Object Group Manager application.
Cisco EMF User Access Control allows system administrators to control the features of their system that various levels of personnel can access. This is important for secure network management.
Click the Access icon (Figure 3-6) to launch the Cisco EMF User Access Control application or select Access from a pop-up menu if you are using other Cisco EMF applications. To access the pop-up menu, right-click a selected object.

Refer to the Cisco Element Management Framework User Guide for further details on the Cisco EMF User Access Control application.
In Cisco EMF, when a condition (fault) occurs on a managed object in the network which results in an SNMP trap, the system is notified immediately. Notification is shown as an event which you can view using the Cisco EMF Event Browser (when configured to do so).
You can launch the Event Browser application in any one of the following ways:

Refer to the Cisco Element Management Framework User Guide for further details on the Event Browser application.
The Cisco EMF Auto-discovery application allows you to:
You can open Auto-discovery from the Cisco EMF Launchpad window or from a pop-up menu that displays on a selected object.
Click the Discovery icon (Figure 3-8) to launch the Cisco EMF Auto-discovery application or select Discovery from a pop-up menu if you are using other Cisco EMF applications. To access the pop-up menu, right-click a selected object.

Refer to the Cisco Element Management Framework User Guide for further details on the Cisco EMF Auto-discovery application.
To quit a Cisco EMF user session, follow these steps:
 in the Toolbar
Step 2 A window prompts you, "Do you wish to quit the Cisco EMF Manager System?" Click Yes to quit the session. All active applications are closed and the session terminates.
 |
Note Before you install the Cisco 6400 SCM application, you must install and start a licensed version of the full Cisco EMF application. |
Refer to the Cisco 6400 Service Connection Manager Installation and Upgrade Guide for installation instructions.
Before you can use the Cisco 6400 SCM to manage the Cisco 6400 UAC you must perform basic configuration changes, using Cisco IOS commands, which might need to be run on your Cisco 6400 UAC.
Refer to the appropriate section in the Cisco 6400 Service Connection Manager Installation and Upgrade Guide for further information.
You must start a Cisco EMF user session before you can launch the Cisco 6400 SCM application.
MapViewer is the primary entry point into the Cisco 6400 system. MapViewer provides you with complete flexibility in viewing, building, and monitoring your network using graphical representations of network elements.
Click the Viewer icon (Figure 3-3) to launch the MapViewer application or select Map Viewer from a pop-up menu if you are using other Cisco EMF applications. To access the pop-up menu right-click a selected object.
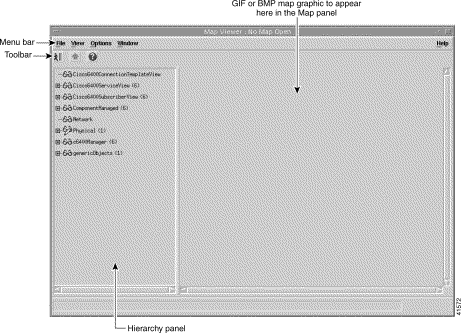
When you launch the MapViewer application for the first time, a window (similar to the one shown in Figure 3-9) appears.
Use the Cisco EMF Viewer application to:
 |
Note Refer to the Cisco Element Management Framework User Guide for further details. |
Figure 3-10 shows a sample MapViewer window after regions and sites are deployed and the appropriate map background is set. You can easily monitor the status of all network elements or abstractions of elements contained within the network and you can launch any of the additional applications shown on the Cisco EMF Launchpad.
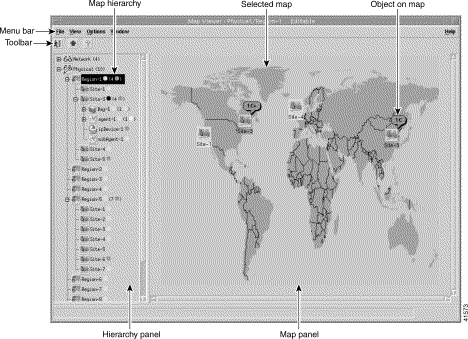
The Map Viewer window is divided into two panels:
You can view several maps at one time in different windows.
To resize the Hierarchy panel and Map panel, position the cursor over the boundary, left-click using the mouse, then drag the boundary. You can view all information in the left and right panels using the scroll bars.
You can select one or more objects and right-click. This displays the list of services available on an object in a pop-up menu. The services available depends on the class of the object and is enabled or disabled according to the access of the user.
The deployment process should be carried out after starting the Cisco 6400 SCM for the first time or after installing new hardware or network elements. Deployment informs the Cisco 6400 SCM that supported network elements are present.
You can deploy the Cisco 6400 SCM objects manually or automatically by launching a wizard-style deployment tool that enables you to automatically deploy a network modeled in Cisco EMF. The deployment wizard also enables you to (optionally) deploy objects in Cisco EMF in advance of actual deployment of a Cisco 6400 UAC in the field.
Deployment is one of the first stages of the provisioning process. Deployment is the first stage of equipment provisioning. It is also referred to as pre-provisioning—meaning that part of the network hardware setup before the service is actually provisioned. After objects are deployed, the initial state of all objects is normal.
The 6400 SCM provides a Quick Start deployment option that guides you through the most commonly used deployment process, resulting in a fully discovered 6400 chassis (Figure 3-11). Full details of the various alternative Cisco 6400 SCM deployment options are described in "Cisco 6400 Deployment Process."
 |
Note Quick Start Deployment creates a chassis, discovers a chassis objects and then commissions the chassis and its objects. |

 |
Note Quick Start deployment assumes that the IOS CLI Telnet and IOS CLI Enable Passwords are (respectively) identical on both the NSP and each NRP. This is common in operational environments. When the NSP and NRP passwords are different, you can reset the NRP password at the end of this process. See "Cisco 6400 Deployment Process," for a full description of Cisco 6400 SCM deployment options. |
To launch Quick Start deployment, follow these steps:
Step 2 Right-click on a relevant site object that you created from the Physical view.
Step 3 Hold down the right mouse button and choose Deployment > Cisco 6400 UAC > Deploy Cisco 6400 UAC (Quick Start) option. The Deployment Wizard—Object Parameters window (1 of 3) appears (Figure 3-12).
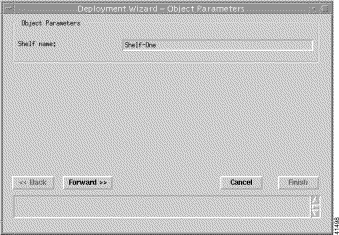
Step 4 Enter a Shelf name. A Shelf is an object that acts as a container for chassis objects. Each Shelf object must have a unique name for deployment to be successful.
Step 5 Click Forward. The Deployment Wizard - Object Parameters window (2 of 3) appears (Figure 3-13).
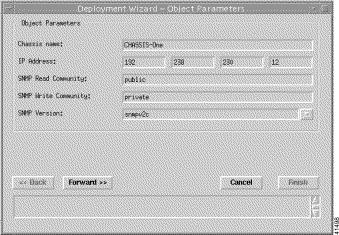
Step 6 Enter values for Chassis name, IP Address (for the primary NSP), SNMP Read Community, and SNMP Write Community, and then select an SNMP version.
Step 7 Click Forward. The Deployment Wizard—Object Parameters window (3 of 3) appears (Figure 3-14).
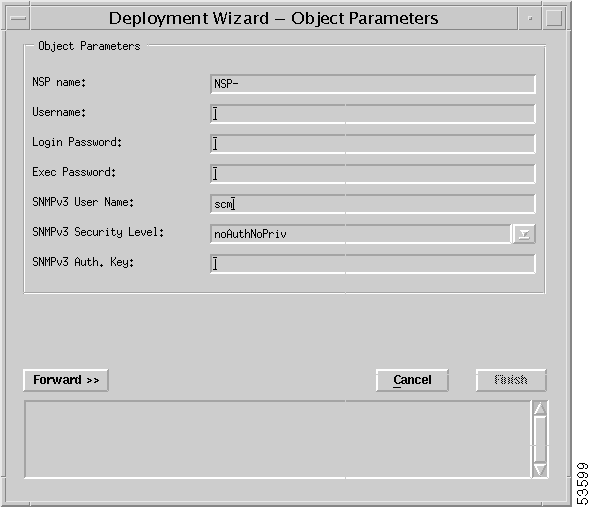
Step 8 Enter values for NSP name, Username, Login Password, Exec. Password, SNMPv3 User Name, SNMPv3 Security Level, and SNMPv3 Auth Key.
Where:
 |
Note IOS Password and IOS Enable Password must be the same as the CLI passwords entered on the Cisco 6400 NSP Management window (Configuration tab). See the "Configuration Tab" section for further details. |
Step 9 Click Forward. The Deployment Summary details appear in the Deployment Summary window (Figure 3-15).
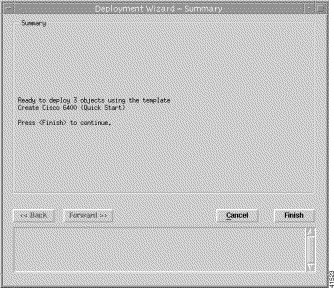
Step 10 Click Finish (when the Deployment Summary information is correct) to complete the deployment (creating the relevant objects in the Cisco EMF) and close the Deployment Summary window.
 |
Note To view a chassis map of the chassis and card objects that you created using the quick start deployment option, double-click the Shelf object that you just created in the c6400Manager. See "Viewing the Cisco 6400 SCM Chassis Map" section for further details. |
 |
Note After deployment, you might want to start global performance logging for one or more selected chassis. See the "Starting Global Performance Logging" section for further details. |
 |
Note Unlike Auto-discovery, if you use Quick Start Deployment, the NRPs appear in a commissioned state and it is not necessary for you to re-enter the CLI password. If you use Auto-discovery, then you must commission the NRPs and re-enter the CLI password after the chassis is discovered. |
![]()
![]()
![]()
![]()
![]()
![]()
![]()
![]()
Posted: Tue May 29 10:13:53 PDT 2001
All contents are Copyright © 1992--2001 Cisco Systems, Inc. All rights reserved.
Important Notices and Privacy Statement.