|
|

This chapter describes how to install and remove the Cisco 6400 Service Connection Manager (SCM) software. It also provides instructions for upgrading an existing SCM installation to a new release of software. This chapter contains the following sections:
Cisco 6400 Service Connection Manager (SCM) software provides simplified Asynchronous Transfer Mode (ATM) and Layer 2 and 3 IP services to access servers and Digital Subscriber Line Access Multiplexers (DSLAMs). SCM provides these services through network and service management of the Cisco 6400 Universal Access Concentrator (UAC) hardware.
The next-generation Internet access environment combines multiple forms of narrowband and broadband access with common core services and deployment. Rapid deployment of these complex access networks to serve millions of subscribers is known as Telephony Scale Data Networking (TSDN). The Cisco 6400 SCM addresses the need for service aggregation in TSDN deployments by providing integrated management capabilities through a service-oriented user interface.
The Cisco 6400 UAC is located within the service provider's infrastructure and acts as a central point of control for Layer 2 and Layer 3 services. These services can include ATM Virtual Channel Connections (VCCs); Point-to-Point Protocol (PPP) tunneling through Layer 2 Tunneling Protocol (L2TP); or PPP termination into local routing and to local or cached content.
The Cisco 6400 SCM Element Manager software adds custom windows and modeling behavior to the standard Cisco Element Management Framework (Cisco EMF) system to allow the management of the Cisco 6400 UAC hardware.
Multiple element managers can be installed onto a single Cisco EMF server, thereby allowing multidevice and multivendor management from a single system.
 |
Note If you plan to install the Cisco 6400 SCM in a deployment with another element manager (EM), such as the Cisco DSLAM Manager (CDM) or the Cisco GSR Manager (CGM), make sure that the EM uses the same version of Cisco EMF and COM as SCM. Otherwise, the EMs cannot coexist. |
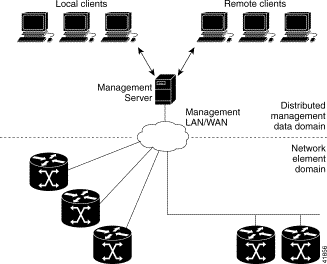
You can deploy the Cisco 6400 SCM in a distributed manner to use the power of multiple machines. You can perform two types of installation (server or client) from the CD-ROM. Figure 1-1 shows a typical deployment.
Each Cisco 6400 SCM deployment must have a Cisco 6400 SCM server installed. The Cisco 6400 SCM server contains all of the server processes that keep track of the current state of the network, such as models, user access, and events. The server also includes all client application windows.
A Cisco 6400 SCM deployment can include client installations on separate workstations. These client installations:
The client communicates with the Cisco 6400 SCM server to retrieve management information and processes all window updates locally. By offloading processing to the client, the Cisco 6400 SCM server possesses more resources to process network information.
The client installation copies the client software onto the local machine. (You need not mount files across the network.) The only network traffic occurs when the client requires more data from the server.
|
Note A Cisco 6400 SCM server installation also includes all files that run a Cisco 6400 SCM user session on the server system. The Cisco 6400 SCM system can therefore be installed on a single system with server and client functionality, and can be upgraded by adding separate client machines later as required. |
The Cisco 6400 SCM is a Cisco EMF based solution that runs on Sun Solaris/SPARC hardware. This section describes the system requirements for using the Cisco 6400 SCM to manage a Cisco 6400 UAC. For information about software requirements, see the Release Notes for the SCM release you are installing.
Small server deployments require a Sun Ultra 60 workstation configured as follows:
Large server deployments require a Sun Enterprise 450 workstation configured as follows:
|
Note If you plan to run several graphically intensive applications on the workstation, it is helpful to use a Sun color card (for example, 24-bit color). A typical server installation requires 300 MB of free disk space in a file system (for example, /opt). Allow an appropriate amount of free disk space for database files. |
|
Note For large-scale deployments, fault-tolerant options (for example, Sun Netra FT1800) are available. |
Client requirements include a Sun Ultra 5 or Ultra 10 workstation configured as follows:
The Cisco EMF, on which the Cisco 6400 SCM is based, requires a license key to operate. For details, refer to the Cisco Element Management Framework Installation and Licensing Guide (in the Cisco EMF Release 3.0 documentation set) or contact the Cisco Technical Assistance Center (TAC) for assistance.
If you plan to install the Cisco 6400 SCM in a deployment with another element manager (EM), such as CDM or CGM, make sure that the EM uses the same version of Cisco EMF and COM as the SCM. Otherwise, the EMs cannot coexist.
To configure the Cisco 6400 UAC hardware so that it can be managed by SCM, complete the steps in the following sections.
|
Note To obtain help on a Cisco IOS command, type the command, followed by ?. |
To configure the Node Switch Processor (NSP) to be manageable by SCM, make sure that the 10BaseT Ethernet port on the NSP is connected to the same network as the Cisco 6400 SCM, and perform the steps in this procedure.
Step 2 Change to privileged mode on the NSP and then to configuration mode by entering the commands in Step a or Step b. Stay in configuration mode to enter the remainder of the commands in this procedure. The configuration-mode prompt is Switch (config)# and the privileged-mode prompt is Switch#.
a. If you have not yet created a password for privileged mode, do so by entering the following commands (where <ENABLE password> is the password to create). Do not include the brackets when you enter the password.
b. If a privileged-mode password already exists, enter the following commands. Do not include the brackets when you enter <ENABLE password>.
Step 3 Configure an Ethernet management port for the NSP:
The Ultra 60 workstation running the Cisco 6400 SCM is now able to ping the NSP.
|
Note If problems occur while you ping the NSP, enter the following command from interface
mode: Switch (config-if)# no bridge-group1 |
Step 4 Check to see if the NSP accepts a Telnet session by entering: telnet <IP address of NSP> from the Ultra 60 workstation running the Cisco 6400 SCM. If the NSP does not accept a Telnet session, set up Telnet access.
Step 5 Configure the NSP to be SNMP-manageable by defining SNMP read-only and read-write communities. By default, SCM is configured with an SNMP read-only community name of public and an SNMP read-write community name of private. You can specify these predefined community names in the following commands, or you can create your own. If you create your own communities, they must match the community names (V1 Read/Write and V2 Read/Write) in the SCM SNMP Management window (Cisco 6400 UAC > Chassis > Manage > SNMP Management).
Step 6 Configure the NSP to send SNMP traps to the SCM server:
|
Note If your Cisco 6400 has an NRP2 module that you want to manage through SCM, perform Steps 7 and 8. Otherwise, go to Step 9. |
Step 7 Create a view with MIB access rights and assign the view to an SNMP group with V3 write access.
|
Note You must also perform these steps on the NRP2, using the same values for <View Name>, <Group Name>, and <User Name>. Do not include brackets when you enter the values. |
b. Create an SNMP group with V3 write access, and assign the view you just created to the group. Be sure to specify the same <View Name> as above.
These steps enable you to change NRP2 management information, such as system name or contact information. In SCM, specify scm in the V3 User Name field of the SNMP Management window (Cisco 6400 UAC > Chassis > Manage > SNMP Management). Then, you can make changes in the NRP2 management information window (Cisco 6400 UAC > Module > Admin > Management Information).
Step 8 Configure the SNMP proxy forwarder, which relays information between the NSP and NRP2. This step sets up the internal communications path between the NSP and NRP2, which is necessary because the NRP2 can only be accessed through the NSP.
Step 9 Exit configuration mode and privileged mode:
Step 10 If WebConsole access is required, refer to the Cisco NSP documentation for setup details.
Step 11 Go to the next section ("NRP Configuration") to continue with the Cisco 6400 SCM hardware configuration process.
To configure the Node Route Processor (NRP) to be manageable by SCM, perform the steps in this procedure.
Step 2 Change to privileged mode on the NRP and then to configuration mode by entering the commands in Step a or Step b. Stay in configuration mode to enter the rest of the commands in this procedure. The configuration-mode prompt is Router (config)# and the privileged-mode prompt is Router#.
a. If you have not yet created a password for privileged mode, do so by entering the following commands (where <ENABLE password> is the password to create). Do not include the brackets when you enter the password.
b. If a privileged-mode password already exists, enter the following commands. Do not include the brackets when you enter <ENABLE password>.
Step 3 Configure an Ethernet management port for the NRP:
|
Note Make sure that the 10BaseT Ethernet port on the NRP is connected to the same network as the Cisco 6400 SCM. |
The Ultra 60 workstation running the Cisco 6400 SCM is now able to ping the NRP.
Step 4 Check to see if the NRP accepts a Telnet session by entering: telnet <IP address of NRP> from the Ultra 60 workstation running the Cisco 6400 SCM. If the NRP does not accept a Telnet session, set up Telnet access.
Step 5 Configure the NRP to be SNMP-manageable by defining SNMP read-only and read-write communities. By default, SCM is configured with an SNMP read-only community name of public and an SNMP read-write community name of private. You can specify these predefined community names in the following commands, or you can create your own. If you create your own communities, they must match the community names (V1 Read/Write and V2 Read/Write) in the SCM SNMP Management window (Cisco 6400 UAC > Chassis > Manage > SNMP Management).
Step 6 Configure the NRP to send SNMP traps to the SCM server:
Step 7 Exit configuration mode and privileged mode:
Step 8 To configure an NRP2 module to be manageable through SCM, go to the next section ("NRP2 Configuration"). Otherwise, the hardware configuration process is completed and the Cisco 6400 hardware is now ready to be managed by SCM.
To configure an NRP2 to be manageable by SCM, perform the steps in this procedure.
|
Note To access the NRP2, you must first access the NSP and then establish a Telnet connection to the NRP2. By default, when the Cisco 6400 detects an NRP2 in the chassis, it creates a set of NRP2 Telnet command aliases to use to access each NRP2. Each alias (nrps1, nrps2, and so on) represents the commands to connect to an NRP2, where the number is the slot in which the NRP2 is installed. To connect to an NRP2, enter the command alias for that slot (for example, enter the alias nrps6 to connect to the NRP2 in slot 6). |
Step 2 Establish a Telnet connection to the NRP2 by entering the following command alias. Replace slot with the number of the slot where the NRP2 is installed. For example, enter nrps1 to connect to the NRP2 in slot 1, nrps2 to connect to the NRP2 in slot 2, and so on.
Step 3 Change to privileged mode and then to configuration mode by entering the following commands. If prompted for a password, enter <ENABLE password> without brackets.
Step 4 Create a view with MIB access rights and assign the view to an SNMP group with V3 write access.
|
Note The <Group Name> must be the same on the NSP and NRP2. For example, if you assigned the scm user to SNMP group xyz on the NSP, you must also create an SNMP group called xyz on the NRP2 and assign the scm user to this xyz group. |
b. Create an SNMP group with V3 write access, and assign the view you just created to the group. Be sure to specify the same <View Name> as above.
These steps enable you to change NRP2 management information, such as system name or contact information. In SCM, specify scm in the V3 User Name field of the SNMP Management window (Cisco 6400 UAC > Chassis > Manage > SNMP Management). Then, you can make changes in the NRP2 management information window (Cisco 6400 UAC > Module > Admin > Management Information).
Step 5 Configure the NRP2 to send traps to the SCM server by entering the following commands. In the first command, you can limit the types of traps to send by including any of the keywords in brackets; otherwise, all traps are sent. The second command identifies the NSP as the recipient of the traps (nrp2-slot is the slot in which the NRP2 is installed).
Step 6 Exit configuration mode and privileged mode:
The Cisco 6400 hardware is now ready to be managed by SCM.
Before attempting to install or upgrade SCM software, make sure that:
|
Note For information about system requirements and limitations, see the release notes for the SCM release you are installing or upgrading. The software installation and upgrade process might take awhile, so plan accordingly. |
The following sections provide instructions for installing and upgrading SCM software:
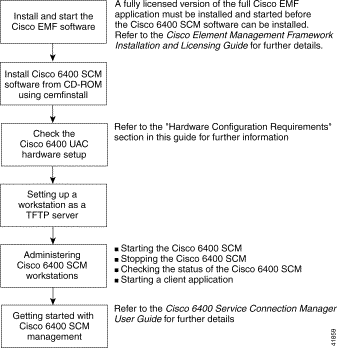
Figure 1-2 shows the recommended workflow for installing the Cisco 6400 Service Connection Manager (SCM) application.
This section describes how to use the cemfinstall command to install Cisco 6400 SCM software onto a system on which no SCM software is currently installed. It also contains instructions for mounting a remote CD-ROM drive, in case the system on which you want to install the SCM software does not have one.
If your system already has SCM software installed and you want to install a new release of SCM software, see the "Upgrading SCM Software" section.
To install software onto a system that does not have its own CD-ROM drive, you must mount the CD on the remote system and then export the device to make it accessible over the network. These operations are performed on the remote system on which the CD-ROM drive exists. Finally, you must mount the remote CD on the local system on which the installation will occur.
|
Note If your system has a local CD-ROM drive, skip this section and go to the next section ("Installing SCM Using cemfinstall"). |
Step 2 Log in as superuser on the remote host and see if the Volume Manager is running:
If the Volume Manager is running, a message similar to this one is returned:
Step 3 If the message above does not appear, start the Volume Manager:
Step 4 Export the CD-ROM device on the remote host:
The displayed list includes the /cdrom mount point.
Step 5 Mount the remote CD-ROM on the local host (the location in which the installation is to take place):
The contents of the CD-ROM are visible under the /mnt/cdfiles mount point.
Step 6 Go to the next section ("Installing SCM Using cemfinstall") to install the SCM software.
|
Note This procedure assumes that you have already installed the Cisco EMF software and any relevant Cisco EMF patches from the Cisco EMF CD-ROM, and that you have a valid license key. For detailed instructions, refer to the Cisco Element Management Framework Installation and Licensing Guide (Cisco EMF Release 3.0) |
To install the Cisco 6400 SCM software using the cemfinstall command, perform the following steps:
Step 2 Make sure that the Cisco EMF is installed and running. To start the Cisco EMF:
Step 3 Insert the Cisco 6400 SCM CD-ROM. Change the directory into the CD-ROM area:
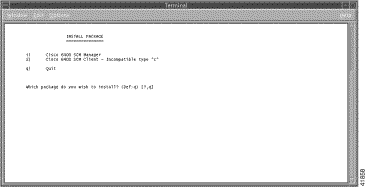
Step 4 Run the install script:
A menu appears containing the SCM client and SCM server installation options (Figure 1-3).
|
Note If the Cisco EMF server/client is not installed, the Cisco 6400 SCM installation option is not available. A Cisco EMF server/client must be installed and running for SCM to be installed. |
Step 5 Select the installation you require (SCM server or client). The utility performs the appropriate installation.
Step 6 When the installation is complete, exit the CD-ROM area:
Step 7 Remove the Cisco 6400 SCM CD-ROM:
Step 8 Start a Cisco EMF session, which also activates SCM:
The Cisco 6400 SCM is now ready to use. See the Cisco 6400 Service Connection Manager User Guide for information on using SCM.
This section describes how to upgrade from earlier releases of Service Connection Manager (SCM) software to SCM Release 2.2(1a).
You can upgrade the following SCM releases to SCM Release 2.2(1a):
|
Note To upgrade from SCM Release 1.x, you must first upgrade from Release 1.x to Release 2.0(1) as described in the Upgrading Databases to Cisco 6400 SCM Release 2.0.1 user guide. Then, you can perform this procedure to upgrade to SCM Release 2.2(1a). |
|
Note This procedure assumes that you have already installed the Cisco EMF software and any relevant Cisco EMF patches from the Cisco EMF CD-ROM, and that you have a valid license key. For detailed instructions, refer to the Cisco Element Management Framework Installation and Licensing Guide (Cisco EMF Release 3.0). |
To successfully upgrade your system to SCM Release 2.2(1a), you must perform the following procedures:
Before you upgrade to SCM Release 2.2(1a), you must back up your current database.
|
Note Your database is composed of system data and user data. The backup includes both system and user data. Before you perform the backup, identify and note the installation environment in which the backup will be performed (that is, CEMF version, CEMF patches that are installed, SCM version, and any other element Managers (EM) installed). By identifying and noting these, you will have all the required backup information in case you need to restore the original database. You must perform a restore to the exact original environment. |
|
Note To display installed CEMF, SCM, and COM components, use the <CEMF_ROOT>/bin/cemf install -show command. |
To perform a backup, follow these steps:
Step 2 Make sure that the Cisco EMF is installed and running. To start the Cisco EMF:
Step 3 Back up your existing SCM installation by entering the following command (where <CEMF_ROOT> is the path of the directory where the Cisco EMF software is installed; the default is /opt/cemf). You are prompted to confirm this directory.
The ./cemf backup command creates a new directory called <CEMF_ROOT>/../AVBackup/.
Step 4 Move (copy and then delete) the backup directory (<CEMF_ROOT>/../AVBackup/) and the files it contains to a separate directory outside of the CEMF directory.
 |
Caution If you do not move the backup directory and its files, you cannot restore your existing SCM configuration if you encounter problems during the upgrade and the backup files created under older versions of SCM software will interfere with future backup files created with the new SCM Release 2.2(1a) of software. |
|
Note If problems occur during the upgrade, use the Cisco EMF restore option to restore your original database. See the Cisco Element Management Framework Installation and Licensing Guide (Cisco EMF Release 3.0) for more details. Make certain to only restore the database into the same environment from which the backup was performed. Ensure that the CEMF, patches, and EMs are the original versions that you started with. |
This section describes how to upgrade to SCM Release 2.2(1a) using the overlay method. The SCM system data in your database will be updated by the new SCM software. The SCM upgrade is applicable to both the server and client.
|
Note The overlay upgrade method allows you to perform the upgrade process over existing software without removing any software first. |
To upgrade SCM software, follow these steps:
If your system does not include a CD-ROM drive, see the "Mounting a Remote CD-ROM Drive" section for instructions on using the CD-ROM drive on another system
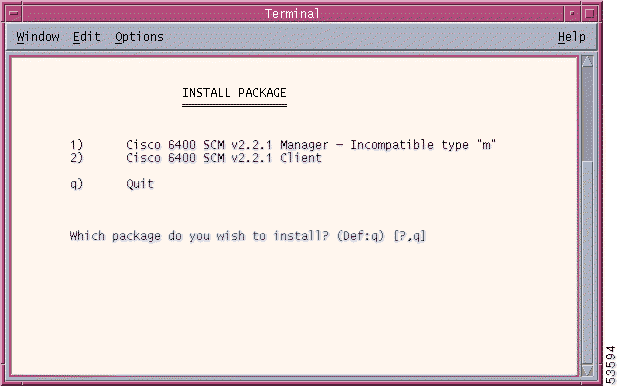
Step 2 Run the install script to upgrade the SCM software:
A menu listing the SCM upgrade options appears (Figure 1-4).
Step 3 Enter the number for the SCM component you want to upgrade (manager or client). The upgrade procedure automatically signals for the upgrade and removes the previous version of SCM software and installs the new version of software. The procedure also displays informational messages during the process.
After the SCM package installation is complete, then upgradeCisco Network Order Manager (CNOM) software, if present. CNOM Release 1.2 is supported by SCM Release 2.2(1a). The CNOM upgrade is only applicable to the server workstation. There is no client software for CNOM.
For detailed CNOM upgrade information, refer to the Cisco Network Order Manager Solution Guide.
This section describes how to update the CEMF patch to CEMF patch 14 and patch 14.2 using the overlay method. This procedure updates any CEMF system data that may have changed. Patch upgrade are applicable to the server and the client.
Step 2 Perform the data migration procedure.
When you upgrade from SCM Release 2.0(1) and SCM Release 2.1(1), you must perform SCM data migration. Data migration is only applicable for the server workstation which contains the CEMF database. To update SCM user data in the database, you must manually run the following two new program scripts:
|
Note Depending on the size of your database, processing time may vary when you run the C6400DM script and NrpToNrp1DM script. |
Step 2 From a terminal session, run the C6400DM script. Type:
Step 3 Run the NrpToNrp1DM script. Type:
Step 4 Identify and record this installation environment for the next backup. Include CEMF version, CEMF patches that are installed, SCM version, and other element managers (EMs) and their versions.
Both the user data and system data are updated.
If your original database is needed at a later time, you must use this original database to restore into the old version software environment (which includes SCM Release, CEMF and patches, and other EMs).
Make certain to only restore the original database into the same environment from which the backup was performed. Ensure that the CEMF, patches, and EMs are the original versions that you started with.
After the upgrade procedures are complete, and both user data and system data are updated, you must back up the new database.
Use the new SCM Release 2.2(1a) database backup for future restoration, if necessary.
After all backup, upgrade, migration, and restore procedures are complete, start a Cisco EMF session, which activates Service Connection Manager (SCM).
|
Note When you launch SCM after the upgrade, objects might be decommissioned. To commission an object that is decommissioned, right-click on the object and select Cisco 6400 UAC > Module > Manage > Configuration in the SCM menu. In the resulting window, click the Commission button to activate the object. |
Step 2 The Cisco EMF login window appears. For information on using SCM, refer to the Cisco 6400 Service Connection Manager User Guide.
|
Caution The NRP2 card is newly supported in SCM Release 2.2(1a) and NRP2 features must be deployed within a chassis managed by SCM Release 2.2(1a). |
This section describes a data migration workaround procedure. You must perform this procedure if you deployed an Node Route Processor Two (NRP2) Card in a chassis managed by SCM Release 2.0(1) or SCM Release 2.1(1).
If you deployed NRP2s in your chassis managed by SCM Release 2.0(1) or SCM Release 2.1(1), follow these steps to perform the NRP2 data migration workaround when you upgrade to SCM Release 2.2(1a):
Step 2 From the Component Managed view, decommission and then delete the card in the relevant NRP2 slot number.
Step 3 Verify that the card is removed from the Component Managed view.
Step 4 Be certain that the Cisco 6400 relevant chassis is set to the proper SNMPv2c and SNMPv3 settings. Using the Chassis 6400 SNMP Management window, check that the settings match in the Cisco 6400 NSP and the NRP2 IOS configuration.
|
Note The SNMPv2c protocol is used to communicate with the Cisco 6400 chassis and SNMPv3 proxy protocol is used for NSP to NRP2 communication. |
Step 5 Decommission and then commission the relevant chassis to initiate sub-chassis discovery. The NRP2 card should now be properly deployed and the NRP2 ATM port in a normal state.
This procedure describes how to remove Cisco 6400 SCM and Cisco EMF software.
|
Note To remove SCM software, run the cemfinstall -r script provided on the SCM CD-ROM. This procedure removes SCM without removing COM. Running the cemfinstall -r script provided with Cisco EMF or another element manager removes COM in addition to SCM. |
|
Caution If the database contains Cisco 6400 devices configured in it when SCM is removed, then the devices will be unmanageable, even if you reinstall SCM. |
To uninstall SCM, follow these steps:
Step 2 Insert the Cisco 6400 SCM CD-ROM.
Step 3 Change the directory into the CD-ROM area:
Step 4 Run the uninstallation script (cemfinstall -r), which stops all Cisco 6400 SCM processes and uninstalls them:
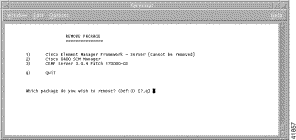
A menu listing the SCM client and SCM server uninstallation options appears (Figure 1-5).
|
Note Figure 1-5 indicates that an SCM client is not installed on the system. However, an SCM server is installed and can be uninstalled through option 2. |
Step 5 Select an uninstallation option. If you are removing multiple software components, be sure to remove the components in the following order:
You are notified that the uninstallation is about to take place. When you proceed with the uninstallation, the window scrolls through the software as it is deleted and the following message appears:
To use the SCM configuration backup and restore feature, you must configure a Trivial File Transfer Protocol (TFTP) server, as described in the following sections.
Configuring the SCM server as a TFTP server is optional. You can choose to use a different machine as the TFTP server, or choose not to use the backup and restore functionality at all. If you decide to use another machine as a TFTP server, make sure that empty backup files exist on the TFTP server. You also need the appropriate permissions for read and write access.
The NSP backup files contain the filename NSPaa.bb.cc.dd (where aa.bb.cc.dd is the IP address of the NSP), and the NRP backup files have the filename NRPaa.bb.cc.dd (where aa.bb.cc.dd is the IP address of the NRP). A backup file is created for the active NSP and each active NRP in the Cisco 6400 chassis.
|
Note When the SCM server is set up to be the TFTP server, SCM ensures that the backup files exist and have the correct permissions. |
TFTP enables you to transfer files to and from remote systems. The SCM configuration backup and restore window allows you to back up and restore the configuration of a Cisco 6400 SCM (NSP and NRPs). TFTP transfers the configuration files from a device to your system through the network.
Make sure that the following prerequisites are met:
The TFTP daemon (tftpd) must be enabled for the Cisco 6400 SCM to upload or download a configuration file. If you are using standard Sun software, verify that the TFTP daemon is enabled:
Step 2 Edit the /etc/inetd.conf file using a text editor (such as vi).
Step 3 Look in the file /etc/inetd.conf for the line that invokes tftpd. If the line is commented out (starts with a pound sign [#] as in the following example), remove the pound sign.
Step 4 Save the changes in the edited file and exit.
Step 5 Reboot the system.
Step 6 Verify that the TFTP daemon is enabled.
The output should be similar to the following:
|
Note If there is no output, the TFTP daemon is not enabled. For additional information on TFTP, refer to the UNIX man pages on tftp and tftpd. |
The tftpboot directory stores the configuration files from the Cisco 6400 SCM NSP and NRPs.
Step 2 The tftpboot directory must have the appropriate permissions. To modify the permissions, enter:
The following sections describe how to perform basic Service Connection Manager tasks.
 |
Tip Enter cemf -h to obtain help information. |
The Cisco 6400 SCM software is automatically started during system bootup or by starting Cisco EMF. To start CEMF, follow these steps:
Step 2 Start the Cisco EMF (which starts SCM). Type:
The Cisco 6400 SCM process begins.
The Cisco 6400 SCM software is stopped during system shutdown or by stopping CEMF. To stop CEMF, follow these steps:
Step 2 Log in as superuser.
Step 3 Stop the Cisco EMF (which also stops SCM). Type:
The CEMF and Cisco 6400 SCM processes cease.
You can check the status of the CEMF and Cisco 6400 SCM. Follow these steps:
Step 2 If CEMF and the Cisco 6400 SCM is active, the system displays a list of the processes that are running.
If SCM is not active, the following message appears:
|
Note Client refers to both clients on the SCM server and clients on a remote host. |
Start a client application as follows:
Step 2 Start the Cisco EMF:
Step 3 Start a Cisco EMF session (which also starts SCM):
Step 4 At the prompt, enter a username and password. The default username is admin and the default password is admin.
![]()
![]()
![]()
![]()
![]()
![]()
![]()
![]()
Posted: Tue Mar 4 07:00:13 PST 2003
All contents are Copyright © 1992--2002 Cisco Systems, Inc. All rights reserved.
Important Notices and Privacy Statement.