|
|

This chapter describes the security features built into the Cisco 6400 Service Connection Manager (SCM) application. The Cisco 6400 SCM achieves this through the use of Cisco EMF carrier class security mechanisms. Refer to the Cisco Element Management Framework User Guide for further information.
Cisco EMF User Access Control, which is Cisco EMFs mechanism for Carrier Class Security, provides:
 |
Note It may be advisable to restrict the Cisco EMF options available to less experienced personnel. |
Additionally, complex new equipment technologies are being launched into the market by both existing and new equipment providers. Faced with many new equipment features, personnel may make mistakes, for example in equipment configuration, which could affect network uptime.
Service Provider organizations may be obligated under law to protect sensitive information contained within management systems. The ability to provide secure customer network management is therefore a valuable service to offer customers.
The Cisco 6400 SCM adds additional security mechanisms or feature lists to the standard Cisco EMF security mechanisms. See the "Cisco 6400 SCM Feature Lists" section for details of the additional Cisco 6400 SCM v2.0.x feature lists.
See the "Example" section that describes how to create and configure the features of your system that allow or restrict the access for various levels of personnel.
Cisco EMF Security allows system administrators to set up Access Manager objects using the Access Manager GUI. Access Manager objects can be classed as either personnel or services as follows:
The Access Manager object is set up to allow or restrict user access to features within Cisco EMF. For example, an administrator could set up a user to have access only to those parts of Cisco EMF which are relevant to their specific tasks. A user would only be aware of their own access to the system and the use of their password.
For example, Joe may be the NOC expert on xDSL modems, but he may be a relative ATM novice. Helen, on the other hand, may be the ATM expert but she may know very little about the intricacies of xDSL technologies. With Cisco EMF Access Control, the systems administrator is able to ensure Joe has read/write access to all xDSL network elements for configuration and test purposes, while Helen can only view the status information for these elements. Helen, on the other hand, can reconfigure ATM equipment, whereas Joe is refused access to the Element Manager windows which permit such reconfiguration.
Three levels of user access are available. These names describe the type of access available to each:
Cisco EMF Security also enables administrators to define security levels for specific managed object attributes. This is key to restricting access to sensitive or critical parameters of managed equipment (for example, the IP address of an item of equipment.) A user with Read-Write access may be able to apply a new configuration to that piece of equipment, but they may not be able to modify its IP address, as this could invalidate normal management of the device. Control of the IP address may be the specific responsibility of the network topology manager.
Refer to the Cisco Element Management Framework User Guide for further information on the Cisco EMF Access Manager application.
A Cisco EMF feature list is a list of one or more windows that can have security access control applied to them. The Cisco 6400 SCM feature lists are those specific to the Cisco 6400 SCM functionality. The Cisco 6400 SCM feature lists are supplied by the Cisco 6400 SCM application, and are not user configurable.
 |
Note System administrators can add their own Cisco 6400 SCM specific access specifications built from the feature lists described in the following sections. |
| Feature List | Window |
SCM_ATM_Service_Config | ATM Service Configuration |
SCM_PPPoA_SD_Service_Config | PPPoA-SD Service Configuration |
SCM_L2TP_Service_Config | L2TP Service Configuration |
SCM_RFC1483_Bridged_Service_Config | RFC1483 Bridged Service Configuration |
SCM_RFC1483_IRB_Service_Config | RFC1483 IRB Service Configuration |
SCM_IP_Uplink_Service_Config | IP Uplink Service Configuration |
| Feature List | Window |
SCM_RFC1483_Routed_Service_Config | RFC1483 Routed Service Configuration |
SCM_Deploy_ATM_Service | ATM Service Deployment |
SCM_Deploy_PPPoA_SD_Service | PPPoA-SD Service Deployment |
SCM_Deploy_L2TP_Service | L2TP Service Deployment |
SCM_Deploy_RFC1483_Bridged_Service | RFC1483 Bridged Service Deployment |
SCM_Deploy_RFC1483_IRB_Service | RFC1483 IRB Service Deployment |
SCM_Deploy_IP_Uplink_Service | IP Uplink Service Deployment |
SCM_Deploy_RFC1483_Routed_Service | RFC1483 Routed Service Deployment |
| Feature List | Window |
SCM_Deploy_Connection_Template | Connection Template Deployment |
SCM_Connection_Template_Config | Connection Template Configuration |
SCM_PPPoA_SD_Service_Profile | PPPoA-SD Service Profile Configuration |
SCM_L2TP_Service_Profile | L2TP Service Profile Configuration |
SCM_RFC1483_Bridged_Service_Profile | RFC1483 Bridged Service Profile Configuration |
SCM_RFC1483_IRB_Service_Profile | RFC1483 IRB Service Profile Configuration |
SCM_IP_Uplink_Service_Profile | IP Uplink Service Profile Configuration |
SCM_Service_Uplink_Service_Profile | Service Uplink Profile Configuration (for RFC1483 Routed Service Uplinks) |
| Feature List | Window |
SCM_Subscriber_Config | Subscriber Configuration |
SCM_Subscriber_Connection | Subscriber Connection |
SCM_Subscriber_Disconnection | Subscriber Disconnection |
SCM_Deploy_Subscriber | Subscriber Deployment |
| Feature List | Window |
SCM_Service_Status | Service Status |
SCM_Connection_Status | Connection Status |
| Feature List | Window |
SCM_Element_Management | All Element Manager windows (plus the Cisco 6400 UAC, Chassis, State, Commission/Decommission menu option) but not including the SSG Configuration and SONET APS Configuration windows |
SCM_SSG_Config | SSG Configuration |
SCM_SONET_APS_Config | SONET APS Configuration |
| Feature List | Window |
SCM_Deploy_Chassis_NSP | 6400 Chassis/NSP/Shelf Manual Deployment, Quick Start Deployment |
SCM_Deploy_NRP | 6400 NRP Manual Deployment |
SCM_Deploy_OC3 | OC3 Line Card Manual Deployment |
SCM_Deploy_OC12 | OC12 Line Card Manual Deployment |
SCM_Deploy_DS3 | DS3 Line Card Manual Deployment |
| Feature List | Window |
SCM_Chassis_Backup_Restore | Chassis Backup / Restore |
SCM_Chassis_Configuration | Chassis Configuration |
SCM_Chassis_Command_Log | Chassis Command Log |
SCM_Chassis_IOS_Image_Download | Chassis IOS Image Download |
SCM_Chassis_SysLog | Chassis System Log |
SCM_Chassis_SNMP_Management | Chassis SNMP Management |
SCM_Chassis_Mgmt_Info | Chassis Management Information |
| Feature List | Window |
SCM_Module_Performance | Module Performance |
SCM_Module_Backup_Restore | Module Backup/Restore |
SCM_Module_Command_Log | Module Command Log |
SCM_Module_SysLog | Module System Log |
SCM_Module_IOS_Image_Download | Module IOS Image Download |
SCM_Module_Configuration | Module Configuration |
SCM_Module_Mgmt_Info | Module Management Information |
| Feature List | Window |
SCM_Interface_Configuration | Interface Configuration |
SCM_Interface_Performance | Interface Performance |
SCM_Interface_Status | Interface Status |
Default access specifications are supplied by the Cisco 6400 SCM application. Default access specifications can be changed or removed by authorized users.
Includes ALL the above feature lists, that is, access to everything in the Cisco 6400 SCM application.
Includes all Service Configuration windows and Service Deployment feature lists.
 |
Note The SCM_Service_Provisioning access specifications do not include service profile note access, which can be considered as a super user policy definition. |
Includes all Service Profiles feature lists (all service profiles, plus Connection Template deployment and configuration).
 |
Note SCM_Service_Profiles does not include service profile access. Service profile access is considered as a super-user "policy definition" feature. |
Includes all Subscriber Provisioning feature lists (Subscriber deployment, configuration, connection and disconnection).
Includes all SCM EM window feature lists, EM deployment, and all Generic feature lists above with the exception of Backup/Restore and IOS Image Download.
Includes Backup/Restore and IOS Image Download feature lists.
This section provides an example of how to create a new user, who can create and configure PTA-MD services, and then connect subscribers to the service instance. Figure 11-1 describes a typical work flow that shows how to first create an Access Specification; then create a User Group; and finally, create the User.
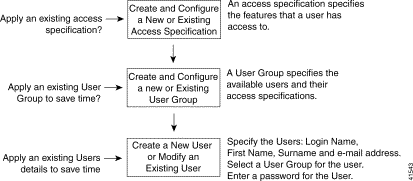
This example describes how to:
 |
Note Access specifications ensure that users are restricted to only carry out the tasks that they are permitted to do (by the selected feature lists). This example does not allow the user to create a PTA-MD service profile, this task is restricted to users with a higher security level. |
To create the example SSG/PTA-MD access specification, follow these steps:
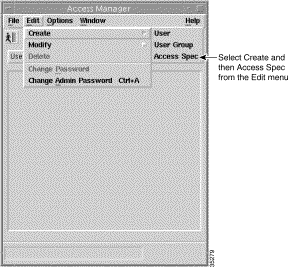
Step 2 Select Create, then Access Spec from the Edit drop down menu. The Create Access Specification wizard launches. A window similar to Figure 11-3 appears.
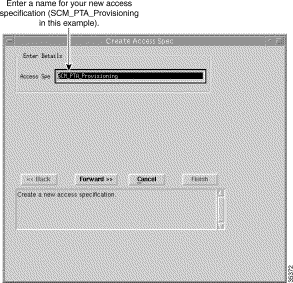
Step 3 Enter a name for the new access specification to be created.
 |
Note A valid name must have at least five characters with no spaces. You can use the Tab key to move between fields. |
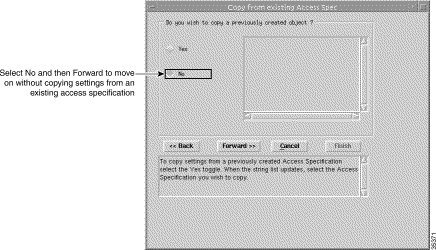
Step 4 Click Forward. The Copy from Existing Access Spec window appears:
 |
Note You are now required to select settings for the new access specification. You can copy settings from a previously created specification and edit the specification (refer to the Cisco Element Management Framework User Guide) or create a new specification without copying settings from an existing access specifications. In this example we will create a new specification without copying settings from an existing access specifications. |
Step 5 Click No.
Step 6 Click Forward. The Select Permission window appears:
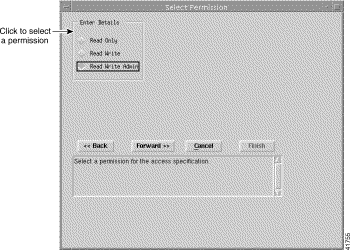
Step 7 Select a permission level from Read Only, Read Write, or Read Write Admin.
Step 8 Click Forward. The Select User Groups window appears.
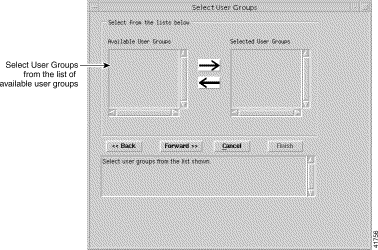
Step 9 Select the user group that you wish to include in the new access specification, then click the right arrow to move the selected user group into the list of selected user groups in the right panel. An alternative method is to double click on a selected object. The left arrow moves the selected item back into the left panel.
Step 10 Click Forward when the list of selected user groups is complete. The Select Feature Lists window appears:
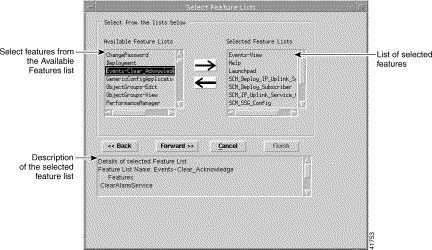
Step 11 Select the feature list that you wish to apply to the new specification, then click the right arrow. Table 11-11 displays a list of the feature lists selected from the Available Feature Lists in this example and describes what each feature list allows the user to do.
 |
Note See "Cisco 6400 SCM Feature Lists" section for details of the feature lists available in the Cisco 6400 SCM application. |
| Selected Feature List | Allows The User To |
SCM_Deploy_Subscriber | Deploy new subscribers |
SCM_Deploy_IP_Uplink_Service | Deploy IP Uplink service instances |
Viewer-View | Allows the user to access the Map Viewer window but does not allow the user to edit the Map Viewer window. |
SCM_Subscriber_Disconnect | Connect subscribers |
SCM_Subscriber_Connect | Disconnect subscribers |
SCM_Subscriber_Config | Configure subscribers information |
SCM_SSG_Config | Configure SSG configuration |
SCM_IP_Uplink_Service_Config | Configure IP Uplink services |
Launchpad | Access the Cisco EMF Launchpad |
Help | Access On-Help |
Events_View | View events |
Events-Clear_Acknowledge | Acknowledge and clear events |
 |
Note Feature lists that allow access to the standard Cisco EMF applications (that is, Launchpad, Viewer, and Event Browser) are included and can be selected. The Launchpad, Viewer, and Event Browser applications provide entry points to the PTA-MD and SSG windows and the commonly used Cisco EMF fault management capability windows. |
 |
Note The User in this example is not allowed to create service profiles. Creating service profiles would be the responsibility of another user (for example, a super user). |
Step 12 Click Forward when the Selected Feature Lists is complete. The Select Object Groups window appears.
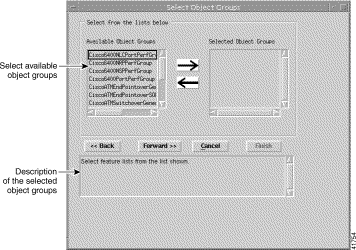
You may wish to restrict access for SCM_PTA_Provisioning to a specific geographical area. For example, to create a user who is restricted to SCM_PTA_Provisioning in the Chicago area only, with no access to other regions. To do this you would:
1. Create an object group to define the geographical area (refer to the "Object Group Manager" section in the Cisco Element Management Framework User Guide) for further information.
2. Associate this object group with the access specification. Step 13 describes how to associate an object group with the access specification.
Step 13 Select the object group you want to associate with the SCM_PTA_Provisioning access specification, then click the right arrow. When the group is complete, click Forward.
 |
Note You can create an access specification without associating it with an Object Group. This allows unlimited geographical access. |
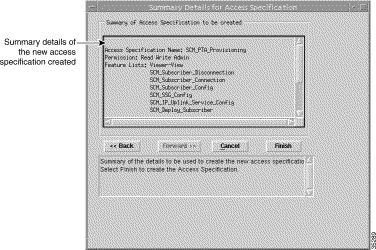
Step 14 Click Finish to create the access specification. The Access Manager window appears with the name of the new access specification displayed at the bottom of the list of access specifications.
Now we use this access specification as a basis for defining a new group of users.
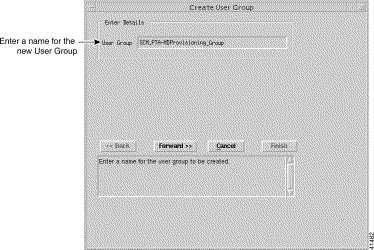
Step 15 Select Create, then User Group from the Edit drop down menu. The Create User Group wizard launches (see Figure 11-10).
 |
Note A valid name must have at least five characters with no spaces. You can use the Tab key to move between fields. |
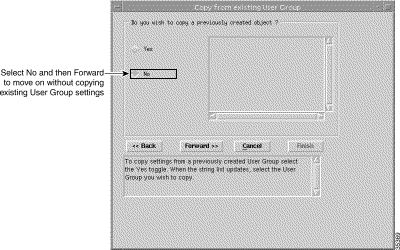
Step 16 Click Forward. The Copy from Existing User Group window appears:
 |
Note You can copy settings from a previously created User Group and edit the specification (refer to the Cisco Element Management Framework User Guide) or create a new User Group without copying settings from an existing access specifications. In this example we will create a new User Group without copying settings from an existing User Group. |
Step 17 Click No.
Step 18 Click Forward. The Select User Group window appears:
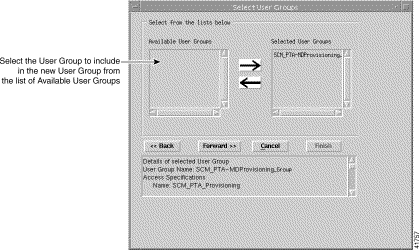
Step 19 Select the User Groups that you wish to include in the new User Group, then click the right arrow. This moves the selected User Group into the list of selected users in the right panel. An alternative method is to double click on an item in Available User Groups. The left arrow moves the selected item (in the right list) back into the left panel.
Step 20 Click Forward when the list of selected User Groups is complete. The Select Access Specification window appears:
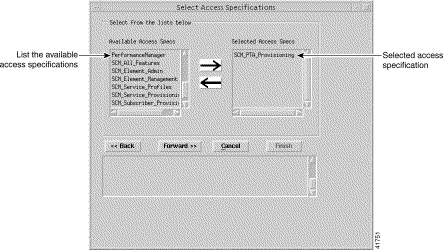
Step 21 Select the access specification you wish to apply to the new User Group, then click the right arrow. In this example, the SCM_PTAProvisioning access specification that was created earlier is selected.
Step 22 Click Forward. A Summary Details for User Groups window, similar to Figure 11-13 appears. When any details are incorrect, you can click Cancel to exit the wizard or click Back to return to the appropriate window and correct the details.
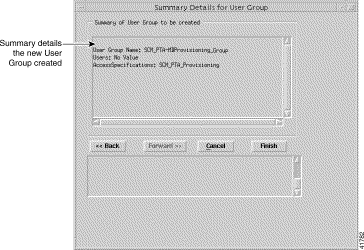
Step 23 Click Finish to create the User Group. The Access Manager window appears with the name of the new User Group displayed at the bottom of the User Groups list.
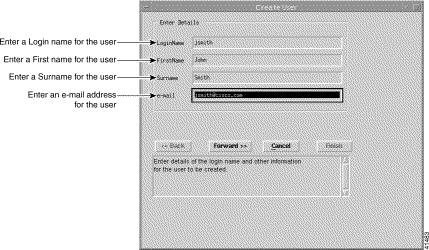
Step 2 Enter details for the new user into the Enter details panel.
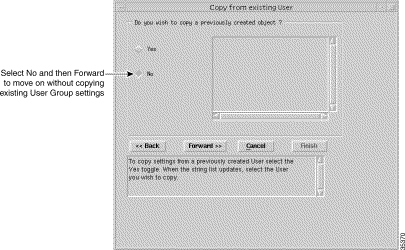
Step 3 Click Forward. The Copy from Existing User window appears:
 |
Note You can copy settings from a previously created User Group and edit the specification (refer to the Cisco Element Management Framework User Guide) or create a new User without copying settings from an existing access specifications. In this example we will create a new User without copying settings from an existing User. |
Step 4 Click No.
Step 5 Click Forward. The Select User Groups window appears, showing SCM_PTA_MD as one of the Available User Groups:
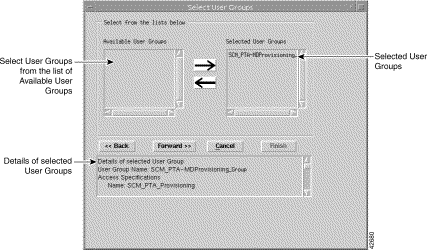
Step 6 Select the User Groups you wish your new user to belong to, then click the right arrow. This moves the selected User Group into the list of selected User Groups in the right panel. An alternative method is to double click on an Available User Group. The left arrow moves the selected item (in the right list) back into the left panel.
Step 7 Click Forward when the list of selected user groups is complete. The User Password Entry window appears:
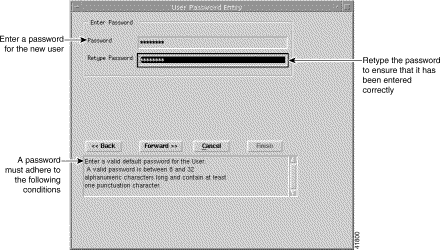
Step 8 Enter a Password for the new user following the conditions specified in the panel (below the Back, Forward, Cancel and Finish buttons). You will be alerted when you enter an invalid password.
Step 9 Retype the password to confirm that you have entered the password correctly.
Step 10 Click Forward. A Summary Details for User window, similar to Figure 11-19 appears. When any details are incorrect, you can click Cancel to exit the wizard or click Back to return to the appropriate window and correct the details.
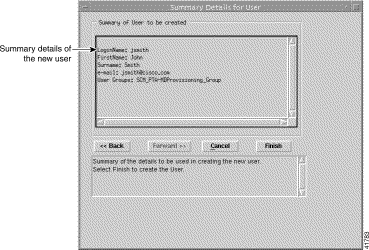
Step 11 Click Finish to create the User. The Access Manager window appears with the name of the new User displayed at the bottom of the User's list.
This example has described how to:
Using the principles described in the above example you should now be able to create users with different access security levels.
![]()
![]()
![]()
![]()
![]()
![]()
![]()
![]()
Posted: Fri Aug 4 02:08:41 PDT 2000
Copyright 1989-2000©Cisco Systems Inc.