|
|

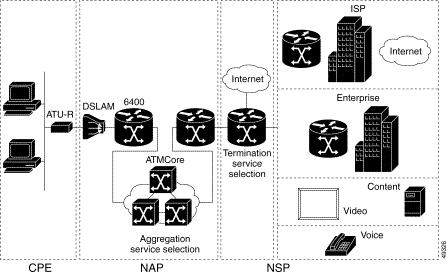
This chapter provides a brief overview of available asymmetric DSL (ADSL) architecture options. A typical ADSL service architecture is illustrated in Figure 2-1. In the architecture illustrated, the network consists of Customer Premise Equipment (CPE), the Network Access Provider (NAP) and the Network Service Provider (NSP).
CPE refers to an end-user workstations (such as a PC) together with an ADSL modem or ADSL terminating unit router (ATU-R). The NAP provides ADSL line termination by using DSL access multiplexers (DSLAMs). The DSLAM forwards traffic to the local access concentrator, which is used for Point-to-Point Protocol (PPP) tunneling and Layer 3 termination. From the Layer 2 Tunneling Protocol Access Concentrator (LAC), services extend over the ATM core to the NSP.
In this section some of the major DSL architectures are briefly addressed. The order of the architectures presented is from the most simplistic (bridging based) to the most robust and scalable (PPP based). Five general design scheme are described:
The RFC 1483 bridging architecture is very simple to understand and implement. An ATU-R acts as a bridge between the Ethernet and the wide-area networking (WAN) side. As a result, it requires minimal configuration.
With RFC 1483 bridging, CPE 802.3 Ethernet frames are segmented into asynchronous transfer mode (ATM) cells through ATM adaptation layer 5 (AAL5). The receiving equipment is notified of the type of protocol segmented into to cells because the standard calls appending logical link control/subnetwork access protocol (LLC/SNAP) information to the 802.3 frame before its segmented into the ATM cells. This enables the node route processor (NRP) in the 6400 to determine which protocols are embedded within the ATM cells. This also allows for multiprotocol support for the subscriber. Since the bridge is in bridging mode, it does not care what upper layer protocols are being encapsulated.
Figure 2-2 illustrates a typical RFC 1483-based architecture.
Some of the key points of this architecture that needs to be kept in mind while designing a DSL solution with IRB.
Various other implementation aspects to consider include:
Security is the principal concern with an RFC 1483 architecture because bridging is vulnerable to IP hijacking. This security problem can be solved by using separate bridge groups per user. This approach is not optimal because the Cisco IOS has a bridge group limitation of 255. A more scalable solution would be to have the users coming to different multipoint subinterfaces and belonging to the same bridge group. Users in the same bridge group would not be able to see each other.
The RFC 1483 bridging model more suitable for smaller Internet service providers (ISPs) and corporate access networks where scalability is not an issue. Due to security and scalability issues bridging-based DSL architectures are losing popularity. NSPs and ISPs are migrating to Point-to-Point Protocol over ATM (PPPoA) or Point-to-Point Protocol over Ethernet (PPPoE) which are scalable and secure, but more complex to implement.
 |
Note IRB (RFC 1483-based bridging) strategies are not a recommended architecture and customers using IRB are encouraged to migrate to Routed Bridge Encapsulation (RBE) or one of the PPP-based protocols. |
The following is an example minimum configuration to bring up RFC 1483 bridging (IRB) on the NRP. The configuration reflects a typical IRB setup where a Bridge Group Virtual Interface (BVI) provides Layer 3 connectivity for a bridge group.
Routed bridge encapsulation (RBE) was designed to address disadvantages of IRB, such as broadcast storms and security, while providing ease of implementation.
With RBE, when an NRP receives RFC 1483 packets, the packets are not bridged but instead routed based on IP header information. This happens without the need for a bridge virtual interface. For packets coming in from the ISP side to the CPE, the NRP makes routing decision based on the IP destination. If no address resolution protocol (ARP) information is present, the NRP sends out an ARP request to the destination interface.
One of the main advantages of RBE is its ease of migration from IRB. Configuration on the ATU-R is the same.
It also resolves the security issues associated with IRB and RBE does not suffer from the number of bridge group limitation.
Figure 2-3 illustrates a typical RBE network architecture.
Most of the design/implementation consideration are the same as with the IRB architecture. However security is enhanced and better performance results because each subinterface is treated as a routed port.
With RBE, a single virtual circuit (VC) is assigned a route, a set of routes, or a cider block. As a result, the trusted environment is reduced to a single CPE represented by one of these. The NAP/NSP controls the addresses used by the CPE by configuring a IP subnet on the subinterface. This allows the NAP/NSP to control the number of users attached to the ATU-R.
RBE is only supported on point-to-point subinterfaces. The interfaces can be numbered or unnumbered.
In the case of unnumbered interfaces there can be a situation in which multiple subinterfaces use the same numbered interface (such as Ethernet0/0/0 172.10.10.0). In this case all the subscribers behind these subinterfaces will be in the same subnet. In order to create a mapping between the subscriber and the ATM subinterface, you must add static hosts routes. Please see configuration provided in the following NRP Configuration. section
|
Note New Feature in 12.1(1) DC1: Dynamic Host Configuration Protocol Relay for Unnumbered Interfaces Using ATM RBE |
|
Note Dynamic Host Configuration Protocol (DHCP) Relay now supports unnumbered interfaces using ATM RBE. DHCP Relay automatically adds a static host route specifying the unnumbered interface as the outbound interface. |
|
Note DHCP Relay can also now use the ip dhcp database global configuration command. This optional command allows the DHCP Relay to save route information to a TFTP, FTP, or RCP server for recovery after reloads. |
The following is an example minimum configuration to bring up RBE on the NRP. The only specific command needed is atm route-bridged ip interface on the ATM subinterfaces on which the user VCs are configured. In this example, static routes to the user are implemented. These routes are not required with Cisco IOS Release 12.1(1) DC1 or later which include the new feature Dynamic Host Configuration Protocol Relay for Unnumbered Interfaces Using ATM RBE.
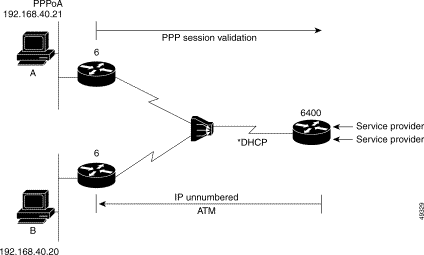
PPPoA was primarily implemented as part of ADSL. It relies on RFC 1483, operating in either LLC/SNAP or VC-Mux mode. The ATU-R encapsulates IP packets into PPP frames and then segments them into ATM cells via AAL5. The PPP link is terminated at the NRP and the originating workstation's IP packet is routed to its final destination through the service provider of choice. The NRP typically uses a Remote Authentication Dial-in User Service (RADIUS) server to authenticate and authorize the user, although this can be done within the router. DHCP servers are used to assign the IP address to the user, although this could also be done within the router.
A PPPoA implementation involves configuring the ATU-R with PPP authentication information (login and password). This is the main advantage of this architecture over IRB or RBE implementations, as it provides for per session Authentication, Authorization, and Accounting (AAA).
DHCP with Network Address Translation (NAT) can be used at the ATU-R. Implementing DHCP and NAT allows service providers to allocate a single IP address per CPE. This in turn performs NAT or Protocol Address Translation (PAT) for the end users. This architecture also offers ease of trouble shooting as the NSP can easily check which subscriber is on/off based on the PPP session.
Figure 2-4 illustrates an example PPPoA network architecture.
Some of the key attributes of this architecture to consider when designing a DSL solution with PPPoA are as follows:
The user login information is configured on the CPE which leads to a single PPP session per VC. Thus the user has access to a single set of services.
Various other implementation aspects that needs to be considered are nature of subscriber (residential or SOHO), services offered by NSP, type of billing, termination point of PPP, NAT performed at the CPE or the NRP, typical data volume etc.
The number of PPP sessions per NRP is very high which makes PPPoA very scalable.
Following resource restrictions can help in designing the network.
There are various ways to reach a service destination when implementing PPPoA. Examples include:
Termination of PPP at the point of aggregation is most common. The NRP authenticates the subscriber using local or RADIUS authentication. The CPE receives the IP address using IP Control Protocol (IPCP). The NRP performs NAT if the IP pool consists of illegal (local) IP addresses.
In L2TP architecture the PPP sessions are not terminated at the aggregation, but rather tunneled to the upstream termination point (SP or corporate net) using L2TP or Layer 2 Forwarding Protocol (L2F). In this model the LAC authentication is based on domain name and the user gets authenticated at the termination end. Thus the user can access one destination at a time and would have to change the domain name on the CPE to change end destinations.
SSG provides one-to-many mapping of services as opposed to the one-to-one mapping provided in tunneling. With SSG, the subscriber accesses the services using the web-based Service Selection Dashboard (SSD). The user can select one or many services on the fly using the SSD.
In summary PPPoA is becoming the architecture of choice because of its scalability, security and SSG support.
This PPPoA configurations has four basic tasks:
PPPoA is supported for aal5mux, aal5snap, aal5ciscoppp and aal5autoppp encapsulations (aal5autoppp is for auto detect PPPoX deployments).
The following is an example minimum configuration to bring up PPPoA on the NRP. The configuration example is for the network shown in Figure 2-4.
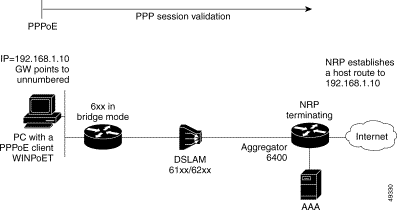
In the PPPoE architecture, an ATU-R acts as an Ethernet-to-WAN bridge and the PPP session is established between the end user's PC and the access concentrator (the NRP). RFC 2516 details the point-to-point session establishment protocol.
PPPoE requires PPP client software such as Windows PPP over Ethernet Client Software Application (WINPoET) to be installed on each PC on the subscriber side. The client initiates a PPP session by encapsulating PPP frames into a MAC frame and then bridging the frame (over ATM/DSL) to the gateway router (NRP). From this point, the PPP sessions can be established, authenticated, addressed, etc. The client receives its IP address using IPCP from the PPP termination point (NRP).
Figure 2-5 illustrates an example PPPoE network architecture.
|
Note PPPoE is currently only supported with Cisco Express Forwarding (CEF) switching. |
|
Note PPPoE provides all the benefits of PPPoA, for example per session AAA, SSG functionality, security etc. |
In general, the design considerations for PPPoA apply to a PPPoE architecture as well. In order to be in compliance with the RFC 2516, IP maximum transmission unit (MTU) must be specified as 1492 in the PPPoE virtual-template configuration on the NRP.
In order to control the number of users on the subscriber's side, you can implement the following session limiting global configuration commands:
Each of these commands was first introduced with Cisco IOS 12.0(3)DC. For more information, refer to the following feature module:
|
Note Cisco 827 can be used to initiate PPPoE session from the CPE. |
The following is an example minimum configuration to bring up PPPoE on the NRP. This configuration example is for the network shown inFigure 2-5. PPPoE has all the same configuration tasks as PPPoA, but also includes the configuration of a vpdn group with protocol identified as PPPoE. PPPoE is supported for aal5snap and aal5autoppp encapsulations (aal5autoppp is for auto detect PPP over X deployments),
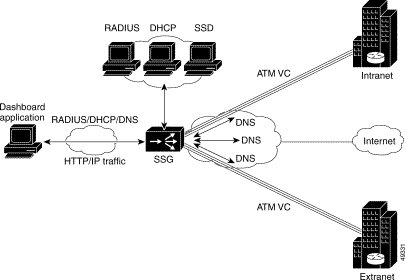
SSG is a Layer 2 and Layer 3 solution for DSL that provides RADIUS authentication and accounting for user interactive policy routing to different IP destinations (services). Using the Service Selection Dashboard (SSD), a user selects from a predetermined list of services for which they are authorized access.
|
Note The Cisco SSD functionality discussed throughout this document is available only with the NRP-SSG with Web Selection product. |
Figure 2-6 illustrates an example SSD-based SSG network environment.
1. The user opens an HTML browser and accesses the URL of the Cisco SSD, a web server application. The Cisco SSD forwards user login information to the NRP-SSG, which forwards the information to the AAA server.
2. If the user is not valid, the AAA server sends an Access-Reject message.
3. If the user is valid, the AAA server sends an Access-Accept message with information specific to the user's profile about which services the user is authorized to use. The NRP-SSG logs the user in, creates a host object in memory, and sends the response to the Cisco SSD.
4. Based on the contents of the Access-Accept response, the Cisco SSD presents a dashboard menu of services that the user is authorized to use, and the user selects one or more of the services. The NRP-SSG then creates an appropriate connection for the user and starts RADIUS accounting for the connection.
|
Note When a non-Point-to-Point Protocol (non-PPP) user, such as in a bridged networking environment, disconnects from a service without logging off, the connection remains open and the user will be able to access the service again without going through the logon procedure. This is because no direct connection (PPP) exists between the subscribers and the NRP-SSG. To prevent non-PPP users from being logged on to services indefinitely, be sure to configure the Session-Timeout and/or Idle-Timeout RADIUS attributes. |
NRP-SSG supports the following capabilities:
The next hop gateway attribute is used to specify the next hop key for a service. Each NRP-SSG uses its own next hop gateway table that associates this key with an actual IP address.
|
Note This attribute overrides the IP routing table for packets destined to a service. |
When using a PPPoE client, then the user SSD login name must be same as the PPPoE user login name. A host object with username and password is created when a PPPoE session is terminated at the NRP. The same attributes are used by SSG to log the user into SSD.
If the CPE is configured with PPPoA and PAT, then the user SSD login name must be same as the PPP user login name configured on the CPE. With PAT configured on the CPE, only one user should be using the SSD because with NAT/PAT the NRP/SSG sees only one source IP coming in from the CPE
With a transparent pass through filter configure, as soon as a user logs into the SSD, the user will be cut off from the services configured in the transparent pass through filter. One way to get around this is to configure Auto login services that are same as those supported by the transparent pass through filter.
In the following example SSD and RADIUS are running on the same system
The following is a sample SSD configuration fragment:
Refer to the following document for more configuration details:
Reduced downtime and increased availability are the chief concerns in DSL network design. The network should be designed such that subscribers see the benefits of this "always on" service. Table 2-1 maps potential failure points to the kinds of considerations (if any) to weigh in building redundancy into a DSL network.
Table 2-1 DSL Network Redundancy Considerations
|
Deployment of a high-availability solutions involves a number of constraints to consider when assessing any redundancy-base implementation. Three key considerations include:
![]()
![]()
![]()
![]()
![]()
![]()
![]()
![]()
Posted: Fri Aug 22 13:59:24 PDT 2003
All contents are Copyright © 1992--2003 Cisco Systems, Inc. All rights reserved.
Important Notices and Privacy Statement.