|
|

This chapter provides installation procedures for Direct Connect with a POTS splitter configuration.
 |
Warning Only trained and qualified personnel should be allowed to install, replace, or service this equipment. |
 |
Caution Before you start the installation procedures, read the entire chapter for important information and safety warnings. |
 |
Note Before installing and cabling the equipment, be aware of standard safety practices and the hazards
involved in working with electrical circuitry to prevent accidents. See the
"Safety Requirements" section
for all cautions and warnings that are necessary to ensure a safe and hazard-free installation. To see translations of the warnings that appear in this publication, refer to the Regulatory Compliance and Safety Information for the Cisco 6100 Series System document. |
 |
Tip See the "Direct Connect with a POTS Splitter Configuration" section for more information about Direct Connect with a POTS splitter configuration components. |
When you install a Direct Connect with a POTS splitter configuration, be sure that you follow the installation procedures in the proper sequence. Table 3-1 is a checklist of the installation steps in the order in which they should occur. Detailed installation instructions are located in the sections following Table 3-1.
|
Caution Proper ESD protection is required whenever you handle Cisco digital subscriber line access multiplexer (DSLAM) equipment. Installation and maintenance personnel should be properly grounded using ground straps to eliminate the risk of ESD damage to the equipment. Cards are subject to ESD damage whenever they are removed from the chassis. |
| 1MDF = main distribution frame |
The following sections detail the installation procedures for in a Direct Connect with a POTS splitter configuration.
For the rack to remain stable, you must install your Cisco 6100 with NI-2 system from the bottom to the top of the rack. Before you install any of the chassis, measure the total rack space required to install your system. The required rack space depends on the number of Cisco 6100 chassis, fan trays, and POTS splitters you plan to use. The number of chassis and required fan trays increase if you plan to install a subtended network.
You can install a combination of the Cisco 6100 system components in a 7-foot rack:
|
Note See "Preparing for Installation" for the calculation tables that are necessary to plan total rack space for your Cisco 6100 with NI-2 system configuration. |
The Cisco 6100 with NI-2 system fits in a 23-inch wide rack. See Table 2-2 for individual rack space requirements. Allow 1 rack unit (RU) of space between the fan tray and the POTS splitter. This space allows for the intake plenum and for cabling back to front for the NI-2 card.
|
Warning To prevent bodily injury when mounting or servicing this unit in a rack, you must take special precautions to ensure that the system remains stable. The following guidelines are provided to ensure your safety: —This unit should be mounted at the bottom of the rack if it is the only unit in the rack. —When mounting this unit in a partially filled rack, load the rack from the bottom to the top with the heaviest component at the bottom of the rack. —If the rack is provided with stabilizing devices, install the stabilizers before mounting or servicing the unit in the rack. |
If you plan to expand your system to include more chassis in the future, allow space in the rack for additions during the initial installation, keeping in mind the weight distribution and stability of the rack.
You can use the following POTS splitters in a Direct Connect with POTS splitter configuration:
The following sections detail the installation procedures for each POTS splitter.
Complete the following steps to install the Cisco 6120 in the rack:
|
Warning Two people are required to lift the chassis. Grasp the chassis underneath the lower edge and lift with both hands. To prevent injury, keep your back straight and lift with your legs, not your back. |
The Cisco 6120 does not dissipate heat; therefore, the bottom of the rack is the best location for the Cisco 6120.
Step 2 Use six mounting screws and a Phillips-head screwdriver to bolt the Cisco 6120 in the rack.
Step 3 Remove the retaining bar.
Step 4 Repeat Steps 1 through 3 for each Cisco 6120 as necessary.
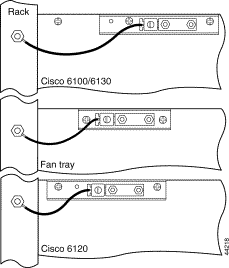
See Figure 1-1 for the correct placement of the Cisco 6120.
Refer to the appropriate vendor documentation for installation procedures for the third-party POTS splitter.
See Figure 1-1 for the correct placement of the third-party POTS splitter.
|
Warning Two people are required to lift the chassis. Grasp the chassis underneath the lower edge and lift with both hands. To prevent injury, keep your back straight and lift with your legs, not your back. |
Complete the following steps to install the fan tray in the rack:
|
Note If you are using more than one Cisco 6100 chassis in a Direct Connect with a POTS splitter configuration, you must install a fan tray under each chassis. |
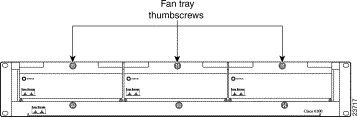
Step 2 Locate the first fan module and unscrew the thumbscrew that holds the fan module in place (the screw at the top of each fan module), as shown in Figure 3-1.
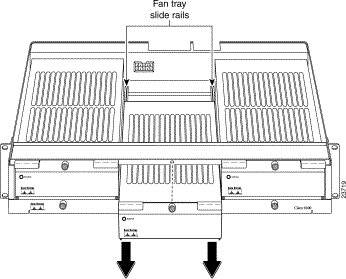
Step 3 Carefully remove the fan module by pulling it toward you. The fan module is located on slide rails for easy removal and installation. (See Figure 3-2.)
Step 4 Place the fan module on a flat and stable surface (for example, a table top) until you are ready to reinsert it into the fan tray.
Step 5 Repeat Steps 2 through 4 for each fan module.
Step 6 Position the fan tray chassis, which occupies 2 RUs of space, above the POTS splitter.
Allow an additional 1 RU of space between the fan tray and the POTS splitter. This space allows for the intake plenum.
Step 7 Use four mounting screws and a Phillips-head screwdriver to bolt the fan tray in the rack above the POTS splitter. See Figure 1-1 for the correct placement of the fan tray.
Step 8 Align a fan module with the fan tray slide rails inside the fan tray.
Step 9 Slide the fan module into the fan tray.
Step 10 Tighten the thumbscrew above the fan module.
Step 11 Repeat Steps 8 through 10 for each fan module.
|
Note For information about fan tray maintenance and air filter replacement, see "Upgrading and Maintaining the Cisco 6100 System." |
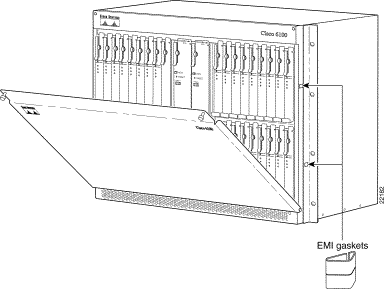
A thermal guard is required when using the Cisco 6100 chassis with 4xflexis.
|
Warning Two people are required to lift the chassis. Grasp the chassis underneath the lower edge and lift with both hands. To prevent injury, keep your back straight and lift with your legs, not your back. |
Complete the following steps to install the thermal guard on the Cisco 6100 chassis:
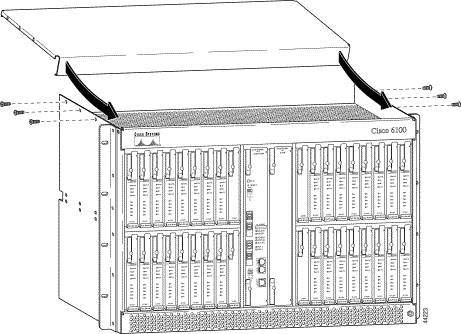
Step 2 Angle the thermal guard above the chassis, as shown in Figure 3-3.
Step 3 Place the lip of the thermal guard under the lip of the Cisco 6100 chassis.
Step 4 Gently push the back of the thermal guard onto the chassis.
Step 5 Use six screws (three on each side of the chassis) to secure the thermal guard to the chassis, as shown in Figure 3-3.
Figure 3-4 shows an installed thermal guard.
Complete the following steps to install the Cisco 6100 chassis:
|
Warning Two people are required to lift the chassis. Grasp the chassis underneath the lower edge and lift with both hands. To prevent injury, keep your back straight and lift with your legs, not your back. |
Step 2 Use four mounting screws and a Phillips-head screwdriver to bolt the Cisco 6100 in the rack.
Step 3 Remove the chassis front cover.
Step 4 Repeat Steps 1 through 3 for each Cisco 6100 as necessary.
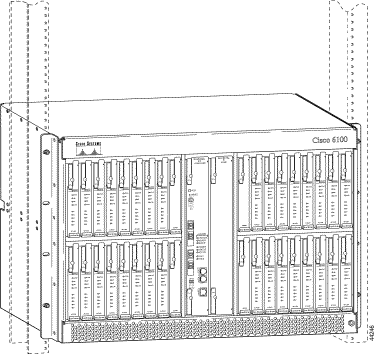
See Figure 1-1 for the correct placement of the Cisco 6100.
Blank faceplates should occupy any empty slots in either the Cisco 6100 or the Cisco 6120 chassis. The blank faceplate installation is similar to the line card installation.
Complete the following steps to install the blank faceplates in the Cisco 6100 or Cisco 6120:
Step 2 Lift up on the ejector tab and gently apply pressure to the bottom of the faceplate while pushing the blank faceplate into the slot.
Step 3 Push on the faceplate to fully seat the blank faceplate.
Step 4 Press down on the ejector tab to secure the faceplate.
During the system installation, complete the following steps to connect the grounding lug on the Cisco 6100, fan tray, and POTS splitter directly to the rack:
Step 2 Measure enough wire to connect the Cisco 6100 to the rack. Use 12 American Wire Gauge [AWG] or thicker (green or green with yellow stripes) stranded copper wire for the Cisco 6100 chassis grounding. Use 14 AWG or thicker (green or green with yellow stripes) stranded copper wire for the fan tray and POTS splitter grounding. (See Figure 3-5 for grounding wire location.)
|
Tip Make sure your wire is as short as possible to make the connection. |
Step 3 Use a wire stripper to remove the casing from both ends of the wires.
Step 4 Use a 3/16-inch flat-head screwdriver to loosen the screw on the rack.
Step 5 Hook one end of the copper wire around the screw on the rack.
Step 6 Tighten the rack screw over the copper wire.
Step 7 Use a flat-head screwdriver to loosen the compression screw that is provided on the grounding lug of the Cisco 6100.
The grounding lugs are located in the upper left corner of each chassis (viewed from the rear), as shown in Figure 3-5.
Step 8 Insert the other end of the copper wire under the compression screw.
Step 9 Tighten the compression screw over the copper wire.
Step 10 Repeat Steps 1 through 9 for the fan tray and the POTS splitter (Cisco 6120).
Refer to the appropriate vendor documentation for grounding procedures for the third-party POTS splitter.
The left side of Figure 3-5 shows how to ground the Cisco 6100, fan tray, and POTS splitter to the rack.
You can use the following POTS splitters in a Direct Connect with POTS splitter configuration:
The following sections detail the cabling procedures to connect the Cisco 6100 to each POTS splitter. These connections are for xDSL data flow between the Cisco 6100 and the POTS splitter.
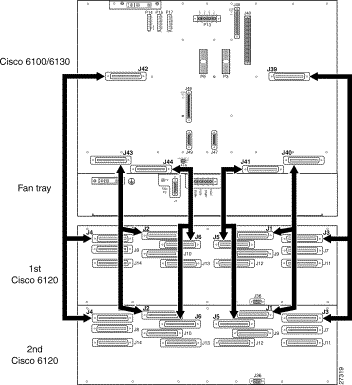
Connect the one-to-two Champ cables from the Cisco 6100 (connectors J39 through J44) to the Cisco 6120 (connectors J1 through J6). Table 3-2 shows the corresponding Cisco 6100 and Cisco 6120 connectors when two Cisco 6120 chassis are used.
|
Note See the "Cisco 6100 to Cisco 6120 Cables" section for cable part numbers. |
| Cisco 6100 Connector | First Cisco 6120 Connector |
Second Cisco 6120 Connector |
|---|---|---|
Figure 3-6 shows the cabling between one Cisco 6100 and two Cisco 6120 chassis in which the one-to-two cables are used.
|
Note For additional information about the Cisco 6120 backplane connectors, see the "Cisco 6120 Backplane" section on page 1-30. |
Use the cables described in the "Cisco 6100 to Third-Party POTS Splitter Cables" section to cable the Cisco 6100 to the third-party POTS splitter. Refer to the appropriate vendor documentation for cabling procedures for the third-party POTS splitter.
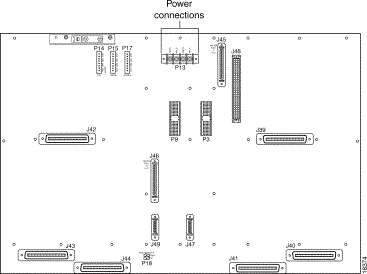
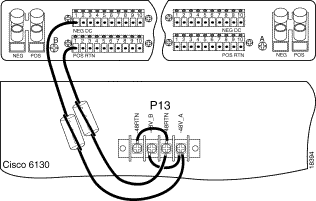
External power is supplied to the system as -48 VDC from the central office (CO) power source or rectifier to the fuse and alarm panel. Power is fed from the fuse and alarm panel to the Cisco 6100 chassis by a terminal block connector with four dual-power connections (P13) located at the top of the chassis backplane. Figure 3-7 shows the location of the power connection (P13) on the chassis.
|
Note The fuse and alarm panel and wires are not provided by Cisco. |
You can wire the power connections from the Cisco 6100 to the fuse and alarm panel for either dual- or single-power feed.
|
Note Connect each Cisco 6100 with NI-2 system component to a separate fuse. Do not power the components
in the rack by chaining them together. See "Preparing for Installation" for the calculation tables that are necessary to determine the minimum fuse rating for each component that is wired to the fuse and alarm panel. Refer to the power rating label on the back of the Cisco 6100 to determine the maximum fuse rating. |
Complete the following steps to attach the Cisco 6100 power connections (P13) to the fuse and alarm panel for a dual-power feed:
Step 2 Measure enough wire (12 AWG black and red copper solid or stranded wire) to connect each of the Cisco 6100 power input connections to the fuse and alarm panel.
Figure 3-8 shows the Cisco 6100 power input connections wired to the fuse and alarm panel.
|
Note Figure 3-8 shows the wires looped through a ferrite. If you use thicker wire, it will not be necessary to loop the wire through the ferrite. |
Step 3 Use a wire stripper to remove the casing from both ends of the wires.
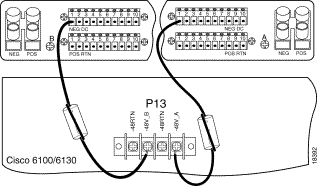
Step 4 Use a Phillips-head screwdriver to attach a wire to the -48V_A power input connection on the Cisco 6100 (P13).
Step 5 Loop the wire through the ferrite as shown in Figure 3-9. If you use thicker wire, it will not be necessary to loop the wire through the ferrite.
Step 6 Attach the wire to a fuse and alarm panel NEG (negative) DC connector.
Step 7 Use a Phillips-head screwdriver to attach a wire to the -48V_B power input connection on the Cisco 6100 (P13).
Step 8 Loop the wire through the ferrite as shown in Figure 3-9. If you use thicker wire, it will not be necessary to loop the wire through the ferrite.
Step 9 Attach the wire to a fuse and alarm panel NEG DC connector.
Step 10 Measure enough wire (12 AWG black and red copper solid or stranded wire) to connect each of the Cisco 6100 power return connections to the fuse and alarm panel.
Figure 3-10 shows the Cisco 6100 power return connections wired to the fuse and alarm panel for a dual-power feed.
|
Note Figure 3-10 shows the wires looped through a ferrite. If you use thicker wire, it will not be necessary to loop the wire through the ferrite. |
Step 11 Use a wire stripper to remove the casing from both ends of the wires.
Step 12 Use a Phillips-head screwdriver to attach a wire to a -48V power return connection (-48RTN) on the Cisco 6100 (P13).
Step 13 Loop the wire through the ferrite as shown in Figure 3-9. If you use thicker wire, it will not be necessary to loop the wire through the ferrite.
Step 14 Attach the wire to a fuse and alarm panel POS (positive) RTN connector.
Step 15 Repeat Steps 10 through 14 for the remaining -48V power return connection (-48RTN).
Step 16 Use a socket driver or a Phillips-head screwdriver to attach the clear cover over the Cisco 6100 power connections.
Complete the following steps to attach the Cisco 6100 power connections (P13) to the fuse and alarm panel for a single-power feed:
Step 2 Measure enough wire (12 AWG black and red copper solid or stranded wire) to connect each of the Cisco 6100 power connections to the fuse and alarm panel.
Figure 3-11 shows the Cisco 6100 power connections wired to the fuse and alarm panel for a single-power feed.
|
Note Figure 3-11 shows the wires looped through a ferrite. If you use thicker wire, it will not be necessary to loop the wire through the ferrite. |
Step 3 Use a wire stripper to remove the casing from both ends of the wires.
Step 4 Use a Phillips-head screwdriver, to attach a wire to the -48V_A power input connection on the Cisco 6100 (P13).
Step 5 Loop the wire through the ferrite as shown in Figure 3-12. If you use thicker wire, it will not be necessary to loop the wire through the ferrite.
Step 6 Attach the wire to the fuse and alarm panel NEG DC connector.
Step 7 Use a Phillips-head screwdriver to attach a wire to a -48RTN power return connection on the Cisco 6100 (P13). See Figure 3-11 for correct placement.
Step 8 Loop the wire through the ferrite as shown in Figure 3-12. If you use thicker wire, it will not be necessary to loop the wire through the ferrite.
Step 9 Attach the wire to the fuse and alarm panel POS RTN connector. See Figure 3-11 for correct placement.
Step 10 Use a Phillips-head screwdriver to attach a wire to connect the -48V_A and -48V_B power input connections to each other.
Step 11 Use a Phillips-head screwdriver to attach a wire to connect the -48RTN power return connections to each other.
Step 12 Use a socket driver or a Phillips-head screwdriver to attach the clear cover over the Cisco 6100 power connections.
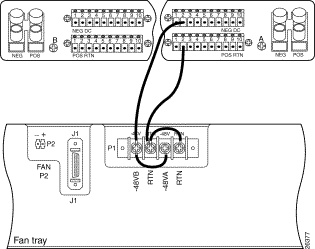
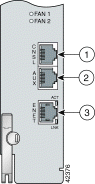
External power is supplied to the system as -48 VDC from the CO power source or rectifier to the fuse and alarm panel. Power is fed from the fuse and alarm panel to the fan tray by a terminal block connector with four dual power connections (P1) located at the top of the fan tray backplane. Figure 3-13 shows the location of the power connection (P1) on the fan tray.
|
Note The fuse and alarm panel and wires are not provided by Cisco. |
|
Note Connect each Cisco 6100 with NI-2 system component to a separate fuse. Do not power the components
in the rack by chaining them together. See "Preparing for Installation" for the calculation tables that are necessary to determine the minimum fuse rating for each component that is wired to the fuse and alarm panel. Refer to the label on the back of the fan tray to determine the maximum fuse rating. |
You can wire the power connections from the fuse and alarm panel to the fan tray for either dual- or single-power feed.
Complete the following steps to attach the fan tray power connections to the fuse and alarm panel for a dual-power feed:
Step 2 Measure enough wire (14 to 18 AWG copper solid or stranded wire) to connect each of the fan tray power connections to the fuse and alarm panel.
Figure 3-14 shows the power connections from the fan tray to the fuse and alarm panel for a dual-power feed.
Step 3 Use a wire stripper to remove the casing from both ends of the wires.
Step 4 Use a Phillips-head screwdriver to attach a wire to the -48VA power input connection on the fan tray (P1).
Step 5 Attach the wire to the fuse and alarm panel NEG DC connector. See Figure 3-14 for correct placement.
Step 6 Use a Phillips-head screwdriver to attach a wire to the -48VB power input connection on the fan tray (P1).
Step 7 Attach the wire to the fuse and alarm panel NEG DC connector. See Figure 3-14 for correct placement.
Step 8 Use a Phillips-head screwdriver to attach a wire to an RTN power return connection on the fan tray (P1).
Step 9 Attach the wire to a fuse and alarm panel POS RTN connector.
Step 10 Repeat Steps 8 and 9 for the remaining RTN power return connection.
Step 11 Use a socket driver or a Phillips-head screwdriver to attach the clear cover over the fan tray power connections.
Complete the following steps to attach the fan tray power connections to the fuse and alarm panel for a single-power feed:
Step 2 Measure enough wire (14 to 18 AWG copper solid or stranded wire) to connect each of the fan tray power connections to the fuse and alarm panel.
Figure 3-15 shows the power connections from the fan tray to the fuse and alarm panel for a single-power feed.
Step 3 Use a wire stripper to remove the casing from both ends of the wires.
Step 4 Use a Phillips-head screwdriver to attach a wire to the -48VA power input connection on the fan tray (P1).
Step 5 Attach the wire to the fuse and alarm panel NEG DC connector.
Step 6 Use a Phillips-head screwdriver to attach a wire to an RTN power return connection on the fan tray (P1). See Figure 3-15 for correct placement.
Step 7 Attach the wire to the fuse and alarm panel POS RTN connector. See Figure 3-15 for correct placement.
Step 8 Use a Phillips-head screwdriver to attach a wire to connect the -48VA and -48VB power input connections to each other.
Step 9 Use a Phillips-head screwdriver to attach a wire to connect the RTN power return connections to each other.
Step 10 Use a socket driver or a Phillips-head screwdriver to attach the clear cover over the fan tray power connections.
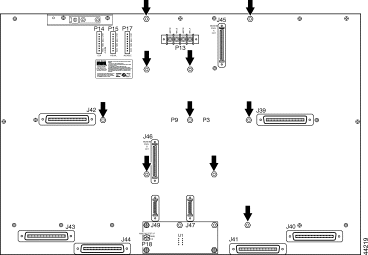
The Cisco 6100 chassis should ship with the system I/O card already installed on the chassis backplane. The system I/O card is attached to chassis connectors P3 and P9, two 2-mm hard metric (HM) module connectors.
If the system I/O card is missing from the Cisco 6100, complete the following steps to install it on the chassis backplane:
Step 2 Use a one-quarter inch socket driver or wrench to screw ten standoff screws into the locations formerly occupied by ten of the twelve screws that you removed in Step 1. Tighten the standoff screws using the one-quarter inch socket driver or wrench. See Figure 3-17 for standoff screw location.
|
Caution Be careful when you remove the screws and reinsert the standoff screws into the screw holes on the backplane so that the backplane circuitry does not become damaged. |
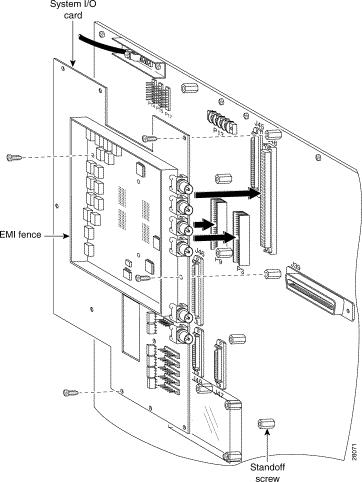
Step 3 Hold the system I/O card vertically and align the holes on the system I/O card over the twelve standoff screws, as shown in Figure 3-18.
Step 4 Carefully press the system I/O card onto the Cisco 6100 connectors P3 and P9 on the chassis backplane until the system I/O card is in place and against the standoff screws.
Step 5 Use a Phillips-head screwdriver and four backplane screws to attach the system I/O card to the standoff screws, as shown in Figure 3-18.
Step 6 Use a Phillips-head screwdriver and two backplane screws to attach the EMI cover bracket, as shown in Figure 3-19.
Step 7 Attach the EMI cover on the EMI fence, as shown in Figure 3-19.
|
Caution Be careful not to bend the tabs on the EMI cover when you install the cover on the EMI fence. |
Step 8 Verify that no EMI cover tabs are outside the EMI fence.
Step 9 Use a Phillips-head screwdriver and a screw to attach the EMI cover to the EMI cover bracket, as shown in Figure 3-19.
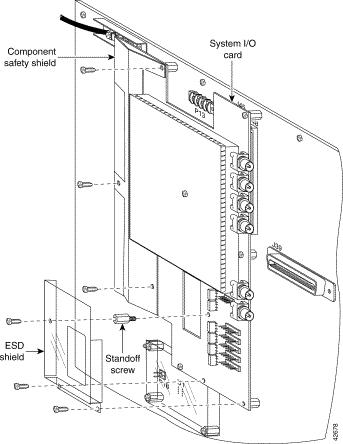
Step 10 Use a Phillips-head screwdriver and three backplane screws to attach the safety shield to the left side of the system I/O card, as shown in Figure 3-20. The backplane screws will screw into the existing standoff screws on the backplane.
Step 11 Use a one-quarter inch socket driver or wrench to screw a standoff screw between relays K4 and K5, as shown in Figure 3-20. Tighten the standoff screws using the one-quarter inch socket driver or wrench.
Step 12 Place the ESD shield above the standoff screw that you installed in Step 10 so that the hole in the shield aligns with the standoff screw, as shown in Figure 3-20.
Step 13 Use a Phillips-head screwdriver and three backplane screws to attach the plastic ESD shield to the system I/O card (see Figure 3-20).
Complete the following steps to connect the fan tray alarm cable:
Step 2 Attach the P2 connector of the same fan tray alarm cable to connector P4 on the system I/O card, as shown in Figure 3-21.
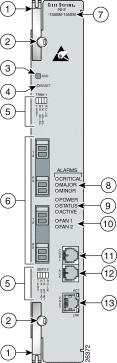
Five rows of wire-wrap pins are located on the right side of the system I/O card. These pins support the following alarms:
One NI-2 card in the Cisco 6100 chassis manages the alarms that are generated by the wire-wrap pins (P1 through P5). An alarm cutoff (ACO) switch, located on the NI-2 card faceplate, shuts off the audible alarms.
Figure 3-22 shows the location of the wire-wrap pins on the system I/O card.
Table 3-3 maps the wire-wrap pins to the alarms that are supported by the NI-2 card through the Cisco 6100 chassis backplane.
| PIN No. | Header P1 | Header P2 | Header P3 | Header P41 | Header P5 |
|---|---|---|---|---|---|
| 1Header P4 is used for the fan tray alarm.
2AUD = audible. 3CRIT = critical. 4CO = common. 5MIN = minimum. 6VIS = visual. 7RX_BITS = receive building-integrated timing source. 8NO = normally open. 9MAJ = major. 10NC = normally closed. 11The ACO switch is located on the faceplate of the NI-2 card. This switch turns off the audible alarms that are generated by the system software. 12GND = ground. |
The following sections detail the cabling procedures to connect the POTS splitter to the MDF. You can use one of the following POTS splitters:
Complete the following steps to connect the Cisco 6120 to the MDF:
Step 2 Connect the voice lines by connectors (J7 to J10) to the MDF for distribution to the Public Switched Telephone Network (PSTN). Figure 3-23 shows the connectors used to link the Cisco 6120 to the Class 5 switch (through the MDF).
|
Note See the "Direct Connect with a POTS Splitter Configuration Port Mapping Tables" section for port mapping information. |
Use the cables that are described in the "POTS Splitter to MDF Cables" section to cable the third-party POTS splitter to the MDF. Refer to the appropriate vendor documentation for cabling procedures for the third-party POTS splitter.
If the Cisco 6100 ships with any line cards installed, complete the following steps to pull the line cards away from the chassis backplane connection:
|
Caution If the power connections are improperly connected and power is applied while the line cards are installed, the line cards and chassis could be damaged. |
Use a flat-head screwdriver to move the locking tab from the locked to the unlocked position. Be sure to turn the locking tab so that it does not overlap the 4xflexis, as shown in Figure 3-24.
Step 2 Lift up on the ejector tab of each line card. This action disconnects the line card from the backplane.
Step 3 Carefully slide the line card toward you and away from the backplane connection.
Step 4 Repeat Steps 1 through 3 for each 4xflexi. Repeat Step 2 and Step 3 for the blank faceplates in the Cisco 6100 chassis.
Set all DIP switches on SW1 and SW2 to the OFF position (Figure 3-25). The dip switches are located in the lower left corner of the backplane, as shown in Figure 1-5.
|
Warning Systems using a Cisco 6100 chassis must connect to the network through a POTS splitter. |
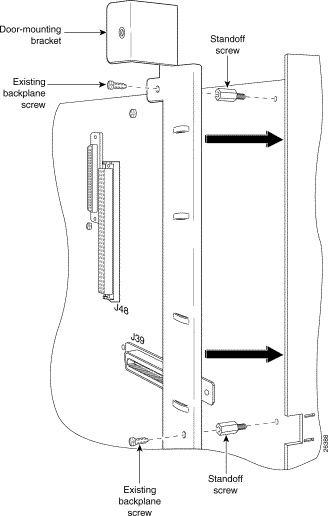
Complete the following steps to install the optional rear cover:
Three screws are located on the right of the chassis, and three are located on the left. See Figure 3-26 for the location of the screws. Keep the backplane screws. They will be used when you install the cover-mounting brackets.
Step 2 Install the six standoff screws in the locations formerly occupied by the six screws that you removed in Step 1. Use a one-quarter inch socket driver or wrench to tighten the standoff screws.
Step 3 Face the rear of the chassis and install the cover-mounting bracket on the right side of the chassis. Place the bracket over the standoff screws. Use three of the screws that you removed in Step 1 to fasten the cover-mounting bracket to the chassis. (See Figure 3-27.)
Step 4 Install the cover-mounting bracket (with the rear cover attached) on the left side of the chassis. Place the bracket (with rear cover) over the standoff screws. Use three of the screws that you removed in Step 1 to fasten the cover-mounting bracket (with rear cover) to the chassis.
Step 5 Use the tie wraps provided in the accessory kit to attach cables to the cover-mounting bracket loops, as necessary.
Complete the following steps to apply power to the Cisco 6100 with NI-2 system:
Step 2 Apply power to the system with one of the following methods:
|
Caution If the power connections are improperly connected and power is applied while the cards are installed, the cards and chassis could be damaged. |
Step 3 Verify that the fuse calculation for the Cisco 6100 with NI-2 system is correct. See Table 2-4 for a fuse calculation table.
Step 4 Verify that the power connections from the Cisco 6100 to the fuse and alarm panel are wired as shown in Figure 3-10 or Figure 3-11.
Step 5 Verify that the power connections from the fan tray to the fuse and alarm panel are wired as shown in Figure 3-14 or Figure 3-15.
Step 6 Check the polarity of the -48 VDC connections to each chassis by attaching a voltmeter with the minus lead on -48RTN and the plus lead on -48V_A or -48V_B. Ensure that the meter reads between -36 VDC and -60 VDC. If your voltmeter shows a positive voltage, the power inputs might be reversed. If the voltmeter shows a negative voltage that is out of the -36 VDC to -60 VDC range, check the power supply for failure or check for a blown fuse in the fuse and alarm panel.
Verify that the fan modules are operational by locating the LED on the front of each fan module. If the LED is
The fan modules should be operational before you install the line cards.
|
Caution It is important that the Cisco 6100 cooling fans run continuously. |
|
Caution Proper ESD protection is required each time you handle Cisco DSLAM equipment. Installation and maintenance personnel should be properly grounded using ground straps to eliminate the risk of ESD damage to the equipment. Cards are subject to ESD damage each time they are removed from the chassis. |
|
Caution Installing the cards in the chassis with the power leads reversed can damage the cards. |
|
Warning The power supply circuitry for the Cisco DSLAM equipment can constitute an energy hazard. Before you install or replace the equipment, remove all jewelry (including rings, necklaces, and watches). Metal objects can come into contact with exposed power supply wiring or circuitry inside the DSLAM equipment. This could cause the metal objects to heat up and cause serious burns or weld the metal object to the equipment. |
|
Warning Do not reach into a vacant slot or chassis while you install or remove a card or a fan. Exposed circuitry could constitute an energy hazard. |
|
Note All cards must be fully seated in the chassis. A push on the faceplate of each card is required for the card to be fully seated. |
Complete the following steps to install the NI-2 card in the Cisco 6100. It is important that you accomplish each step completely before moving on to the next step.
Step 2 Verify that slots 10 and 11 of the Cisco 6100 chassis have no bent pins.
Step 3 Vertically align the card edge with the card guides at the top and bottom of slot 10 on the Cisco 6100.
Step 4 Lift up on the ejector tabs and gently apply pressure to the bottom of the faceplate while pushing the card into the slot.
Step 5 Push on the faceplate of each card to fully seat the card.
Step 6 Press down on the ejector tabs to secure the card and connect it to the backplane.
Step 7 Lock both NI-2 card locking tabs.
Use a flat-head screwdriver to turn the locking tab so that it overlaps the NI-2 card to prevent inadvertent dislodging, as shown in Figure 3-28.
Step 8 Perform a software update if the STATUS LEDs on the NI-2 card is flashing.
Refer to the Configuration Guide for Cisco DSLAMs with NI-2 for software upgrade procedures.
Complete the following steps to install a jumper card in slot 12 of the Cisco 6100 chassis:
Step 2 Lift up on the ejector tab and gently apply pressure to the bottom of the faceplate while pushing the jumper card into the slot.
Step 3 Push on the faceplate to fully seat the jumper card.
Step 4 Press down on the ejector tab to secure the faceplate.
|
Caution Proper ESD protection is required each time you handle Cisco DSLAM equipment. Installation and maintenance personnel should be properly grounded using ground straps to eliminate the risk of ESD damage to the equipment. Cards are subject to ESD damage each time they are removed from the chassis. |
If you pulled the line cards away from the Cisco 6100 chassis backplane in the "Pull All Line Cards Away" section, reseat the line cards to verify the power connection.
Complete the following steps to reseat all of the line cards. It is important that you accomplish each step completely before moving on to the next step.
|
Note All line cards must be fully seated in the chassis. A push on the faceplate of each line card is required for the line card to be fully seated. |
a. Lift up on the ejector tab and gently apply pressure to the bottom of the faceplate while pushing the line card into the slot.
b. Push on the faceplate of each line card to fully seat the line card.
c. Press down on the ejector tab to secure the line card and connect it to the backplane.
Use a flat-head screwdriver to turn the locking tab so that it overlaps the 4xflexi to prevent inadvertent dislodging. Figure 3-24 shows how to position the locking tab.
Step 2 Verify that the STATUS LEDs on all line cards are solid green (where applicable).
This self-test procedure takes several minutes. If the STATUS LEDs are not green after the self-test, see "Troubleshooting," for troubleshooting procedures.
Step 3 Perform a software update if the STATUS LEDs on the 4xflexis are flashing.
Refer to the Configuration Guide for Cisco DSLAMs with NI-2 for software upgrade procedures.
|
Note Blank faceplates should occupy any empty slots in the Cisco 6100. The blank faceplate installation is similar to the line card installation. |
|
Caution Proper ESD protection is required each time you handle Cisco DSLAM equipment. Installation and maintenance personnel should be properly grounded using ground straps to eliminate the risk of ESD damage to the equipment. Cards are subject to ESD damage each time they are removed from the chassis. |
If the Cisco 6100 ships without any line cards installed in the chassis, install the Cisco 6100 with NI-2 system cards in the following order to verify the power connection.
|
Caution Installing the cards in the chassis with the power leads reversed can damage the cards. |
|
Warning The power supply circuitry for the Cisco DSLAM equipment can constitute an energy hazard. Before you install or replace the equipment, remove all jewelry (including rings, necklaces, and watches). Metal objects can come into contact with exposed power supply wiring or circuitry inside the DSLAM equipment. This could cause the metal objects to heat up and cause serious burns or weld the metal object to the equipment. |
|
Warning Do not reach into a vacant slot or chassis while you install or remove a card or a fan module. Exposed circuitry could constitute an energy hazard. |
|
Note All cards must be fully seated in the chassis. A push on the faceplate of each card is required for the card to be fully seated. |
To install all of the cards, complete the following steps. It is important that you accomplish each step completely before moving on to the next step.
a. Vertically align the line card edge with the guides at the top and bottom of slot 1 on the Cisco 6100.
b. Lift up on the ejector tab and gently apply pressure to the bottom of the faceplate while pushing the line card into the slot.
c. Push on the faceplate of each line card to fully seat the line card.
d. Press down on the ejector tab to secure the line card and connect it to the backplane.
Use a flat-head screwdriver to turn the locking tab so that it overlaps the 4xflexi to prevent inadvertent dislodging. Figure 3-24 shows how to position the locking tab.
The 4xflexis are installed in slots 1 through 8, 13 through 28, and 31 through 38.
Step 2 Install the POTS splitter cards in the Cisco 6120.
a. Vertically align the card edge with the guides at the top and bottom of slot 1 on the Cisco 6120.
b. Lift up on the ejector tab and gently apply pressure to the bottom of the faceplate while pushing the card into the slot.
c. Push on the faceplate of each card to fully seat the card.
d. Press down on the ejector tab to secure the card and connect it to the backplane.
e. Install the remaining POTS cards using the same procedure.
The POTS cards are installed in slots 1 through 10 and 13 through 22 of the Cisco 6120.
|
Note Refer to the appropriate vendor documentation for POTS splitter card installation procedures for the third-party POTS splitter. |
Step 3 Verify that the STATUS LEDs on all line cards are solid green (where applicable).
This self-test procedure takes several minutes. If the STATUS LEDs are not green after the self-test, see "Troubleshooting," for troubleshooting procedures.
Step 4 Perform a software update if the STATUS LEDs on the 4xflexis are flashing.
Refer to the Configuration Guide for Cisco DSLAMs with NI-2 for software upgrade procedures.
|
Note Blank faceplates should occupy any empty slots in the Cisco 6100. The blank faceplate installation is similar to the line card installation. |
This section provides installation procedures for the DS3 and OC-3c network connections.
Complete the following steps to connect the DS3/2DS3 NI-2 card to the network:
The DS3/2DS3 NI-2 card connections are on the system I/O card, which is located on the backplane of the Cisco 6100 chassis. These connections attach to the ATM switch. Two 75-ohm DS3 Bayonet-Neill-Concelman (BNC) connectors are provided for DS3 transmit (J14) and receive (J12). See Figure 3-29 for the location of the DS3 BNC connectors.
Step 2 Attach one end of a coaxial cable (type 734A, type 735A, or equivalent) to the transmit DS3 BNC connector (J14) for the system I/O card on the chassis backplane.
Step 3 Attach the end of the cable that you used in Step 2, which originates at the transmit DS3 BNC connector, to the ATM switch.
Step 4 Attach one end of a coaxial cable (type 734A, type 735A, or equivalent) to the receive DS3 BNC connector (J12) for the system I/O card on the Cisco 6100 backplane.
Step 5 Attach the end of the cable that you used in Step 4, which originates at the receive DS3 BNC connector, to the ATM switch.
Complete the following steps to connect the OC-3c/OC-3c NI-2 card to the network:
|
Warning Do not stare into the beam or view it directly with optical instruments. |
Step 2 Pull the OC-3c/OC-3c NI-2 card transmit and receive fiber-optic cables from the ATM switch through the 1 RU of space between the fan tray and the POTS splitter.
Step 3 Attach the receive cable from the ATM switch to the transmit connector in the inset on the faceplate of the OC-3c/OC-3c NI-2 card (trunk 1 interface connector TX). See Figure 3-30 for the OC-3c network interface connection location.
The transmit connector is the one closest to the top of the faceplate. The receive connector is closest to the bottom of the faceplate. The connector IDs are silkscreened inside the inset.
Step 4 Attach the transmit cable from the ATM switch to the receive connector in the inset on the faceplate of the OC-3c/OC-3c NI-2 card (trunk 1 interface connector RX). See Figure 3-30 for the OC-3c network interface connection location.
Step 5 Allow enough slack in the cable so that the fan tray can be opened and the fans can be maintained.
Step 6 Coil the fiber loosely within the 1 RU of space to take out slack.
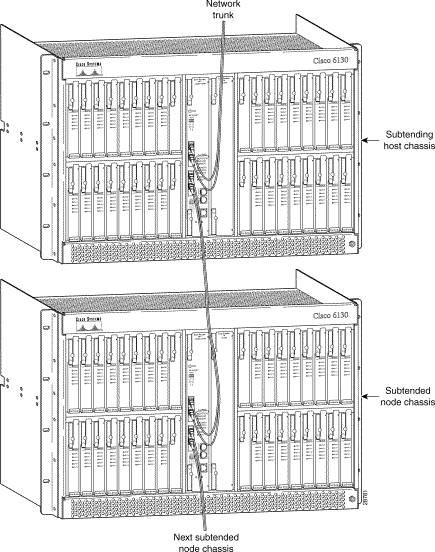
If you are installing a subtended network with subtended node chassis to a subtending host chassis, complete the steps in the following sections. The following sections provide installation procedures for the DS3 and OC-3c subtended network configuration.
If you are not installing a subtended network, go to the "Connect the Software Management System to the NI-2 Card" section.
|
Note For information on a subtended network configuration, see the "Subtended Network Configuration" section on. |
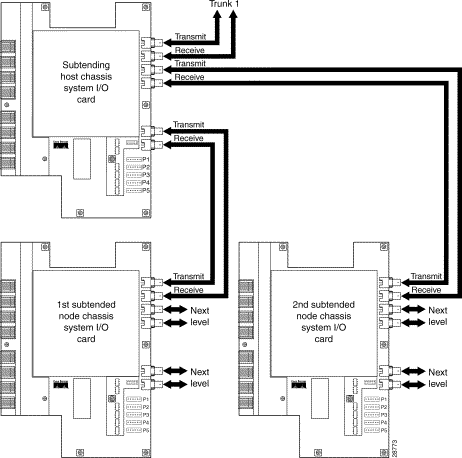
Coaxial connections for DS3 cabling are located on the system I/O card. The transmit and receive DS3 BNC connectors on the subtending host chassis system I/O card are connected to the transmit and receive DS3 BNC connectors on the subtended node chassis system I/O card.
|
Note The system I/O card BNC cables are not provided by Cisco. |
Complete the following steps to cable the system I/O card for subtending:
Step 2 On the first subtended node chassis backplane, attach the end of the BNC cable used in Step 1 to the receive DS3 BNC connector (J12) on the system I/O card.
Step 3 On the subtending host chassis backplane, attach one end of a BNC cable to the receive DS3 BNC connector (J8) on the system I/O card.
Step 4 On the first subtended node chassis backplane, attach the end of the BNC cable used in Step 3 to the transmit DS3 BNC connector (J14) on the system I/O card.
Step 5 On the subtending host chassis backplane, attach one end of a BNC cable to the transmit DS3 BNC connector (J6) on the system I/O card.
Step 6 On the second subtended node chassis backplane, attach the end of the BNC cable used in Step 5 to the receive DS3 BNC connector (J12) on the system I/O card.
Step 7 On the subtending host chassis backplane, attach one end of a BNC cable to the receive DS3 BNC connector (J4) on the system I/O card.
Step 8 On the second subtended node chassis backplane, attach the end of the BNC cable used in Step 7 to the transmit DS3 BNC connector (J14) on the system I/O card.
Figure 3-31 shows the cabling for a DS3 subtending network configuration.
For OC-3c subtending, the connections are made from the front of the subtending host chassis and the subtended node chassis. To cable the Cisco 6100 with NI-2 system for OC-3c subtending, complete the following steps:
Step 2 Attach an OC-3c fiber-optic cable to the transmit (TX) subtend 2 interface connector in the inset on the faceplate of the OC-3c/OC-3c NI-2 card in the subtending host chassis.
Step 3 Attach the other end of the cable that you used in Step 2 to the receive (RX) trunk 1 interface connector in the inset on the faceplate of the OC-3c/OC-3c NI-2 card in the subtended node chassis.
Step 4 Attach an OC-3c fiber-optic cable to the receive (RX) subtend 2 interface connector in the inset on the faceplate of the OC-3c/OC-3c NI-2 card in the subtending host chassis.
Step 5 Attach the other end of the cable that you used in Step 4 to the transmit (TX) trunk 1 interface connector in the inset on the faceplate of the OC-3c/OC-3c NI-2 card in the subtended node chassis.
Figure 3-32 shows the subtending connections between two Cisco 6100 with NI-2 system chassis.
Connect both the 10BaseT RJ-45 port on the NI-2 card (ENET) and the Sun SPARCstation running the CDM management application to an Ethernet so that the Cisco 6100 and the management station can communicate. Figure 3-33 shows where to connect the Ethernet cable.
|
Warning The ports labeled "ENET," "CNSL," and "AUX" are safety extra-low voltage (SELV) circuits. SELV circuits should be connected only to other SELV circuits. Because the DSL circuits are treated like telephone-network voltage, avoid connecting the SELV circuit to the telephone network voltage (TNV) circuits. |
 |
TimeSaver Cisco recommends that you label each data cable at both ends to identify its destination. |
Connect a VT100-compatible terminal to the system console port on the NI-2 card (CNSL). Connect the terminal to a power source and set it up using the values that are shown in Table 3-4. Figure 3-33 shows where to connect the console cable.
|
Warning The ports labeled "ENET," "CNSL," and "AUX" are SELV circuits. SELV circuits should be connected only to other SELV circuits. Because the DSL circuits are treated like telephone-network voltage, avoid connecting the SELV circuit to the TNV circuits. |
|
Note This step is optional. |
Connect a terminal, a modem, or another serial device to the RJ-45 auxiliary port on the NI-2 card (AUX). Figure 3-33 shows where to connect the auxiliary cable.
|
Warning The ports labeled "ENET," "CNSL," and "AUX" are SELV circuits. SELV circuits should be connected only to other SELV circuits. Because the DSL circuits are treated like telephone-network voltage, avoid connecting the SELV circuit to the TNV circuits. |
|
TimeSaver Cisco recommends that you label each data cable at both ends to identify its destination. |
Verify that the Cisco 6100 front cover is attached to the chassis and closed (see Figure 3-34).
Complete the following steps to close the optional rear cover:
Step 2 Release the latches after the rear cover is in place.
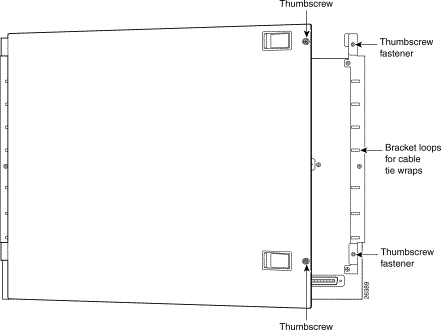
Step 3 Align the two thumbscrews that are located on the rear cover with two thumbscrew fasteners on the bracket (see Figure 3-36). Tighten the thumbscrews to secure the rear cover.
When you turn on the Cisco 6100 for the first time, an interactive dialog called the System Configuration Dialog appears on the console screen. The System Configuration Dialog guides you through the initial configuration process. (You can run the dialog at any time by entering the setup command in privileged EXEC mode.)
When you complete the dialog, the system displays the configuration command script that you have created. It then offers you three options:
If you enter 2, the configuration is saved and used. If you answer 0 or 1, the configuration you created is not saved. Enter 1 if you wish to discard the configuration and restart the System Configuration Dialog.
Complete these steps before you run the System Configuration Dialog:
Step 2 If you plan to configure in-band management, also determine the IP address for the ATM interface that will be used for in-band management (ATM0/0).
Step 3 Find out what the password strategy is for your environment. The System Configuration Dialog prompts you for three passwords, plus an SNMP community string. The three required password types are enable secret, enable, and virtual terminal.
Step 4 Choose a name for the Cisco 6100. (This step is optional.)
When you power up a Cisco 6100 for the first time, you are offered the option of running the System Configuration Dialog. The System Configuration Dialog offers two configuration options: basic management setup and extended setup.
An example of the use of each option follows the "Interface Numbering" section. In each example, an arrow marks the point in the dialog where basic management setup and extended setup diverge.
The System Configuration Dialog and the command line interface use the following interface numbering scheme:
This is the basic management setup example:
This is the extended setup example:
You have completed the installation process for the Cisco 6100.
![]()
![]()
![]()
![]()
![]()
![]()
![]()
![]()
Posted: Tue Jan 28 06:31:58 PST 2003
All contents are Copyright © 1992--2002 Cisco Systems, Inc. All rights reserved.
Important Notices and Privacy Statement.