|
|

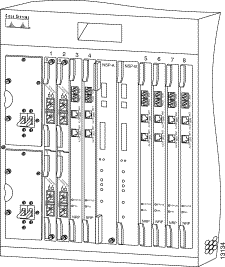
The Cisco 6400 contains two slots for node switch processors (NSPs) and eight slots for node line cards (NLCs) or node route processors (NRPs), as shown in Figure 5-1. Each slot can contain one full-height or two half-height cards. NRPs and NSPs support enhanced high system availability (EHSA) redundancy, and NLCs support SONET automatic protection switching (APS) redundancy at the port-level.
Redundancy can be configured between:
This chapter contains the following sections:
When configuring redundancy between two NRPs or two NSPs, the two cards must have identical hardware configurations. Check each card in a redundant pair, and make sure they share the following parameters:
If redundancy is configured between two cards with different amounts of memory or disk capacity, the Cisco 6400 will display a warning message. Depending on which card is identified as the primary card, the Cisco 6400 will perform the following actions:
 |
Note This approach allows for memory upgrades on a redundant pair of NRPs or NSPs. For information about performing memory upgrades, see the Cisco 6400 UAC FRU Installation and Replacement document. |
Both NSP slots are numbered slot 0 for consistent interface identification between primary and secondary devices. Nevertheless, the left NSP slot is labeled slot A and the right slot is labeled slot B to distinguish between the two slots, when required.
You can use EHSA redundancy for simple hardware backup or for software error protection. Hardware backup protects against NSP card failure because you configure both NSP cards with the same software image and configuration information. Additionally, you configure the system to automatically synchronize configuration information on both cards when changes occur.
Software error protection protects against critical Cisco IOS software errors in a particular release because you configure the NSP cards with different software images, but use the same configuration. If you are using new or experimental Cisco IOS software, consider using the software error protection method.
If two NSPs are installed in the Cisco 6400, they automatically act as a redundant pair. No configuration is necessary.
To verify NSP redundancy, use the show redundancy EXEC command:
To ensure that the configuration is consistent between redundant NSPs or NRPs, you can configure automatic synchronization between the two devices. You have the option of synchronizing just the startup configuration, the boot variables, the configuration register, or all three configurations (standard). When configuration is complete, you can disable autoconfiguration using the no command.
To automatically synchronize the configurations between redundant NSPs, complete the following steps beginning in global configuration mode:
| Command | Purpose | |
|---|---|---|
| Step 1 | ||
| Step 2 | ||
| Step 3 |
Boot variables are ROM monitor (ROMMON) environment variables used to control the booting process. The configuration register, stored in NVRAM, contains startup time parameters for the system. For more information about the booting process, see the Cisco IOS Configuration Fundamentals Configuration Guide.
In the following example, the configuration is synchronized between redundant NSPs:
To verify that NVRAM and sec-NVRAM contain identical startup configurations, compare the output of the following command entries:
The displayed output should be identical.
To erase the startup configuration on redundant NSPs, complete the following steps beginning in EXEC mode:
| Command | Purpose | |
|---|---|---|
| Step 1 | ||
| Step 2 |
|
Note If you only erase the startup configuration on the primary NSP, and the primary and secondary NSPs reverse roles, the new primary NSP will use the old startup configuration. |
To verify that you erased the startup configuration on redundant NSPs, use the dir nvram: and dir sec-nvram: EXEC commands and check that the startup-config size is zero:
You can also use the show startup EXEC command and make sure that a valid configuration file does not appear:
Introduced in Cisco IOS Release 12.1(5)DB, the PCMCIA disk mirroring enables automatic data synchronization between the PCMCIA disks of two redundant NSPs. Disk synchronization is the act of copying data from one disk to another.
Disk mirroring provides full NSP redundancy for the NRP-2, which depends on the NSP for image and file storage. Without disk mirroring, there is no guarantee of NRP-2 support after an NSP failover (user intervention might be required to restore the NRP2 state to that prior to the failover). With disk mirroring enabled, NRP-2 has continued support from the NSP, except during the relatively short NSP failover period.
When PCMCIA disk mirroring is enabled, as it is by default, disk synchronization is initiated each time that:
|
Note PCMCIA disk mirroring is not supported in Cisco IOS Release 12.1(4)DB and earlier releases. Use the dir, mkdir, and copy EXEC commands to manually copy files from the primary NSP's PCMCIA disks to the secondary NSP's PCMCIA disks. |
PCMCIA disk mirroring also introduced new labels for pairs of mirrored disks:
The mir-disk0 and mir-disk1 labels enable you to perform any integrated file system (IFS) operation (such as copy, rename, and delete) on the same file on both the primary and secondary disks.
You can, however, initiate disk synchronization between disk0: and disk1: on the active NSP, even in a single-NSP system.
Disk mirroring is enabled by default. To disable disk mirroring, complete the following steps beginning in global configuration mode:
| Command | Purpose | |
|---|---|---|
| Step 1 | ||
| Step 2 | ||
| Step 3 |
In the following example, PCMCIA disk mirroring is disabled:
To verify that disk mirroring is disabled, use the show redundancy sync-status EXEC command:
If disk mirroring is disabled, and you want to re-enable it, complete the following steps beginning in global configuration mode:
| Command | Purpose | |
|---|---|---|
| Step 1 | ||
| Step 2 | ||
| Step 3 |
In the following example, PCMCIA disk mirroring is enabled:
To verify that disk mirroring is enabled, complete one or both of the following steps:
Step 2 Use the dir command to verify matching file names and file sizes on the mirrored PCMCIA disks.
By default, when performing disk synchronization (either through disk mirroring or user initiation), the system compares files between the PCMCIA disks. The system does not copy files with matching file names, sizes, and time stamps. You can, however specify a file size threshold below which files are copied without comparison.
To specify the file size threshold, complete the following steps beginning in global configuration mode:
| Command | Purpose | |
|---|---|---|
| Step 1 | ||
| Step 2 | ||
| Step 3 | Specifies the file size threshold below which files are copied without comparison. |
In the following example, PCMCIA disk mirroring is enabled with a specified file size threshold of 2 MB:
To verify the file size threshold, use the show redundancy sync-status EXEC command, and check the Mirror Threshold field:
Instead of specifying a file size threshold below which files are copied without comparison, you can choose to copy all files blindly (without comparing sizes or time stamps).
To copy all files blindly, complete the following steps beginning in global configuration mode:
| Command | Purpose | |
|---|---|---|
| Step 1 | ||
| Step 2 | ||
| Step 3 | Specifies to copy all files blindly when performing disk synchronization. |
In the following example, PCMCIA disk mirroring is enabled and set to copy all files blindly:
To verify blind copying, use the show redundancy sync-status EXEC command to check the configured synchronization type. The first line displayed should end with "full sync" instead of "proper sync."
Disk synchronization copies the data from one PCMCIA disk to another. To initiate disk synchronization, use one of the following commands in global configuration mode:
| 1Optional all keyword specifies to copy all files blindly (without comparing file sizes and time stamps).
2disk0: = PCMCIA disk in NSP disk slot 0 3disk1: = PCMCIA disk in NSP disk slot 1 |
To verify disk synchronization, complete one or both of the following steps:
Step 2 Use the dir command to verify matching file names and file sizes on the mirrored PCMCIA disks.
When disk mirroring is enabled and disk synchronization is complete, avoid performing IFS operations (such as copy, rename, and delete) using the labels disk0:, disk1:, sec-disk0:, or sec-disk1:. Modifying a file using these labels can break disk synchronization without affecting the output of the show redundancy sync-status EXEC command. In other words, the show redundancy sync-status command output can declare disks to be "in sync," even after disk synchronization is broken using the improper labels.
Because the dir command does not modify any files, you can use the dir command with the disk0:, disk1:, sec-disk0:, or sec-disk1: labels at any time to check disk contents, as shown in the previous sections.
Cisco recommends that you perform mirrored IFS operations by using the labels mir-disk0: and mir-disk1:. These new labels target the PCMCIA disks in the specified slot of both NSPs, and ensure that the files affected by the IFS operations are still mirrored.
|
Note If you want to save a file on only one PCMCIA disk and not have that file mirrored, use the [sec-]disk0:/non-mirror or [sec-]disk1:/non-mirror directory. |
The following examples show mirrored IFS operations:
The following example shows an intentional nonmirrored IFS operation:
Use the show redundancy sync-status EXEC command to display all status information on disk mirroring and synchronization.
Use the debug disk-mirror EXEC command to display debug messages for IFS call events, disk write events, and disk synchronization events.
For simple hardware backup, the redundant NSPs must have the same system image.To ensure that the redundant NSPs run the same image, complete the following steps:
Step 2 Use the dir {bootflash: | disk0: | disk1: | sec-bootflash: | sec-disk0: | sec-disk1:} EXEC command to verify the location and version of the primary and secondary NSP software image.
Step 3 If the primary and secondary NSPs contain the same image version in the same location, the NSPs are already configured for hardware backup. Do not proceed to the next step.
Step 4 If the secondary NSP does not contain the same image in the same location, use the delete and squeeze EXEC commands to delete the secondary NSP software image.
Step 5 Copy the primary NSP image to the same location on the secondary NSP.
To verify that the NSP redundancy is configured for hardware backup, use the show bootvar and dir EXEC commands from Step 1 and Step 2. Check that both NSPs use the same system image and store the image in identical locations.
For software error protection, the primary and secondary NSPs should have different system images. Cisco recommends using NSP redundancy for software error protection when you are using new or experimental Cisco IOS software.
To specify different startup images for the primary and secondary NSPs, complete the following steps, beginning in EXEC mode:
Step 2 If necessary, copy the desired system images to the primary and secondary NSPs. Make sure the primary and secondary NSPs use different image versions.
Step 3 From global configuration mode, use the boot system global configuration command to boot the images from the appropriate locations. Enter the image for the primary NSP first.
Step 4 Set the configuration register to load the system image from Flash.
Step 5 Enable automatic synchronization of the redundant NSPs.
Step 6 Save the configuration file to the startup configuration in NVRAM. Because automatic synchronization is enabled, this step saves the boot system commands to both NSP startup configurations.
Step 7 If the primary NSP is not running the correct image, reset both NSPs.
Step 8 If the primary NSP is running the earlier software version, perform a switchover from the current primary to the secondary NSP.
To verify that NSP redundancy is configured for software error protection, use the show bootvar EXEC command. Check that the secondary NSP is up, that the BOOT variables identify different software images, and that all other variables match.
To boot a dual-NSP system from a network server (also called netbooting), the network management interface (Ethernet 0/0/0 on the NSP) must be configured for Dynamic Host Configuration Protocol (DHCP) IP address acquisition. To do this, complete the following steps beginning in global configuration mode:
| Command | Purpose | |
|---|---|---|
| Step 1 | Enables automatic synchronization between the redundant NSPs. |
|
| Step 2 | ||
| Step 3 | Configures the NSP network management interface for DHCP IP address acquisition. |
|
| Step 4 | ||
| Step 5 |
|
Note Make sure the DHCP server is properly set up with appropriate dynamic and static pools of IP addresses. |
In the following example, the NSP network management interface is configured for DHCP IP address acquisition. This allows you to boot redundant NSPs from a network server.
To verify that the NSPs are prepared for netbooting, use the more sec-nvram:startup-config EXEC command. The presence of the correct commands in the secondary startup configuration confirms that both NSPs are configured properly.
For two NRPs to act as a redundant pair, they must be installed in one the following slot pairs:
To configure NRP redundancy, complete the following steps, beginning in global configuration mode:
| Command | Purpose | |
|---|---|---|
| Step 1 | ||
| Step 2 | Configures the two slots as a redundant pair. You need specify only the first slot of the redundant pair. The second slot is assumed to be the adjacent slot. |
In the following example, the NRPs in slots 1 and 2 are configured as a redundant pair.
To verify NRP redundancy, use the show redundancy EXEC command on the NRP:
To erase the startup configuration on redundant NRPs, complete the following steps beginning in EXEC mode:
| Command | Purpose | |
|---|---|---|
| Step 1 | ||
| Step 2 |
|
Note If you erase the startup configuration on the primary NRP only, and the primary and secondary NRPs reverse roles, the new primary NRP will use the old startup configuration. |
To verify that you erased the startup configuration on redundant NRPs, use the dir nvram: and dir sec-nvram: EXEC commands and check that the startup-config size is zero:
You can also use the show startup EXEC command and make sure that a valid configuration file does not appear:
When a node line card (NLC) is configured for redundancy, all ports on that card are automatically configured to operate in redundant mode using SONET automatic protection switching (APS). For more information on SONET APS, see the "SONET APS for NLC Port Redundancy" section.
For two full-height NLCs to act as a redundant pair, they must be installed in one the following slot pairs:
To configure redundant full-height NLCs, complete the following steps beginning in global configuration mode:
| Command | Purpose | |
|---|---|---|
| Step 1 | ||
| Step 2 | Configures the two slots as a redundant pair. You need specify only the first slot of the redundant pair. The second slot is assumed to be the adjacent slot. |
In the following example, the OC-12s in slots 5 and 6 are configured for redundancy:
For two half-height NLCs to act as a redundant pair, they must be installed in one of the following slot/subslot pairs:
To configure redundant half-height NLCs, complete the following steps beginning in global configuration mode:
| Command | Purpose | |
|---|---|---|
| Step 1 | ||
| Step 2 | Configures the two subslots as a redundant pair. You need only specify the first subslot of the redundant pair. The second subslot is assumed to be the adjacent slot. |
In the following example, the OC-3s in subslots 3/0 and 4/0 are configured as a redundant pair:
To verify NLC redundancy, use the show aps EXEC command on the NSP. The show aps command displays the status for all NLCs configured for port redundancy.
SONET automatic protection switching (APS) provides a mechanism to support redundant transmission interfaces (circuits) between SONET devices. Automatic switchover from the working (primary) circuit to the protection (secondary) circuit happens when the working circuit fails or degrades.
The Cisco 6400 supports SONET APS operation that is:
|
Note By default, the NLC in the lower slot number is the working device, and the NLC in the higher slot number is the protection device. |
In the Cisco 6400, a pair of redundant ports is represented as a single interface. APS commands are accepted only for an interface that represents a pair of redundant ports.
For APS operation, the APS mode must be specified for each interface associated with a redundant pair of ports. To enable SONET APS, complete the following steps beginning in global configuration mode:
| Command | Purpose | |
|---|---|---|
| Step 1 | Specifies the interface (that represents a pair of redundant NLC ports). |
|
| Step 2 | Enables SONET APS on the interface. This command must be entered before the other aps commands. |
|
Note SONET APS is enabled by default when you install an NLC in a slot already configured for redundancy. |
If the redundant NLC configuration is disabled by using the no associate slot or no associate subslot redundancy configuration commands, two interface configuration sections are created, one for each port, but all of the APS configuration commands are removed.
In the following example, SONET APS is enabled for ATM interface 1/0/0:
The following table shows example configurations before and after redundancy is turned off:
| Redundancy On | After Redundancy Is Turned Off |
|---|---|
To verify the that SONET APS is enabled or to determine if a switchover has occurred, use the show aps EXEC command or the show controller atm slot/subslot/port command.
In the following example, slot 7 contains the working (primary) card, and slot 8 contains the protection (secondary) card:
In the following example, the OC-3 interface ATM 5/0/0 is not configured for redundancy:
APS priority requests are used to manually control the relationship between two APS ports from the EXEC mode. The APS priority levels, lockout (1), force (2), and manual (5) are defined in the Telcordia GR-253-CORE document.
To set the APS priority requests, use the following commands in EXEC mode:
In the following example, the system is forced to use the protection channel associated with ATM interface 1/0/0:
To verify that you successfully set the APS priority requests, use the show aps EXEC command:
You can configure the APS signal bit error rate (BER) thresholds at which the system announces signal degradation or signal failure.
The aps signal-degrade BER threshold command controls the BER value at which a signal degrade is announced, indicating an unstable or error-prone connection. This BER threshold can be in the range of 10-5 to 10-9, and there is no default threshold.
The aps signal-fail BER threshold command controls the BER value at which a signal failure is announced, indicating a broken connection. This BER threshold can be in the range of 10-3 to 10-5, with a default threshold of 10-3.
To configure the thresholds, complete the following steps beginning in global configuration mode:
| Command | Purpose | |
|---|---|---|
| Step 1 | ||
| Step 2 | Sets the BER threshold value for signal degradation for the interface. |
|
| Step 3 | Sets the BER threshold value for signal failure for the interface. |
The value argument represents the exponent of the BER threshold. For instance, a value of 5 would set the threshold to 10-5.
The following example shows how to set the APS signal degradation and signal failure thresholds for ATM interface 1/0/0:
To display the current BER threshold settings for an interface, use the show interface atm command:
The Cisco 6400 allows you to manually force the primary and secondary devices in a redundant pair to switch roles. This capability can be important for upgrade or debug activities.
To reverse the primary and secondary roles in a redundant pair of NSPs or NRPs, use the following command in EXEC mode:
| Command | Purpose |
|---|---|
Forces the system to switch the current primary and secondary devices of the redundant pair. |
To reverse the primary and secondary roles in a redundant pair of NLCs, use the aps force or aps manual EXEC commands described in the "Setting SONET APS Priority Requests" section.
On the Cisco 6400 it is often useful to reset a card in a particular slot or subslot in a redundant pair. The reset function described here is different from resetting an interface. In general, the hw-module (reset) command simulates card removal and insertion of the specified device. If the specified card is the primary device in a redundant pair, operation will automatically switch to the other card.
To reset a card, use the following command in EXEC mode:
When entered in EXEC mode, this command causes an immediate reset of the device installed in the specified slot or subslot. When a port is reset, all of the input/output hardware associated with the port is reset. If a slot is reset, both of the cards installed in the associated subslots are reset. The main-cpu and sec-cpu options allow you to reset the desired NSP regardless of the one to which you are currently connected.
|
Note The hw-module command is not supported for ports. The command only supports slots and subslots. |
![]()
![]()
![]()
![]()
![]()
![]()
![]()
![]()
Posted: Mon Jun 23 14:24:24 PDT 2003
All contents are Copyright © 1992--2003 Cisco Systems, Inc. All rights reserved.
Important Notices and Privacy Statement.