|
|

This chapter provides tasks and restrictions for Layer 2 tunnel protocol (L2TP) features supported by the Cisco 6400 in Cisco IOS Release 12.2(4)B.
This chapter only describes tasks that are specific to the Cisco 6400 and supplements the following documentation:
|
This chapter includes the following sections:
See the "Supported Features" chapter for additional documentation on L2TP features.
Static tunnel service authorization does not support switched virtual channels (SVCs).
When using a RADIUS service profile for tunnel service authorization, the NRP configured as an L2TP tunnel switch must forward all sessions through L2TP tunnels. The L2TP tunnel switch must not terminate any of the sessions.
L2TP Multihop by remote tunnel hostname is not supported in Cisco IOS Release 12.2(4)B3.
L2TP Multihop by domain is supported in Cisco IOS Release 12.2(4)B3 with the following required configuration:
Enter the lcp renegotiation always configuration command on the L2TP network server (LNS) vpdn-group.
The L2TP access concentrator (LAC) acts as one side of an L2TP tunnel endpoint and is a peer to the L2TP network server (LNS). The LAC sits between an LNS and a remote system and forwards packets to and from each. Packets sent from the LAC to the LNS require tunneling with the L2TP protocol, and the connection from the LAC to the remote system is either local or a PPP link.
Enter the following commands to enable VPDN on a LAC by using L2TP beginning in global configuration mode:
The L2TP network server (LNS) is the termination point for an L2TP tunnel and is a peer to the LAC. The LNS is the logical termination point of a PPP session that is being tunneled from the remote system by the LAC. Basic LNS configuration consists of the following tasks:
You can configure the virtual template interface with configuration parameters you want to apply to virtual access interfaces. A virtual template interface is a logical entity configured for a serial interface, is not tied to any physical interface, and is applied dynamically as needed. Virtual access interfaces are cloned from a virtual template interface, used on demand, and then freed when no longer needed.
To configure the LNS to initiate and receive calls, enter the following commands beginning in global configuration mode:
|
To create and configure a virtual template interface, complete the following steps beginning in global configuration mode:
|
Optionally, you can configure other commands for the virtual template interface. For information about configuring virtual template interfaces, see the "Configuring Virtual Template Interfaces" chapter in the "Virtual Templates, Profiles, and Networks" part of the Cisco IOS Dial Technologies Configuration Guide.
 |
Note Before configuring this feature, see the "Restrictions" section. |
The tunnel service authorization enhancements enable the LAC to conduct static or dynamic tunnel service authorization. A static domain name can be configured on the ATM PVC port (directly or through a VC class) to override the domain name supplied by the client. If a static domain name is not configured, the LAC conducts dynamic tunnel service authorization, which includes two steps.
1. Domain Preauthorization—The LAC checks the client-supplied domain name against an authorized list configured on the RADIUS server for each PVC. If successful, the LAC proceeds to tunnel service authorization. If domain preauthorization fails, the LAC attempts PPP authentication/authorization for local termination.
2. Tunnel Service Authorization—The user profile on the RADIUS server provides a list of domains accessible to the user, enabling tunnel service authorization for the client-supplied domain. If successful, the LAC establishes an L2TP tunnel.
The tunnel service authorization enhancements provide the following benefits:
To configure the tunnel service authorization enhancements, complete the following tasks:
To configure the static domain name directly on the PVC, enter the following commands beginning in global configuration mode:
|
The following example shows the static domain names "net1.com" and "net2.com" assigned to PVCs on an ATM interface. All PPP sessions originating from PVC 30/33 are sent to the "net1.com" L2TP tunnel; all PPP sessions originating from PVC 30/34 are sent to the "net2.com" tunnel.
To configure the static domain name on the VC class, enter the following commands beginning in global configuration mode:
|
In the following example, the static domain name "net.com" is assigned to a VC class. The VC class is then assigned to the VCs on an ATM subinterface.
To verify that you successfully configured the static domain name, enter the show running-config EXEC command.
To enable the LAC to perform domain authorization before tunneling, enter the following command in global configuration mode:
Dynamic tunnel service authorization requires additional commands for proper communication with the RADIUS server. See the "Task 3: Configuring Communication with the RADIUS Server" section.
The following example shows the configuration necessary for the LAC to participate in domain preauthorization:
To check that you successfully enabled domain preauthorization, enter the show running-config EXEC command.
To enable the LAC to communicate properly with the RADIUS server for tunnel service authorization, complete following steps beginning in global configuration mode:
|
The following example shows the configuration necessary for the LAC to participate in tunnel service authorization:
To check that you successfully configured the LAC to communicate properly with the RADIUS server for tunnel service authorization, enter the show running-config EXEC command.
To enable domain preauthorization, enter the following configuration in the user profile on the RADIUS server:
|
The following example shows a domain preauthorization RADIUS user profile:
To verify the RADIUS user profile, refer to the user documentation for your RADIUS server.
To enable tunnel service authorization, use the following configuration in the service profile on the RADIUS server:
|
The following example shows a tunnel service authorization RADIUS service profile:
To verify the RADIUS service profile, refer to the user documentation for your RADIUS server.
This feature enables the initiate-to command to limit the number of sessions per L2TP tunnel. Choose one method to configure this feature:
To limit the number of sessions per tunnel without using a RADIUS server, complete the following steps on the NRP-LAC beginning in global configuration mode:
|
In the following example, the LAC initiates up to three tunnels. Each tunnel is limited to 40 sessions.
Step 2 Enter the show vpdn tunnel privileged EXEC command to verify that the number of displayed sessions does not exceed your configured limit.
To use a RADIUS server to limit the number of sessions per tunnel, enter the following Cisco-AVpair attributes in the RADIUS service profile:
This attribute specifies the IP addresses of the LNSs to receive the L2TP connections.
In the following example, the LAC sends the first PPP session through a tunnel to 10.1.1.1, the second PPP session to 10.2.2.2, and the third to 10.3.3.3. The fourth PPP session is sent through the tunnel to 10.1.1.1, and so forth. If the LAC fails to establish a tunnel with any of the IP addresses in the first group, then the LAC attempts to connect to those in the second group (10.4.4.4 and 10.5.5.5).
This attribute specifies the maximum number of sessions in each tunnel to the IP addresses listed with the vpdn:ip-addresses attribute.
|
Note You must enter a space between the final limit entry and the end quotation marks. |
The following example shows a tunnel service authorization RADIUS service profile with the session limiting entry. IP addresses 10.1.1.1 and 10.2.2.2 are assigned priority 1; IP addresses 10.3.3.3 and 10.4.4.4 are assigned priority 2. Tunnels to 10.1.1.1 are limited to 100 sessions, tunnels to 10.2.2.2 are limited to 200 sessions, tunnels to 10.3.3.3 are limited to 300 sessions, and tunnels to 10.4.4.4 are limited to 400 sessions.
To verify the RADIUS service profile, refer to the user documentation for your RADIUS server.
This feature enables sessions that are authorized with different domains to share the same tunnel. Tunnel sharing reduces the number of tunnels required from the LAC. When used with the L2TP Tunnel Switching feature, tunnel sharing also reduces the number of tunnels to an LNS. While improving tunnel management, tunnel sharing helps to reduce the number of tunnel establishment messages that are sent after interface dropouts, reducing dropout recovery time.
Tunnel Sharing configuration consists of the following tasks:
To implement the tunnel sharing feature, complete the following steps on the NRP-LAC beginning in global configuration mode:
|
In the following example, all sessions that are locally authorized through VPDN group 1 are sent through the same tunnel to 10.1.1.1.
Enter the show running-config EXEC command to check that you successfully enabled the tunnel sharing feature.
To implement the tunnel sharing feature, enter the following Cisco-AVpair attributes in the RADIUS service profile:
This attribute specifies the group to which the service belongs. All services with matching group names are considered members of the same VPDN group.
This attribute indicates that the tunnel sharing feature is enabled for the service.
This attribute has no arguments or keywords.
In the following example, both the net1.com and net2.com services are members of the "group1" VPDN group. With tunnel sharing enabled in both service profiles, the sessions for net1.com and net2.com will be combined and sent through the same tunnels.
To verify the RADIUS service profile, refer to the user documentation for your RADIUS server.
|
Note Before configuring this feature, read the "Restrictions" section. |
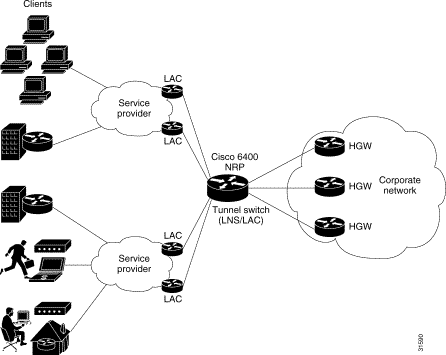
The L2TP Tunnel Switching feature enables the NRP to terminate tunnels from LACs and forward the sessions through new L2TP tunnels selected independently of the client-supplied domains. The NRP as a tunnel switch performs VPDN tunnel authorization based on the ingress tunnel names that are mapped to specified LNSs.
Tunnel switching provides the following benefits:
Figure 2-1 shows an example network topology using the L2TP Tunnel Switching feature.
To configure the L2TP Tunnel Switching feature, complete the following tasks:
|
Note The NRP as a tunnel switch requires at least two VPDN groups: one to handle incoming tunnels from the LAC, and one to create the L2TP tunnels/sessions to the LNS. |
To use the L2TP Tunnel Switching feature, you must first enable VPDN and multihop capabilities by entering the following commands in global configuration mode:
To verify that you enabled VPDN and multihop functionality, enter the show running-config EXEC command.
To terminate the tunnel from the LAC, enter the following commands beginning in global configuration mode:
|
To verify that you successfully configured the tunnel switch to terminate tunnels from the LAC, enter the show running-config EXEC command.
To map the ingress tunnel name to an LNS, complete the following steps beginning in global configuration mode:
|
To verify that you successfully mapped the ingress tunnel name to the LNS, enter the show running-config EXEC command.
To specify how to perform VPDN tunnel authorization searches, enter the following command in global configuration mode:
|
To verify that you successfully configured the tunnel switch to perform VPDN tunnel authorization searches by ingress tunnel name, enter the show running-config EXEC command.
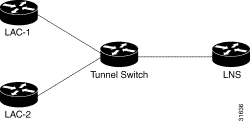
The examples in this section show the configurations necessary for the basic L2TP tunnel switch topology shown in Figure 2-2. In this topology, a tunnel switch terminates tunnels from two LACs and forwards all the sessions through one tunnel to the LNS.
This section provides the following configuration examples:
In the following example, LAC-1 performs tunnel authorization based on domain name and initiates a tunnel to the L2TP tunnel switch:
In the following example, LAC-2 also performs tunnel authorization based on domain name and initiates a tunnel to the L2TP tunnel switch:
In the following example, the NRP is configured as an L2TP tunnel switch. VPDN groups 1 and 2 are used to terminate the tunnels from the LAC. VPDN group 11 is used to initiate the tunnel to the LNS, and it performs tunnel authorization based on the configured ingress tunnel name.
In the following example, the LNS terminates the tunnel from the L2TP tunnel switch:
![]()
![]()
![]()
![]()
![]()
![]()
![]()
![]()
Posted: Thu Jan 29 17:33:12 PST 2004
All contents are Copyright © 1992--2004 Cisco Systems, Inc. All rights reserved.
Important Notices and Privacy Statement.