|
|

April 2, 2001
Product number for replacement kit: 6260-CN-KIT=
This document presents procedures to replace the clinch nut on a Cisco 6260 chassis.
This document describes the following topics:
The Cisco 6260 chassis bezel connects to the clinch nut, a threaded, barrel-shaped insert affixed to the metal chassis tab. The metal chassis tab is located on the front of the Cisco 6260 chassis, between the right fan tray and the right air filter. Figure 1 depicts the metal chassis tab location.

The bezel must be removed from the front of the Cisco 6260 chassis in order to perform routine maintenance on the fan trays, air filters, and power entry modules (PEMs), as shown in Figure 2.
While replacing the bezel, however, overtightening the bezel captive screw into the clinch nut can strip the threads on both the captive screw and the clinch nut, making routine removal of the bezel impossible.
 |
Note In some instances, overtightening the bezel captive screw causes the clinch nut to break free from the metal chassis tab. |

The following tools and equipment are required to replace the Cisco 6260 chassis clinch nut:
 |
Warning Only trained and qualified personnel should be allowed to install, replace, or service this equipment. |
Before working on the equipment, be aware of standard safety guidelines and the hazards involved in working with electrical circuitry to prevent accidents. Adhere to the following cautions and warnings for safe and hazard-free installation.
|
Note To see translations of the warnings that appear in this publication, refer to the Regulatory Compliance and Safety Information for the Cisco 6260 System document that accompanied your Cisco 6260 system. |
 |
Caution Before you start the replacement procedures, read the entire document for important information and safety warnings. |
|
Caution Proper ESD protection is required whenever you handle Cisco digital subscriber line access multiplexer (DSLAM) equipment. Installation and maintenance personnel should be properly grounded using ground straps to eliminate the risk of ESD damage to the equipment. Modules are subject to ESD damage whenever they are removed from the chassis. |
|
Caution It is important that the chassis cooling fans run continuously while the system is powered. |
|
Warning This warning symbol means danger. You are in a situation that could cause bodily injury. Before you work on any equipment, be aware of the hazards involved with electrical circuitry and be familiar with standard practices for preventing accidents. |
|
Warning Only trained and qualified personnel should be allowed to install, replace, or service this equipment. |
|
Warning Never attempt to lift the chassis with the handles on the power supplies or the switching modules. These handles are not designed to support the weight of the chassis. Using them to lift or support the chassis can result in severe damage to the equipment and serious bodily injury. |
|
Warning Before opening the chassis, disconnect the telephone-network cables to avoid contact with telephone-network voltages. |
|
Warning Use copper conductors only. |
|
Warning A readily accessible two-poled disconnect device must be incorporated in the fixed wiring. |
|
Warning To reduce the risk of fire, use only No. 26 AWG or larger telecommunication line cord. |
|
Warning Do not reach into a vacant slot or chassis while you install or remove a card, a module, or a fan. Exposed circuitry could constitute an energy hazard. |
|
Warning Blank faceplates and cover panels serve three important functions: they prevent exposure to hazardous voltages and currents inside the chassis; they contain electromagnetic interference (EMI) that might disrupt other equipment; and they direct the flow of cooling air through the chassis. Do not operate the system unless all cards, faceplates, front covers, and rear covers are in place. |
|
Warning Connect the unit only to a DC power source that complies with the Safety Extra-Low Voltage (SELV) requirements in IEC 60950 based safety standards. |
|
Warning Do not use this product near water; for example, near a bathtub, washbowl, kitchen sink or laundry tub, in a wet basement, or near a swimming pool. |
|
Warning Never install telephone wiring during an electrical storm. |
|
Warning Never defeat the ground conductor or operate the equipment in the absence of a suitably installed ground conductor. Contact the appropriate electrical inspection authority or an electrician if you are uncertain that suitable grounding is available. |
|
Warning During this procedure, wear grounding wrist straps to avoid ESD damage to the card. Do not directly touch the backplane with your hand or any metal tool, or you could shock yourself. |
|
Warning When installing the unit, the ground connection must always be made first and disconnected last. |
|
Warning This equipment needs to be grounded. Use a green and yellow 12 to 14 AWG ground wire to connect the host to earth ground during normal use. |
|
Warning Read the installation instructions before you connect the system to its power source. |
|
Warning Do not work on the system or connect or disconnect cables during periods of lightning activity. |
|
Warning Use caution when installing or modifying telephone lines. |
|
Warning Hold the PEM by the sheet-metal carrier (top and front) only. Internal components may be hot. |
|
Warning Before working on a system that has an on/off switch, turn OFF the power and unplug the power cord. |
|
Warning The power supply circuitry for the equipment can constitute an energy hazard. Before you install or replace the equipment, remove all jewelry (including rings, necklaces, and watches). Metal objects can come into contact with exposed power supply wiring or circuitry inside the DSLAM equipment. This could cause the metal objects to heat up and cause serious burns or weld the metal object to the equipment. |
|
Warning Before working on a chassis or working near power supplies, unplug the power cord on AC units; disconnect the power at the circuit breaker on DC units. Ultimate disposal of this product should be handled according to all national laws and regulations. |
|
Warning To prevent bodily injury when mounting or servicing this unit in a rack, you must take special precautions to ensure that the system remains stable. The following guidelines are provided to ensure your safety: -This unit should be mounted at the bottom of the rack if it is the only unit in the rack. - When mounting this unit in a partially filled rack, load the rack from the bottom to the top with the heaviest component at the bottom of the rack. - If the rack is provided with stabilizing devices, install the stabilizers before mounting or servicing the unit in the rack. |
|
Warning The ports labeled "Ethernet," "10BaseT," "Token Ring," "Console," and "AUX" are safety extra-low voltage (SELV) circuits. SELV circuits should only be connected to other SELV circuits. Because the BRI circuits are treated like telephone-network voltage, avoid connecting the SELV circuit to the telephone network voltage (TNV) circuits. |
|
Warning Class 1 laser product. |
|
Warning Do not stare into the beam or view it directly with optical instruments. |
|
Warning This unit is intended for installation in restricted access areas. A restricted access area is where access can only be gained by service personnel through the use of a special tool, lock and key, or other means of security, and is controlled by the authority responsible for the location. |
|
Warning When installing the unit, always make the ground connection first and disconnect it last. |
|
Warning Connect the unit only to a DC power source that complies with the Safety Extra-Low Voltage (SELV) requirements in IEC 60950 based safety standards. |
|
Warning This equipment is to be installed and maintained by service personnel only as defined by AS/NZS 3260 Clause 1.2.14.3 Service Personnel. |
|
Warning This product requires short-circuit (overcurrent) protection, to be provided as part of the building installation. Install only in accordance with national and local wiring regulations. |
|
Warning The telecommunications lines must be disconnected 1) before unplugging the main power connector or 2) while the housing is open. |
|
Warning Never install telephone jacks in wet locations unless the jack is specifically designed for wet locations. |
|
Warning Do not use a telephone to report a gas leak in the vicinity of the leak. |
|
Warning Ultimate disposal of this product should be handled according to all national laws and regulations. |
|
Warning This is a Class A product based on the standard of the Voluntary Control Council for Interference by Information Technology Equipment. |
|
Warning The DS3 ports are not intended to be connected to cables that run outside the building where it is installed. For any connections outside the building, the DS3 ports must be connected to a network termination unit (NTU). NTU devices should comply with appropriate national safety standards such as UL 1950, CSA 950, EN 60950, IEC 950, and AS 3260. |
|
Warning This product requires short-circuit (overcurrent) protection, to be provided as part of the building installation. Install only in accordance with national and local wiring regulations. |
|
Warning Do not reach into a vacant slot or chassis while you install or remove a module or a fan. Exposed circuitry could constitute an energy hazard. |
|
Warning High-performance devices on this card can get hot during operation. To remove the card, hold it by the faceplate and bottom edge. Allow the card to cool before touching any other part of it or before placing it in an antistatic bag. |
|
Warning This equipment needs to be grounded. Use a green and yellow 14 AWG ground wire to connect the host to earth ground during normal use. |
|
Warning To prevent personal injury or damage to the chassis, never attempt to lift or tilt the chassis using the handles on the port adapters; these types of handles are not designed to support the weight of the unit. Lift the unit only by grasping the chassis underneath its lower edge. |
|
Warning Avoid using a telephone (other than a cordless type) during an electrical storm. There may be a remote risk of electric shock from lightning. |
|
Warning Do not use this product near water; for example, near a bath tub, wash bowl, kitchen sink or laundry tub, in a wet basement, or near a swimming pool. |
|
Warning Never touch uninsulated telephone wires or terminals unless the telephone line has been disconnected at the network interface. |
|
Warning During line card installation, wear grounding wrist straps to avoid ESD damage to the card. Do not directly touch the backplane with your hand or any metal tool, or you could shock yourself. |
Follow these guidelines to prevent ESD damage:
|
Caution Periodically check the resistance value of the antistatic strap. Ensure that the measurement is between 1 and 10 megohms. |
The following sections detail the procedures for replacing the Cisco 6260 chassis clinch nut.
|
Note Following these procedures for replacing the Cisco 6260 chassis clinch nut will cause a temporary loss of subscriber service. |
|
Warning Only trained and qualified personnel should be allowed to install, replace, or service this equipment. |
When you replace the Cisco 6260 chassis clinch nut, be sure that you follow the replacement procedures in the proper sequence. Table 1 is a checklist of the replacement steps in the order in which they should occur.
|
Caution Proper ESD protection is required whenever you handle Cisco DSLAM equipment. Installation and maintenance personnel should be properly grounded using ground straps to eliminate the risk of ESD damage to the equipment. Modules are subject to ESD damage whenever they are removed from the chassis. |
| Check | Replacement Procedure |
|---|---|
| 1. Remove the power from the system. |
| 1. Disconnect the network cables. |
| 2. Remove the bezel and clinch nut. |
| 3. Remove the fan trays and PEMs. |
| 4. Install the U-clip and replace the chassis components. |
| 5. Reconnect the network cables. |
| 6. Apply power. |
The following sections detail the replacement procedures for the Cisco 6260 chassis clinch nut.
The system should not be powered while you remove and replace the Cisco 6260 system hardware components.
|
Caution Removing power from the Cisco 6260 system will cause a service interruption to connected subscribers. |
Follow these steps to remove power to the system:
Step 2 Remove the fuses from the fuse and alarm panel.
Step 3 Turn the circuit breaker on both PEMs to the OFF (0) position.
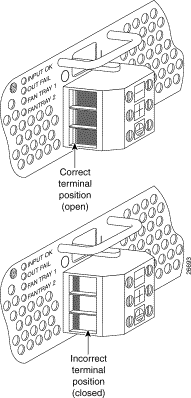
Step 4 Use a flat-head screwdriver to turn all three screws on the left PEM terminal block counterclockwise to open the terminal connectors, + (positive), - (negative), and ground.
Step 5 Disconnect the two wires coming from the fuse and alarm panel to the left PEM.
Step 6 Disconnect the grounding wire from the left PEM.
Step 7 Repeat Step 4 through Step 6 for the right PEM.
Follow these steps to remove the Cisco 6260 network cables:
|
Note If the clinch nut on your Cisco 6260 chassis has broken free, skip to the "Remove the Fan Trays and PEMs" section. |
 |
TimeSaver Cisco recommends that you label each cable and wire at both ends to identify its destination. |
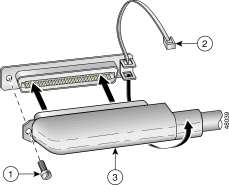
Step 2 Using a flat-head screwdriver, remove the retaining screws fastening the ten RJ-21 (Champ) connectors to the chassis backplane. Using wire cutters or scissors, cut the champ connector tie wraps, and disconnect the cables from the chassis.
Step 3 Disconnect the E3 BNC transmit (TX) and receive (RX) connectors from P1 (the ATM switch connection) on the E3 I/O module, if applicable.
Follow these steps to remove the Cisco 6260 chassis bezel and clinch nut:
Step 2 Using a small flat-head screwdriver, pry the right end of the bezel away from the chassis until you can grasp it with pliers.
Step 3 Bend the bezel away from the chassis at the bezel captive screw location, as shown in Figure 3, until the metal chassis tab and clinch nut become accessible.

Step 4 Using vise-grip pliers, reach behind the bezel and grasp the clinch nut firmly.
Step 5 With a Phillips-head screwdriver, turn the bezel screw counterclockwise to remove the bezel and clinch nut.
Follow these steps to remove the Cisco 6260 fan trays and PEMs:
Step 2 Verify that the power has been removed from the system, as described in the "Remove System Power" section.
Step 3 Use a Phillips-head screwdriver to loosen the two screws on the left fan tray.
Step 4 Grasp the left fan tray by the handle and remove it from the chassis.
|
Caution The fans may continue to turn at high speed for several seconds after the fan tray is removed from the chassis. To avoid injury to your hands, touch the fan tray only by its handle until the fans have stopped. |
Step 5 Inspect the fan tray for loose metal particles, and use a vacuum to remove the particles as necessary. After you remove the particles, place the fan tray on an antistatic surface.
Step 6 Hold the extraction handle on the front of the left PEM and carefully remove the module from the chassis.
Step 7 Inspect the PEM thoroughly for loose metal particles that may have fallen into the PEM top grill cover. Use a vacuum to remove any loose particles on the surface of the PEM, as necessary. Turn the module upside down and shake gently, to remove particles from inside the sheet metal PEM cage that the vacuum cannot reach. Place the PEM on an antistatic surface.
Step 8 Repeat Step 3 through Step 7 to remove the fan tray and PEM from the right of your Cisco 6260 chassis.
Step 9 After you have removed the fan trays and PEMs, thoroughly inspect the PEM slots for loose metal particles, using a vacuum to remove the particles as necessary.
Follow these steps to install the U-clip and replace the Cisco 6260 chassis components:

Step 2 Horizontally align the edge of the left PEM with the module guides at the right and left of the slot in the Cisco 6260.
Step 3 Hold the extraction handle on the front of the left PEM and gently apply pressure while carefully pushing the module into the slot.
|
Note Forcefully inserting the PEM in the slot could cause damage to the EMI gasket located on the top of the faceplate. |
Step 4 Insert the left fan tray into the compartment above the PEM. Make sure that the pins in the lower lip of the fan tray front panel engage with the holes in the PEM below.
Step 5 Use a flat-head or Phillips-head screwdriver to attach the two fan tray screws to the Cisco 6260 chassis.
Step 6 Repeat Step 2 through Step 5 to replace the fan tray and PEM on the right side of the Cisco 6260 chassis.
Step 7 Use a Phillips-head screwdriver to tighten the 6-32 captive screw to attach the replacement bezel to the chassis.
|
Note Cisco recommends that you use a maximum of 8.75 inch pounds of torque to tighten the replacement bezel captive screw. |
|
Warning When you are installing the unit, the ground connection must always be made first and disconnected last. |
Step 8 Use a flat-head screwdriver to turn all three screws on the terminal block counterclockwise to open the terminal connectors, + (positive), - (negative), and ground. This step ensures that the correct opening is presented for the wires. See Figure 5.
Step 9 Insert the end of the grounding wire into the grounding receptacle, which is the bottom receptacle in the terminal block on the PEM (see Figure 6). The stripped part of the wire must be fully inserted into the terminal block, so that no bare wire is exposed.
Step 10 Ensure that no wire strands are left outside the connector.
Step 11 Use the screwdriver to tighten the ground screw in the terminal block to a torque of 1.5 to 1.8 newton meters (13.28 to 15.93 inch-pounds). Tighten in a clockwise direction.
Step 12 Pull on the wire to verify that it is held firmly in place.
Step 13 Make sure that the other end of the grounding wire is connected to ground at the DC power source.
Step 14 Repeat Step 8 through Step 13 for the second PEM.

|
Warning Only a DC power source that is isolated from the AC main power source with reinforced insulation, and that complies with the other safety extra-low voltage (SELV) requirements in UL1950, CSA 950 3rd Edition, EN 60950, and IEC950, can be connected to a Cisco 6260 system. This requirement ensures that in a catastrophic power source fault condition, hazardous voltages are not present on power terminals and connectors. |
Step 15 After connecting the battery return wire to the external power source, insert the other end into the receptacle labeled + (positive) on the terminal block on the first PEM. The stripped part of the wire must be fully inserted, so that no bare wire is exposed. Use the screwdriver to tighten the terminal screw to a torque of 1.5 to 1.8 newton meters (13.28 to 15.93 inch-pounds). Tighten the screws clockwise.
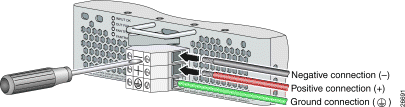
Step 16 After connecting the power lead to the external -48V power source, insert the other end of the wire into the receptacle labeled - (negative) on the terminal block of the first PEM. The stripped part of the wire must be fully inserted, so that no bare wire is exposed. Use the screwdriver to tighten the terminal screw to a torque of 1.5 to 1.8 newton meters (13.28 to 15.93 inch-pounds). Tighten the screws clockwise.
Step 17 Repeat Step 15 and Step 16 for the second PEM.
|
Note Be sure that the chassis is connected to earth ground as described in the Cisco 6260 Hardware Installation Guide. The Cisco 6260 requires two or three ground connections, one to the side of the chassis and one to each PEM. |
Step 18 Use a voltmeter to check the voltage at the terminal block. Connect the voltmeter positive contact to the positive (+) terminal on the Cisco 6260 terminal block. Connect the voltmeter negative contact to the negative (-) terminal on the Cisco 6260 terminal block. If the power is wired correctly, you will see a reading of +48V on the voltmeter.
Follow these steps to reconnect the Cisco 6260 network cables.
Step 2 Reconnect the E3 ATM trunk cables, if you have an E3 I/O module.
a. Reconnect the ATM switch receive trunk coaxial cable to the TX BNC connector on P1.
b. Reconnect the ATM switch transmit trunk coaxial cable to the RX BNC connector on P1.
Follow these steps to apply power to the Cisco 6260:
Step 2 Turn on the breakers in the fuse and alarm panel.
Step 3 Turn the circuit breaker on each PEM to the ON (1) position.
|
Note When the power is on, you will hear the fans start to turn. The fault light for the fan trays will stay on until the fans reach full speed, which takes several seconds. (Fan fault LEDs are Fan 1 and Fan 2 on the NI-2 card, and Fan Tray 1 and Fan Tray 2 on the PEM.) |
Step 4 Verify that the PEM LED is green. If it is not green, refer to the Cisco 6260 System Hardware Installation Guide for troubleshooting procedures.
A complete list of all DSL product related documentation is available on the World Wide Web at
http://www.cisco.com/univercd/cc/td/doc/product/dsl_prod/index.htm
The following sections provide sources for obtaining documentation from Cisco Systems.
You can access the most current Cisco documentation on the World Wide Web at the following sites:
Cisco documentation and additional literature are available in a CD-ROM package, which ships with your product. The Documentation CD-ROM is updated monthly and may be more current than printed documentation. The CD-ROM package is available as a single unit or as an annual subscription.
Cisco documentation is available in the following ways:
If you are reading Cisco product documentation on the World Wide Web, you can submit technical comments electronically. Click Feedback in the toolbar and select Documentation. After you complete the form, click Submit to send it to Cisco.
You can e-mail your comments to bug-doc@cisco.com.
To submit your comments by mail, for your convenience many documents contain a response card behind the front cover. Otherwise, you can mail your comments to the following address:
Cisco Systems, Inc.
Document Resource Connection
170 West Tasman Drive
San Jose, CA 95134-9883
We appreciate your comments.
Cisco provides Cisco.com as a starting point for all technical assistance. Customers and partners can obtain documentation, troubleshooting tips, and sample configurations from online tools. For Cisco.com registered users, additional troubleshooting tools are available from the TAC website.
Cisco.com is the foundation of a suite of interactive, networked services that provides immediate, open access to Cisco information and resources at anytime, from anywhere in the world. This highly integrated Internet application is a powerful, easy-to-use tool for doing business with Cisco.
Cisco.com provides a broad range of features and services to help customers and partners streamline business processes and improve productivity. Through Cisco.com, you can find information about Cisco and our networking solutions, services, and programs. In addition, you can resolve technical issues with online technical support, download and test software packages, and order Cisco learning materials and merchandise. Valuable online skill assessment, training, and certification programs are also available.
Customers and partners can self-register on Cisco.com to obtain additional personalized information and services. Registered users can order products, check on the status of an order, access technical support, and view benefits specific to their relationships with Cisco.
To access Cisco.com, go to the following website:
The Cisco TAC website is available to all customers who need technical assistance with a Cisco product or technology that is under warranty or covered by a maintenance contract.
If you have a priority level 3 (P3) or priority level 4 (P4) problem, contact TAC by going to the TAC website:
P3 and P4 level problems are defined as follows:
In each of the above cases, use the Cisco TAC website to quickly find answers to your questions.
To register for Cisco.com, go to the following website:
http://www.cisco.com/register/
If you cannot resolve your technical issue by using the TAC online resources, Cisco.com registered users can open a case online by using the TAC Case Open tool at the following website:
http://www.cisco.com/tac/caseopen
If you have a priority level 1(P1) or priority level 2 (P2) problem, contact TAC by telephone and immediately open a case. To obtain a directory of toll-free numbers for your country, go to the following website:
http://www.cisco.com/warp/public/687/Directory/DirTAC.shtml
P1 and P2 level problems are defined as follows:
This document is to be used in conjunction with the documents listed in the "Related Documentation" section.
AccessPath, AtmDirector, Browse with Me, CCIP, CCSI, CD-PAC, CiscoLink, the Cisco Powered Network logo, Cisco Systems Networking Academy, the Cisco Systems Networking Academy logo, Fast Step, Follow Me Browsing, FormShare, FrameShare, GigaStack, IGX, Internet Quotient, IP/VC, iQ Breakthrough, iQ Expertise, iQ FastTrack, the iQ Logo, iQ Net Readiness Scorecard, MGX, the Networkers logo, Packet, RateMUX, ScriptBuilder, ScriptShare, SlideCast, SMARTnet, TransPath, Unity, Voice LAN, Wavelength Router, and WebViewer are trademarks of Cisco Systems, Inc.; Changing the Way We Work, Live, Play, and Learn, Discover All That's Possible, and Empowering the Internet Generation, are service marks of Cisco Systems, Inc.; and Aironet, ASIST, BPX, Catalyst, CCDA, CCDP, CCIE, CCNA, CCNP, Cisco, the Cisco Certified Internetwork Expert logo, Cisco IOS, the Cisco IOS logo, Cisco Press, Cisco Systems, Cisco Systems Capital, the Cisco Systems logo, Enterprise/Solver, EtherChannel, EtherSwitch, FastHub, FastSwitch, IOS, IP/TV, LightStream, MICA, Network Registrar, PIX, Post-Routing, Pre-Routing, Registrar, StrataView Plus, Stratm, SwitchProbe, TeleRouter, and VCO are registered trademarks of Cisco Systems, Inc. and/or its affiliates in the U.S. and certain other countries.
All other trademarks mentioned in this document or Web site are the property of their respective owners. The use of the word partner does not imply a partnership relationship between Cisco and any other company. (0108R)
Copyright © 2001, Cisco Systems, Inc.
All rights reserved.
![]()
![]()
![]()
![]()
![]()
![]()
![]()
![]()
Posted: Wed Jul 24 23:14:40 PDT 2002
All contents are Copyright © 1992--2002 Cisco Systems, Inc. All rights reserved.
Important Notices and Privacy Statement.