|
|

This chapter provides instructions for unpacking, installing, and setting up the Cisco 6200 advanced digital subscriber line access multiplexer (DSLAM).
Full installation of the Cisco 6200 consists of the following procedures. Ensure that the installation follows this sequence:
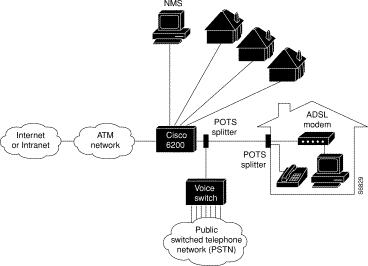
The "Representative Configuration" section illustrates a typically configured Cisco 6200 and a Cisco 6200 in a typical network.
 | Warning For translations of the safety warnings in this chapter, see "Translated Safety Warnings." |
The Cisco 6200 chassis is shipped assembled in a cardboard box. Follow these steps when you remove the unit from the container.
 | Caution Static voltages as low as 30 volts can cause latent damage to circuitry. Be sure to observe all standard antistatic procedures (for example, wear a grounding strap). |
Step 1 Inspect the packing container. If any damage or other signs of mishandling are evident, inform both the carrier and Cisco before unpacking.
Step 2 Carefully remove the chassis from the container.
Step 3 Open the boxes that contain the cables and documentation. (Do not use a knife to open these boxes.)
Before continuing with the installation, check your shipment:
Step 1 Carefully examine all assemblies, cards, and cables.
Step 2 Check the packing list to verify receipt of all components. Contact Cisco to report any discrepancies.
This section describes requirements for the site in which the Cisco 6200 system will be installed. Before you install the Cisco 6200 system, ensure that all the criteria in this section are fully satisfied.
 | Warning This unit is intended for installation in restricted access areas. A restricted access area is where access can only be gained by service personnel through the use of a special tool, lock and key, or other means of security, and is controlled by the authority responsible for the location. |
 | Warning
Only trained and qualified personnel should be allowed to install or replace this equipment. |
The Cisco 6200 shelf connects to one or two -48 VDC inputs, plus frame ground.
A readily accessible disconnect device must be incorporated into the fixed wiring for the site.
 | Warning Only a DC power source that is isolated from AC mains with reinforced insulation, and that complies with the other safety extra-low voltage (SELV) requirements in UL950, CSA 950, EN 60950, and IEC950, can be connected to a Cisco 6200 system. This requirement assures that in a catastrophic power source fault condition, hazardous voltages are not present on power terminals and connectors. |
 | Warning When stranded wiring is required, use approved wiring terminations, such as closed-loop or spade-type with upturned lugs. These terminations should be the appropriate size for the wires and should clamp both the insulation and conductor. |
 | Warning
Use copper conductors only. |
The Cisco 6200's fans maintain a suitable operating temperature for the internal circuitry. Ensure that the air intake vents at the front and sides of the shelf along the bottom edge, as well as the air exhaust vents on the rear and sides at the top, are not obstructed in any way.
Proper operation depends upon proper environment. Although the system can tolerate a wider range of temperatures, for best results Cisco recommends an ambient temperature between 32° and 104° F (0° and 40° C), and humidity between 15 percent and 90 percent noncondensing. For complete environmental requirements including short-term temperature tolerances, see Table 1-1 in "Hardware Description."
 | Warning To prevent a Cisco 6200 system from overheating, do not operate it in an area that exceeds the maximum recommended ambient temperature of 131°F (55°C). |
We strongly recommend that you mount the Cisco 6200 shelf in an equipment rack. The shelf can be installed in any 19-inch-wide rack or cabinet. Vertical hole spacing on the rack rails should meet standard EIA-310-C requirements—1-inch (2.5 cm) spacing. Spacers are available for mounting the shelf into 23-inch racks and ETSI 600-mm racks.
Using the mounting hardware provided, mount the Cisco 6200 in a rack or cabinet.
 | Warning Two people are required to lift the chassis. Grasp the chassis underneath the lower edge and lift with both hands. To prevent injury, keep your back straight and lift with your legs, not your back. To prevent damage to the chassis and components, never attempt to lift the chassis by the plastic panels on the front of the chassis. These handles were not designed to support the weight of the chassis. |
 | Warning To prevent bodily injury when mounting or servicing this unit in a rack, you must take special precautions to ensure that the system remains stable. The following guidelines are provided to ensure your safety: |
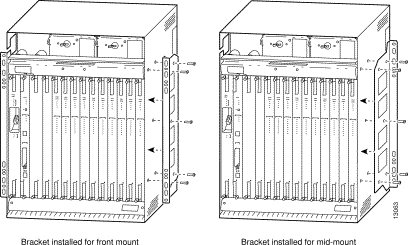
Several types of mounting brackets are available to mount the Cisco 6200 in different racks:
Each type of bracket can be installed in two ways (see Figure 2-1). For a front- or flush-mount installation, attach the brackets so that the flanges that protrude to the sides are at the front of the chassis. For a mid-mount installation, attach the brackets so that the flanges are at the middle of the chassis.
 | Warning
Read the installation instructions before you connect the system to its power source. |
Connect a VT100-compatible terminal to the system console port (labeled CNSL) on the MPC faceplate. Connect the terminal to a power source and set it up using the values shown in Table 2-1.
 | Warning The ports labeled "Ethernet," "ENET," "ETH1," "ETH2," "CNSL," and "Serial Port" are safety extra-low voltage (SELV) circuits. SELV circuits should only be connected to other SELV circuits. Because the DSL circuits are treated like telephone-network voltage, avoid connecting the SELV circuit to the telephone network voltage (TNV) circuits. |
Baud rate | 9600 (transmit and receive) |
Character size | 8 bits |
Parity | None |
Stop bits | 1 |
Xon/Xoff | Hardware busy |
Follow the steps given here to connect a Cisco 6200 system to earth ground. Complete this procedure before you connect system power.
 | Warning Before connecting or disconnecting ground or power wires to the chassis, ensure that power is removed from the DC circuit. To ensure that all power is OFF, locate the circuit breaker on the panel board that services the DC circuit, switch the circuit breaker to the OFF position, and tape the switch handle of the circuit breaker in the OFF position. |
 | Warning
Do not work on the system or connect or disconnect cables during periods of lightning activity. |
 | Warning This equipment is intended to be grounded. Ensure that the host is connected to earth ground during normal use. |
Have the following items on hand before you begin the grounding procedure. Except where noted, these items are not provided with the chassis.
 | Warning
When installing the unit, the ground connection must always be made first and disconnected last. |
To attach the grounding lug and cable to the grounding receptacle on the Cisco 6200, perform these steps:
Step 1 Ensure that power in the DC circuit is OFF.
Step 2 Use a wire stripping tool to remove about 0.75 inch (2 cm) of the covering from the end of the grounding wire.
Step 3 Insert the stripped end of the grounding wire into the open end of the grounding lug.
Step 4 Use the crimping tool to secure the grounding wire into the open end of the grounding lug.
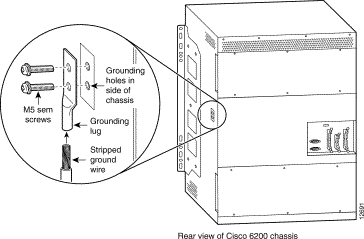
Step 5 Locate the two grounding holes on the Cisco 6200 side panel. Figure 2-2 shows the location of the grounding holes on the right side of the chassis.
Step 6 Place the grounding lug against the grounding holes on the side of the chassis.
Step 7 Insert the two M5 screws from the accessory kit through the holes in the lug and the chassis. Use the Phillips screwdriver to tighten the screws and secure the grounding lug firmly to the chassis.
Step 8 Prepare the other end of the grounding wire and connect it to an appropriate grounding point in your site to ensure adequate earth ground for the system.
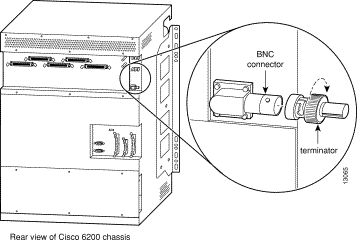
Before you connect power to the Cisco 6200 system, check for a terminator on the right-angle BNC connector located beneath the power terminals on the back of the chassis. (See Figure 2-3.) If the terminator is not installed on the connector, remove it from its packaging on the backplane and install it. The connector is labeled ETH1 and J65.
ETH1 and ETH2 (J66) are Ethernet ports that are not used in this release. In order for the system to function properly, both ETH1 and ETH2 must be terminated. (ETH2's terminator is installed in the factory.)
 | Caution Do not remove the terminators from the BNC connectors. Doing so prevents the cards within the chassis from communicating with each other. |
This procedure tells you how to connect the Cisco 6200 system to a -48 VDC power source. Before attempting this procedure, connect the chassis to earth ground as described in the previous section.
The power connectors are stud terminals on the backplane (see Figure 2-5). For full power redundancy, the two sets of power connectors, labeled A and B, must be connected to separate power sources. If you do not require power redundancy, you can use only one set of terminals—either the A terminals or the B terminals. (Do not use one of each.)
 | Warning Only a DC power source that is isolated from AC mains with reinforced insulation, and that complies with the other safety extra-low voltage (SELV) requirements in UL950, CSA 950, EN 60950, and IEC950, can be connected to a Cisco 6200 system. This requirement assures that in a catastrophic power source fault condition, hazardous voltages are not present on power terminals and connectors. |
 | Warning When stranded wiring is required, use approved wiring terminations, such as closed-loop or spade-type with upturned lugs. These terminations should be the appropriate size for the wires and should clamp both the insulation and conductor. |
 | Warning
Use copper conductors only. |
 | Warning Before connecting or disconnecting ground or power wires to the chassis, ensure that power is removed from the DC circuit. To ensure that all power is OFF, locate the circuit breaker on the panel board that services the DC circuit, switch the circuit breaker to the OFF position, and tape the switch handle of the circuit breaker in the OFF position. |
 | Warning Before working on equipment that is connected to power lines, remove jewelry (including rings, necklaces, and watches). Metal objects will heat up when connected to power and ground and can cause serious burns or weld the metal object to the terminals. |
Have the following items on hand before you begin connecting power:
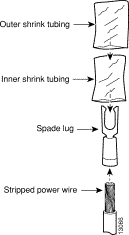
In this procedure, you will prepare the power leads to the Cisco 6200. This includes connecting the leads to their power source, attaching the lugs to the wire, and double-shrink-wrapping the area where the lug joins the wire. Follow these steps to get ready to connect power to the Cisco 6200 DSLAM. Refer to Figure 2-4.
Step 1 Use the Phillips screwdriver to unfasten the metal panel that covers the power terminals on the back of the Cisco 6200. The panel is held in place by six Phillips-head quarter-turn fasteners. Turn each fastener 90 degrees in either direction to release it.
Step 2 Use the Phillips screwdriver to remove the small plastic cover over the power terminals.
Step 3 Use the nutdriver to loosen the nuts on the power terminals you intend to use. Remove the power lugs from those terminals.
Step 4 Use the wire stripping tool to remove about 0.75 inch (2 cm) of the covering from the end of each power wire.
Step 5 Use the crimping tool to secure a power lug to the stripped end of each power wire.
Step 6 Slip a piece of shrink tubing over each power lug and push it down until it covers the joint between the lug and the wire.
Step 7 Use the heat gun to shrink the tubing on each power wire.
Step 8 Repeat Step 6 and Step 7 to add a second layer of shrink tubing to each power wire.
 | Warning Only a DC power source that is isolated from AC mains with reinforced insulation, and that complies with the other safety extra-low voltage (SELV) requirements in UL950, CSA 950, EN 60950, and IEC950, can be connected to a Cisco 6200 system. This requirement assures that in a catastrophic power source fault condition, hazardous voltages are not present on power terminals and connectors. |
 | Warning This unit has more than one power supply connection; all connections must be removed completely to completely remove power from the unit. |
Follow these steps to connect power to the system. Refer to Figure 2-5.
Step 1 Ensure that power in the DC circuit is OFF.
Step 2 Ensure that the power entry modules (PEMs) are fully inserted into the Cisco 6200 chassis and secured with their captive screws.
Step 3 Ensure that the circuit breakers on both PEMs are turned to OFF (0).
Step 4 Connect the power wires to the DC power source or sources.
Step 5 Use the nutdriver to connect the return wire from the first external power source to the stud terminal labeled (+)48V RTN A.
 | Warning The illustration shows the DC power supply terminal block. Wire the DC power supply using the appropriate lugs at the wiring end, as illustrated. The proper wiring sequence is ground to ground, positive to positive, and negative to negative. Note that the ground wire should always be connected first and disconnected last. |
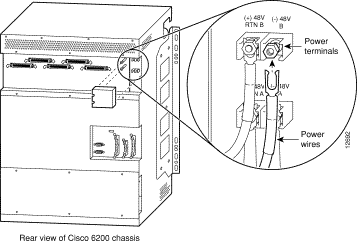
Step 6 Connect the power lead from the first power source to the stud terminal labeled (-)48V A.
Step 7 Connect the return wire from the second external power source, if you are using one, to the stud terminal labeled (+)48V RTN B.
Step 8 Connect the power lead from the second power source to the stud terminal labeled (-)48V B.
Step 9 Replace the small plastic cover over the power terminals and screw it into place.
Step 10 Turn on power to the DC circuit.
Step 11 At the front of the chassis, flip the circuit breakers on both PEMs to ON (1).
If the power is properly connected, a green LED on the front of each PEM lights up. The green LED indicates that the PEM is making power available to the chassis.
The Cisco 6200 is ready for connection to external equipment. Be sure to label all cables at both ends to identify their destinations. When the cabling is complete, you will have implemented the following data connections:
1. Trunk interface with the network
2. Interface to the PC running the Cisco 6200 Manager software
3. Twisted pair copper wire interface to the POTS splitter
4. Auxiliary port connection
5. Alarm relay connection
 | Warning The ports labeled "Ethernet," "ENET," "ETH1," "ETH2," "CNSL," and "Serial Port" are safety extra-low voltage (SELV) circuits. SELV circuits should be connected only to other SELV circuits. Because the DSL circuits are treated like telephone-network voltage, avoid connecting the SELV circuit to the telephone network voltage (TNV) circuits. |
The system console should already be connected, as described in the "Console Connection" section.
Refer to "Pin Assignments," for connector pinouts.
The trunk interface is made with the NTC module, which is available in four versions:
The four versions of the NTC are visually and functionally similar. Installation procedures are the same regardless of which NTC version is used in your chassis.
Trunk interface connectors are recessed into the faceplate of the NTC module. This dual port has both a transmit (upstream) and a receive (downstream) connector (see Figure 2-6).
 | Warning Class 1 laser product. |
 | Warning Because invisible laser radiation may be emitted from the aperture of the port when no cable is connected, avoid exposure to laser radiation and do not stare into open apertures. |
The fiber optic communication channels in the single-mode OC-3 card (NTC OC3-SM) operate with laser energy, which can be harmful, especially to the eyes. During normal operation, this energy is confined to the cable and presents no danger. To avoid injury when connecting or disconnecting optical channels, observe these precautions: always disconnect the card from the backplane before connecting or disconnecting optical cables; always keep the protective cap on the optic connector when the connector is not in use; and never look into an optical cable or connector.
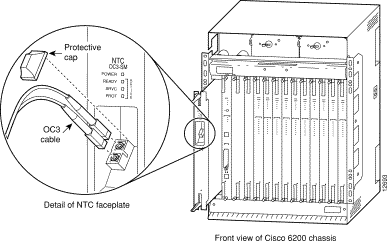
Connect the NTC module to the fiber channel using the following steps:
Step 1 Read and understand the preceding warnings.
Step 2 Use the extraction levers to disconnect the NTC from the backplane.
Step 3 Remove the protective caps from the NTC fiber optic connector and from the external data cable.
Step 4 Attach the external cable to the recessed connector on the NTC faceplate (see Figure 2-6).
Step 5 Insert the NTC back into the chassis.
Use the Ethernet (ENET) port on the MPC module to connect the Cisco 6200 to an Ethernet LAN. The Ethernet LAN should also be connected to the PC running the Cisco 6200 Manager software. The MPC Ethernet port is for 10BaseT Ethernet with an RJ-45 receptacle.
Follow these steps to connect the Cisco 6200 and the management PC to an Ethernet LAN:
Step 1 Attach a standard 10BaseT cable with an RJ-45 connector to the ENET port on the Cisco 6200 MPC (slot 2).
Step 2 Connect the other end of the 10BaseT cable to the Ethernet LAN to be used for management traffic.
Step 3 Connect the management PC to the same Ethernet LAN, using a cable compatible with the connector on the PC.
Set up unshielded twisted pair (UTP) copper wire connections between the Cisco 6200 and the POTS splitter (if one is required), or the subscriber loop.
Connections are made with ten 50-pin dangler cables (Figure 2-7) that are attached to the Cisco 6200 backplane at the factory. Each cable terminates with a 50-pin Telco Champ receptacle (AMP No. 229975-1) with a 90-degree strain relief. Refer to "Pin Assignments," for cable pin assignments between the SLC and the POTS splitter, and for an illustration of the back of the chassis.
The dangler cables are numbered J1 through J10. They correspond to the SLC slots as shown in Table 2-2.
| J1 | Slot 5 | J6 | Slot 10 |
| J2 | Slot 6 | J7 | Slot 11 |
| J3 | Slot 7 | J8 | Slot 12 |
| J4 | Slot 8 | J9 | Slot 13 |
| J5 | Slot 9 | J10 | Slot 14 |

Connect a terminal, a modem, or another serial device to the auxiliary console port, J40 on the rear panel. (This step is optional.)
Connect an external alarm device to the alarm relay connector, J39 on the rear panel. (This step is optional.) See the section "Alarm Relay Connector" in "Pin Assignments," for information on alarm relay wiring.
The hardware portion of the installation process is complete. Replace the plastic cover panels on the front of the chassis, the metal cover panels on the back of the chassis, and cover all empty card slots with blank faceplates.
 | Warning Blank faceplates and cover panels serve three important functions: they prevent exposure to hazardous voltages and currents inside the chassis; they contain electromagnetic interference (EMI) that might disrupt other equipment; and they direct the flow of cooling air through the chassis. Do not operate the system unless all cards, faceplates, front covers, and rear covers are in place. |
The setup dialog allows you to perform first-time configuration of the Cisco 6200. The dialog prompts you to enter basic information needed to start a Cisco 6200.
The setup dialog runs automatically the first time you turn on your Cisco 6200. You can run the dialog at a later time by entering setup while you are in privileged EXEC mode:
| Task | Command |
|---|---|
When you power up the Cisco 6200 for the first time, an interactive dialog called the System Configuration Dialog appears on the system console screen. The System Configuration Dialog guides you through the configuration process. You must run through the entire System Configuration Dialog until you come to the item that you intend to change. To accept settings for items that you do not want to change, press the Return key.
When you complete your changes, the setup dialog displays the configuration command script that you created. It then asks if you want to use this configuration. If you answer Yes, the configuration is saved to NVRAM. If you answer No, the configuration is not saved and the process begins again. There is no default for this prompt; you must answer either Yes or No.
Take these steps before you run the System Configuration Dialog:
Step 1 Find out the Cisco 6200's IP address and the password strategy for your environment.
Step 2 Make sure the PCMCIA Flash memory card is fully inserted in its slot on the MPC.
The following procedure shows how to use the System Configuration Dialog to configure a Cisco 6200.
Step 1 When you power up the Cisco 6200 or connect a console to a newly started system, the System Configuration Dialog displays its introductory screen:
         --- System Configuration Dialog ---
At any point you may enter a question mark '?' for help.
Use ctrl-c to abort configuration dialog at any prompt.
Default settings are in square brackets '[]'.
Step 2 To continue with the setup, answer Yes to the following question:
Would you like to enter the initial configuration dialog? [yes]: y
Step 3 If you want to see how the box is currently configured, answer Yes to the following question. This example shows a configuration for a new Cisco 6200 with only MPC and NTC cards inserted.
Would you like to enter the initial configuration dialog? [yes]: y

Any interface listed with OK? value "NO" does not have a valid configuration
Interface..............IP-Address......OK?.Method Status..............Protocol
ATM0/0.................unassigned......NO..unset..up....................up
Ethernet0/0............unassigned......NO..unset..up....................up
Ethernet0/1............unassigned......NO..unset..up....................up
Step 4 Specify a hostname. The hostname will appear in the command prompt. If you do not enter a hostname, the system uses the default hostname, Router. This example uses the name c6200.
Configuring global parameters:
  Enter host name [c6200]: c6200
Step 5 Specify a password to be encrypted. Be sure to write this password down and put it in a safe place. If you do not want your password encrypted, press Enter. In this example, the password is c6200dslam.
The enable secret is a one-way cryptographic secret used
instead of the enable password when it exists.
  Enter enable secret: c6200dslam
Step 6 Specify a password that will be used in the absence of an encrypted password. An unencrypted enable password appears as plain text in the configuration file. In this example, the enable password is 12345.
The enable password is used when there is no enable secret
and when using older software and some boot images.
  Enter enable password: 12345
Step 7 Specify a password for the virtual terminal so that you can Telnet to the Cisco 6200. In this example, the virtual terminal password is 12345.
Enter virtual terminal password []: 12345
Step 8 Enter Yes for the question about SNMP network management and specify a community string. (You must enter this community string and the DSLAM's IP address when you set up the Cisco 6200 Manager application.)
Configure SNMP Network Management? [yes]: y

Community string [public]:
Step 9 Enter Yes for the questions about configuring IP and IGRP routing. Press Return to accept the default IGRP autonomous system number, or enter a new number.
Configure IP? [yes]: y

    Configure IGRP routing? [yes]: y
      Your IGRP autonomous system number [1]:
Step 10 In this step, you configure the interfaces displayed in Step 3.
(a) ATM 0/0 is an internal interface used for in-band management. If you wish to use this feature, answer as indicated below, supplying your own IP address and subnet information.
Configuring interface parameters:

Configuring interface ATM0/0:
  Is this interface in use? [yes]: y

  Configure IP on this interface? [no]: y

    IP address for this interface: 10.4.0.1

    Number of bits in subnet field [0]:
    Class A network is 10.4.0.0, 0 subnet bits; mask is /8
If you do not wish to use the in-band management feature, answer No when the setup dialog asks if the interface is in use:
Configuring interface ATM0/0:
  Is this interface in use? [yes]: n
(b) Ethernet 0/0 is the interface to your network. Configure this interface so that you can access the Cisco 6200 through a Telnet session. In this example, the IP address is 172.25.25.25 and the number of bits in the subnet mask is 8.
Configuring interface Ethernet0/0:
  Is this interface in use? [yes]: y

  Configure IP on this interface? [yes]: y

    IP address for this interface []: 172.25.25.25

    Number of bits in subnet field []: 8

    Class B network is 172.25.25.25, 8 subnet bits; mask is /24
(c) Ethernet 0/1 is dynamically configured by the system, so you should exercise care in responding to prompts concerning this interface. Answer Yes when the system asks if Ethernet 0/1 is in use. Answer No when prompted to configure this interface, as shown in this example. (Ethernet 1/0 represents the backplane of the Cisco 6200.)
Configuring interface Ethernet0/1:
  Is this interface in use? [yes]: yes

  Configure IP on this interface? [yes]: no
 | Caution Any change in the configuration of the Ethernet 0/1 interface may halt communication among the cards. Do not configure Ethernet 1/0. |
Step 11 After you complete the configuration, the configuration script is generated.
The following configuration command script was created:
hostname c6200
enable secret 5 $1$1Lwi$U4DcmZ8.f1S5ZG2bUmsn9.
enable password 12345
line vty 0 4
password 12345
snmp-server community public
!
!
interface ATM0/0
shutdown
no ip address
!
interface Ethernet0/0
ip address 172.25.25.25 255.255.255.0
!
interface Ethernet0/1
no ip address
!
end
Step 12 The next question asks if you want to use this configuration. If you answer Yes, the configuration is copied to the running configuration and stored in NVRAM (the startup configuration).
Use this configuration? [yes/no]: y

Building configuration...
[OK]Use the enabled mode 'configure' command to modify this configuration.
Press RETURN to get started!
Refer to the User Guide for the Cisco 6200 Manager for instructions on installing the management software on a PC running Windows NT.
For instructions on provisioning ports and other node configuration tasks, refer to one of the following:
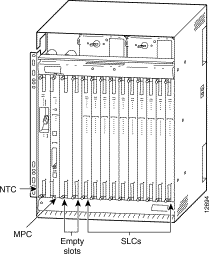
A functional configuration of the Cisco 6200 is shown in Figure 2-8. Figure 2-9 shows the module configuration for the Cisco 6200 system.
![]()
![]()
![]()
![]()
![]()
![]()
![]()
![]()
Posted: Tue Dec 17 19:15:37 PST 2002
All contents are Copyright © 1992--2002 Cisco Systems, Inc. All rights reserved.
Important Notices and Privacy Statement.