|
|

Product Numbers MC-FCI-V2.2=, MC-C2FCI-V10.2=
This document contains the procedure for upgrading CSC-FCI Fiber Distributed Data Interface (FDDI) cards from FDDI Microcode Version 128.43 or later (see Note following) to Versions 2.2 and 10.2. Microcode Version 2.2 is compatible only with the first-generation ciscoBus controller card (CSC-CCTL). Microcode Version 10.2 is compatible only with the second-generation ciscoBus controller card (CSC-CCTL2). If you are upgrading a first-generation CSC-CCTL to a CSC-CCTL2, you must also upgrade the microcode on all existing ciscoBus cards to Version 10.0 or later. The section "System Compatibility" on page 2 describes the compatibility requirements for first- and second-generation ciscoBus controller cards and ciscoBus interface cards.
Version 2.2 and Version 10.2 microcode upgrade kits contain two replacement programmable array logic (PAL) devices, which are necessary for bus timing only if you are upgrading from a microcode version earlier than 2.0 or 10.0. If your current FDDI microcode is Version 2.0 or 10.0, the PALs are already installed and should not be replaced.
The upgrade steps are the same for both microcode versions (2.2 and 10.2); only the component part numbers are different. In the following sections, the term CSC-FCI indicates both the CSC-FCI (first-generation ciscoBus interface card) and CSC-C2FCI (second-generation ciscoBus interface card) unless otherwise indicated.
Use the information in this section to ensure that your existing equipment is compatible with the new microcode and that you have the proper tools and parts to complete this procedure without interruption.
Your system must meet the following compatibility requirements before you install the new microcode:
You can display the current software version with the EXEC command show version. The current system software version is displayed in the first line of the output followed by a list of the installed interface cards. In the following example, the system is running System Software Release 9.1(4):
router# show version
GS Software (GS3-BFX), Version 9.1(4)
Copyright (c) 1986-1992 by cisco Systems, Inc.
You can display the controller type and microcode version of each installed ciscoBus card with the EXEC command show controller cbus. The first line of the display for each installed CSC-FCI should indicate a Controller Type 4.0 or later and Microcode Version 128.43 or later. The following example shows a CSC-FCI and a first generation ciscoBus controller card, CSC-CCTL:
router# show cont cbus
cBus 1, controller type 5.0, microcode version 2.0
  (text omitted)
 FDDI 0, controller type 4.0, microcode version 1.0
Verify that the FDDI Controller Type is 4.0 or later and that the Microcode Version is 128.43 or later. If not, you must upgrade your card before proceeding. The Microcode Release Note publication (Part Number 78-1069-nn--where nn is the latest version) provides the latest information on both the recommended and minimum required microcode versions for using all cards with System Software Releases 8.2 through 9.1. If the latest version implements features that you are not using in your system, and you already have the minimum required version installed, there is no requirement to update the microcode. However, new microcode versions occasionally fix bugs and provide performance enhancements in addition to implementing new features. You will obtain maximum performance and reliability by upgrading to the recommended version.
The CSC-CCTL2 is required to run ciscoBus network interface cards with the C2 designator, which are listed in Table 1. The C2 indicates that a ciscoBus card is running Microcode Version 10.0 or later and is, therefore, compatible with the second-generation ciscoBus controller card, the CSC-CCTL2. When you upgrade the microcode on a CSC-FCI to Version 10.0 or later, the name of the card also changes from CSC-FCI to CSC-C2FCI to indicate that it is CCTL2-compatible. If you are installing a new CSC-CCTL2, you must upgrade the microcode on all ciscoBus interface cards to Version 10.0 or later.
| CCTL Controller | CCTL2 Controller | Description |
|---|---|---|
| CSC-CCTL | CSC-CCTL2 | ciscoBus controller |
| CSC-FCI | CSC-C2FCI | FDDI interface |
| CSC-C2FCIT | FDDI with translational bridging | |
| CSC-HSCI | CSC-C2HSCI | High-Speed Serial Interface (HSSI) |
| CSC-C2CTR | ciscoBus Token Ring interface, 4/16Mbps | |
| CSC-MEC | CSC-C2MEC | Multiport Ethernet controller interface |
You can display a description of the current ciscoBus controller card and ciscoBus interface cards with the EXEC command show controller cbus. The name and controller type of each ciscoBus interface card, the ciscoBus slot in which it is installed, and the microcode version of each is displayed (additional, statistical information is also displayed for each interface card, but is omitted from the following example). When installing Microcode Version 10.0 or later on any ciscoBus interface card, the ciscoBus controller card (listed first) must be a Controller Type 6.0 or later (which is a CSC-CCTL2), and all other ciscoBus interface cards must be running Microcode Version 10.0 or later (or you must upgrade the microcode on those cards at the same time).
The following sample display shows a CSC-CCTL2 controller with all ciscoBus interface cards upgraded to Microcode Version 10.0:
router# show cont cbus
ciscoBus 1, controller type 6.0, microcode version 10.0
  512 Kbytes of main memory, 128 Kbytes cache memory
  	(text omitted)
FDDI-T 0, controller type 7.1, microcode version 10.0
  Interface 0 - Fddi0, station address 0000.0c02.6aa3 (bia
	(text omitted)
CTR 1, controller type 9.0, microcode version 10.0
  Interface 8 - TokenRing0, station address 0000.3040.e004 (bia
	(text omitted)
HSCI 2, controller type 10.0, microcode version 10.0
  Interface 16 - Hssi0, electrical interface is Hssi DTE
    	(text omitted)
To perform this upgrade, you need the following:
Electrostatic discharge damage (ESD) occurs when electronic printed circuit cards are improperly handled and can result in complete or intermittent failures. ESD can impair electronic circuitry and equipment. Always follow ESD prevention procedures when removing and replacing cards. Following are steps for handling printed circuit cards:
Step 1 Slip on an ESD-preventive wrist strap, ensuring that it makes good skin contact.
Step 2 Connect the strap to an unpainted chassis frame surface or another proper grounding point or surface to safely channel unwanted ESD voltages to ground.
Step 3 Use the ejectors to remove the card. Handle the card by its sides. Place the card on an antistatic surface or in a static shielding bag. To prevent further damage to the card by ESD voltages, defective cards must remain in the static shielding bag when returned for repair or replacement.
Step 4 Handling the new card by its edges only, insert it into the chassis. Avoid contact between the card and clothing. The wrist strap only protects the card from ESD voltages on the body; ESD voltages on clothing can still damage the card.
 | Caution Use an ohmmeter to check the ESD-preventive wrist strap to ensure that the resistor is providing proper ESD protection. For safety, the measurement should be between 1 to 10 mega ohms. |
Follow this procedure to upgrade the CSC-FCI. Before opening the chassis, refer to the section "System Compatibility" on page 2 and ensure that your system meets the minimum requirements for the microcode version that you are installing.
 | Caution Before performing these installation procedures, turn off power to the system. Removing or installing a card in the backplane when the system power is on will severely damage the card and can also damage other system components. |
Step 1 Turn OFF the system power and unplug the power cord.
Step 2 Loosen the two thumb fasteners and remove the front access panel to expose the card cage. The thumb fasteners are tightened with 12 in/lb of torque for shipping. If you are removing the front panel for the first time, use a large, flat-blade screwdriver to turn the thumb fasteners counterclockwise to loosen. When you replace the panel, turn the thumb fasteners clockwise until finger-tight.
 | Caution Observe proper ESD prevention procedures when handling cards and components to prevent damage from electrostatic discharge. Refer to the section "Preventing Electrostatic Discharge (ESD) Damage" on page 5. |
Step 3 Put on the ESD wrist strap provided with the upgrade kit, or use your own grounding strap. Attach the equipment end to an unpainted area on the chassis.
Step 4 Disconnect the internal ribbon cables that are attached to the front of the CSC-FCI. If other cables (to other cards) prevent you from removing CSC-FCI, note the card and port locations of each before disconnecting them (to avoid misrouting cables when you reconnect them).
Step 5 Use your thumbs to pull the ejector tabs out and away from the card edge to loosen it; then pull the card out of its slot. Place the card on an antistatic mat.
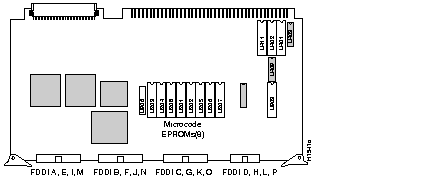
Step 6 Locate the eight microcode components (U201 through U208) and two PALs (U906 and U402) to be replaced, which are shown in Figure 1. You need to replace the two PALs only if the existing microcode is earlier than Version 2.0. Refer to the appropriate table as follows:

Step 7 Remove each of the old components with a chip extractor. If one is not available, use a flat-blade screwdriver to remove the components.
Step 8 Insert the new components into the appropriate sockets, as shown in Figure 1 and listed in Tables 2 and 3. Align the notch on the component with the notch on its socket as shown.
Step 9 Be careful not to bend or crush any of the pins when inserting the new components. If a pins is bent, use needlenose pliers to straighten it, then carefully reinsert the component in the socket.
Step 10 When all required components have been replaced, reinsert the card, reconnect the internal cables, and restart the system for an installation check.
| Socket Location | 128.43 | 128.45 | 1.0 | 2.0 | 2.2 |
| U201 | F0 | 17-0689 | 17-0988-01 U201 | 17-0988-02 U201 | 17-0988-03 U201 |
| U202 | F1 | 17-0690 | 17-0989-01 U202 | 17-0989-02 U202 | 17-0989-03 U202 |
| U203 | F2 | 17-0691 | 17-0990-01 U203 | 17-0990-02 U203 | 17-0990-03 U203 |
| U204 | F3 | 17-0692 | 17-0991-01 U204 | 17-0991-02 U204 | 17-0991-03 U204 |
| U205 | F4 | 17-0693 | 17-0992-01 U205 | 17-0992-02 U205 | 17-0992-03 U205 |
| U206 | F5 | 17-0694 | 17-0993-01 U206 | 17-0993-02 U206 | 17-0993-03 U206 |
| U207 | F6 | 17-0695 | 17-0994-01 U207 | 17-0994-02 U207 | 17-0994-03 U207 |
| U208 | F7 | 17-0696 | 17-0995-01 U208 | 17-0995-02 U208 | 17-0995-03 U208 |
| U402 (PAL)1 | 17-0665 | 17-0665 | 17-1361-01 U4022 | 17-1361-01 U4022 | |
| U906 (PAL) | 17-0671 | 17-0671 | 17-1362-01 U9062 | 17-1362-01 U9062 |
| Socket Location | 128.43 | 128.45 | 1.0 | 2.0 | 2.1 | 10.0 | 10.2 |
| U201 | F0 | 17-0689 | 17-0988-01 U201 | 17-0988-02 U201 | 17-0988-03 U201 | 17-1350-01 U201 | 17-1350-02 U201 |
| U202 | F1 | 17-0690 | 17-0989-01 U202 | 17-0989-02 U202 | 17-0989-03 U202 | 17-1351-01 U202 | 17-1351-02 U202 |
| U203 | F2 | 17-0691 | 17-0990-01 U203 | 17-0990-02 U203 | 17-0990-03 U203 | 17-1352-01 U203 | 17-1352-02 U203 |
| U204 | F3 | 17-0692 | 17-0991-01 U204 | 17-0991-02 U204 | 17-0991-03 U204 | 17-1353-01 U204 | 17-1353-02 U204 |
| U205 | F4 | 17-0693 | 17-0992-01 U205 | 17-0992-02 U205 | 17-0992-03 U205 | 17-1354-01 U205 | 17-1354-02 U205 |
| U206 | F5 | 17-0694 | 17-0993-01 U206 | 17-0993-02 U206 | 17-0993-03 U206 | 17-1355-01 U206 | 17-1355-02 U206 |
| U207 | F6 | 17-0695 | 17-0994-01 U207 | 17-0994-02 U207 | 17-0994-03 U207 | 17-1356-01 U207 | 17-1356-02 U207 |
| U208 | F7 | 17-0696 | 17-0995-01 U208 | 17-0995-02 U208 | 17-0995-03 U208 | 17-1357-01 U208 | 17-1357-02 U208 |
| U402 (PAL)1 | 17-0665 | 17-0665 | 17-1361-01 U4022 | 17-1361-01 U4022 | 17-1361-01 U4022 | 17-1361-01 U4022 | |
| U906 (PAL) | 17-0671 | 17-0671 | 17-1362-01 U9062 | 17-1362-01 U9062 | 17-1362-01 U9062 | 17-1362-01 U9062 |
After you reinstall the CSC-FCI and reconnect the internal ribbon cables, verify the installation before you replace the front panel by observing the LEDs on the ciscoBus controller card. There are no status indicators on the CSC-FCI, and the LEDs on the FDDI appliques do not come on until the interfaces are brought back up. The ciscoBus controller card indicators come on to indicate the presence of a valid card installed in each ciscoBus slot, but will not come on for a card that is not installed correctly or that does not appear to be running a valid microcode version.
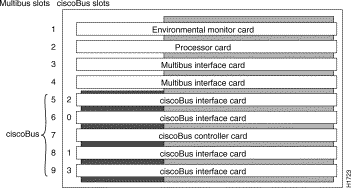
The ciscoBus controller card (CSC-CCTL or CSC-CCTL2) is always installed in the center ciscoBus slot (Multibus slot number 7) as shown in Figure 2. After you verify that the LEDs come on correctly, use the show controller cbus command to display the new microcode version.

The bank of indicators used on the CSC-CCTL is different from that on the CSC-CCTL2. Descriptions of both types of ciscoBus controller cards follow; review them so you can anticipate how the indicators should come on. Before turning on the chassis power to check the installation, note the ciscoBus slot number(s) that contain the CSC-FCIs you just reinstalled.
The CSC-CCTL contains a bank of 16 LEDs as shown in Figure 3: four sets of four LEDs, one set for each interface slot in the ciscoBus. Figure 3 shows the LEDs as viewed with the card installed in the card cage--edge on, component side up. In the illustration, the numbers above each LED indicate the corresponding ciscoBus slot number (slot numbers and locations are shown in Figure 3). Only the first (far left) LED in each set of four is used as an indicator that comes on when an interface is present in a ciscoBus slot. Upon power-up, all the LEDs come on, indicating that the CSC-CCTL is active. When the system boot is completed, only those LEDs that indicate the presence of a card in the corresponding ciscoBus slot should remain on; the LEDs for empty ciscoBus slots should go out.

The CSC-CCTL2 contains a bank of five LEDs: one red indicator for each ciscoBus slot and one green OK indicator. Figure 4 shows the indicators as viewed with the card installed in the card cage--edge on, component side up. In the illustration, the numbers above each LED indicate the corresponding ciscoBus slot number (slot numbers and locations are shown in Figure 4). Upon power-up, all the LEDs come on, indicating that the CSC-CCTL2 is active. When the system boot is completed, only those LEDs that indicate the presence of a card in the corresponding ciscoBus slot should remain on; the LEDs for empty ciscoBus slots should go out.

Verify correct installation of the new microcode components with the following steps.
Step 1 Turn ON the system power. Verify that all the LEDs on the ciscoBus controller card (CSC-CCTL or CSC-CCTL2) come on according to the previous description of each. If they do not, check the following:
Step 2 CSC-CCTL2 only: When the system has completed its boot cycle (it will beep when complete), verify that the far right, green OK indicator comes on and remains on. If it does not come on, check the following:
Step 3 When the system has completed its boot cycle, check the four red indicators on the ciscoBus controller card. Ensure that the indicator for each occupied ciscoBus slot is on (refer to the section "Checking LEDs" on page 8 if necessary). In particular, check the slots for all CSC-FCIs you just reinstalled. If the LEDs do not come on properly, check the following:
To display the new microcode version, enter the EXEC command show controller cbus. The first line of the display for each installed FCI card should indicate the new microcode version and should now be displayed as a Controller Type 4.1, as follows.
router# show cont cbus
ciscoBus 1, controller type 3.0, microcode version 2.1
  (text omitted)
FDDI 0, controller type 4.1, microcode version 2.2
router# show cont cbus
ciscoBus 1, controller type 6.0, microcode version 10.1
(text omitted)
FDDI 0, controller type 4.1, microcode version 10.2
When the installation checks out successfully, replace the access cover and finger-tighten the two thumb fasteners.
This completes the CSC-FCI or CSC-C2FCI microcode upgrade.


|
|