|
|

This chapter describes each type of power supply, and includes the following sections:
Use the following power supply specifications to help you plan where to install the
Cisco ONS 15104. Be sure to plan for close proximity of other devices for easy cabling configuration.
The AC power supply is used most often when the Cisco ONS 15104 is installed at a remote site that will not require configuration changes or maintenance. The installed AC power supply is located on the far right of the Cisco ONS 15104 chassis. The AC power supply automatically detects and adjusts for input voltage levels to either 110/120 or 220/240. Figure 3-1 shows the Cisco ONS 15104 with an AC-power supply.
 | Caution Check the power at your site to ensure that you are receiving clean power (free of spikes and noise). Install a power conditioner, if necessary, to ensure proper voltages and power levels in the source voltage for the system. |
Table 3-1 lists the AC-input power supply specifications.
| Description | Design Specification |
|---|---|
Power (input) | 125 watts RMS1 |
Source voltage range | 90 to 264 VAC2 |
North America service minimum | 15A |
International service minimum | 10A or 16A |
Power Source Input | 110/120 or 220/240 VAC |
| 1RMS = root mean square 2VAC = volts alternating current |
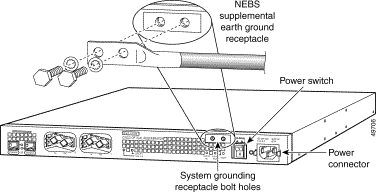
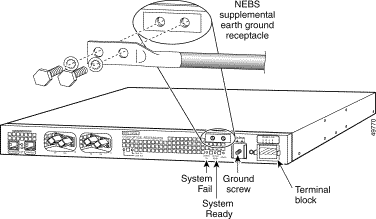
Even though the Cisco ONS 15104 requires a safety earth ground connection as part of the power connections, we strongly recommend that you connect the central office ground system to the supplemental bonding and grounding receptacle bolt holes on the Cisco ONS 15104 chassis. A receptacle is located on the front flanges of the chassis, near the top edge of the chassis. (See Figure 3-2.) The receptacle consists of two round bolt holes surrounded by an area of bare metal.
Install proper grounding at the site to avoid damage from lightning and power surges.
To ensure a satisfactory supplemental ground connection, you will need the following parts:
Use Figure 3-3 as a reference for the following procedure.
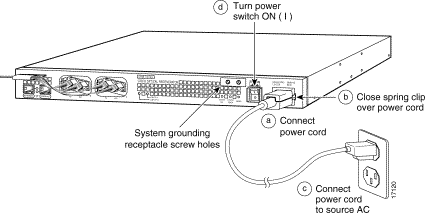
Perform the following procedure to connect or disconnect the AC power supply:
Step 1 Verify that the power switch on the Cisco ONS 15104 is in the OFF (0) position. (See Figure 3-3d.)
Step 2 Connect the AC power cord to the AC power supply receptacle on the Cisco ONS 15104. (See Figure 3-3a.)
Step 3 Close the spring clip over the power cord plug. (See Figure 3-3b.)
Step 4 Connect the other end of the AC power cord to the source AC receptacle. (See Figure 3-3c.)
Step 5 Turn the power switch to ON (|). (See Figure 3-3d.)
This completes the instructions to connect or disconnect the AC power supply. Proceed to the following section, "Verifying the AC Power Supply Installation."
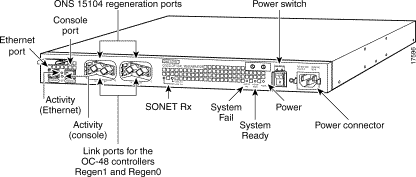
To complete the installation, check the LEDs on the front of the Cisco ONS 15104 to verify that the power supply is operating properly. (See Figure 3-4.)
Perform the following procedure to verify AC power supply installation:
Step 2 Verify the power supply.
Step 3 Verify that the Cisco ONS 15104 powers on. Visually check that the green LED light signifies that the power supply is on.
This indicates that the AC voltage source is within the range of 90 to 264 VAC.
Step 4 Check the following areas for possible problems, if the power LED is off:
Step 5 Visually check the LEDs during startup.
If a failure occurs upon startup, the red system fail LED will come on, and the green system ready LED will flash to indicate that a failure has occurred.
Step 6 If the system fail LED goes on, turn the power off.
The DC power supply is used most often when the Cisco ONS 15104 is installed in a lab or a populated site with direct configuration access to routers and a PC terminal. If you plan to use a DC-powered Cisco ONS 15104 in an onsite network environment, place it near external electrical power devices that the Cisco ONS 15104 will use as a power source.
| Caution Check the power at your site to ensure that you are receiving clean power (free of spikes and noise). Install a power conditioner, if necessary, to ensure proper voltages and power levels in the source voltage for the system. |
| Caution Install proper grounding at the site to avoid damage from lightning and power surges. |
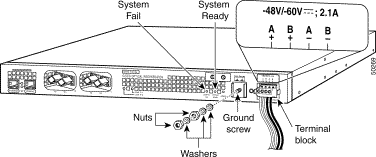
A DC-powered Cisco ONS 15104 is equipped with a single -40.5/-75 VDC central office (CO) power supply with redundant inputs from Battery A and Battery B. Table 3-2 lists the DC power supply specifications.
| Description | Design Specification |
|---|---|
Power (input) | 125W |
Input power cable | commensurately rated wire gauge |
Source voltage range | -40.5V to -75V |
Even though the Cisco ONS 15104 requires a safety earth ground connection as part of the power connections, we strongly recommend that you connect the central office ground system to the supplemental bonding and grounding receptacle bolt holes on the Cisco ONS 15104 chassis. A receptacle is located on the front of the chassis, near the top edge of the chassis. (See Figure 3-5.) The receptacle consists of two round bolt holes surrounded by an area of bare metal.
Install proper grounding at the site to avoid damage from lightning and power surges.
To ensure a satisfactory supplemental ground connection, you will need the following parts:
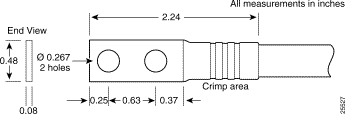
The grounding lug should be dual-hole and able to fit over M6 terminal studs at 0.625-inch (15.88-mm) centers. (For example, Panduit part number LCD8-14A-L, or equivalent.) Figure 3-6 shows the type of lug required for the DC-input cable connections.
 | Warning An On or Off switch or a disconnect device is not provided on the Cisco ONS 15104 with direct current (DC) power. A readily accessible disconnect device, such as a circuit breaker, shall be incorporated into the fixed wiring. |
Perform the following steps to connect the DC power supply as shown in Figure 3-7.
Step 2 Attach the ground wire to the ground screw on the front of the unit with the three washers and two nuts. (See Figure 3-7.)
Step 3 Ensure that the ground safety does not interfere with other hardware and then tighten the nuts.
Step 4 Prepare the other end of the grounding wire and connect it to the appropriate grounding point at your site to ensure an adequate earth ground.
Step 5 Locate the source wires from the two external electrical power devices that you want to configure with the Cisco ONS 15104.
Step 6 Use the wire strippers to strip 3/8 of an inch of the wire cover from each source.
Step 7 Insert the stripped wire from each external electrical power into the appropriate hole in the terminal block.
Step 8 Use the 3/16 flat blade screwdriver to tighten the screws on the DC terminal block.
Step 9 Turn the circuit breaker on the power source to power on the Cisco ONS 15104.
This completes the instructions to connect the DC-power supply. To verify the installation proceed to the following section, "Verifying the DC Power Supply Installation,".
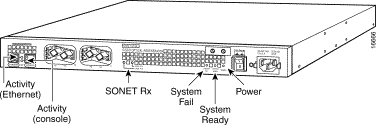
To verify that the power supply is operating properly perform the following procedures:
Step 2 Verify that the Cisco ONS 15104 powers on.
The green power LED indicates that the power supply is on, and the DC voltage source is within VDC range.
Step 3 If the power LED is off, check the following areas for possible problems,:
Step 4 Visually check the LEDs during startup. If a failure occurs upon startup, the red system fail LED will come on, and the green system ready LED will flash to indicate that a failure has occurred.
Step 5 If the system fail LED goes on, turn the power source off and do the following:
![]()
![]()
![]()
![]()
![]()
![]()
![]()
![]()
Posted: Fri Jan 5 07:56:46 PST 2001
All contents are Copyright © 1992--2001 Cisco Systems, Inc. All rights reserved.
Important Notices and Privacy Statement.