|
|

Cisco Part Number MAS-7KARB=
This document contains instructions for replacing the arbiter in the Cisco 7000 Series routers: the Cisco 7000 and the Cisco 7010. On both models, the arbiter mounts directly to the front of the backplane inside the chassis. You must turn off all system power before opening the chassis to access the arbiter.
The sections in this document include the following:
 | Warning You must turn OFF all system power and remove the front chassis panels to access the arbiter. The system backplane, which is exposed when the front panels are removed, carries dangerous current levels. Before opening the chassis, read "Safety Guidelines" to avoid injury. |
Following are brief descriptions of the Cisco 7000 Series routers and the arbiter.
The Cisco 7000 Series comprises the seven-slot Cisco 7000 and the five-slot Cisco 7010. Both models use the same route processor (RP), switch processor (SP), CxBus interface processors (IPs), and arbiter (MAS-7KARB). The Cisco 7000 provides five interface slots and offers a second modular power supply for redundant power. The Cisco 7010 provides three interface slots that support fewer interfaces, but which offer the same performance as the Cisco 7000 at a lower cost. Figure 1 shows the IP end of both models.

The arbiter is a printed circuit board that is mounted to the front (non-IP side) of the backplane. The arbiter arbitrates traffic across the CxBus by prioritizing access requests from IPs to ensure that each request is processed. The arbiter provides the following services for the system:
Figure 2 shows the interior of the seven-slot Cisco 7000 at the front (non-IP end) of the chassis, with the top and bottom front chassis panels removed to show the internal components.
Figure 3 shows the interior of the five-slot Cisco 7010 at the non-IP end, with the cover panel removed to show the internal components.

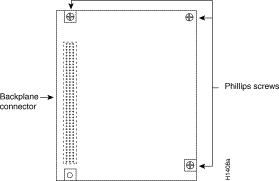
On both models, a 96-pin connector on the back of the arbiter plugs into a backplane receptacle, and standoff screws secure the arbiter to the backplane. The replacement instructions that follow describe specifically how the arbiter is mounted to the backplane on each model.
Opening the chassis exposes the power distribution wiring on the backplane. If the power is not shut down, the high current present on the backplane becomes a hazard. Also, removing the cover compromises the electromagnetic interference (EMI) integrity of the system. Therefore, always make sure that the system power switch is turned off before removing any internal components or interior chassis panels.
Before you begin this installation, review the safety guidelines in this section to avoid injuring yourself or damaging the equipment.
The following guidelines will help to ensure your safety and protect the equipment. This list is not inclusive of all potentially hazardous situations, so be alert.
In addition, use the guidelines that follow when working with any equipment that is connected to telephone wiring or other network cabling.
Electrostatic discharge (ESD) damage, which can occur when electronic boards or components are improperly handled, results in complete or intermittent failures. The RP, SP, and IPs each comprise a printed circuit board that is fixed in a metal carrier. EMI shielding, connectors, and a handle are integral components of the carrier. However, the arbiter is a printed circuit board that is not intended to be handled and has no frame or shielding. Handle the arbiter by the board edges only; never touch the board components, traces, or connector pins.
 | Caution Handle an arbiter by the edges only; avoid touching the board components, traces, or connector pins. |
Following are guidelines for preventing ESD damage:
Following are the tools and equipment that you will need to complete this replacement:
To replace the arbiter in a Cisco 7000 model, you also need the following tools:
To replace the arbiter in a Cisco 7010 model, you also need the following tools:
To replace the arbiter, you must turn off all system power and open the chassis. Proceed to the appropriate replacement procedure for your Cisco 7000 Series model:
In the Cisco 7000 model, the arbiter mounts directly to the backplane above the power bus bar. (See Figure 2.) A connector on the back of the arbiter plugs into a backplane receptacle, and three Phillips screws hold the board in place. To access the arbiter, you must turn off all system power and remove the top and bottom front chassis panels.
| Warning Before accessing the chassis interior, turn all power switches to OFF (O) and unplug the power cords. Dangerous current levels are present on the backplane when the system power is on. |
You must remove the bottom front panel before you can remove the top front panel. The inner side of the bottom front panel has ball studs that snap into the chassis frame. The top front panel is attached to the chassis with two screws. The EMI shielding around the outer edge of the top front panel acts as a spring and compresses when you push the panel into the chassis to keep the panel fitted tightly into the chassis opening.
To remove the front panels, perform the following steps:
Step 2 Pull the bottom of the panel out about one inch, then place your fingers behind the sides of the panel and pull it outward and down off the chassis. (See Figure 4.)

Step 3 On the top front panel, use a screwdriver to loosen the two captive screws at the bottom edge of the panel frame.
Step 4 Place one hand against the top front center of the panel to brace it. (See Figure 5a.) The top of the panel acts as a pivot point when you pull the bottom out and away from the chassis.

Step 5 With your other hand, grasp the front of the panel by inserting your fingers into the opening on the underside of the bezel. (See Figure 5a.)
Step 6 While pushing slightly against the top of the panel to constrain it, pivot the bottom edge of the frame outward about two inches. (See Figure 5a.) Because of the tightly compressed EMI shielding, you will have to use significant force to pull the bottom of the panel outward. However, be careful that you do not pull the panel more than two inches away from the chassis, or you can damage the inner bezel or LED board.
Step 7 When the bottom of the frame clears the chassis opening, keep your hands in the same positions and pull the panel downward and off the chassis. (See Figure 5b.)
After you remove the front chassis panels, remove the existing arbiter as follows:
Step 2 Locate the arbiter (see Figure 2), which is mounted directly to the upper part of the backplane above the power bus bar. The arbiter is held in place by the connector and three Phillips screws. Figure 3 shows the orientation of the arbiter on the Cisco 7000 backplane.
Step 3 Use the Phillips screwdriver to loosen each of the three screws by turning each counterclockwise two full turns. When all three screws are loosened, unscrew them completely from the board and put them aside. You will need them to install the new arbiter.
Step 4 Handling the arbiter by the edges only, grasp the edges of the board and pull the board straight out, keeping the arbiter parallel to the backplane. If necessary, gently rock the board from top to bottom to dislodge the board connector from the backplane.
Step 5 Place the board in an antistatic bag for return to the factory if required.
Install the new arbiter as follows:
Step 2 Handling the arbiter by the edges only, hold the board in the orientation shown in Figure 3. The connector should be on the left, on the back side of the board (the side facing away from you), and the component side of the board should be facing you.
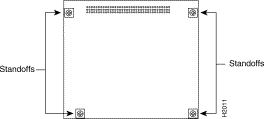
Step 3 Holding the edges of the board with your fingers, position the arbiter bus connector over the backplane receptacle and align the three holes in the corners of the board with the standoffs on the backplane.
Step 4 Push the board straight in toward the backplane until the board connector is fully seated in the backplane connector.
Step 5 The board should be flush against the standoffs, and the holes on the top and lower right of the board should be aligned with those in the standoffs. If they are not, remove the arbiter and ensure that the pins are not damaged, then repeat steps 3 and 4.
Step 6 Replace the three Phillips screws in the top left, top right, and lower right holes in the board, and turn each two full turns to secure the board in the backplane. When all screws are in place and the board is aligned, tighten all three screws.
Step 7 Proceed to the next section to replace the top and bottom front chassis panels before you restart the system to verify the installation.
Follow these steps to replace the front chassis panels:
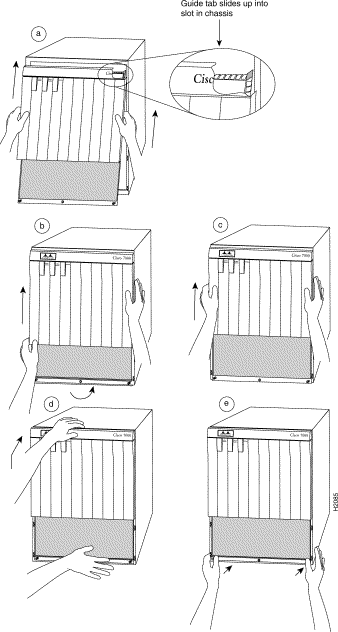
Step 2 Two guide tabs at the top edges of the panel fit into two slots in the top edges of the chassis opening. Tilt the top of the panel back (away from you) about 30 degrees from vertical and slide the two guide tabs into the chassis slots. (See Figure 7a.)
Step 3 Check the top of the panel and make sure it is lined up with the top of the chassis opening. Failure to align the panel at this point can result in equipment damage when performing the next step.
Step 4 Push the panel upward to push the tabs into the slots (see Figure 7a) and pivot the bottom of the panel toward the chassis until the panel frame meets the chassis. (See Figure 7b.) Maintain a steady upward pressure to keep the guide tabs in the chassis slots.
Step 5 When the panel is flush against the front of the chassis, push the panel upward until the bottom of the panel is level with the bottom of the chassis opening. (See Figure 7c.)
Step 6 While holding the panel in place, place one palm against the top front center of the panel to brace it, and place the other against the lip near the bottom edge of the frame. (See Figure 7d.)
Step 7 Push the panel upward and back into the chassis opening until the tabs on the front sides of the panel are flush against the front of the chassis. (See Figure 7d.) You will have to use significant force to compress the EMI shielding enough to fit into the opening. If the panel resists, pull it slightly downward and make sure that the panel is lined up with the top and sides of the opening in the chassis.
Step 8 When the tabs on the front sides of the panel are flush against the sides of the chassis, tighten the two captive screws in the bottom edge of the frame.
Step 9 To replace the bottom front panel, place the ball studs on the back of the panel over the holes in the front lip of the chassis and push the panel onto the chassis until the ball studs snap into place.
This completes the installation. Proceed to the next section to verify the installation.
Perform the following steps to verify that the new arbiter is installed correctly:
Step 2 After the system software boots, verify that the RP Normal LED is on. If it is not, the system software has failed to boot properly. Do the following:
Step 3 Verify that the Enabled LED on the SP goes on and remains on. If it does not, and if the RP Normal LED is on, suspect that the arbiter is not installed properly. Repeat the instructions in the previous step.
If after several attempts, the arbiter does not appear to be functioning properly, or if you experience trouble with the installation (for instance, if the holes in the board do not align with the backplane holes), contact a service representative or the Technical Assistance Center (TAC). (For the TAC phone number and email address, refer to the end of this document.)
This completes the arbiter replacement in the Cisco 7000. If you are returning the arbiter to the factory, refer to "Returning Parts to the Factory" for instructions.
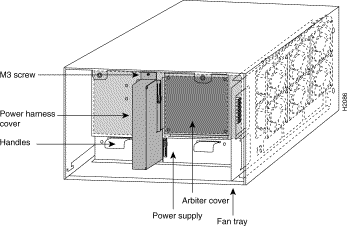
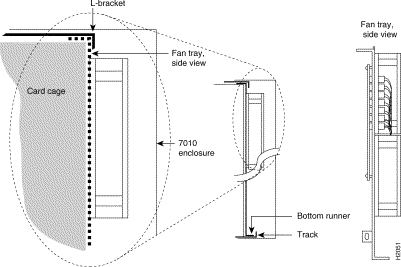
In the Cisco 7010 model, the arbiter mounts directly to the non-IP side of the backplane, behind the backplane cover. (See Figure 3.) A connector on the back of the arbiter plugs into a backplane socket, and the corners of the arbiter butt up against four standoffs. When the backplane cover is in place, four long Phillips screws extend through the cover, arbiter, and standoffs to secure the cover and the arbiter to the backplane. To replace the arbiter, you must remove the chassis cover panel and remove the fan tray, power harness cover, and backplane cover.
You must remove the fan tray in order to remove the backplane cover. To remove the fan tray, you need only remove a single M-4 pan-head screw that anchors the fan tray to the interior chassis frame. The fan tray slides into the right side of the chassis (when viewing the chassis from the non-IP end).
Because the power harness cover straddles both the power supply and backplane cover, you must remove it to access the arbiter. The power harness cover shields the wiring harness that delivers DC power from the power supply to the backplane. A tab at the bottom of the cover fits into a slot in the chassis floor; a single Phillips screw secures the top of the harness cover to the backplane cover.
The backplane cover shields the non-IP side of the backplane and the arbiter (the arbiter cover is integrated with the backplane cover). Fourteen Phillips screws secure the four flanged sides of the cover to the interior chassis frame and, near the center of the cover, two additional screws secure the cover to two standoffs mounted to the backplane (behind the cover). The arbiter standoff screws secure the backplane cover and the arbiter to the four arbiter standoffs mounted to the backplane. Removing the backplane cover exposes the entire backplane, including the arbiter, which remains attached to the backplane by the 96-pin connector.
The two captive slotted screws are the only fasteners on the cover panel. Five tabs at the bottom edge of the panel fit into slots at the base of the chassis opening. The tabs act as a pivot point for pulling the panel away from the chassis opening, and as guides to align the panel when replacing it.
| Warning Before opening the chassis, turn OFF the system power and unplug the power cord. When the power is on, conductors carrying high current are exposed on the fan tray and backplane. |
Follow these steps to remove and replace the chassis cover panel:
Step 2 Pull the top of the panel out about three inches, then grasp the sides of the panel and pull it upward and away from the chassis.
Step 3 Put the cover aside, then proceed to the next procedure to remove the fan tray.

When viewing the chassis from the non-IP end, the fan tray is on the far right. (See Figure 3.) A cutout in the front of the tray provides a handle for pulling the tray out of the chassis. An M-4 Phillips screw anchors a tab on the lower left side of the tray to the interior chassis frame, just below the right power supply ear. When the fan tray is fully inserted in the chassis, an edge connector on the fan control board snaps into the backplane electrical connector. The bottom of the tray is a metal runner that guides the tray along a metal track on the chassis floor. Also, a bracket on the chassis ceiling helps guide the tray into the chassis. Refer to Figure 9 while performing the following procedure.
After removing the chassis cover, follow these steps to remove the fan tray:
Step 2 Locate the fan tray, which is in the far right of the non-IP end of the chassis. (See Figure 3.) On the lower left side of the fan tray, locate the tab that is anchored to the chassis frame with an M-4 Phillips screw.
Step 3 Use a No. 2 Phillips screwdriver to remove the M-4 Phillips screw that secures the fan tray.
Step 4 Grasp the cutout handle in the front of the tray and pull the fan tray straight out of the chassis. (See Figure 9.) After the fan control board connector becomes free of the backplane socket, the fan tray will slide easily along the track and out of the chassis.
Step 5 Place the removed fan tray aside and proceed to the next section to remove the power harness cover.

You must remove the power harness cover in order to remove the backplane cover and access the arbiter. A single M-3 Phillips screw secures the power harness cover to the backplane cover.
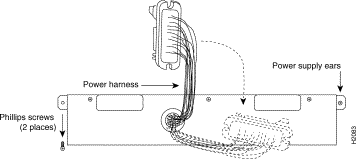
The power distribution wiring harness from the power supply connects to the backplane through a cutout in the backplane cover. You must disconnect the power harness before you can remove the backplane cover. When disconnecting the harness, be sure to pull the connector plug; do not pull on the harness wires. Pulling on the wires can damage the wiring and break internal connections.
After you remove the fan tray, follow these steps to remove the power harness cover:
Step 2 Use a No. 1 Phillips screwdriver to remove the M-3 screw that secures the harness cover to the backplane. (See Figure 10.)
Step 3 Holding the cover with one hand, tilt the top of the cover back toward you, then pull it upward slightly so that the tab clears the slot in the chassis floor.
Step 4 When the tab clears the slot, pull the cover back off the harness and out of the chassis.
Step 5 Disconnect the power harness plug from the backplane receptacle by pulling the polarized plug out of the receptacle; do not pull on the wires. (See Figure 11.)
Step 6 Lay the wiring harness down on the chassis floor and proceed to the next section to remove the backplane cover.

The backplane cover is held in place with sixteen 10mm M3 pan-head screws and four 20mm M3 pan-head standoff screws. The 10mm screws secure the flanged edges of the backplane cover to the chassis frame: there are two on each side of the cover, five along the top and five along the bottom edges, and two standoffs near the center to the left of the backplane power connection. The four longer 20mm standoff screws, one at each corner of the arbiter cover, extend through the cover, arbiter, and into the backplane to anchor the arbiter.
| Caution Be careful not to disconnect any backplane screws that are near the cover flanges. Before proceeding, refer to Figure 12 and locate the 20 screws so that you can remove only those that secure the backplane cover. |

After you remove the power harness cover, follow these steps to remove the backplane cover:
Step 2 Use a No. 1 Phillips screwdriver to remove the four longer (20mm) M-3 standoff screws from the arbiter cover. (See Figure 12.) Keep these four longer standoff screws separate so that you can replace all the screws in the proper place.
Step 3 Holding the cover at the edge of each side with your fingertips, and pull the cover straight out, away from the backplane (toward you) until it clears the three guide pins at the top and lower right corners.
Step 4 Place the removed backplane cover aside and proceed to the next section to remove the arbiter.
The arbiter will remain secured to the backplane by the 96-pin connector. Figures 3 and 3 show the orientation of the arbiter on the Cisco 7010 backplane.
When removing the arbiter, handle the board by the edges only to avoid damage from ESD. After you remove the backplane cover, follow these steps to remove the arbiter:
Step 2 Grasp the edges of the board and pull the board straight out from the backplane to disconnect the board connector from the backplane socket. If necessary, rock the board from side to side very slightly to dislodge the pins from the backplane.
Step 3 Place the arbiter in an antistatic bag.
Step 4 If you are returning the failed arbiter to the factory, use the packaging from the new arbiter to pack and return the old one. Refer to the specific return instructions that accompany the new arbiter, if any, or contact a service representative or the Technical Assistance Center (TAC). (For the TAC phone number and email address, refer to the end of this document.)
This completes the arbiter removal procedure; proceed to the following section to install the new arbiter.
Follow these steps to install the new arbiter:
Step 2 Holding the edges of the board with your fingers, position arbiter bus connector over the backplane socket and align the four holes in the corners of the board with the four standoffs.
Step 3 Place your fingers around the top and side edges of the board and push the board straight in toward the backplane until the bus connector is fully seated in the backplane socket.
Step 4 The board should be flush against the standoffs, and the holes on the top and lower right of the board should be aligned with those in the standoffs. If they are not, remove the arbiter and ensure that the pins are not damaged, then repeat steps 2 and 3.
Step 5 Proceed to the next section to replace the backplane cover.
After you install the new arbiter on the backplane, follow these steps to replace the backplane cover:
Step 2 Ensure that the guide pins extend through the holes in the cover, then slide the cover back towards the backplane until it is flush against the chassis frame.
Step 3 Replace the four long standoff screws at each corner of the arbiter cover, but do not tighten them until you align the cover and replace the other screws.
Step 4 Replace the 16 M-3 screws along the cover edges and in the two standoffs. When all screws are in place, tighten them all.
Step 5 Proceed to the next section to reconnect the power harness and replace the cover.
After you replace the backplane cover, follow these steps to reconnect the power harness to the backplane port and replace the power harness cover:
Step 2 Hold the power harness cover with one hand, with the tab on the bottom and the open side facing away from you. Tilt the top of the panel back slightly (toward you). (See Figure 10.)
Step 3 Insert the tab on the bottom of the cover into the slot in the chassis floor. (See Figure 10.)
Step 4 While pushing the cover downward slightly to keep the bottom tab in the slot, push the top of the cover back over the harness wires until the sides are flush against the backplane cover. Ensure that all of the harness wires are tucked under the cover.
Step 5 Insert the M-3 screw through the top of the harness cover and use a No. 1 Phillips screwdriver to tighten it.
Step 6 Proceed to the next section to replace the fan tray.
Before inserting the fan tray, compare the hardware inside the chassis to Figure 14. The runner on the bottom of the fan tray must slide along in the track on the floor. At the same time, the runner on the top of the tray must slide through the notch at the top of the chassis opening, then over the top of the card cage while staying to the left of the L-bracket on the chassis ceiling.
After you replace the power harness cover, follow these steps to replace the fan tray:
Step 2 Insert the top runner of the fan tray through the notch in the top of the chassis. Continue pushing the tray straight into the chassis, and ensure that the bottom runner slides into the track on the floor of the chassis. If the tray hangs up, pull it back out a few inches and try pushing it back in again. If the runners seem to be catching on the brackets, push the tray slightly toward the left when inserting it again.
Step 3 Slide the tray back into the chassis, pushing it all the way in until the edge connector on the fan control board snaps into the backplane socket.
Step 4 Replace the M-4 Phillips screw that secures the tab on the fan tray to the backplane, then use a No. 2 Phillips screwdriver to tighten the screw.
Step 5 Proceed to the next section to replace the cover panel.
After you replace the fan tray, follow these steps to replace the chassis cover panel:
Step 2 Slide the guide tabs into the slots in the bottom edge of the chassis. (See Figure 4.)
Step 3 Using the guides as a pivot point, push the top half of the panel back toward the chassis opening until the panel is flush with the edges of the chassis.
Step 4 Hold the top front of the panel in place, if necessary, while you tighten the two captive slotted screws with a 3/16-inch flatblade screwdriver.
This completes the arbiter replacement. Proceed to the next section to restart the system and check the installation.
After you reassemble the chassis and replace the cover, perform the following steps to verify that the new arbiter is installed correctly and functioning properly. These steps will also help you verify that all the components that you removed or disconnected as part of this replacement procedure are returned to their previous state, when all router components (except the failed arbiter) were operating properly.
Step 2 About 10 seconds after you turn the power on, verify that the Normal LED on the RP goes on, which indicates that the system software booted successfully. If it does go on, proceed to the next step. If it does not go on, do the following:
Step 3 Verify that the Enabled LED on the SP goes on and remains on. If it does not, and if the RP Normal LED is on, suspect that the arbiter is not installed properly. Repeat the instructions in the previous step.
If after several attempts, the arbiter does not appear to be functioning properly, or if you experience trouble with the installation (for instance, if the holes in the board do not align with the backplane holes), contact a service representative for assistance. (For the TAC phone number and email address, refer to the end of this document.)
This completes the arbiter replacement in the Cisco 7010. If you are returning the removed arbiter to the factory, refer to the next section for instructions.
If your warranty or maintenance agreement requires that you return the failed arbiter to the factory, use the packing materials from the new arbiter or spare to return the replaced arbiter. Return the old arbiter within 10 days; otherwise, Cisco will bill you for the new part.
If you have questions about the order, please call 1 415 903-7208 or send a FAX to 1 415 903-8080.

![]()
![]()
![]()
![]()
![]()
![]()
![]()
![]()
Posted: Tue Feb 13 12:49:57 PST 2001
All contents are Copyright © 1992--2001 Cisco Systems, Inc. All rights reserved.
Important Notices and Privacy Statement.