|
|

Table Of Contents
Removing and Installing the VPN Acceleration Module
Cisco 7100 Series—Removing and Installing the VAM
Cisco 7200 Series—Removing and Installing the SA-VAM
Cisco 7401ASR Router—Removing and Installing the SA-VAM
Removing and Installing the VPN Acceleration Module
This chapter describes how to remove the VPN acceleration module (VAM) from the supported platforms and how to install a new or replacement VAM.
Before you begin installation, read Chapter 2, "Preparing for Installation" for a list of parts and tools required for installation.
This chapter contains the following sections:
•
Online Insertion and Removal
•
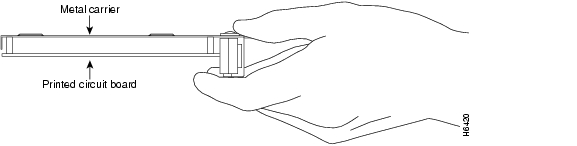
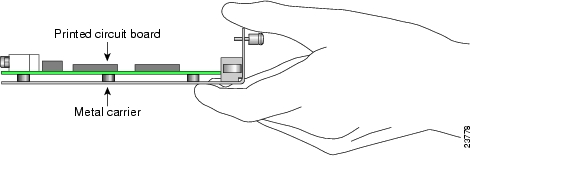
The VAM is a single-width circuit board mounted on a metal carrier. In the SA-VAM, the printed circuit board is mounted to the bottom of the metal carrier (see Figure 3-1) and in the SM-VAM, the printed circuit board is mounted to the top of the metal carrier (see Figure 3-2).
Note
Note
Caution
Handling the VAM
Caution
Figure 3-1 Handling the SA-VAM
Figure 3-2 Handling the SM-VAM
Online Insertion and Removal
The SA-VAMs support online insertion and removal (OIR) in the Cisco 7100 series routers, Cisco 7200 series routers, and the Cisco 7401ASR router. You do not need to power routers down when removing and replacing the SA-VAMs.
However, the SM-VAM on the Cisco 7100 series routers does not support OIR. You need to power down the Cisco 7100 series router when removing and replacing the SM-VAM.
It is wise to gracefully shut down the system before removing a port adapter that has active traffic moving through it. Removing a module while traffic is flowing through the ports can cause system disruption. Once the module is inserted, the ports can be brought back up.
Note
OIR allows you to install and replace modules while the router is operating; you do not need to notify the software or shut down the system power, although you should not run traffic through the module you are removing while it is being removed. OIR is a method that is seamless to end users on the network, maintains all routing information, and preserves sessions.
The following is a functional description of OIR for background information only; for specific procedures for installing and replacing a module in a supported platform, refer to the "VAM Removal and Installation" section.
Each module has a bus connector that connects it to the router. The connector has a set of tiered pins in three lengths that send specific signals to the system as they make contact with the module. The system assesses the signals it receives and the order in which it receives them to determine if a module is being removed from or introduced to the system. From these signals, the system determines whether to reinitialize a new interface or to shut down a disconnected interface.
Specifically, when you insert a module, the longest pins make contact with the module first, and the shortest pins make contact last. The system recognizes the signals and the sequence in which it receives them.
When you remove or insert a module, the pins send signals to notify the system of changes. The router then perfoms the following procedure:
1.
2.
3.
Caution
Warnings and Cautions
Observe the following warnings and cautions when installing or removing VPN acceleration modules.
Warning
Warning
Warning
Warning
Caution
VAM Removal and Installation
In this section, the illustrations that follow give step-by-step instructions to remove and install the VAM. This section contains the following illustrations:
•
•
•
Warning
Note
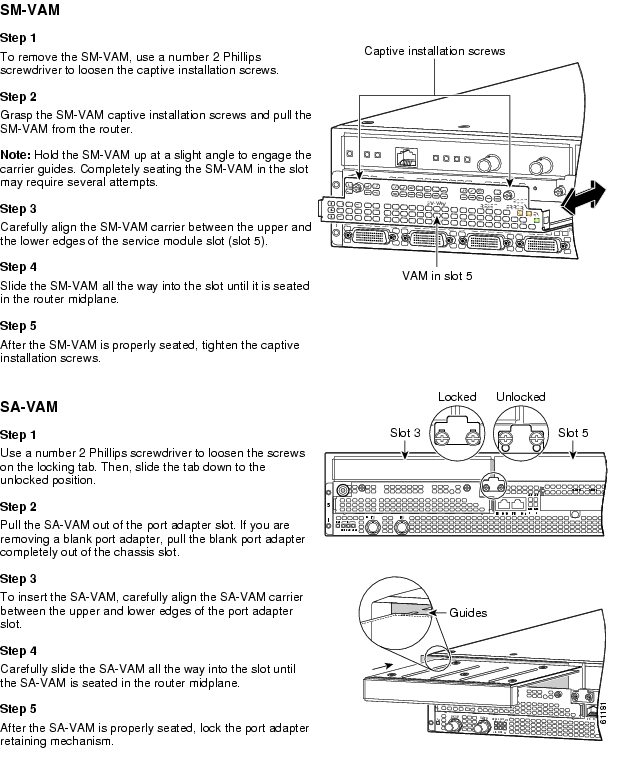
Cisco 7100 Series—Removing and Installing the VAM
Cisco 7200 Series—Removing and Installing the SA-VAM
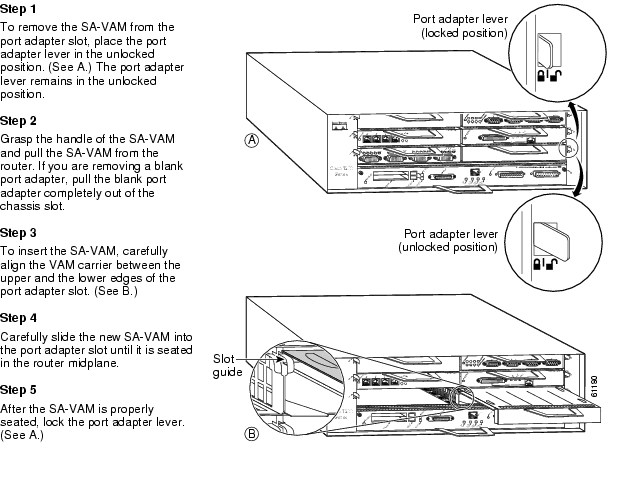
Cisco 7401ASR Router—Removing and Installing the SA-VAM
![]()
![]()
![]()
![]()
![]()
![]()
![]()
![]()
Posted: Sun Mar 12 03:12:42 PST 2006
All contents are Copyright © 1992--2006 Cisco Systems, Inc. All rights reserved.
Important Notices and Privacy Statement.