|
|

Table Of Contents
Information About Getting Help
Information About Authorization and Command Levels (Hierarchy)
Information About CLI Help Features
Information About Navigational and Shortcut Features
Information About Managing Command Output
Redirecting Command Output to a File
How to change from User to Viewer level authorization
How to log in with Root level authorization
How to exit from the Privileged Exec mode and revert to the Viewer mode
How to exit from the Global Configuration Mode
Information About Navigating Between Configuration Modes
Entering and Exiting Global Configuration Mode
Information About Interface Configuration Modes
Command Line Interface
This chapter describes how to use the SCE platform Command-Line Interface (CLI), its hierarchical structure, authorization levels and its help features. The Command-Line Interface is one of the SCE platform management interfaces.
The CLI is accessed through a Telnet session or directly via the console port on the front panel of the SCE platform. When you enter a Telnet session, you enter as the simplest level of user, in the User Exec mode.
The SCE platform supports up to six concurrent CLI sessions; five sessions initiated by Telnet connection, and one session on the console port.
•
Information About Getting Help
•
•
•
•
•
Information About Getting Help
To obtain a list of commands that are available for each command mode, enter a question mark (?) at the system prompt. You also can obtain a list of keywords and arguments associated with any command using the context-sensitive help feature.
The following table lists commands you can enter to get help that is specific to a command mode, a command, a keyword, or an argument.
Information About Authorization and Command Levels (Hierarchy)
When using the CLI there are two important concepts that you must understand to navigate:
•
This manual documents commands at all authorization levels.
•
The following sections describe the available Authorization and Command Hierarchy Levels and how to maneuver within them.
The on-screen prompt indicates both your authorization level and your command hierarchy level, as well as the assigned host name.
Note
CLI Command Hierarchy
The set of all CLI commands is grouped in hierarchical order, according to the type of the commands. The first two levels in the hierarchy are the User Exec and Privileged Exec modes. These are non-configuration modes in which the set of available commands enables the monitoring of the SCE platform, file system operations, and other operations that cannot alter the configuration of the SCE platform.
The next levels in the hierarchy are the Global and Interface configuration modes, which hold a set of commands that control the global configuration of the SCE platform and its interfaces. Any of the parameters set by the commands in these modes should be saved in the startup configuration, such that in the case of a reboot, the SCE platform restores the saved configuration.
The following table shows the available CLI modes.
When you login to the system, you have the User authorization level and enter User Exec mode. Changing the authorization level to Viewer does not change the mode. Changing the authorization level to Admin automatically moves you to Privileged Exec mode. To move to any of the configuration modes, you must enter commands specific to that mode.
A telnet session begins with a request for password, and will not continue until the proper user password is supplied. This enhances the security of the system by not revealing its identity to unauthorized people.
The list of available commands in each mode can be viewed using the question mark `?' at the end of the prompt.
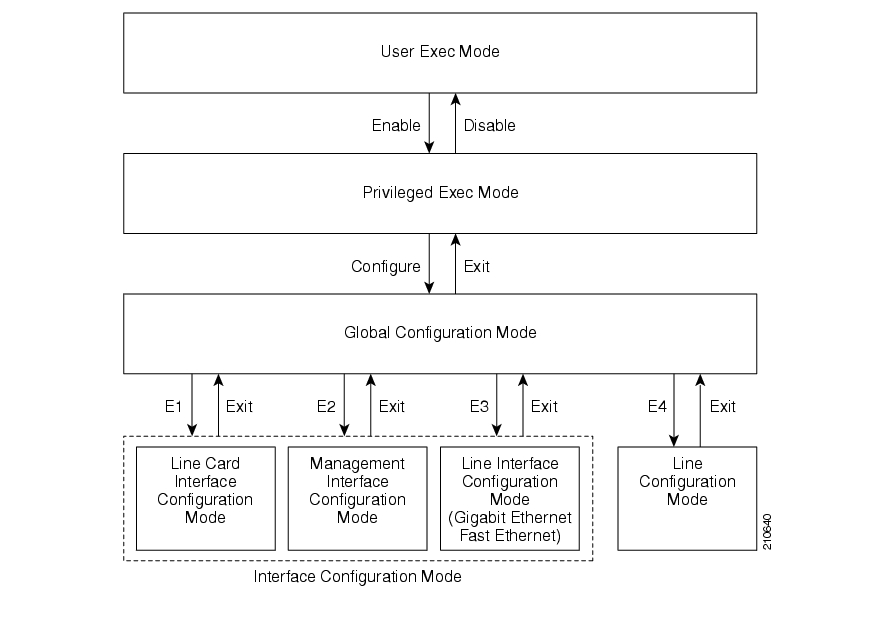
The figure below, illustrates the hierarchical structure of the CLI modes, and the CLI commands used to enter and exit a mode.
Figure 2-1 CLI Command Modes
The following commands are used to enter the different configure interface modes and the Line Configuration Mode:
•
•
•
•
•
•
Note
Note
Example:
This example illustrates moving into and out of configuration modes as follows:
•
•
•
•
•
•
•
•
•
SCE#configure
SCE(config)#clock timezone PST -10
SCE(config)#interface Mng 0/1
SCE(config if)#speed 100
SCE(config if)#exit
SCE(config)#interface LineCard 0
SCE(config if)#link-mode all-links forwarding
SCE(config if)#exit
SCE(config)#exit
SCE#
Prompt Indications
The on-screen prompt indicates your authorization level, your command hierarchy level, and the assigned host name. The structure of the prompt is:
<hostname (mode-indication) level-indication>
Authorization levels are indicated as follows:
This prompt...
Indicates this...
>indicates User and Viewer levels
numberindicates Admin level
#>indicates Root level
Command hierarchy levels are indicated as follows:
This command hierarchy...
Is indicated as...
User Exec
SCE>Privileged Exec
SCE#Global Configuration
SCE(config)#Interface Configuration
SCE(config if)#Line Configuration
SCE(config-line)#
Example:
The prompt
SCE1(config if)#indicates:•
SCE1•
•
Information About CLI Help Features
CLI provides context sensitive help. Two types of context sensitive help are supported:
Partial Help
To obtain a list of commands that begin with a particular character string, enter the abbreviated command entry immediately followed by a question mark (?). This form of help is called partial help, because it lists only the keywords or arguments that begin with the abbreviation you entered.
Example:
The following example illustrates how typing c?displays all available arguments that start with the letter c.
SCE(config)#snmp-server c?
Community		contact
SCE(config)#snmp-server c
Argument Help
To obtain a list of command's associated keywords or parameters, type a question mark (?) in place of a keyword or parameter on the command line.
Note
Example:
The following example illustrates how to get a list of all arguments or keywords expected after the command snmp-server.
SCE(config)#snmp-server ?
Community	Define community string
Contact		Set system contact
Enable		Enable the SNMP agent
Host   	 	Set traps destination
Location		Set system location
SCE(config)# snmp-server
When asking for help on particular parameter, the system informs you of the type of data that is an accepted legal value. The types of parameters supported are:
Example:
The following example illustrates the use of ?to get help on commands syntax. In this example, you can enter either the word running-config, or any name of a file, after the word copy.
SCE#copy ?
	running-config		Copy running configuration file
	STRING			Source file name
SCE#copy
The [no] Prefix
Many CLI commands offer the option of adding the word nobefore the command to disable the feature controlled by the command or revert it to its default configuration. This notation is shown in the CLI Command Reference (on page 1 ) as [no]to denote it is optional.
For example, no service telnetddisables the telnet server. Enabling the telnet server is done by typing service telnetd.
Information About Navigational and Shortcut Features
Command History
CLI maintains a history buffer of the most recent commands you used in the current CLI session for quick retrieval. Using the keyboard, you can navigate through your last commands, one by one, or all commands that start with a given prefix. By default, the system saves the last 30 commands you typed. You can change the number of commands remembered using the history sizecommand.
To use the history functions, use the keys shown in the following table.
Keyboard Shortcuts
The SCE platform has several keyboard shortcuts that make it easier to navigate and use the system. The following table shows the keyboard shortcuts available.
You can get a display the keyboard shortcuts at any time by typing help bindings.
Tab Completion
The CLI interface features tab completion. When you type in the first letters of a command and type <Tab>, the system automatically fills in the rest of the command or keyword. This feature works only when there is one command that could be possible using the starting letters.
Example:
The letters snm followed by <Tab> will be completed to the command snmp-server.
SCE(config)#snm<Tab>
SCE(config)#snmp-server
If you type <Enter> instead of <Tab>, and there is no ambiguity, the system actually carries out the command which would be filled in by the rest of the word.
Example:
The following example displays how the system completes a partial (unique) command for the enable command. Because enable does not require any parameters, the system simply carries out the enable command when the user presses Enter.
SCE>en<Enter>
Password:
SCE#
FTP User Name and Password
CLI enables saving ftp user name and password to be used in FTP operations—download and upload, per session.
These settings are effective during the current CLI session.
The following example illustrates how to set FTP password and user name and the use in these settings for getting a file named config.tmp from a remote station using FTP protocol.
SCE#ip ftp password vkSCE#ip ftp username vkSCE#copy ftp://@10.1.1.253/h:/config.tmp myconf.txtconnecting 10.1.1.253 (user name vk password vk) to retrieve config.tmp SCE#Information About Managing Command Output
Some commands, such as many show commands, may have many lines of output. There are several ways of managing the command output:
•
•
•
Note that by default, the show commands act the same as the more commands; that is, the output is displayed interactively a single screen at a time. Use the no more (on page ) command to disable this feature so that show commands display the complete output all at one time.
•
•
Scrolling the Screen Display
The output of some showand dircommands is quite lengthy and cannot all be displayed on the screen at one time. Commands with many lines of output are displayed in chunks of 24 lines. You can choose to scroll the display line by line or refresh the entire screen. At the prompt after any line, you can type one of the following keys for the desired action:
•
Show one more line
•
Show 24 more lines (a new chunk)
•
Stop prompting for more
•
Display a help string showing possible options
•
Filtering Command Output
You can filter the output of certain commands, such as show, more, and dir, so that output lines are displayed only if they include or exclude a specified expression. The filtering options are as follows:
•
•
•
The syntax of filtered commands is as follows:
•
•
•
Following is an example of how to filter the show versioncommand to display only the last part of the output, beginning with the version information.
SCE# show version begin revisionRedirecting Command Output to a File
You can redirect the output of commands, such as show, more, and dir, to a file. When writing the output of these commands to a file, you can specify either of the following options:
•
•
The syntax of redirection commands is as follows:
•
•
Following is an example of how to do the following:
•
•
SCE# more subscribers_10.10.2004 include gold append current_gold_subscribersCLI Authorization Levels
The SCE platform has four authorization levels, which represent the user access permissions. When you initially connect to the SCE platform, you automatically have the most basic authorization level, that is User, which allows minimum functionality.
To monitor the system, you must have Viewer authorization, while to perform administrative functions on the SCE platform, you must have Admin or Root authorization. A higher level of authorization is accessed by logging in with appropriate password, as described in the procedures below.
In each authorization level, all the commands of the lower authorization layers are available in addition to commands that are authorized only to the current level.
The following CLI commands are related to authorization levels:
•
•
Each authorization level has a value (number) corresponding to it. When using the CLI commands, use the values, not the name of the level, as shown in the following table.
How to change from User to Viewer level authorization
A telnet session begins with a request for password, and will not continue until the proper user password is supplied. This enhances the security of the system by not revealing its identity to unauthorized people.
DETAILED STEPS
Step 1
SCE>prompt, type enable 5 and press Enter..The system prompts for a password by showing the prompt
Password:Step 2
Note
SCE>does not change when you move from User to Viewer level.How to log in with Root level authorization
Step 1
Step 2
Password:prompt appears. Type in the user level password and press Enter.The SCE>prompt appears.
You now have user level authorization.
Step 3
SCE>prompt, type enable 15and press Enter.The system prompts for a password by showing the prompt Password:
Step 4
.Note that the password is an access-level authorization setting, not an individual user password.
The system prompt changes to
SCE#>to show you are now in Root level.This example illustrates how to change the authorization level from User to Root, and then revert back to Admin. No password is required for moving to a lower authorization level.
SCE>enable 15
Password:  <Cisco>
SCE#>disable
SCE#
Exiting Modes
This section describes how to revert to a previous mode.
•
•
How to exit from the Privileged Exec mode and revert to the Viewer mode
Step 1
The SCE> prompt for the Viewer and User Exec mode appears.
How to exit from the Global Configuration Mode
Step 1
The appropriate prompt for the previous level appears.
Example:
This example illustrates how to change the authorization level from User to Root, and then revert back to Admin. No password is required for moving to a lower authorization level.
SCE(config if)#exitSCE(config)#Information About Navigating Between Configuration Modes
•
•
Entering and Exiting Global Configuration Mode
•
•
How to enter the Global Configuration Mode
DETAILED STEPS
Step 1
SCE#prompt, type configure, and press Enter..The
SCE(config)# prompt appears.How to exit the Global Configuration Mode
Step 1
SCE#prompt, type exit, and press Enter.The
SCE#prompt appears.Information About Interface Configuration Modes
The components that are configured by the Interface Configuration Modes are:
•
–
The LineCard interface configures the main functionality of viewing and handling traffic on the line.
•
–
•
–
The Line Configuration Mode enables you to configure Telnet parameters.
•
•
•
•
•
•
Configuring the Physical Ports
The SCE platform contains the following physical port interfaces:
•
Interface Mng 0/1 or 0/2
The Management Interface mode configures the settings for the interface to a remote management console. The two management ports support management interface redundancy.
The following commands are used to configure the management port:
–
–
–
–
–
•
Interface FastEthernet 0/1, 0/2, 0/3, or 0/4
The FastEthernet Interface mode configures the settings for the FastEthernet interface to the Internet traffic on the wire. Each of the four ports can be set individually.
The following commands are used to configure the Fast Ethernet line ports:
–
–
–
–
•
Interface GigabitEthernet 0/1, or 0/2
The GigabitEthernet Interface mode configures the settings for the GigabitEthernet interface to the Internet traffic on the wire. Each of the two ports can be set individually.
–
•
The following commands are used to configure the Gigabit Ethernet line ports:
–
–
–
Note
Management Interface: 1,2
Ethernet Line Interfaces:
SCE 1000 platform: 1,2
SCE 2000 platform: 1,2,3,4Entering Management Interface Configuration Mode
Before you can configure the parameters for the management interface, you must be in the Mng Interface Configuration Mode.
•
•
How to enter Mng Interface Configuration Mode
DETAILED STEPS
Step 1
The
SCE(config)#prompt appears.Step 2
The
SCE(config-if)#prompt appears.The system prompt changes to reflect the higher level mode.
How to return to the Global Configuration mode
Step 1
How to enter LineCard Interface Configuration mode
The following procedure is for entering Line Card Interface Configuration mode. The procedures for entering the other interfaces are the same except for the interface command as described above.
DETAILED STEPS
Step 1
The
SCE(config)#prompt appears.Step 2
The
SCE(config if)#prompt appears.Step 3
The
SCE(config)#prompt appears.Step 4
Entering Ethernet Line Interface Configuration Mode
•
•
How to enter the FastEthernet Interface Configuration Mode
DETAILED STEPS
Step 1
SCE#prompt, type configure, and press EnterThe
SCE(config)#prompt appears.Step 2
The
SCE(config if)#prompt appears.The following example shows how to enter Configuration Mode for the FastEthernet Interface #3.
SCE(config)#interface FastEthernet 0/3SCE(config if)#How to enter the GigabitEthernet Interface Configuration Mode:
DETAILED STEPS
Step 1
SCE#prompt, type configure, and press EnterThe
SCE(config)#prompt appears.Step 2
Step 3
The
SCE(config if)#prompt appears.The following example shows how to enter Configuration Mode for the GigabitEthernet Interface number 2.
SCE(config)#interface GigabitEthernet 0/2SCE(config if)#How to navigate from one Interface Configuration Mode to another
Step 1
You are returned to the Global Configuration Mode.
Step 2
The "do" Command: Executing Commands Without Exiting
There are four configuration command modes:
•
•
•
•
When you are in one of these configuration modes, it is possible to execute an EXEC mode command (such as a showcommand) or a privileged EXEC (such as show running-config) without exiting to the relevant command mode. Use the 'do' command for this purpose.
How to execute an exec mode command from a configuration command mode
Step 1
SCE(config)#(orSCE(config if)#) prompt, type do <command>.The specified command executes without exiting to the appropriate exec command mode.
The following example shows how to display the running configuration while in interface configuration mode.
SCE(config if#) do show running-configHow to create a CLI script
The CLI scripts feature allows you to record several CLI commands together as a script and play it back. This is useful for saving repeatable sequence of commands , such as software upgrade. For example, if you are configuring a group of SCE platforms and you want to run the same configuration commands on each platform, you could create a script on one platform and run it on all the other SCE platforms. The available script commands are:
•
•
•
•
Step 1
SCE#prompt, type script capture sample1.scrwhere sample1.scris the name of the script.Step 2
Step 3
The system saves the script.
The following is an example of recording a script for upgrading software.
SCE#script capture upgrade.scr
SCE#configureSCE(config)#boot system new.pkg
Verifying package file... Package file verified OK. SCE(config)#exitSCE#copy running-config startup-configWriting general configuration file to temporary location... Extracting files from `/tffs0/images/new.pkg'... Verifying package file... Package file verified OK. Device `/tffs0/' has 81154048 bytes free, 21447973 bytes are needed for extraction, all is well. Extracting files to temp locations... Renaming temp files... Extracted OK. Backing-up general configuration file... Copy temporary file to final location... SCE#script stopSCE#
![]()
![]()
![]()
![]()
![]()
![]()
![]()
![]()
Posted: Wed May 30 08:54:28 PDT 2007
All contents are Copyright © 1992--2007 Cisco Systems, Inc. All rights reserved.
Important Notices and Privacy Statement.