|
|

Table Of Contents
Uninstalling the DHCP Forwarder
Adding a DHCP Forwarder Resource
Removing a DHCP Forwarder Resource
DHCP Forwarder Application
This module describes how to install the DHCP forwarder application as well as adding and removing resources.
Note
This module is only relevant when the DHCP Lease Query LEG is installed on the SM server.
The DHCP Forwarder application acts as a bridge between the DHCP Lease Query LEG and the DHCP servers. The LEG sends a request to the DHCP Forwarder, which then forwards the request to the appropriate DHCP server. The DHCP Forwarder passes the replies from the DHCP servers to the LEG. The LEG signals the forwarder which server should receive each request. Therefore, no special configuration is needed for this application.
Because only root privileged applications can open ports under 1024 (DHCP uses ports 67 and 68), the DHCP Forwarder runs with root privileges.
•
•
Installing the DHCP Forwarder
Step 1
You must run the DHCP Forwarder installation script as root.
#./install-forwarder.shThe installation script extracts the DHCP Forwarder distribution to the sm-inst-dir \sm\server\addons\dhcp-forwarder directory ( sm-inst-dir refers to the SM installation directory). The script adds the initialization scripts to their location according to the machine's OS.
Step 2
The DHCP Forwarder application can be run using one of the following methods:
•
•
•
#/etc/init.d/p3dhcpforwarder start
Note
Uninstalling the DHCP Forwarder
Step 1
Run the following command as root to stop the application.
#/etc/init.d/p3dhcpforwarder stopStep 2
Run the following command as root to remove the startup and shutdown scripts.
•
•
# rm /etc/rc*.d/[SK]*p3dhcpforwarder /etc/init.d/p3dhcpforwarder•
•
# rm /etc/rc.d/rc*.d/[SK]*p3dhcpforwarder /etc/rc.d/init.d/ p3dhcpforwarderStep 3
Run the following command to remove the application.
# rm -r ~pcube/sm/server/addons/dhcp-forwarder
DHCP Forwarder VCS Agent
To verify that the DHCP Forwarder process is active at all times, a Veritas Cluster Server (VCS) Agent of type OnOnlyProcess is added as a resource.
•
•
Adding a DHCP Forwarder Resource
Step 1
Step 2
Step 3
Run the following command via a Telnet session on each of the servers:
>ps -ea -o pid,s,argsLook for the line containing the text "DHCP_FORWARDER". This line contains the path and arguments of the DHCP Forwarder to be used in the next step.
Step 4
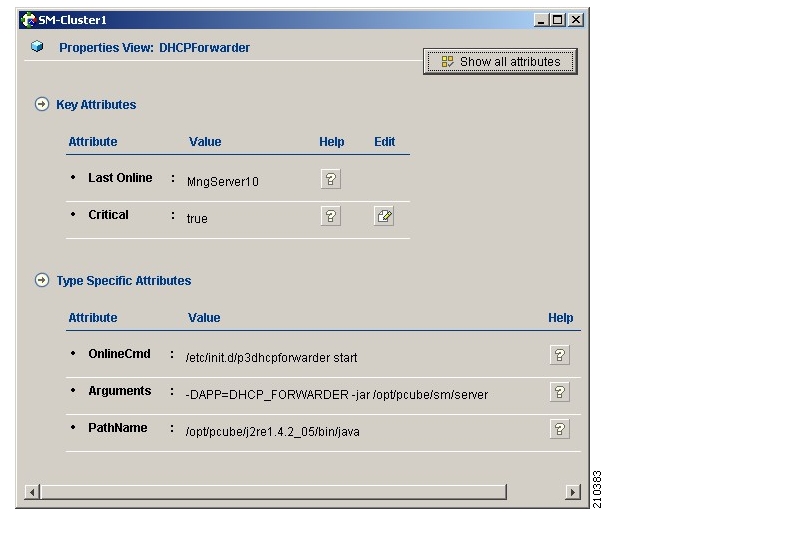
Define the parameters as follows:
•
•
/etc/init.d/p3dhcpforwarder start•
•
For further information about the parameters, see the following figure.
Figure 6-1 Adding a DHCP Forwarder Resource
Note
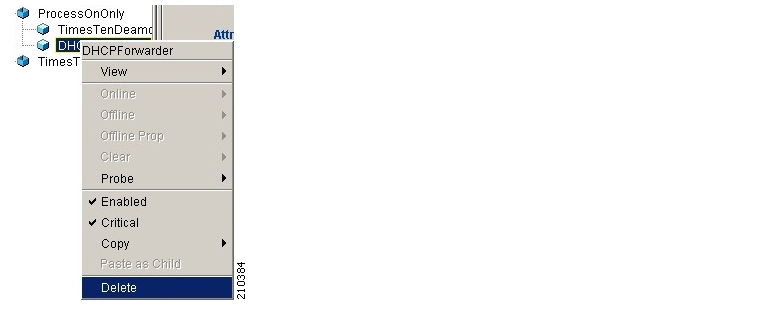
Removing a DHCP Forwarder Resource
Step 1
Figure 6-2 Removing a DHCP Forwarder Resource
![]()
![]()
![]()
![]()
![]()
![]()
![]()
![]()
Posted: Thu Jan 24 11:34:48 PST 2008
All contents are Copyright © 1992--2008 Cisco Systems, Inc. All rights reserved.
Important Notices and Privacy Statement.