|
|

This chapter describes how to configure a typical ATM network after autoconfiguration has established the default network connections. The network configuration modifications described in this chapter are used to optimize your ATM network operation.
This chapter uses the following virtual path (VP) and virtual channel (VC) terminology:
The characteristics of the VC are established when the VC is created and include the following:
These switching features can be turned off with interface configuration commands; autonomous switching must be explicitly enabled per interface.
Note For a complete description of the commands mentioned in this chapter, refer to the LightStream 1010 ATM Switch Command Reference publication.
When configuring virtual connections perform the following tasks:
Table 6-1 list the types of supported virtual connections.
Table 6-1 Supported LightStream 1010 Virtual Connection Types
| Connection | Point-to- Point |
Point-to- Multipoint |
Transit | Terminate |
|---|---|---|---|---|
For an overview description of LightStream 1010 ATM switch configuration examples see the Light Stream 1010 ATM Switch User Guide publication. The LightStream 1010 ATM Switch Command Reference publication provides the complete syntax for every switch configuration command and describes the no form of each command.
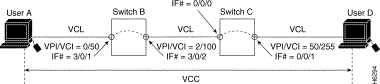
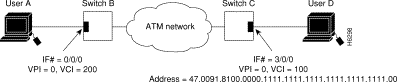
This section describes configuring LightStream 1010 virtual channel connections (VCCs). A VCC is established as a bidirectional facility to transfer ATM traffic between two ATM layer users. Figure 6-1 shows a VCC between ATM user A and user D.
Note The value of the virtual path and virtual channel identifiers may change as the traffic is relayed through the ATM network.
To configure a point-to-point VCC, use the following configuration command using the no form of this command to remove an entry:
| 1This command is documented in the LightStream 1010 ATM Switch Command Reference publication.
2The any-vci parameter is only available for atm interface 2/0/0. |
Note The row index for rx-cttr and tx-cttr must be configured before using this optional parameter. See the section "Configure Connection Traffic Table" in the chapter "Configuring Resource Management."
Parameter pd is not applicable to a virtual path.
The following example configures the internal cross-connect PVC on Switch B between interface 3/0/1, VPI=0, VCI =50 and interface 3/0/2, VPI=2, VCI=100 (see Figure 6-1):
The following example configures the internal cross-connect PVC on Switch-C between interface 4/1/0, VPI=2, VCI =100 and interface 0/0/1, VPI 50, VCI=255:
Each subsequent VC cross-connection and link must be configured until the VC is terminated to create the entire VCC.
The following example configures the CPU leg of any terminating PVC:
When configuring the CPU leg of a PVC that is not a tunnel, the VPI should be configured as 0. The preferred method of VCI configuration is to select the any-vci parameter, unless a specific VCI is needed as a parameter in another command, such as map-list.
Note If configuring a specific VCI value for the CPU leg, select a VCI value higher than 300. This will prevent a conflict with an automatically assigned VCI for well-known channels if the switch reboots.
To show the VC configuration use the following EXEC mode commands:
| Task | Command |
|---|---|
The following example displays Switch-B PVC configuration on interface 3/0/1:
The following example displays Switch-B PVC configuration on interface 3/0/1:
The following example displays Switch-B VC configuration on interface 3/0/1, VPI = 0, VCI = 50:
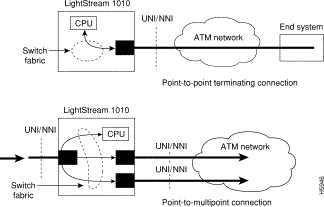
This section describes configuring terminating permanent virtual channel (PVC) connections. Terminating connections provide the connection to the LightStream 1010 switch CPU for LANE, IP over ATM, and control channels for ILMI, signaling, and PNNI plus network management.
Figure 6-2 is an illustration of transit and terminating connections.
Point-to-point and point-to-multipoint are two type of terminating connections. Both terminating connections are configured using the same commands as transit connections (discussed in the previous sections). However, all switch terminating connections use interface 2/0/0 to connect to the switch CPU.
The following sections describe both point-to-point and point-to-multipoint configuration of PVC and PVP connections.
To configure both point-to-point and point-to-multipoint terminating PVC connections, use the following EXEC commands. Use the no form of this command to disable
| 1This command is documented in the LightStream 1010 ATM Switch Command Reference publication.
2The any-vci feature is only available for interface ATM 2/0/0. |
.
When configuring point-to-multipoint PVC connections using the atm pvc command, the root point is port A and the leaf points are port B.
Note The row index for rx-cttr and tx-cttr must be configured before using this optional parameter. See the section "Configure Connection Traffic Table" in the chapter "Configuring Resource Management."
The following example configures the CPU leg of any terminating PVC:
When configuring the CPU leg of a PVC that is not a tunnel, the VPI should be configured as 0. The preferred method of VCI configuration is to select the any-vci parameter, unless a specific VCI is needed as a paramter in another command, such as map-list.
Note If configuring a specific VCI value for the CPU leg, select a VCI value higher than 300. This will prevent a conflict with an automatically assigned VCI for well-known channels if the switch reboots.
The following example configures the internal cross-connect PVC between interface 3/0/1, VPI=1, VCI =50 and the terminating connection at the CPU interface 2/0/0, VPI=0, and VCI unspecified:
The following example configures a point-to-multipoint connection from the root point PVC on switch interface 0/0/0, VPI=50, VCI =100 and the terminating connection at the leaf point switch CPU interface 2/0/0, VPI=0, VCI=300:
To show the terminating PVC configuration, use the following EXEC mode commands:
| Task | Command |
|---|---|
See the section "Use the show vc Command to Display Virtual Channel Connections" for examples of the show atm vc commands.
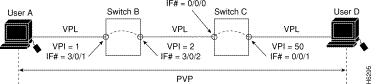
This section describes configuring a permanent virtual path (PVP) connection. Figure 6-3 is an example of an LightStream 1010 switch with PVPs configured through the switch.
To configure a permanent virtual path connection, use the following EXEC commands. Use the no form of this command to disable:
| Task | Command |
|---|---|
At the privileged EXEC prompt, enter configuration mode from the terminal. |
|
atm pvp vpi [cast-type type] [upc upc] [rx-cttr index] [tx-cttr index] interface card/sub_card/port |
| 1This command is documented in the LightStream 1010 ATM Switch Command Reference publication. |
Note The row index for rx-cttr and tx-cttr must be configured before using this optional parameter. See the section "Configure Connection Traffic Table" in the chapter "Configuring Resource Management."
The following example configures the internal cross-connect PVP within Switch-B between interfaces 3/0/1, VPI=0 and interface 3/0/2, VPI=2:
The following example configures the internal cross-connect PVP within Switch-C between interfaces 4/1/0, VPI=2 and interface 0/0/1, VPI=50:
Each subsequent PVP cross-connection and link must be configured until the VP is terminated to create the entire PVP.
To show the ATM interface configuration, use the following command:
The following example displays the PVP configuration of Switch-B:
This section describes configuring point-to-multipoint PVC connections.
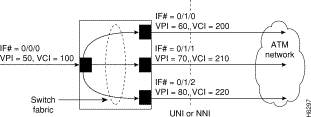
In Figure 6-4, cells entering the switch at the root point (on the left side at interface 0/0/0, VPI=50, VCI=100), are duplicated and switched to the leaf points (output interfaces), on the right side of the example.
Note If desired, one of the leaf points can terminate in the LightStream 1010 at the CPU interface ATM 2/0/0.
This section describes the commands needed to configure the example in Figure 6-4.
To configure point-to-multipoint PVC connections use the following EXEC commands. Use the no form of this command to disable:
| 1This command is documented in the LightStream 1010 ATM Switch Command Reference publication. |
To configure the point-to-multipoint PVC connections using the atm pvc command the root point is port-A and the leaf points are port-B.
Note The row index for rx-cttr and tx-cttr must be configured before using this optional parameter. See the section "Configure Connection Traffic Table" in the chapter "Configuring Resource Management."
The following example configures the root point PVC on switch interface 0/0/0, VPI=50, VCI =100 to the leaf point interface 0/1/0, VPI=60, VCI=200 (see Figure 6-4):
The following example configures the same root point PVC to the leaf point interface 0/1/1, VPI=70, VCI=210:
The following example configures the same root point PVC to the leaf point interface 0/1/2, VPI=80, VCI=220:
To show the point-to-multipoint PVC configuration use the following EXEC mode commands:
| Task | Command |
|---|---|
The following example displays the point-to-multipoint PVC configuration on interface 3/0/1:
The following example displays the VC configuration on interface 3/0/1, VPI = 50, VCI = 100:
This section describes configuring point-to-multipoint PVP connections.
Figure 6-5 provides an example of point-to-multipoint PVP connections.
In Figure 6-5, cells entering the switch at the root point (the left side at interface 0/0/0), VPI=50, are duplicated and switched to the leaf points (output interfaces), on the right side of the example.
The following section describes the commands needed to configure this example.
To configure point-to-multipoint PVP connections, use the following EXEC commands. Use the no form of this command to disable:
| 1This command is documented in the LightStream 1010 ATM Switch Command Reference publication. |
To configure the point-to-multipoint PVP connections using the atm pvp command the root point is Port A and the leaf points are Port B.
Note The row index for rx-cttr and tx-cttr must be configured before using this optional parameter. See the section "Configure Connection Traffic Table" in the chapter "Configuring Resource Management."
The following example configures the root point PVP on switch interface 0/0/0, VPI=50 to the leaf point interface 0/1/0, VPI=60 (see Figure 6-5):
The following example configures the same root point PVP to the leaf point interface 0/1/0, VPI=70:
The following example configures the same root point PVP to the leaf point interface 0/1/2, VPI=80:
To show the ATM interface configuration use the following command:
The following example displays the PVP configuration of the point-to-multipoint PVP connections:
This section describes configuring soft PVC connections. Soft PVC connections provide the following features:
Figure 6-6 is an illustration of the soft PVC connections used in the following examples:
To configure a soft PVC connection, use the following EXEC commands. Use the no form of this command to disable:
| 1This command is documented in the LightStream 1010 ATM Switch Command Reference publication. |
Note The row index for rx-cttr and tx-cttr must be configured before using this optional parameter. See the section "Configure Connection Traffic Table" in the chapter "Configuring Resource Management."
The following example allows User A to determine the destination ATM address of the interface connected to User D:
The following example configures a soft PVC on Switch-B between interface 0/0/0, source VPI = 0, source, VCI = 200, and Switch-C, destination ATM address = 47.0091.8100.00.0000.1111.1111.1111.1111.1111.1111.00, VPI = 0, VCI = 100 (see Figure 6-6):
To display the soft VC configuration at either end switch use the following EXEC mode commands:
| Task | Command |
|---|---|
The following example displays the soft VC configuration of Switch-B, on interface 0/0/0 out to the ATM network:
The following example displays the soft VC configuration of Switch-C, on interface 4/0/0 out to the ATM network:
This section describes configuring soft permanent virtual path (soft PVP) connections. Soft PVP connections provide the following features:
Figure 6-7 is an illustration of the soft PVP connections used in the section.
To configure a soft PVP connection, use the following EXEC commands. Use the no form of this command to disable:
| 1This command is documented in the LightStream 1010 ATM Switch Command Reference publication. |
Note The row index for rx-cttr and tx-cttr must be configured before using this optional parameter. See the section "Configure Connection Traffic Table" in the chapter "Configuring Resource Management."
The following example configures a soft PVP on Switch-B between interface 0/0/0, source VPI=75, and Switch-C, destination ATM address=47.0091.8100.00.0000.1111.1111.1111.1111.1111.1111.00, VPI=50 (Figure 6-7):
To show the ATM virtual path configuration use the following command:
The following example displays the soft VP configuration at switch B, on interface 0/0/0 out to the ATM network:
The following example displays the soft VP configuration at switch C, on interface 4/0/0 out to the ATM network:
This section describes the soft PVC route optimization feature. Most soft PVCs have a much longer lifetime than SVCs. The route chosen during PVC setup remains the same even though the network topology may change.
Soft PVC connections, with the route optimization percentage threshold set, provide the following features:
Route optimization is directly related to administrative weight. Administrations weight is similar to hop count. For a description of administrative weight see the section "Configure Administrative Weight Mode" in the chapter "Configuring ATM Routing and PNNI."
Configuring soft PVC route optimization is described in the following sections:
Soft PVC route optimization must be enabled, and a threshold level configured, to determine the point when a better route is identified and the old route is reconfigured.
To enable and configure soft PVC route optimization, use the following EXEC commands. Use the no form of this command to disable:
| Task | Command |
|---|---|
At the privileged EXEC prompt, enter configuration mode from the terminal. |
|
| 1This command is documented in the LightStream 1010 ATM Switch Command Reference publication. |
The following example enables soft PVC route optimization and sets the threshold percentage to 250 percent:
Soft PVC route optimization must be enabled and configured to determine the point when a better route is found the old route is reconfigured.
To enable and configure asoft PVC interface with route optimization, use the following interface configuration commands. Use the no form of this command to disable:
| Task | Command |
|---|---|
At the privileged EXEC prompt, enter configuration mode from the terminal. |
|
atm route-optimization soft-connection |
| 1This command is documented in the LightStream 1010 ATM Switch Command Reference publication. |
The following example configures a soft PVC with route optimization interval configured as every 30 minutes between the hours of 6:00 PM and 5:00 AM:
To display the soft PVC route optimization configuration, use the following EXEC mode commands:
The following example displays the soft PVC configuration on interface 0/0/0:
Normally the default well-known VCs will be automatically created with default VCIs. But for the unusual instances where the LightStream 1010 switch will interface to non-standard equipment, the steps described in this scetion will allow configuring nondefault well-known VCI values on a per-interface basis.
Table 6-2 list the default well-known VCs and their default configuration.
Table 6-2 Well-Known Virtual Channels
| Caution Do not change the well-known channels to use a VC where the remote end is sending AAL-5 messages not intended for this well-known VC. For example, do not swap VC values between two types of Well-Known VCs. |
Following is an overview of the steps needed to configure nondefault well-known VCs:
Step 2 Delete the existing automatically created well-known VCs.
Step 3 Configure the individual encapsulation type as follows:
Step 4 Copy running-config to startup-config
To configure the nondefault VCs for signaling, ILMI, and PNNI, use the following EXEC commands. Use the no form of this command to disable
| 1This command is documented in the LightStream 1010 ATM Switch Command Reference publication. |
.
The following example performs the nondefault VC configuration steps:
Step 2 Change to interface configuration mode for ATM interface 0/0/0.
Step 3 Enter manual-well-known-vc mode and delete the existing default well-known VCs using the atm manual-well-known-vc delete command.
Step 4 Confirm deletion by entering y.
Step 5 Configure the nondefault VC for signaling from the default 5 to 35 using the atm pvc 0 35 interface atm 2/0/0 0 any-vci encap qsaal command.
Step 6 Cofigure the ILMI VC then, configure the PNNI VC if needed using the same procedure.
Step 7 Save the new running configuration to the startup configuration using the copy running-config startup-config command.
Following is an example of this procedure:
![]()
![]()
![]()
![]()
![]()
![]()
![]()
![]()
Posted: Thu Jan 23 21:06:40 PST 2003
All contents are Copyright © 1992--2002 Cisco Systems, Inc. All rights reserved.
Important Notices and Privacy Statement.