This chapter describes how to configure Internet Protocol (IP) over asynchronous transfer mode (ATM) and LAN Emulation (LANE) on the LightStream 1010 ATM switch. The LAN Emulation and IP-over-ATM connection can only be used to manage the LightStream 1010 switch.
Note For definitions of all commands discussed in this chapter, refer to the LightStream 1010 ATM
Switch Command Reference publication.
This chapter is separated into the following two sections:
Note All of the examples in this chapter describe configuration of the ASP in a LightStream 1010
chassis. If the ASP is installed in the Catalyst 5500 Fast Ethernet switch chassis, the CPU Ethernet
interface will be 13/0/0 instead of 2/0/0.
Configuration of IP Over ATM
To configure the IP over ATM, complete the tasks in the following sections:
Note If the ASP is installed in the Catalyst 5500 switch chassis, the CPU Ethernet interface will be
13/0/0.
Configure Classical IP over ATM in an SVC Environment
This section describes classical IP over ATM in an SVC environment. It requires a network administrator to configure only the device's own ATM address and that of a single ATM ARP server into each client device.
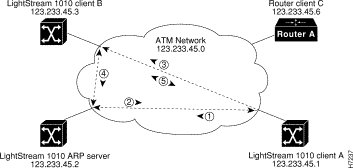
Figure 13-1 describes the steps needed to set up a classical IP over ATM connection between LightStream 1010 ATM switch client A and client B.
Figure 13-1 Example of Classical IP Over ATM Connection Setup
Step 1 The initial IP packet sent by client A triggers a request to the ARP server to look up the IP address and the corresponding ATM address of client B in the ARP server ARP table.
Step 2 The ARP server sends back a response to client A with the matching ATM address.
Step 3 Client A uses the ATM address it just obtained from the ARP server to setup an SVC directly to client B.
Step 4 When client B replies with an IP packet to client A, it also triggers a query to the ARP server.
Note When client B receives the ATM address for client A, it usually discovers it already has a call
set up to client A's ATM address and will not set up another call.
Step 5 Once the connection is known to both clients, they communicate directly over the SVC.
In Cisco's implementation, the ATM ARP client tries to maintain a connection to the ATM ARP server. The ATM ARP server can tear down the connection, but the client attempts once each minute to bring the connection back up. No error messages are generated for a failed connection, but the client will not route packets until the ATM ARP server is connected and translates IP network addresses.
For each packet with an unknown IP address, the client sends an ATM ARP request to the ARP server. Until that address is resolved, any IP packet routed to the ATM interface will cause the client to send another ATM ARP request.
The LightStream 1010 ATM switch may be configured as an ATM ARP client to work with any ATM ARP server conforming to RFC 1577. Alternatively, one of the LightStream 1010 ATM switches in a logical IP subnet (LIS) may be configured to act as the ATM ARP server itself. In that case, it automatically acts as a client as well. To configure classical IP and ARP in an SVC environment, perform one of the following tasks:
Note In the previous example some of the commands extended beyond the single line of the screen
and the command line shifted ten spaces to the left. The dollar sign ($) indicates the command line
has shifted.
Using ESI Example
The following example configures CPU interface 2/0/0 of client A, in Figure 13-1, as the following:
ATM ARP client with end system identifier—0041.0b0a.1081.40
IP address—123.233.45.1
subnet mask—255.255.255.0
ARP server NSAP address—47.0091.8100.0000.1111.1111.1111.2222.2222.2222.00
Note In the previous example one command extended beyond the single line of the screen and the
command line shifted ten spaces to the left. The dollar sign ($) indicates the command line has
shifted.
Configure as an ATM ARP Server
Cisco's implementation of the ATM ARP server supports a single, nonredundant server per logical IP subnetwork (LIS) and supports one ATM ARP server per subinterface. Thus, a single LightStream 1010 ATM switch can support multiple ARP servers by using multiple interfaces.
To configure the ATM ARP server, complete the following tasks starting in global configuration mode:
Task
Command
Step 1. At the privileged EXEC prompt, enter configuration mode from the terminal.
configure1 [terminal]
Step 2. Select the interface to be configured.
interface atm2/0/0[.sub_inter #]
Step 3. Specify the NSAP ATM address of the interface. or Specify the end-system-identifier address of the interface.
atm nsap-addressnsap-address
atm esi-addressesi-address
Step 4. Configure the switch as an ARP server.
atm arp-serverself
Step 5. Specify the IP address of the interface.
ip addressaddress mask
Step 6. Configure the ATM ARP server optional idle timer.
atm arp-servertime-outminutes2
Step 7. Exit interface configuration mode.
exit
Step 8. Configure a static route through the switch to the CPU interface. See the following note.
atm route {addr-prefix3} atm 2/0/0 internal
1This command is documented in the LightStream 1010 ATM Switch Command Reference publication.
2When you use this form of the atm arp-server command, it indicates that this interface will perform the ATM ARP server functions. When you configure the ATM ARP client (as described earlier), the atm arp-server command is used—with a different keyword and argument—to identify a different ATM ARP server to the client.
You can designate the current LightStream 1010 ATM switch as the ATM ARP server in Step 5 by adding the keyword self.
Note You only need to specify a static route in
Step 7 when configuring an ARP
client using NSAP address.
The idle timer interval is the number of minutes a destination entry listed in the ATM ARP server's ARP table can be idle before the server takes any action to time out the entry.
Example
The following example configures CPU interface 2/0/0 of the ARP server, in Figure 13-1, as the following:
ATM ARP client with end system identifier—0041.0b0a.1081.40
Configure Classical IP over ATM in a PVC Environment
This section describes classical IP over ATM in a PVC environment. The ATM Inverse ARP mechanism is applicable to networks that use PVCs, where connections are established but the network addresses of the remote ends are not known. A server function is not used in this mode of operation.
In a PVC environment, configure the ATM Inverse ARP mechanism by performing the following tasks, starting in global configuration mode:
Task
Command
Step 1. At the privileged EXEC prompt, enter configuration mode from the terminal.
configure1 [terminal]
Step 2. Select the interface to be configured.
interface atm2/0/0
Step 3. Specify the IP address of the interface.
ip addressaddress mask
Step 4. Create a PVC and enable Inverse ARP on it.
atm pvcvpivciencap aal5snap [inarp minutes]
1This command is documented in the LightStream 1010 ATM Switch Command Reference publication.
To show the IP over ATM interface configuration use the following command:
Task
Command
Show the ATM interface ARP configuration.
show atm map
Example
The following example displays the map-list configuration of the switch static map and IP over ATM interfaces:
Switch#show atm map
Map list yyy : PERMANENT
ip 1.1.1.2 maps to VPI=0 VCI=200
Map list zzz : PERMANENT
Map list a : PERMANENT
Map list 1 : PERMANENT
Map list ATM2/0/0_ATM_ARP : DYNAMIC
arp maps to NSAP 47.009181005670000000001122.00410B0A1081.40
, connection up, VPI=0 VCI=85, ATM2/0/0
ip 10.0.0.5 maps to NSAP 47.009181005670000000001122.00410B0A1081.40
, broadcast, ATM2/0/0
Switch#
Map a Protocol Address to a PVC
The ATM interface supports a static mapping scheme that identifies the ATM address of remote hosts or switches. This IP address is specified as a PVC or as an NSAP address for SVC operation. Configuration for both PVC and SVC map lists are described in the following sections:
This section describes how to map a PVC to an address, which is a required task if you are configuring a PVC.
You enter mapping commands as groups. You first create a map list and then associate it with an interface. Begin the following tasks in global configuration mode:
Task
Command
Step 1. At the privileged EXEC prompt, enter configuration mode from the terminal.
configure1 [terminal]
Step 2. Enable IP host based routing.
ip host-routing
Step 3. Specify an ATM interface and enter interface configuration mode.
interface atmcard/sub_card/port [.sub_inter #]
Step 4. Enter the IP address and subnet mask associated with this interface.
ipA.B.C.Dmask
Step 5. Enter the map group name associated with this PVC.
1This command is documented in the LightStream 1010 ATM Switch Command Reference publication.
You can create multiple map lists, but only one map list can be associated with an interface. Different map lists can be associated with different interfaces.
Example
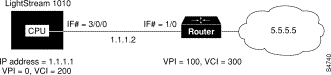
Figure 13-2 describes configuring the following PVC map list:
IP host-based routing is enabled.
ATM CPU interface 2/0/0 is configured with IP address 1.1.1.1 and a subnet mask.
An internal cross-connect PVC is configured from the CPU interface to ATM interface 3/0/0.
An IP route is created between the switch and the router.
A map group is assigned with the name yyy.
A map list is created with the name yyy then associated to the IP network connection 1.1.1.2 and ATM VC 200 is configured on ATM interface 3/0/0.
Figure 13-2 PVC Map List Configuration Example
Following is an example of the commands used to configure the map list in Figure 13-2.
To show the map list interface configuration use the following command:
Task
Command
Show the ATM interface map list configuration.
show atm map
Example
The following example displays the map list configuration of the LightStream 1010 switch at interface 2/0/0:
Switch#show atm map
Map list yyy : PERMANENT
ip 1.1.1.2 maps to VPI=0 VCI=200
Switch#
SVC Based Map-List Configuration
This section describes how to map an SVC to an NSAP address, which is a required task if you are configuring an SVC.
You enter mapping commands as groups. You first create a map list and then associate it with an interface. Begin the following tasks in global configuration mode:
Task
Command
Step 1. At the privileged EXEC prompt, enter configuration mode from the terminal.
configure1 [terminal]
Step 2. Enable IP host based routing.
ip host-routing
Step 3. Specify an ATM interface and enter interface configuration mode.
interface atmcard/sub_card/port [.sub_inter #]
Step 4. Enter the IP address and subnet mask associated with this interface.
ipA.B.C.Dmask
Step 5. Configure interface NSAP address.
atm nsap-address 20-octet NSAP address
Step 6. Enter the map group name associated with this PVC.
map-group name
Step 7. Exit interface configuration mode.
exit
Step 8. Create a map list by naming it, and enter map-list configuration mode.
map-list name
Step 9. Associate a protocol and address to a specific virtual circuit.
1This command is documented in the LightStream 1010 ATM Switch Command Reference publication.
You can create multiple map lists, but only one map list can be associated with an interface. Different map lists can be associated with different interfaces.
Example
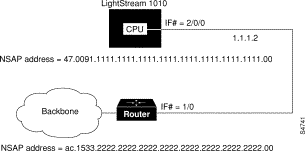
Figure 13-3 describes configuring the following SVC map list:
IP host-based routing is enabled.
ATM CPU interface 2/0/0 is configured with IP address 1.1.1.1 and a subnet mask.
ATM CPU interface 2/0/0 is configured with NSAP address 47.0091.1111.1111.1111.1111.1111.1111.1111.1111.00.
A map group is assigned with the name zzz.
A map list is created with the name zzz then associated NSAP address ac.1533.2222.2222.2222.2222.2222.2222.2222.2222.2222.00.
Figure 13-3 SVC Map List Configuration Example
Following is an example of the commands used to configure the map list in Figure 13-3.
To show the map list interface configuration use the following command:
Task
Command
Show the ATM interface map list configuration.
show atm map
Example
The following example displays the map list configuration of the LightStream 1010 switch at interface 2/0/0:
Switch#show atm map
Map list yyy : PERMANENT
ip 1.1.1.1 maps to VPI=0 VCI=200
ip 1.1.1.2 maps to VPI=0 VCI=200
Map list zzz : PERMANENT
Switch#
Configuration of LAN Emulation
This section describes how to configure LAN emulation (LANE) on the LightStream 1010 ATM switch.
What is LAN Emulation (LANE) on ATM?
The ATM Forum defined the LAN Emulation (LANE) specification to allow legacy LAN users to take advantage of ATM's benefits without requiring modifications to end-station hardware or software.
ATM is connection-oriented networking, not a broadcast medium. ATM uses connection-oriented service with point-to-point signaling or multicast signaling between source and destination devices. However, LAN-based protocol suites use connectionless service. LANs use broadcasts so source devices can find one or more destination devices.
LANE emulates a broadcast environment like IEEE 802.3 Ethernet on top of an ATM network that is a point-to-point environment. Client devices such as routers, ATM workstations, and LAN switches use LANE server functions to emulate a LAN across ATM.
LANE defines a service interface for network layer protocols that is identical to existing MAC layers. No changes are required to existing upper layer protocols and applications. Data sent across the ATM network is encapsulated in the appropriate LAN MAC packets. LANE essentially bridges LAN traffic across ATM. The LANE protocol defines the operation of an emulated LAN.
The ATM LANE system has three servers that are single points of failure. These are the LANE configuration server, the LANE server, and the broadcast-and-unknown server.
Cisco has developed a fault tolerance mechanism known as simple server redundancy that eliminates these single points of failure. Although this scheme is proprietary, no new protocol additions have been made to the LANE subsystems.
LANE supports DECnet, Banyan VINES, and XNS.
LANE Servers and Components
A single emulated LAN consists of the following entities: A LANE configuration server, a broadcast-and-unknown server, a LANE server, and LANE clients.
LANE configuration server — A server that assigns individual clients to particular emulated LANs by directing them to the LANE server that corresponds to the emulated LAN. The LANE configuration server maintains a database of LANE client ATM or MAC addresses and their emulated LAN. A LANE configuration server can serve multiple emulated LANs.
broadcast-and-unknown server—A multicast server that floods unknown destination traffic and forwards multicast and broadcast traffic to clients within an emulated LAN. One Cisco broadcast-and-unknown server exists per emulated LAN.
LANE server —A server that provides a registration facility for clients to join the emulated LAN. There is one Cisco LANE server per emulated LAN. The LANE server handles LAN Emulation Address Resolution Protocol (LE ARP) requests and maintains a list of LAN destination MAC addresses.
LANE client—An entity in an endpoint such as a router that performs data forwarding, address resolution, and other control functions for a single endpoint in a single emulated LAN. The LANE client provides a standard LAN service to any higher layers that interfaces to it. A router or switch can have multiple resident LANE clients, each connecting with different emulated LANs. The LANE client registers its MAC and ATM address with the LANE server.
Emulated LAN entities coexist on one or more Cisco routers. On Cisco routers, each LANE server and broadcast-and-unknown server is always a single entity. Other LANE components include ATM switches—any ATM switch that supports the ILMI and signaling. Multiple emulated LANs can coexist on a single ATM network.
Implementation Considerations
The following sections contain information relevant to implementation:
Network Support
Addressing
Rules for Assigning Components to Interfaces and Subinterfaces
Network Support
In this release, Cisco supports the following networking features:
Ethernet-emulated LANs only. This release does not support emulation of Token Ring networks.
Routing from one emulated LAN to another via IP, IPX, or AppleTalk.
Bridging between emulated LANs and between emulated LANs and other LANs.
Simple server redundancy for fault tolerance of all LANE servers.
DECnet, Banyan VINES, and XNS routed protocols.
Addressing
On a LAN, packets are addressed by the MAC-layer address of the destination and source stations. To provide similar functionality for LANE, MAC-layer addressing must be supported. Every LANE client must have a MAC address. In addition, every LANE component (server, client, broadcast-and-unknown server, and configuration server) must have an ATM address that is different from that of all the other components.
All LANE clients on the same interface have the same, automatically assigned MAC address. That MAC address is also used as the end-system identifier (ESI) part of the ATM address, as explained in the following section. Although client MAC addresses are not unique, all ATM addresses are unique.
LANE ATM Addresses
LANE uses NSAP-format ATM end system addresses. These addresses consist of the following:
A 13-byte prefix that includes the following fields defined by the ATM Forum
Cisco's Method of Automatically Assigning ATM Addresses for LANE
Cisco provides the following standard method of constructing and assigning ATM and MAC addresses for use in a LANE configuration server's database. A pool of MAC addresses is assigned to each ATM interface on the router or switch. For constructing ATM addresses, the following assignments are made to the LANE components:
The prefix fields are the same for all LANE components on the ATM interface; the prefix indicates the identity of the switch. The prefix value must be configured on the switch.
The ESI field value assigned to every client on the interface is the first of the pool of MAC addresses assigned to the interface.
The ESI field value assigned to every server on the interface is the second of the pool of MAC addresses.
The ESI field value assigned to the broadcast-and-unknown server on the interface is the third of the pool of MAC addresses.
The ESI field value assigned to the configuration server is the fourth of the pool of MAC addresses.
The selector field value is set to the subinterface number of the LANE component—except for the LANE configuration server, which has a selector field value of 0.
Because the LANE components are defined on different subinterfaces of an ATM interface, the value of the selector field in an ATM address is different for each component. The result is a unique ATM address for each LANE component, even within the same router. For more information about assigning components to subinterfaces, see the "Rules for Assigning Components to Interfaces and Subinterfaces" section later in this chapter.
For example, if the MAC addresses assigned to an interface are 0800.200C.1000 through 0800.200C.1007, the ESI part of the ATM addresses is assigned to LANE components as follows:
Any client gets the ESI 0800.200c.1000.
Any server gets the ESI 0800.200c.1001.
The broadcast-and-unknown server gets the ESI 0800.200c.1002.
The LANE configuration server gets the ESI 0800.200c.1003.
Using ATM Address Templates
ATM address templates can be used in many LANE commands that assign ATM addresses to LANE components (thus overriding automatically assigned ATM addresses) or that link client ATM addresses to emulated LANs. The use of templates can greatly simplify the use of these commands. The syntax of address templates, the use of address templates, and the use of wildcard characters within an address template for LANE are very similar to those for address templates of ISO CLNS.
Note E.164-format ATM addresses do not support the use of LANE ATM address templates.
LANE ATM address templates can use two types of wildcards: an asterisk (*) to match any single character, and an ellipsis (...) to match any number of leading or trailing characters.
In LANE, a prefix template explicitly matches the prefix but uses wildcards for the ESI and selector fields. An ESI template explicitly matches the ESI field but uses wildcards for the prefix and selector.Table 13-1 indicates how the values of unspecified digits are determined when an ATM address template is used:
Table 13-1 Values of Unspecified Digits in ATM Address Templates
Unspecified Digits In
Value Is
Prefix (first 13 bytes)
Obtained from ATM switch via Interim Local Management Interface (ILMI)
ESI (next 6 bytes)
Filled with the slot MAC address1 plus
0—LANE client
1—LANE server
2—LANE broadcast-and-unknown server
3—Configuration server
Selector field (last 1 byte)
Subinterface number, in the range 0 through 255.
1The lowest of the pool of MAC addresses assigned to the ATM interface plus a value that indicates the LANE component.
Rules for Assigning Components to Interfaces and Subinterfaces
The following rules apply to assigning LANE components to the major ATM interface and its subinterfaces:
The LANE configuration server always runs on the major interface.
The assignment of any other component to the major interface is identical to assigning that component to the 0 subinterface.
The server and the client of the same emulated LAN can be configured on the same subinterface.
Clients of two different emulated LANs cannot be configured on the same subinterface.
Servers of two different emulated LANs cannot be configured on the same subinterface.
Note On the LightStream 1010, LAN components may only be configured on the ASP interface or
one of it's subinterfaces.
LANE Configuration Task List
Before you begin to configure LANE, you must decide whether you want to set up one or multiple emulated LANs. If you set up multiple emulated LANs, you must also decide where the servers and clients will be located, and whether to restrict the clients that can belong to each emulated LAN. Bridged emulated LANs are configured just like any other LAN, in terms of commands and outputs. Once you have made those basic decisions, you can proceed to configure LANE.
To configure LANE, complete the tasks in the following sections:
There can be multiple servers on an emulated LAN and/or servers (LANE server/broadcast-and-unknown server) in an ATM cloud.
You can configure some emulated LANs with unrestricted membership and some emulated LANs with restricted membership. You can also configure a default emulated LAN, which must have unrestricted membership.
Once LANE is configured, you can monitor and maintain the components in the participating routers by completing the tasks in the following section:
It might help you to begin by drawing up a plan and a worksheet for your own LANE scenario, showing the following information and leaving space for noting the ATM address of each of the LANE components on each subinterface of each participating router or switch:
The router and interface where the LANE configuration server will be located
The router, interface, and subinterface where the LANE server and broadcast-and-unknown server for each emulated LAN will be located. There can be multiple servers for each emulated LAN for fault-tolerant operation.
The routers, interfaces, and subinterfaces where the clients for each emulated LAN will be located
The name of the default emulated LAN (optional)
The names of the emulated LANs that will have unrestricted membership
The names of the emulated LANs that will have restricted membership
The last three items in this list are very important; they determine how you set up each emulated LAN in the configuration server's database.
Display LANE Default Addresses
You can display the LANE default addresses to make configuration easier. Complete this task for each router or switch that participates in LANE. This command displays default addresses for all ATM interfaces present on the router. Write down the displayed addresses on your worksheet.
To display the default LANE addresses, complete the following step, beginning in global configuration mode:
Task
Command
Display the LANE default addresses.
show lane default-atm-addresses
Example
The following example displays the default LANE addresses:
Switch#show lane default-atm-addresses
interface ATM2/0/0:
LANE Client: 47.00918100000000400B0A2B81.0002F6900801.**
LANE Server: 47.00918100000000400B0A2B81.0002F6900802.**
LANE Bus: 47.00918100000000400B0A2B81.0002F6900803.**
LANE Config Server: 47.00918100000000400B0A2B81.0002F6900804.00
note: ** is the subinterface number byte in hex
Switch#
Enter the Configuration Server's ATM Address(es) on the Cisco Switch
You must enter the configuration server's ATM address into the Cisco Lightstream 1010 ATM switch and save it permanently, so that the value is not lost when the switch is reset or powered off.
On the Cisco LightStream 1010 ATM switch, the configuration server address can be specified for the entire switch, or per port.
To enter the configuration server addresses on the Cisco LightStream 1010 for the entire switch:
Task
Command
Step 1. At the privileged EXEC prompt, enter configuration mode from the terminal.
configure1 [terminal]
Step 2. Specify the LANE configuration server's ATM address for the entire switch.
atm lecs-address-default address
Step 3. Save the configuration value permanently.
copy running-config
1This command is documented in the LightStream 1010 ATM Switch Command Reference publication.
To enter the configuration server addresses on the Cisco LightStream 1010 per port:
Task
Command
Step 1. Make sure you are in interface configuration mode.
interface atm card/sub_card/port [.sub_inter #]
Step 2. Specify the LANE configuration server's ATM address for a port.
After you have set up all servers, broadcast-and-unknown servers, and clients on all ATM subinterfaces on all routers and switches that will participate in LANE, and have displayed their ATM addresses, you can use the information to populate the configuration server's database.
You can set up a default emulated LAN, whether or not you set up any other emulated LANs. You can also set up some emulated LANs with restricted membership and others with unrestricted membership.
To set up the database, complete the tasks in the following sections as appropriate for your emulated LAN plan and scenario:
Set Up the Database for the Default Emulated LAN Only
Set Up the Database for Unrestricted-Membership Emulated LANs
Set Up the Database for Restricted-Membership LANs
Set Up the Database for the Default Emulated LAN Only
When you configure a router as the configuration server for one default emulated LAN, you provide a name for the database, the ATM address of the server for the emulated LAN, and a default name for the emulated LAN. In addition, you indicate that the configuration server's ATM address is to be computed automatically.
When you set up a database of only a default unrestricted emulated LAN, you do not have to specify where the LANE clients are located. That is, when you set up the configuration server's database for a single default emulated LAN, you do not have to provide any database entries that link the ATM addresses of any clients with the emulated LAN name.
To set up the configuration server for the default emulated LAN, complete the following steps beginning in global configuration mode:
Task
Commands
Step 1. At the privileged EXEC prompt, enter configuration mode from the terminal.
configure1 [terminal]
Step 2. Create a named database for the LANE configuration server
lane database database-name
Step 3. In the configuration database, bind the name of the emulated LAN to the ATM address of the LANE server. Repeat this step for each server.
nameelan-nameserver-atm-addressatm-address index n
Step 4. In the configuration database, provide a default name for the emulated LAN.
default-nameelan-name
Step 5. Exit from database configuration mode and return to global configuration mode.
exit
1This command is documented in the LightStream 1010 ATM Switch Command Reference publication.
In Step 2, enter the ATM address of the server for the specified emulated LAN, as noted in your worksheet and obtained in the "Display LANE Default Addresses" section. You can have any number of servers per emulated LAN for fault tolerance. Priority is determined by entry order. The first entry has the highest priority unless you override it with the index option.
If you are setting up only a default emulated LAN, the elan-name value in Step 2 is the same as the default emulated LAN name you provide in Step 3.
Set Up the Database for Unrestricted-Membership Emulated LANs
When you set up a database for unrestricted emulated LANs, you create database entries that link the name of each emulated LAN to the ATM address of its server.
However, you may choose not to specify where the LANE clients are located. That is, when you set up the configuration server's database, you do not have provide any database entries that link the ATM addresses or MAC addresses of any clients with the emulated LAN name.
To configure a router or switch as the configuration server for multiple emulated LANs with unrestricted membership, complete the following steps beginning in global configuration mode:
Task
Command
Step 1. At the privileged EXEC prompt, enter configuration mode from the terminal.
configure1 [terminal]
Step 2. Create a named database for the LANE configuration server.
lane database database-name
Step 3. In the configuration database, bind the name of the first emulated LAN to the ATM address of the LANE server for that emulated LAN.
Repeat this step with the same emulated LAN name but different server ATM addresses to define secondary or backup servers for this emulated LAN.
nameelan-name1server-atm-addressatm-address index n
Step 4. In the configuration database, bind the name of the second emulated LAN to the ATM address of the LANE server.
Repeat this step, providing a different emulated LAN name and an ATM address, for each additional emulated LAN in this switch cloud.
nameelan-name2server-atm-addressatm-address index n
Step 5. (Optional) Specify a default emulated LAN for LANE clients not explicitly bound to an emulated LAN.
default nameelan-name1
Step 6. Exit from database configuration mode and return to global configuration mode.
exit
1This command is documented in the LightStream 1010 ATM Switch Command Reference publication.
In Steps 2 and 3, enter the ATM address of the server for the specified emulated LAN, as noted in your worksheet and obtained in the "Display LANE Default Addresses" section.
Set Up the Database for Restricted-Membership LANs
When you set up the database for restricted-membership emulated LANs, you create database entries that link the name of each emulated LAN to the ATM address of its server.
However, you also must specify where the LANE clients are located. That is, for each restricted-membership emulated LAN, you provide a database entry that explicitly links the ATM address or MAC address of each client of that emulated LAN with the name of that emulated LAN.
Those client database entries specify the clients that are allowed to join the emulated LAN. When a client requests that the configuration server indicate which emulated LAN it is to join, the configuration server consults its database and then responds as configured.
When clients for the same restricted-membership emulated LAN are located in multiple routers, each client's ATM address or MAC address must be linked explicitly with the name of the emulated LAN. As a result, you must configure as many client entries (at Step 5, in the following procedure) as you have clients for emulated LANs in all the routers. Each client will have a different ATM address in the database entries.
To set up the configuration server for emulated LANs with restricted membership, perform the following steps beginning in global configuration mode:
Task
Command
Step 1. At the privileged EXEC prompt, enter configuration mode from the terminal.
configure1 [terminal]
Step 2. Create a named database for the LANE configuration server.
lane database database-name
Step 3. In the configuration database, bind the name of the first emulated LAN to the ATM address of the LANE server for that emulated LAN.
nameelan-name1server-atm-addressatm-address index n
Step 4. In the configuration database, bind the name of the second emulated LAN to the ATM address of the LANE server.
Repeat this step, providing a different name and a different ATM address, for each additional emulated LAN.
nameelan-name2server-atm-addressatm-address index n
Step 5. (Optional) Specify a default emulated LAN for LANE clients not explicitly bound to an emulated LAN.
default nameelan-name1
Step 6. Add a database entry associating a specific client's ATM address with a specific restricted-membership emulated LAN.
Repeat this step for each of the clients of each of the restricted-membership emulated LANs on this switch cloud, in each case specifying that client's ATM address and the name of the emulated LAN with which it is linked.
Once you have created the database entries as appropriate to the type and the membership conditions of the emulated LANs, you can enable the configuration server on the selected ATM interface and router or switch by completing the following steps:
Task
Command
Step 1. At the privileged EXEC prompt, enter configuration mode from the terminal.
configure1 [terminal]
Step 2. If you are not currently configuring the interface, specify the major ATM interface where the configuration server is located.
interface atm 2/0/0[.sub_inter #]
Step 3. Link the configuration server's database name to the specified major interface, and enable the configuration server.
lane config database database-name
Step 4. Specify that the configuration server's ATM address will be computed by our automatic method.
lane config auto-config-atm-address
Step 5. Exit interface configuration mode.
exit
Step 6. Return to EXEC mode.
Ctrl-Z
1This command is documented in the LightStream 1010 ATM Switch Command Reference publication.
For each router that will participate in LANE, set up the necessary servers and clients for each emulated LAN; then display and record the server and client ATM addresses. Be sure to keep track of the router or switch interface where the LANE configuration server will eventually be located.
For only one default emulated LAN, you will have one set of servers to set up: one as a primary server and the rest as backup servers for the same emulated LAN. For multiple emulated LANs, you can set up servers for another emulated LAN on a different subinterface or on the same interface of this router or switch—or you can place the servers on a different router.
When you set up a server and broadcast-and-unknown server on a router, you can combine them with a client on the same subinterface, a client on a different subinterface, or no client at all on the router.
Where you put the clients is important, because any router with clients for multiple emulated LANs can route frames between those emulated LANs.
Set Up the Server, Broadcast-and-Unknown Server, and a Client on a Subinterface
To set up the server, broadcast-and-unknown server, and (optionally) clients for an emulated LAN, perform the following steps beginning in interface configuration mode:
Task
Command
Step 1. At the privileged EXEC prompt, enter configuration mode from the terminal.
configure1 [terminal]
Step 2. Specify the subinterface for the first emulated LAN on this router.
interface atm2/0/0[.sub_inter #]
Step 3. Enable a LANE server and a LANE broadcast-and-unknown server for the first emulated LAN.
lane server-bus ethernetelan-name1
Step 4. (Optional) Enable a LANE client for the first emulated LAN.
lane client ethernet [elan-name1]
Step 5. Provide a protocol address for the client.
protocol address mask2
1This command is documented in the LightStream 1010 ATM Switch Command Reference publication.
2The command or commands depend on the routing protocol used.
If the emulated LAN in Step 3 is intended to have restrictedmembership, consider carefully whether you want to specify its name here. You will specify the name in the LANE configuration server's database when it is set up. However, if you link the client to an emulated LAN in this step, and through some mistake it does not match the database entry linking the client to an emulated LAN, this client will not be allowed to join this emulated LAN or any other.
If you do decide to include the name of the emulated LAN linked to the client in Step 3 and later want to associate that client with a different emulated LAN, make the change in the configuration server's database before you make the change for the client on this subinterface.
Each emulated LAN is a separate subnetwork. In Step 4 make sure that the clients of the same emulated LAN are assigned protocol addresses on the same subnetwork and that clients of different emulated LANs are assigned protocol addresses on different subnetworks.
On any given router or switch, you can set up one client for one emulated LAN or multiple clients for multiple emulated LANs. You can set up a client for a given emulated LAN on any routers you choose to participate in that emulated LAN. Any router with clients for multiple emulated LANs can route packets between those emulated LANs.
To set up only a client for an emulated LANs, perform the following steps beginning in interface configuration mode:
Task
Command
Step 1. At the privileged EXEC prompt, enter configuration mode from the terminal.
configure1 [terminal]
Step 2. Specify the subinterface for an emulated LAN on this router.
interface atm2/0/0[.sub_inter #]
Step 3. Provide a protocol address for the client on this subinterface.
protocol address2
Step 4. Enable a LANE client for the first emulated LAN.
lane client ethernetelan-name1
1This command is documented in the LightStream 1010 ATM Switch Command Reference publication.
2The command or commands depend on the routing protocol used.
Each emulated LAN is a separate subnetwork. In Step 2, make sure that the clients of the same emulated LAN are assigned protocol addresses on the same subnetwork and that clients of different emulated LANs are assigned protocol addresses on different subnetworks.
This section describes configuring a LAN Emulation (LANE) client connection from the LightStream 1010 switch in the headquarters building to the CPU port 2/0/0 of the switch.
Note This connection may be used for switch management only.
Interface 2/0/0 configured as a LANE client will allow configuration of the switch from a remote host.
To configure interface 2/0/0 as a LANE client on the LightStream 1010 switch requires configuring the LANE client as described in the following section.
Using the atm lane client ethernet Command Description
To configure the interface 2/0/0 as a LANE client on LightStream 1010 switch, use the following EXEC commands using the no form of these commands to disable:
Task
Command
Step 1. At the privileged EXEC prompt, enter configuration mode from the terminal.
configure1 [terminal]
Step 2. Specify the address to the LECS.
atm lecs-addresslecs-address
Step 3. Select the interface to be configured.
interface atm2/0/0[.sub_inter #]
Step 4. Specify an ATM address, and override the automatic ATM address assignment for the LANE client.
lane client-atm-addressatm-address-template
Step 5. Configure a LANE client on the specified subinterface.
lane client ethernet [elan-name]
1This command is documented in the LightStream 1010 ATM Switch Command Reference publication.
Example
The following example configures the LAN emulation configuration server ATM address = 47.0091.0000..., switches to interface configuration mode to configure ATM CPU interface 2/0/0, ATM address = .0800.200C.1001.**, Ethernet LANE client at interface 2/0/0 as an Ethernet connection, with the name = mis,:
The LANE simple server redundancy feature creates fault tolerance using standard LANE protocols and mechanisms. If a failure occurs on the LANE configuration server or on the LANE server/broadcast-and-unknown server, the emulated LAN can continue to operate using the services of a backup LANE server. This protocol is called the Simple Server Redundancy Protocol (SSRP).
This section describes how to configure simple server redundancy for fault tolerance on an emulated LAN.
Understand Simple Server Redundancy
You can define redundant LANE configuration servers by configuring one or more server addresses—obtained through the Interim Local Management Interface (ILMI)—on the ATM switch. The LANE configuration server turns on server redundancy by adjusting its database to accommodate multiple server ATM addresses for a particular emulated LAN. The additional servers serve as backup servers for that emulated LAN.
For simple LANE service replication or fault tolerance to work, the ATM switch must support multiple LANE server addresses. This mechanism is specified in the LANE standard. The LANE servers establish and maintain a standard control circuit that enables the server redundancy to operate.
LANE simple server redundancy comes ready to operate with Cisco IOS Release 11.2 software. To activate the feature, you add an entry for the hierarchical list of servers that will support the given emulated LAN. All database modifications for the emulated LAN must be identical on all LANE configuration servers.
Older LANE configuration files continue to work with this new software. LANE configurations that network with non-Cisco ATM equipment continue to work, but the non-Cisco ATM equipment cannot participate in the LANE simple server redundancy.
The LANE protocol does not specify where any of the emulated LAN server entities should be located, but for the purpose of reliability and performance, Cisco implements these server components on its routers.
With the earlier implementation of LANE, only one LANE configuration server, capable of serving multiple emulated LANS, and only one LANE server/broadcast-and-unknown server per emulated LAN could exist for an ATM switch cloud. The earlier LANE protocol did not allow for multiple LANE servers within an emulated LAN. Therefore, these components represented both single points of failure and potential bottlenecks for LANE service.
LANE simple server redundancy corrects these limitations by allowing backup LANE configuration servers and LANE server/broadcast-and-unknown servers for an emulated LAN. Offered in Cisco IOS Release 11.2 or later, LANE simple server redundancy is enabled when you configure multiple servers for the same emulated LAN.
Note This server redundancy does not overcome other points of failure beyond the router ports:
Additional redundancy on the LAN side or in the ATM switch cloud are not a part of the LANE
simple server redundancy feature.
This redundancy feature works only with Cisco LANE configuration servers and LANE server/broadcast-and-unknown server combinations. Third-party LANE components continue to interoperate with the LANE configuration server and LANE server/broadcast-and-unknown server function of Cisco routers but cannot take advantage of the redundancy features.
Enable Redundant LANE Configuration Servers
To enable redundant LANE configuration servers, enter the multiple LANE configuration server addresses into the end ATM switches, which are used as central locations where the list of LANE configuration server addresses can be obtained. This allows LANE components connected to the switches to obtain the global list of LANE configuration server addresses.
To enable fault tolerance, you enable multiple, redundant, and standby LANE configuration servers and multiple, redundant, and standby LANE server/broadcast-and-unknown servers.Cisco LANE continues to operate seamlessly with other vendors' LANE components, but fault tolerance is not effective in this situation.
To configure multiple LANE server/broadcast-and-unknown servers for emulated LANs on the routers or switches, perform the following steps:
Task
Command
Step 1. Specify redundant LANE server/broadcast-and-unknown servers, or simple server replication. Enter the command for each LANE server address for the same emulated LAN. The index determines the priority. 0 is the highest priority.
name elan-name server-atm-address address index n
Step 2. Enable a LANE client for the first emulated LAN.
lane client ethernetelan-name1
Server redundancy guards against the failure of the hardware on which LANE server components are running. This includes all the ATM interface cards in Cisco routers and Catalyst switches. Fault tolerance is not effective for ATM network or switch failures.
For server redundancy to work correctly:
All the ATM switches must have identical lists of the global LANE configuration server addresses, in the identical priority order.
The operating LANE configuration servers must use exactly the same configuration database. Load the configuration table data using the config net command. This method minimizes errors and enables the database to be maintained centrally in one place.
Up to 16 LANE configuration server addresses can be handled by the LANE subsystem.
There is no limit on the number of LANE servers that can be defined per emulated LAN.
When a LANE configuration server switchover occurs, no previously joined clients are affected.
When a LANE server/broadcast-and-unknown server switches over, momentary loss of clients occurs until they are all transferred to the new LANE server/broadcast-and-unknown server.
LANE configuration servers come up as masters until a higher-level LANE configuration server tells them otherwise. This is automatic and cannot be changed.
If a higher-priority LANE server comes online, it bumps the current LANE server off on the same emulated LAN. Therefore, there may be some flapping of clients from one LANE server to another after a powerup, depending on the order of the LANE servers coming up. Flapping should settle after the last highest-priority LANE server comes up.
If none of the specified LANE servers are up or connected to the master LANE configuration server and more than one LANE server is defined for an emulated LAN, a configuration request for that specific emulated LAN is rejected by the LANE configuration server.
Changes made to the list of LANE configuration server addresses on ATM switches may take up to a minute to propagate through the network. Changes made to the configuration database regarding LANE server addresses take effect almost immediately.
If none of the designated LANE configuration servers are operational or reachable, the ATM Forum-defined well-known LANE configuration server address is used.
You can override the LANE configuration server address on any subinterface, by using the following commands:
lane auto-config-atm-address
lane fixed-config-atm-address
lane config-atm-address
Caution
When an override like this is performed, fault-tolerant operation cannot be guaranteed. To avoid affecting the fault-tolerant operation, do not override any LANE configuration server, LANE server or broadcast-and-unknown server addresses.
If an underlying ATM network failure occurs, there may be multiple master LANE configuration servers and multiple active LANE servers for the same emulated LAN. This situation creates a "partitioned" network. The clients continue to operate normally, but transmission between different partitions of the network is not possible. When the network break is repaired, the system recovers.
Monitor and Maintain the LANE Components
After configuring LANE components on an interface or any of its subinterfaces, on a specified subinterface, or on an emulated LAN, you can display their status. To show LANE information, perform the following tasks in EXEC mode:
Task
Command
Display the global and per-virtual channel connection LANE information for all the LANE components and emulated LANs configured on an interface or any of its subinterfaces.
show lane card/sub_card/port [.sub_inter #] | nameelan-name] [brief]
Display the global and per-VCC LANE information for the broadcast-and-unknown server configured on any subinterface or emulated LAN.
show lane bus [interface atm card/sub_card/port [.sub_inter #] | nameelan-name] [brief]
Display the global and per-VCC LANE information for all LANE clients configured on any subinterface or emulated LAN.
show lane client [interface atm card/sub_card/port [.sub_inter #] | nameelan-name] [brief]
Display the global and per-VCC LANE information for the configuration server configured on any interface.
show lane config [interface atm card/sub_card/port [.sub_inter #]]
Display the LANE configuration server's database.
show lane database [database-name]
Display the LANE ARP table of the LANE client configured on the specified subinterface or emulated LAN.
show lane le-arp [interface atm card/sub_card/port [.sub_inter # | nameelan-name]
Display the global and per-VCC LANE information for the LANE server configured on a specified subinterface or emulated LAN.
show lane server [interface atm card/sub_card/port [.sub_inter #] | nameelan-name] [brief]
LANE Configuration Examples
The examples in the following sections illustrate how to configure LANE for the following cases:
Default Configuration for a Single Emulated LAN with a LEC on the ATM switch
Default Configuration for a Single Emulated LAN with a Backup LANE configuration server and LANE server on the ATM switch
These examples show the LANE configurations, not the process of determining the ATM addresses and entering them.
Default Configuration for a Single Emulated LAN Example
The following example configures two Cisco 4500 routers and one Cisco LightStream 1010 ATM switch for one emulated LAN. Router 1 contains the configuration server, the server, the broadcast-and-unknown server, and a client. The remaining router and ATM switch each contain a client for the emulated LAN. This example accepts all default settings that are provided. For example, it does not explicitly set ATM addresses for the different LANE components that are colocated on the router. Membership in this LAN is not restricted.
Router 1
router1#show lane default-atm-addresses
interface ATM0:
LANE Client: 47.00918100000000603E7B2001.00000C407572.**
LANE Server: 47.00918100000000603E7B2001.00000C407573.**
LANE Bus: 47.00918100000000603E7B2001.00000C407574.**
LANE Config Server: 47.00918100000000603E7B2001.00000C407575.00
note: ** is the subinterface number byte in hex
router1#
ATM Switch
Switch#configure terminal
Enter configuration commands, one per line. End with CNTL/Z.
56 11 10 data 47.00918100000000603E7B2001.00000C407572.01
57 6 5 data 47.00918100000000603E7B2001.00000C407C02.02
Switch#
Default Configuration for a Single Emulated LAN with a Backup LANE Configuration Server and LANE Server on the ATM switch
The following example configures two Cisco 4500 routers and one Cisco LightStream 1010 ATM switch for one emulated LAN with fault tolerance.
Router 1 contains the configuration server, the server, the broadcast-and-unknown server, and a client. Router 2 contains only a client. The ATM switch contains the backup LANE configuration server and the backup LANE server for this emulated LAN and another client.
This example accepts all default settings that are provided. For example, it does not explicitly set ATM addresses for the different LANE components that are colocated on the router. Membership in this LAN is not restricted.
Router 1
router1#show lane default-atm-addresses
interface ATM0:
LANE Client: 47.00918100000000603E7B2001.00000C407572.**
LANE Server: 47.00918100000000603E7B2001.00000C407573.**
LANE Bus: 47.00918100000000603E7B2001.00000C407574.**
LANE Config Server: 47.00918100000000603E7B2001.00000C407575.00
note: ** is the subinterface number byte in hex
router1#
ATM Switch
Switch#show lane default-atm-address
interface ATM2/0/0:
LANE Client: 47.00918100000000603E7B2001.00603E7B2002.**
LANE Server: 47.00918100000000603E7B2001.00603E7B2003.**
LANE Bus: 47.00918100000000603E7B2001.00603E7B2004.**
LANE Config Server: 47.00918100000000603E7B2001.00603E7B2005.00
note: ** is the subinterface number byte in hex
Switch#configure terminal
Enter configuration commands, one per line. End with CNTL/Z.