|
|

Product Numbers: WATM-ASP1=
This document contains instructions for installing and configuring the LightStream 1010 ATM switch processor (ASP) module. For a complete description of commands used to configure and maintain the ASP, refer to the LightStream 1010 ATM Switch Software Configuration Guide and LightStream 1010 ATM Switch Command Reference publications. For complete hardware configuration and maintenance procedures, refer to the LightStream 1010 ATM Switch User Guide publication.
Cisco documentation and additional literature are available on a CD called Cisco Connection Documentation, Enterprise Series. The CD is updated and shipped monthly, so it might be more up-to-date than the printed documentation. To order the Cisco Connection Documentation, Enterprise Series CD, contact your local sales representative or call Customer Service. The CD is available both as a single CD and as an annual subscription. You can access Cisco technical documentation on the World Wide Web Universal Resources Locator (URL) http://www.cisco.com.
Sections in this document include the following:
 | Warning Only trained and qualified personnel should install or replace the LightStream 1010 ATM switch, chassis, power supplies, fan assembly, or modules. |
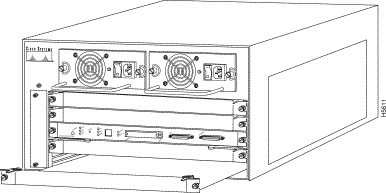
The LightStream 1010 uses a five-slot, modular chassis featuring the option of dual, fault-tolerant, load-sharing power supplies (See Figure 1.) The central slot in the LightStream 1010 is dedicated to a single, field-replaceable ATM switch processor (ASP) module that supports both the 5-Gbps shared memory and the fully nonblocking switch fabric. The ASP also supports the feature card and high performance reduced instruction set (RISC) processor that provides the central intelligence for the device. The remaining slots support up to four hot-swappable Carrier Modules (CAMs). Each CAM supports up to two hot-swappable Port Adapter Modules (PAMs) for a maximum of eight PAMs per switch, supporting a wide variety of desktop, backbone, and wide-area interfaces.
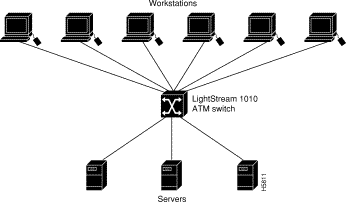
The LightStream 1010 ATM switch provides switched ATM connections to individual workstations, servers, LAN segments, or other ATM switches and routers using fiber-optic, unshielded twisted-pair (UTP), and coaxial cable.
Figure 2 shows an example of a network configuration using the LightStream 1010 ATM switch in a high-performance workgroup.
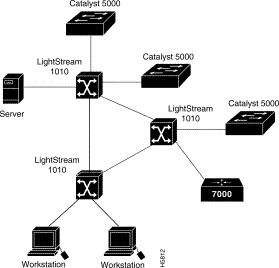
Figure 3 shows an example of a network configuration using the LightStream 1010 ATM switch for a campus backbone.
The ASP, shown in Figure 4, is the main system processor in the switch. The ASP contains the ATM switching engine and network management processor for the system software and most of the system memory components. It maintains and executes the management functions that control the system.

The ASP has the following features:
In addition to these features, the ASP performs the following management functions:
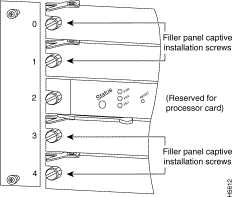
The ASP must be installed in slot 2, the middle slot when facing the front panel. (See Figure 1.)
The embedded Flash memory allows you to remotely load and store system software images. You can download a new software image over the network or from a local server, and add the new image to Flash memory or replace an existing file.
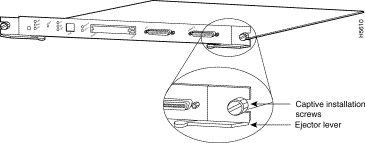
Access to the reset switch, located behind the faceplate of the ASP, is through a small hole approximately 1.5 inches to the right of the ASP status LED. (See Figure 5.)
The Ethernet RJ-45 port (labeled Enet) may be used to connect a management workstation and enables SNMP management of the LightStream 1010 switch. (See Figure 5.)
The dual-height Personal Computer Memory Card International Association (PCMCIA), Type II, card slot (shown in Figure 5) can be used to store Cisco Internetwork Operating System (IOS) software or system configuration information on a Flash card. The switch may also boot from the software stored on the Flash card.

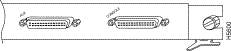
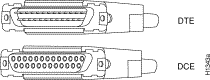
The console port on the ASP is a female, EIA/TIA-232, data communications equipment (DCE), DB-25 receptacle. Both data set ready (DSR) and data carrier detect (DCD) are active when the system is running. (See Figure 6.) The ready to send (RTS) signal tracks the state of the clear to send (CTS) input. The console port does not support modem control or hardware flow control. The console port requires a straight-through EIA/TIA-232 cable. Table 1 lists the signals used on this port.
| Pin | Signal | Direction | Description |
|---|---|---|---|
1 | GND | -- | Ground |
2 | TxD | <--- | Transmit data |
3 | RxD | ---> | Receive data |
6 | DSR | ---> | Data set ready (always on) |
7 | GND | -- | Ground |
8 | DCD | ---> | Data carrier detect (always on) |
20 | DTR | ---> | Data terminal ready |
The auxiliary port on the ASP is a male, EIA/TIA-232 DTE, DB-25 plug to which you can attach a channel service unit/data service unit (CSU/DSU) or other equipment in order to access the switch from the network. (See Figure 6.) Table 2 lists the EIA/TIA-232 signals used on this port.
The asynchronous auxiliary port supports hardware flow control and modem control.
| Pin | Signal | Direction | Description |
2 | TxD | ---> | Transmit data |
3 | RxD | <--- | Receive data |
4 | RTS | ---> | Request to send (used for hardware flow control) |
5 | CTS | <--- | Clear to send (used for hardware flow control) |
6 | DSR | <--- | Data set ready |
7 | Signal ground | -- | Signal ground |
8 | CD | <--- | Carrier detect (used for modem control) |
20 | DTR | ---> | Data terminal ready (used for modem control only) |
The feature card is a daughter card of the ASP module that implements a number of value-added capabilities over and above the base switch mechanisms. These include:
Supporting such capabilities on the field-replaceable feature card allows you to upgrade the LightStream 1010 in the field as and when such standards evolve and more advanced mechanisms are required.
Table 3 lists the ATM switch processor specifications:
| Description | Specifications |
|---|---|
Switch and processor capacity | 5 Gbps1 shared memory, nonblocking switch fabric |
Software images | Default image with IISP protocol |
Dimensions (H x W x D) | 1.2 x 14.4 x 16 in.(3.0 x 36.6 x 40.6 cm) |
Weight | 6.85 lb (3.09 kg) |
Operating temperature | 32 to 104° F (0 to 40° C) |
Nonoperating temperature | -40 to 67° F (-40 to 75° C) |
Humidity | 10 to 90%, noncondensing |
Altitude | -500 to 10,000 ft (-52 to 3,048 m) |
Microprocessor | 100-MHz MIPs R4600 |
Memory | 8 MB of Flash memory (upgradeable to 16 MB) |
Interface timing | Loop timing, Stratum 4 accuracy clock for self-timing, master clock distribution port |
ATM Switch Processor (ASP) | ASP module, 16 MB DRAM, 8 MB Flash memory, No Flash card installed WATM-ASP1 |
Management access | Standard Ethernet and dual EIA/TIA 232 serial ports on ASP module |
ASP Interface ports | RJ-45 IEEE 802.3 Ethernet 10BaseT port, 25-pin EIA/TIA-2324 AUX port, and a DB-25 console port for an administration workstation |
Network management | Port Tx and Rx LEDs, switch and common equipment status LEDs |
Mean Time Between Failures | 5.8 years for ASP and Feature card |
Maximum station-to-station cabling distance | 10BaseT Ethernet---Category 3-5 UTP5: 328 ft. (100 m) |
Agency approvals | Safety: UL6 1950, CSA7-C22.2 No. 950-93, and EN60950 |
The LEDs on the ASP indicate the status of the system, which includes the fan assembly and power supply(ies) and the ASP. The ASP LEDs are shown in Figure 7 and described in Table 4.

| LED | Description |
|---|---|
Status | The switch performs a series of self-tests and diagnostic tests. |
Fan | Indicates whether or not the fan is operational. |
PS 0, left bay | If the power supply is operational, the PS0 LED is green. |
PS 1, right bay | If the power supply is operational, the PS1 LED is green. |
Link | Green---The Ethernet port is operational. |
RX (Receive) | Off---No signal received. |
TX (Transmit) | Off---Not transmitting. |
Slot 11 | Off---No signal detected. |
Slot 02 | Off---No signal detected. |
When preparing your site for network connections to the switch, you need to consider a number of factors related to each type of interface:
The length of your networks and the distances between connections depend on the type of signal, the signal speed, and the transmission media (the type of cabling used to transmit the signals). For example, fiber-optic cable has a greater channel capacity than twisted-pair cabling. The following distance limits are provided as guidelines for planning your network connections before installation.
Serial signals can travel a limited distance at any given bit rate; generally, the slower the baud rate, the greater the distance. Table 5 shows the standard relationship between baud rate and distance for EIA/TIA-232 signals.
| Rate (bps) | Distance (feet) | Distance (meters) |
|---|---|---|
2400 | 200 | 60 |
4800 | 100 | 30 |
9600 | 50 | 15 |
19200 | 25 | 7.6 |
38400 | 12 | 3.7 |
56000 | 8.6 | 2.6 |
To install and configure the switch, you need a terminal with an EIA/TIA-232 data terminal equipment (DTE) port and an EIA/TIA-232 data communications equipment (DCE) console cable with DB-25 plugs at one end. You can detach the terminal (and cable) after the installation and configuration procedures are complete.
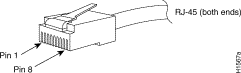
You need an Ethernet cable with RJ-45 male connectors (see Figure 8) between the Ethernet port and the Ethernet network. See the ASP Ethernet RJ-45 connector information in the section "Enet Port" in the chapter "LightStream 1010 ATM Switch Hardware" in the LightStream 1010 ATM Switch User Guide.
EIA/TIA-232 supports unbalanced circuits at signal speeds up to 64 kbps. The ASP console connection is a standard 25-pin D-shell connector (known as a DB-25) that is commonly used for EIA/TIA-232 connections. Figure 9 shows the connectors at the local end of the adapter cable. The system console port on the ASP EIA/TIA-232 connection supports only asynchronous connection.
The ASP contains an EIA/TIA-232 asynchronous console port (DB-25 receptacle).
When connecting a serial device, consider the cable as an extension of the switch for an external connection; therefore, use null-modem cable to connect the switch to a remote DCE device such as a modem or DSU. A straight-through cable to connect the switch to a DTE device such as a terminal or PC.
Before you connect a terminal to the console port, configure the terminal to match the switch console port, as follows:
The following guidelines help ensure your safety and protect the equipment. This list is not inclusive of all potentially hazardous situations that you may be exposed to as you install the module, so be alert.
| Warning Metal objects heat up when connected to power and ground, and can cause serious burns. |
The supervisor engine, modules, and redundant (second) power supplies are designed to be removed and replaced while the system is operating without presenting an electrical hazard or damage to the system. Before removing a redundant power supply, ensure that the first supply is powered on. However, you must shut down the system before removing or replacing any of the replaceable components inside the front panel, for example, the backplane. Never install equipment that appears damaged.
Follow these basic guidelines when working with any electrical equipment:
In addition, use the guidelines that follow when working with any equipment that is disconnected from a power source but still connected to telephone wiring or other network cabling.
| Warning Do not work on the system or connect or disconnect cables during periods of lightning activity. |
Electrostatic discharge (ESD) damage, which occurs when electronic cards or components are improperly handled, can result in complete or intermittent failures. The ASP and PAMs each consist of a printed circuit card that is fixed in a metal carrier. Electromagnetic interference (EMI) shielding, connectors, and a handle are integral components of the carrier. Although the metal carrier helps to protect the cards from ESD, use a preventive antistatic strap whenever you handle the ASP or PAMs. Handle the carriers by the handles and the carrier edges only; never touch the cards or connector pins.
 | Caution Always tighten the captive installation screws on the ASP and PAMs when you are installing them. These screws prevent accidental removal of the ASP, CAMs, and PAMs, provide proper grounding for the system, and help to ensure that the bus connectors are properly seated in the backplane. |
Following are guidelines for preventing ESD damage:

| Caution For safety, periodically check the resistance value of the antistatic strap. The measurement should be between 1 and 10 megohms (Mohms). |
This section describes how to remove and install the ASP card.
| Caution The ASP is a required system component. Removing an ASP while the system is operating causes the system to shut down and may damage the processor. |
The ejector levers and installation screws (see Figure 11) align and seat the card connectors in the backplane. Follow the installation and removal instructions carefully, and review the following examples of incorrect insertion practices and results:
It is also important to use the ejector levers and installation screws when removing an ASP to ensure that the card connector pins disconnect from the backplane in the logical sequence expected by the system. Any ASP that is only partially connected to the backplane can hang the bus. For more information, see the section "Installing and Replacing the ASP."
Figure 11 shows the ejector levers, which you must use when inserting or removing the ASP or CAMs.
You need a 3/16-inch flat-blade screwdriver to remove any filler (blank) PAMs and to tighten the captive installation screws that secure the ASP in their slots. Whenever you handle ASP you should use a wrist strap or other grounding device to prevent electrostatic discharge (ESD) damage. See the section "Preventing Electrostatic Discharge Damage" in the chapter "Preparing for Installation" in the LightStream 1010 ATM Switch User Guide.
ASP and CAM removal instructions are the same, except only CAMs and PAMs support hot-swapping.
| Caution
The ASP is a required system component. Removing an ASP while the system is operating causes the system to shut down and may damage the processor. Power off the system before removing the ASP. |
Take the following steps to remove an ASP (or CAM):
Step 1 Loosen the captive installation screws, by using a screwdriver, at the left and right sides of the ASP.
Step 2 Place your thumbs on the left and right ejector levers and simultaneously push the left lever left and the right lever right to release the ASP from the backplane connector.
Step 3 Grasp the ASP faceplate with one hand and place your other hand under the carrier to support and guide the module out of the slot. Avoid touching the card.
Step 4 Carefully pull the ASP straight out of the slot, keeping your other hand under the carrier to guide it. Keep the module at a 90-degree orientation to the backplane.
Step 5 Place the removed ASP on an antistatic mat or antistatic foam.
Slot number 2 contains the ASP, Figure 12, from top to bottom when viewing the chassis from the front.
ASP and CAM installation instructions are essentially the same, except the ASP does not support hot-swapping.
The ASP is a required system component. Removing an ASP while the system is operating causes the system to shut down and may damage the processor. Power off the system before removing the ASP. For more information, see the section "Installing and Replacing the ASP."
| Caution Handle ASP by the carrier edges only to prevent ESD damage. |
Take the following steps to install an ASP or CAM:
Step 1 Use a 1/4-inch flat-blade screwdriver to loosen the ASPs, which are secured with two captive installation screws. Then remove the ASP card from the slot.
Step 2 Hold the ASP faceplate with one hand, place your other hand under the carrier and guide it into the slot. Avoid touching the card. (See Figure 13.)
Step 3 Place the back of the ASP in the slot and align the notch on the sides of the module carrier with the groove in the slot.
Step 4 Keep the ASP at a 90-degree orientation to the backplane and carefully slide it into the slot until the faceplate makes contact with the ejector levers.
Step 5 Use your thumb and forefinger of each hand and simultaneously push the left lever and the right lever in to fully seat the ASP in the backplane connector.
Step 6 Use a screwdriver to tighten the captive installation screws on the left and right ends of the ASP.
Step 7 Attach network interface cables or other devices to the interface ports.
Step 8 If needed, turn the power back on. See the section "Starting the System" in the chapter "Installing the LightStream 1010 ATM Switch" in the LightStream 1010 ATM Switch User Guide.
Step 9 Check the status of the interfaces as follows:
After you install the module, use the following information to configure the module and the individual interfaces on the ASP module. In the LightStream 1010 ATM Switch User Guide the section "LightStream 1010 ATM Switch Hardware" contains an overview of the port and module numbering scheme used to configure the ASP. The section "Configuring the LightStream 1010 ATM Switch" describes how to configure the ports on the FDDI or CDDI module. The section "Confirming the Installation" describes the procedures you should use to confirm that the ASP is configured correctly.
Each interface (or port) in the switch is designated by several different types of addresses. The physical interface address is the actual physical location (card/sub/port) of the interface connector within the chassis. The system software uses the physical addresses to control activity within the switch and to display status information. These physical card/subcard/port addresses are not used by other devices in the network; they are specific to the individual switch and its internal components and software.
The following sections describe how the LightStream 1010 switch assigns and controls both the physical (card/subcard/port) and Media Access Control (MAC)-layer addresses for interfaces within the chassis.
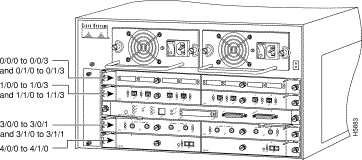
In the LightStream 1010 switch, port IDs specify the actual physical location of each PAM port on the front of the switch. (See Figure 14.) The address is composed of a three-part number in the format card/subcard/port number. The first number identifies the slot in which the module is installed. Module slots are numbered 0 to 4 from top to bottom. The second number identifies the subcard or PAM number. The PAMs are numbered 0 and 1 with 0 being the left PAM facing the front of the switch. The third number identifies the physical port number on the module. The port numbers always begin at 0 and are numbered from the left port to the right port, facing the front of the switch. The number of additional ports (/1, /2, and so on) depends on the number of ports available on the module.
Interface ports maintain the same port ID regardless of whether other modules are installed or removed. However, when you move a module to a different slot, the first number in the address changes to reflect the new slot number. For example, on a 4-port 155 UTP PAM in chassis slot 1 in PAM slot 0, the address of the left port is 1/0/0 and the address of the right port is 1/0/3. If you remove the 4-port 155 UTP PAM from slot 1 and install it in slot 4, the addresses of those same ports become 4/0/0 and 4/0/3.
You can identify module ports by physically checking the card/subcard/port location on the front of the switch. You can also use software commands to display information about a specific interface, or all interfaces, in the switch. To display information about every interface, use the show interface command without parameters. To display information about a specific interface, use the show interface command with the interface type and port address in the format show interface atm card/subcard/port. This command is described in the LightStream 1010 ATM Switch Command Reference publication.
|
|