|
|

As described in the "Overview" chapter, two classes of software must be fully functional in an LS2020 networking environment to take full advantage of the capabilities of an LS2020 enterprise ATM switch:
The StreamView software modules support the following functions:
The table below lists the facilities provided by the StreamView application and refers you to related LS2020 documents for more detailed information.
| For information about ... | See ... |
| Running the LS-Configurator | LightStream 2020 Configuration Guide |
| Running the CLI, the LS-Monitor, and the LS-Topology Map | LightStream 2020 Network Operations Guide |
| LynxOS commands | LightStream 2020 NP O/S Reference Manual |
| LS2020 SNMP management information base (MIB) | LightStream 2020 Operations Guide |
The following procedures apply when you are installing either a new version or an upgrade of StreamView network management software on an NMS running HP OpenView. These procedures assume that HP OpenView is already installed and operating properly on the Sun SPARCstation.
The StreamView installation procedure involves three network management modules and associated facilities, as listed below:
The StreamView installation procedure involves the use of the ovinstall command. This command is used to accomplish the following:
directory and install it under HP OpenView
To install the StreamView network management software onto an NMS that is running HP OpenView, perform the following steps:
Step 1 Log in to the NMS as root. If logging in to root is disabled, issue the following command to "user ID root:"
su password:<root password>
Step 2 Create a user account called npadmin, if it does not already exist.
The CLI uses the password for the npadmin account as the password for the CLI protected mode. If no npadmin account has been defined for the workstation, the CLI uses the root password as the CLI protected-mode password.
Step 3 Ensure that the /usr/OV/bin directory is in your path (the installation procedure uses this directory). To display your path, issue the following command at the SunOS prompt:
echo $PATH
To set your path in a Bourne shell or a bash shell, issue the following command:
export PATH=$PATH:/usr/OV/bin
To set your path in a C shell (csh), issue the following command:
setenv PATH ${PATH}:/usr/OV/bin
LSnode:2# is illustrated as the node name; substitute the name of your LS2020 node in executing this command.
LSnode:2# cat /usr/OV/install/system/OVIC/ovindex
Release 1.4 is indicated by the line "cid: ov1.4" in this file.
Step 4 Insert the tape containing the StreamView software into the NMS quarter-inch tape drive.
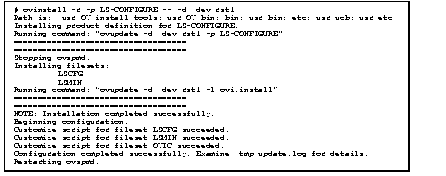
Step 5 Issue the HP OpenView ovinstall command at the root prompt, as shown below, to extract the LS-Configurator from tape:
ovinstall -r -p LS-CONFIGURE - - -d <tape-drive>
Figure 3-1 shows a typical screen display that results from executing the ovinstall command to extract the LS-Configurator software from tape.
If you specify an incorrect device in the ovinstall command, the installation process terminates immediately and returns the following message or its equivalent:
"ovinstall: cannot install product definition for LS-CONFIGURE"
ovinstall command to extract and install the three StreamView network management modules (LS-Configurator, LS-Monitor, and LS-Topology Map), the <tape-drive> parameter may be any one of the following: /dev/rst0, /dev/rst1, or /dev/rst2, depending on which port your tape drive uses. The command takes from five to fifteen minutes to extract and install the specified StreamView module (LS-Configurator, LS-Monitor, or LS-Topology Map) and associated files.
more /tmp/update.log. An example of this file is provided in the appendix "StreamView Output Samples" under the heading "Sample Output to StreamView Installation Log File."
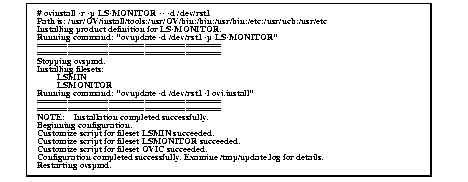
Step 6 Issue the HP OpenView ovinstall command to extract the LS-Monitor from tape:
ovinstall -r -p LS-MONITOR - - -d <tape-drive>
Figure 3-2 shows a typical screen display that results from executing the above ovinstall command to extract the LS-Monitor software from tape.
Step 7 Issue the HP OpenView ovinstall command to extract the LS-Topology Map software from tape:
ovinstall -r -p LS-TOPOMAP -- -d <tape-drive>
Figure 3-3 shows a typical screen display that results from executing the above ovinstall command to extract the LS-Topology Map software from tape.

Step 8 Update the HP OpenView Fields database with StreamView fields by issuing the following command:
See the section "Sample Output from OpenView Fields Command" in the "StreamView Output Samples" appendix for sample output generated by this command.
Step 9 Ensure that the StreamView network management application has been installed properly by issuing the following command:
ovw -verify
The verify program takes less than a minute to run and prints the names of verified objects. If the verification process fails, a message on the screen so indicates. In this case, call your service representative for assistance.
See the "Sample Output from HP OpenView Verify Command" section in the "StreamView Output Samples" appendix for sample output generated by the ovw -verify command.
Step 10 Issue the following command to check the status of the HP OpenView daemons:
ovstatus
ovstatus command returns the following message:
"ovstatus: ovspnd is not running; use ovstart to start ovspnd"
issue the ovstart command from "user ID root," as shown below:
# ovstart
Step 11 To update variables associated with the SNMP community, execute the xnmsnmpconf command at the shell prompt.
This command displays the SNMP configuration screen. When displayed, double-click on the "Default" parameters field (which contains default values in text fields). Modify the following field values to read as shown:
161
6.0
2
The default polling interval is five minutes, which determines how long it will be before the display indicates changes in the network. Setting the polling interval to a value less than five minutes causes additional SNMP traffic to be generated and is, therefore, not advised.
By default, LS2020 nodes require the use of the "write" community for SNMP set operations, as indicated below:
set community: write
However, you may choose to use another name for the community that has read/write privileges, or you may choose to allow SNMP set operations from any community.
To allow such operations, however, you must configure the HP OpenView environment appropriately using the xnmsnmpconf command.
Alternatively, you can change the files at the LS2020 nodes to conform to the behavior of HP OpenView.
See the LightStream 2020 Network Operations Guide for additional information about setting up SNMP communities in an LS2020 network.
Step 12 Verify that the /etc/services file contains the following line:
snmp-trap 162/udp
If this line is not present in the /etc/services file, create it. To do so, as "user ID root," open the /etc/services file with the vi editor:
# vi /etc/services
Insert the snmp-trap 162/udp line in the appropriate location in the /etc/services file.
The installation of StreamView is now complete. The next section describes how to create the proper usage environment for running StreamView under HP OpenView.
This section describes how to set up the StreamView application so that it will run under HP OpenView on the NMS. Each NMS user intending to run StreamView under HP OpenView must perform the procedures in this section.
These procedures assume that you have already installed the StreamView application on your NMS, as described in the preceding section, "Installing StreamView to Run Under HP OpenView ."
This section provides instructions for setting up the StreamView usage environment for the Bourne shell (sh and bash) and the C shell (csh). For clarity, the set-up procedures for the Bourne shell and the C shell are discussed under separate headings below.
Note that other shells may differ in details; in the case of another shell, consult the applicable documentation for that shell.
In preparation for setting up the user environment under HP OpenView, determine the type of shell each user is using.
In an NFS environment that uses the Network Information Services (NIS) facility, enter the following command:
# ypmatch <username> passwd
In an environment that does not use the NIS facility, enter the following command:
# egrep <username> /etc/passwd
The shell can be identified from the last field of the password entry, as shown in the following example:
jjones:o@elQMkzZv7oF:10563:312:Jon Jones:/home/jjones:/bin/bash
To set up StreamView to operate under HP OpenView and the Bourne shell, perform the following procedures:
Step 1 From your home directory, edit the .profile file or the .bash_profile file that is read by the Bourne shell on login. Add the following lines to the end of the file:
PATH=$PATH:/usr/OV/bin/ls_bin
export LSC_DATABASE=/usr/OV/databases/ls/configure.netdb
export LSC_CFGLOGPATH=/usr/OV/log
export LSC_CFGTCPPORT=6789
export XKEYSYMDB=<pathname>/XKeysymDB
<pathname> for XKEYSYMDB in the last line above, consult your Sun system administrator. The file XKeysymDB should be in the subdirectory lib, lib/X11, or /usr/openwin/lib under the directory containing your X Windows executables. You can use the command find / -name XKeysymDB -print to search for the XKeysymDB file. However, be aware that the search process may be lengthy and disclose multiple copies of the file. Also, note the upper- and lower-case conventions in the XKeysymDB filename; this case sensitivity is critical. If XKEYSYMDB is incorrectly defined when OpenView is started, that is, no file named XKeySymDB is found where XKEYSYMDB points, error output is directed to the standard error output device (STDERR). A sample of such output is shown in the "StreamView Output Samples" appendix under the heading "Error Output When XKEYSYMDB Is Undefined."
Step 2 Determine whether a UIDPATH variable is already set in your login environment by issuing the following command:
echo $UIDPATH
Step 3 If the system displays a search path in Step 2, add the following line to the end of the .profile file or the .bash_profile file:
export UIDPATH=$UIDPATH:/usr/OV/bin/ls_bin/%U
Otherwise, if the system displays the message "UIDPATH: unbound variable" or displays no message, add the following line to the .profile file or the .bash_profile file:
export UIDPATH=/usr/OV/bin/ls_bin/%U
Step 4 Determine whether an XFILESEARCHPATH variable is already set in your login environment by issuing the following command:
% echo $XFILESEARCHPATH
Step 5 If the system displays a search path in Step 4, add the following line to the end of the .profile file or the .bash_profile file:
export XFILESEARCHPATH=$XFILESEARCHPATH:/usr/OV/%T/%N%S
Otherwise, if the system displays the message "XFILESEARCHPATH: unbound variable" or displays no message, check for the existence of the following directory:
If this directory exists, add the following lines to the end of the .profile or .bash_profile file:
Check for the existence of the following directory:
If the previous directory does not exist, but this directory does exist, add the following lines to the end of the .profile or .bash_profile file:
export XFILESEARCHPATH=/usr/lib/X11/%T/%N%S:\
If both of the above directories exist, add the following lines to the end of the .profile or .bash_profile file:
If neither of the above directories exists, call your network administrator or Cisco Systems Customer Support for assistance.
Step 6 Any HPOV/NMS user logged in during the StreamView installation process should now log out and log in again to activate the new environment variables.
Step 7 If this is a new HP OpenView user, check the user's home directory for the existence of the .Xdefaults file (or its equivalent .Xresources). If this file contains data, skip to Step 8.
If this file exists but contains no data, append the contents of the /usr/OV/newconfig/xdefaults file to the user's .Xdefaults file by issuing the following command sequence:
mv .Xdefaults Xdef.sav
cat Xdef.sav /usr/OV/newconfig/xdefaults > .Xdefaults
This step gives StreamView access to the screen fonts and application colors needed for display purposes.
If you need to revert to the old .Xdefaults file, you can find its contents in the backup file Xdef.sav.
If the .Xdefaults file does not exist in the user's home directory, issue the following command to create it:
% cp /usr/ov/newconfig/xdefaults .Xdefaults
A sample .Xdefaults file is shown in the appendix "StreamView Output Samples."
Step 8 Issue the following command from the console of your NMS to start HP OpenView:
ovw
If, after issuing the ovw command, the message "ovw: cannot connect to database" is returned, issue the following command:
% ovstatus
This command reports the nature of the problem, as shown below:
"ovstatus: ovspnd is not running; use ovstart to start ovspnd"
Issue the ovstart command from "user ID root," as shown below:
# ovstart
As an alternative, if you want to start HP OpenView and run it in background mode while keeping the current window active, issue the following command:
ovw&
In background mode, the ovw process is fully usable.
ovw command.
Step 9 If the following error message appears in the parent window from which you started HP OpenView in Step 8, the message indicates that the XFILESEARCHPATH is not set correctly:
In this case, shut down HP OpenView, revert to Step 5 above, and add "/usr/OV/%T/%N%S" to the XFILESEARCHPATH. Continue from that point with Step 6 and Step 8 to restart HP OpenView.
Note that the first time the LS-Configurator tool (cfg) is executed, the database is created automatically with the name specified by LSC_DATABASE, taking on the extensions .dir and .pag and the file permissions of the first user.
All users who will create or modify LS2020 node configurations must be in the same UNIX group. If not, such users will be limited to read-only access to the database and, therefore, will not be able to update LS2020 nodes with configuration information from the global database.
For example, if the operations group has read-only access to the global database, "user ID root" should issue the following commands to ensure that the operations group has required read-write access priviliges to the file configure.netdb:
su
cd /usr/OV/databases/ls
chgrp <ops-group> configure.netdb
To set up StreamView to operate under HP OpenView and the C shell, perform the following steps:
Step 1 From your home directory, edit the .cshrc file that is read by the C shell on login. Add the following lines to the end of the file:
setenv PATH ${PATH}:/usr/OV/bin/ls_bin
setenv LSC_DATABASE /usr/OV/databases/ls/configure.netdb
setenv LSC_CFGLOGPATH /usr/OV/log
setenv LSC_CFGTCPPORT 6789
setenv XKEYSYMDB <pathname>/XKeysymDB
<pathname> for XKEYSYMDB in the last line above, consult your Sun system administrator. The file XKeysymDB should be in the subdirectory lib, lib/X11, or /usr/openwin/lib under the directory containing your X Windows executables. You can use the command find / -name XKeysymDB -print to search for the XKeysymDB file. However, be aware that the search process may be lengthy and find multiple copies of the file. Also, note the upper- and lower-case conventions in the XKeysymDB filename; this case sensitivity is critical. If XKEYSYMDB is incorrectly defined when OpenView is started, thaty is, no file named XKeySymDB is found where XKEYSYMDB points, error output is directed to the standard error output device (STDERR). A sample of such output is shown in the "StreamView Output Samples" appendix under the heading "Error Output When XKEYSYMDB Is Undefined."
Step 2 Determine whether a UIDPATH variable is already set in your login environment by issuing the following command:
echo $UIDPATH
Step 3 If the system displays a search path in Step 2, add the following line to the end of the .cshrc file:
setenv UIDPATH ${UIDPATH}:/usr/OV/bin/ls_bin/%U
Otherwise, if the system displays the message "UIDPATH: Undefined variable" or displays no message, add the following line to the end of the .cshrc file:
setenv UIDPATH /usr/OV/bin/ls_bin/%U
Step 4 Determine whether an XFILESEARCHPATH variable is already set in your login environment by issuing the following command:
Step 5 If the system displays a search path in Step 4, add the following line to the end of the .cshrc file:
Otherwise, if the system displays the message "XFILESEARCHPATH: undefined variable" or displays no message, check for the existence of the following directory:
If this directory exists, add the following line to the end of the .cshrc file:
Check for the existence of the following directory:
If the previous directory does not exist, but this directory does exist, add the following line to the end of the .cshrc file:
setenv XFILESEARCHPATH /usr/lib/X11/%T/%N%S:/usr/OV/%T/%N%S
If both of the above directories exist, add the following line to the end of the .cshrc file:
setenv XFILESEARCHPATH /usr/openwin/lib/%T/%N%S:/usr/lib/X11/%T/%N%S:/usr/OV/%T/%N%S
If neither of the above directories exists, call your network administrator or Cisco Systems Customer Support for assistance.
Step 6 Any HPOV/NMS user logged in during the StreamView installation process should now log out and log in again to activate the new environment variables.
Step 7 If this is a new HP OpenView user, check the user's home directory for the existence of the .Xdefaults file (or its equivalent .Xresources). If this file contains data, skip to Step 8.
If this file exists but contains no data, append the contents of the /usr/OV/newconfig/xdefaults file to the user's .Xdefaults file by issuing the following command sequence:
mv .Xdefaults Xdef.sav
cat Xdef.sav /usr/OV/newconfig/xdefaults > .Xdefaults
This step gives StreamView access to the screen fonts and application colors needed for display purposes.
If you need to revert to the old .Xdefaults file, you can find its contents in the backup file Xdef.sav.
If the .Xdefaults file does not exist in the user's home directory, issue the following command to create it:
% cp /usr/ov/newconfig/xdefaults .Xdefaults
A sample .Xdefaults file is shown in the appendix "StreamView Output Samples."
Step 8 Issue the following command from the console of your NMS to start HP OpenView:
ovw
If, after issuing the ovw command, the message "ovw: cannot connect to database" is returned, issue the following command:
% ovstatus
This command reports the nature of the problem, as shown below:
"ovstatus: ovspnd is not running; use ovstart to start ovspnd"
Issue the ovstart command from "user ID root," as shown below:
# ovstart
As an alternative, if you want to start HP OpenView and run it in background mode while keeping the current window active, issue the following command:
ovw&
In background mode, the ovw process is fully usable.
ovw command.
Step 9 If the following error message appears in the parent window from which you started HP OpenView in Step 8, the message indicates that the XFILESEARCHPATH is not set correctly:
In this case, shut down HP OpenView, revert to Step 5 above, and add "/usr/OV/%T/%N%S" to the XFILESEARCHPATH. Continue from that point with Step 6 and Step 8 to restart HP OpenView.
Note that the first time the LS-Configurator tool (cfg) is executed, the database is created automatically with the name specified by LSC_DATABASE, and having the extensions .dir and .pag and the file permissions of the first user.
All users who will create or modify LS2020 node configurations must be in the same UNIX group. If not, such users will be limited to read-only access to the database and, therefore, will not be able to update LS2020 nodes with configuration information from the global database.
For example, if the operations group has read-only access to the global database, "user ID root" should issue the following commands to ensure that the operations group has required read-write access priviliges to the file configure.netdb:
su
cd /usr/OV/databases/ls
chgrp <ops-group> configure.netdb
The following procedures apply when you are installing either a new version or an upgrade of the StreamView network management software on an NMS that is not running HP OpenView.
To install the StreamView application to operate stand-alone without HP OpenView, perform the following steps:
Step 1 Log in to the NMS as root.
Step 2 Create a user account called npadmin.
The CLI uses the password for the npadmin account as the password for the CLI protected mode. If no npadmin account is defined for the NMS, the CLI uses the root password as the CLI protected mode password.
Step 3 Back up your ovsnmp.conf file, if desired. This step is predicated on whether or not you have customized your existing configuration files and whether or not you wish to preserve them for a subsequent installation or upgrade of StreamView software.
For example, if you have already installed Release 2.1 of the StreamView network management software in a non-HP OpenView environment and you need to re-install the software for some reason, you should first back up any configuration files you have customized since the previous installation.
Specifically, if you have customized the file /usr/LightStream-2.1/templates/ovsnmp.conf, you should save a backup copy of this file and restore it after the installation has been completed (see Step 7).
To back up the ovsnmp.conf file, change to the proper directory and copy the configuration file, as shown below:
cd /usr/LightStream-2.1/templates
# cp -p ovsnmp.conf ovsnmp.conf.custom
Issue the list (ls) command to display the existing configuration files, as shown below:
ls ovsnmp.conf*
This command will list the following configuration files:
ovsnmp.conf
ovsnmp.conf.custom
Step 4 Change to the root directory by issuing the following command:
cd /
Step 5 Insert the StreamView software tape into the NMS quarter-inch tape drive.
Step 6 Issue the following commands in the order shown to extract the StreamView application files from tape:
mt -f <tape-drive> rew
# mt -f <tape-drive> fsf 4
# tar xvpf <tape-drive>
The <tape-drive> parameter may be any one of the following, depending on which port your tape drive uses: /dev/nrst0, /dev/nrst1, or /dev/nrst2.
nrst0 for tape drive rst0). The letter n specifies "no rewind." If you omit this character, you will not be able to read the tape.
The extraction process, which takes from ten to twenty minutes to complete, creates the following directory structures:
/usr/LightStream-2.1
/usr/LightStream-2.1/bin
/usr/LightStream-2.1/db
/usr/LightStream-2.1/log
/usr/LightStream-2.1/mib
/usr/LightStream-2.1/templates
Step 7 Restore your ovsnmp.conf file, if necessary.
If you saved a backup copy of your ovsnmp.conf file in Step 3, determine whether differences exist between your backup copy of the "ovsnmp.conf.custom" file and the new ovsnmp.conf file. Do this by executing the following commands:
# cd /usr/LightStream-2.1/templates
# diff ovsnmp.conf ovsnmp.conf.custom
If no differences between these files are reported, the files are identical. On the other hand, if differences are reported, save the distribution copy of the ovsnmp.conf file by issuing the following command:
# mv ovsnmp.conf ovsnmp.conf.orig
Copy your custom configuration file to ovsnmp.conf by issuing the following command:
# cp ovsnmp.conf.custom ovsnmp.conf
The installation of the StreamView network management software is now complete. The next section describes how to set up the NMS environment for using StreamView in a non-HP OpenView environment.
This section describes how to set up the StreamView application so that it will run on the NMS without HP OpenView. Each LS2020 user intending to run StreamView on the NMS without HP OpenView must complete the procedures in this section.
These procedures assume that you have already installed the StreamView application on your NMS to operate without HP OpenView, as described in the preceding section, "Installing StreamView to Run Without HP OpenView ."
This section provides instructions for setting up the StreamView usage environment for the Bourne shell (sh and bash) and the C shell (csh). For convenience and clarity, the set-up procedures for these shells are described under separate headings below.
Note that other shells may differ in details; in the case of another shell, consult the appropriate shell documentation for additional information.
To set up the StreamView application to operate without HP OpenView under the Bourne shell, perform the following steps:
Step 1 Open the /etc/services file with the vi editor, as shown below:
Verify that the /etc/services file contains the following entry:
snmp-trap 162/udp
If this entry is not present in the /etc/services file, create the entry and close the file.
Step 2 Determine which type of shell each user is using, as described below.
In an NFS environment using the Network Information Services (NIS) facility, enter the following command:
ypmatch <username> passwd
In an environment that does not use the NIS facility, enter the following command:
egrep <username> /etc/passwd
The last field of the output that results from either of the above commands identifies the shell in use, as shown in the following example:
jjones:o@elQMkzZv7oF:10563:312:Jon Jones:/home/jjones:/bin/bash
Step 3 Each StreamView user must define several environment variables. To do so, go to your home directory and edit the .profile file or the .bash_profile file that the Bourne shell reads on login.
<pathname> for XKEYSYMDB shown in the Bourne shell procedures below, consult your Sun system administrator. The file XKeysymDB should be in the subdirectory lib, lib/X11, or /usr/openwin/lib under the directory containing your X Windows executables. You can use the command find / -name XKeysymDB -print to search for the XKeysymDB file. However, be aware that the search process may be lengthy and disclose multiple copies of the file. Also, note the upper- and lower-case conventions in the XKeysymDB filename; this case sensitivity is critical. If XKEYSYMDB is incorrectly defined when OpenView is started, that is, no file named XKeySymDB is found where XKEYSYMDB points, error output is directed to the standard error output device (STDERR). A sample of such output is shown in the "StreamView Output Samples" appendix under the heading "Error Output When XKEYSYMDB Is Undefined."
Step 4 Determine whether a UIDPATH variable is already set in your login environment by entering the following command:
echo $UIDPATH
Step 5 If the system displays a search path in Step 4, add the following lines to the end of the .profile file or the .bash_profile file:
PATH=$PATH:/usr/LightStream-2.1/bin
export UIDPATH=$UIDPATH:/usr/LightStream-2.1/bin/%U
export LSC_DATABASE=/usr/LightStream-2.1/db/configure.netdb
export LSC_CFGLOGPATH=/usr/LightStream-2.1/log
export LSC_CFGTCPPORT=6789
export OVSNMP_CONF_FILE=/usr/LightStream-2.1/templates/ovsnmp.conf
export XKEYSYMDB=<pathname>/XKeysymDB
After adding the data called for in this step to the appropriate file, skip to Step 7 below.
Step 6 If the system displays UIDPATH: unbound variable or no message in response to the echo $UIDPATH command, add the following lines to the end of the .profile file or the .bash_profile file:
PATH=$PATH:/usr/LightStream-2.1/bin
export UIDPATH=/usr/LightStream-2.1/bin/%U
export LSC_DATABASE=/usr/LightStream-2.1/db/configure.netdb
export LSC_CFGLOGPATH=/usr/LightStream-2.1/log
export LSC_CFGTCPPORT=6789
export OVSNMP_CONF_FILE=/usr/LightStream-2.1/templates/ovsnmp.conf
export XKEYSYMDB=<pathname>/XKeysymDB
Continue with Step 7.
Step 7 Any NMS user logged in during the Streamview installation and configuration process should now log out and log in again to activate the new environment variables.
Step 8 Check the user's home directory for the existence of the .Xdefaults file. If this file is present and contains data, skip to Step 9.
If this file exists but contains no data, append the contents of the /usr/LightStream-2.1/templates/xdefaults file to the user's .Xdefaults file by issuing the following commands:
mv .Xdefaults Xdef.sav
cat Xdef.sav /usr/LightStream-2.1/templates/xdefaults > .Xdefaults
This step gives StreamView access to the screen fonts and application colors needed for display purposes.
If you need to revert to the old .Xdefaults file, you can find its contents in the backup file Xdef.sav.
If the .Xdefaults file does not exist in the user's home directory, issue the following command to create it:
% cp /usr/LightStream-2.1/templates/xdefaults .Xdefaults
A sample .Xdefaults file is shown in the appendix "StreamView Output Samples."
Step 9 By default, LS2020 nodes require the use of the "write" community for SNMP set operations. You may choose to use another name for your community with read/write access privileges, or you may choose to allow SNMP set operations from any community.
To configure this option in your NMS environment, edit the file /usr/LightStream-2.1/templates/ovsnmp.conf, or change the files at each LS2020 node to conform to your workstation's behavior.
Refer to the LightStream 2020 Network Operations Guide for information about setting up SNMP communities in an LS2020 network. Use a text editor such as emacs or vi to modify the file /usr/LightStream-2.1/templates/ovsnmp.conf. The file itself contains instructions for formatting each entry.
Note that the first time the LS-Configurator tool (cfg) is executed, the database is created automatically with the name specified by LSC_DATABASE, taking on the extensions .dir and .pag and the file permissions of the first user.
All users who will create or modify LS2020 node configurations must be in the same UNIX group. If not, such users will be limited to read-only access to the database and, therefore, will not be able to update LS2020 nodes with configuration information from the global database.
For example, if the operations group has read-only access to the global database, "user ID root" should issue the following commands to ensure that the operations group has the required read-write access priviliges to the file configure.netdb:
su
cd /usr/LightStream-2.1/db
chgrp <ops-group> configure.netdb
To set up the StreamView application to operate without HP OpenView under the C shell, perform the following steps:
Step 1 Open the /etc/services file with the vi editor, as shown below:
Verify that the /etc/services file contains the following entry:
snmp-trap 162/udp
If this entry is not present in the /etc/services file, create the entry and close the file.
Step 2 Determine which type of shell each user is using, as described below.
In an NFS environment using the Network Information Services (NIS) facility, enter the following command:
ypmatch <username> passwd
In an environment that does not use the NIS facility, enter the following command:
egrep <username> /etc/passwd
The last field of the output that results from either of the above commands identifies the shell in use, as shown in the following example:
jjones:o@elQMkzZv7oF:10563:312:Jon Jones:/home/jjones:/bin/csh
Step 3 Each StreamView user must define several environment variables. To do so, go to your home directory and edit the .cshrc file that the C shell reads on login.
<pathname> for XKEYSYMDB in the procedures below, consult your Sun system administrator. The file XKeysymDB should be in the subdirectory lib, lib/X11, or /usr/openwin/lib under the directory containing your X Windows executables. You can use the command find / -name XKeysymDB -print to search for the XKeysymDB file. However, be aware that the search process may be lengthy and disclose multiple copies of the file. Also, note the upper- and lower-case conventions in the XKeysymDB filename; this case sensitivity is critical. If XKEYSYMDB is incorrectly defined when OpenView is started, that is, no file named XKeySymDB is found where XKEYSYMDB points, error output is directed to the standard error output device (STDERR). A sample of such output is shown in the "StreamView Output Samples" appendix under the heading "Error Output When XKEYSYMDB Is Undefined."
Step 4 Determine whether a UIDPATH variable is already set in your login environment by entering the following command:
echo $UIDPATH
Step 5 If the system displays a path, add the following lines to the end of the .cshrc file:
setenv PATH ${PATH}:/usr/LightStream-2.1/bin
setenv UIDPATH ${UIDPATH}:/usr/LightStream-2.1/bin/%U
setenv LSC_DATABASE /usr/LightStream-2.1/db/configure.netdb
setenv LSC_CFGLOGPATH /usr/LightStream-2.1/log
setenv LSC_CFGTCPPORT 6789
setenv OVSNMP_CONF_FILE /usr/LightStream-2.1/templates/ovsnmp.conf
setenv XKEYSYMDB <pathname>/XKeysymDB
After adding the data called for in this step to the .cshrc file, skip to Step 7 below.
Step 6 If the system displays the message UIDPATH: Undefined variable or no message in response to the echo $UIDPATH command, add the following lines to the end the .cshrc file:
setenv PATH ${PATH}:/usr/LightStream-2.1/bin
setenv UIDPATH /usr/LightStream-2.1/bin/%U
setenv LSC_DATABASE /usr/LightStream-2.1/db/configure.netdb
setenv LSC_CFGLOGPATH /usr/LightStream-2.1/log
setenv LSC_CFGTCPPORT 6789
setenv OVSNMP_CONF_FILE /usr/LightStream-2.1/templates/ovsnmp.conf
setenv XKEYSYMDB <pathname>/XKeysymDB
Continue with Step 7.
Step 7 Any NMS user logged in during the Streamview installation and configuration process should now log out and log in again to activate the new environment variables.
Step 8 Check the user's home directory for the existence of the .Xdefaults file. If this file is present and contains data, skip to Step 9.
If this file exists but contains no data, append the contents of the /usr/LightStream-2.1/templates/xdefaults file to the user's .Xdefaults file by issuing the following commands:
mv .Xdefaults Xdef.sav
cat Xdef.sav /usr/LightStream-2.1/templates/xdefaults > .Xdefaults
This step gives StreamView access to the screen fonts and application colors needed for display purposes.
If you need to revert to the old .Xdefaults file, you can find its contents in the backup file Xdef.sav.
If the .Xdefaults file does not exist in the user's home directory, issue the following command to create it:
% cp /usr/LightStream-2.1/templates/xdefaults .Xdefaults
A sample .Xdefaults file is shown in the appendix "StreamView Output Samples."
Step 9 By default, LS2020 nodes require the use of the "write" community for SNMP set operations. You may choose to use another name for your community with read/write access privileges, or you may choose to allow SNMP set operations from any community.
To configure this option in your NMS environment, edit the file /usr/LightStream-2.1/templates/ovsnmp.conf, or change the files at each LS2020 node to conform to your workstation's behavior.
Refer to the LightStream 2020 Network Operations Guide for information about setting up SNMP communities in an LS2020 network. Use a text editor such as emacs or vi to modify the file /usr/LightStream-2.1/templates/ovsnmp.conf. The file itself contains instructions for formatting each entry.
Note that the first time the LS-Configurator tool (cfg) is executed, the database is created automatically with the name specified by LSC_DATABASE, taking on the extensions .dir and .pag and the file permissions of the first user.
All users who will create or modify LS2020 node configurations must be in the same UNIX group. If not, such users will be limited to read-only access to the database and, therefore, will not be able to update LS2020 nodes with configuration information from the global database.
For example, if the operations group has read-only access to the global database, "user ID root" should issue the following commands to ensure that the operations group has required read-write access priviliges to the file configure.netdb:
su
cd /usr/LightStream-2.1/db
chgrp <ops-group> configure.netdb
|
|