|
|

Table Of Contents
Installing and Configuring Cisco HSI Software
Hardware and Software Requirements
Installing the Sun Solaris 8 Operating System
Installing a Dual Cisco HSI for a Redundant PGW 2200 Configuration
Installing and Configuring Cisco HSI Software
Introduction
This chapter contains instructions for the system administrator on how to install and configure the Cisco H.323 Signaling Interface (HSI). This chapter contains the following sections:
•
Hardware and Software Requirements
•
Hardware and Software Requirements
The Cisco HSI is targeted to run on a Sun Netra T1 100/105 platform with an 18-GB hard disk drive, a Sun Netra 120 platform with a 36-GB hard disk drive, or a Sun Fire V120 platform with a 36-GB hard disk drive. These platforms run on the Sun Solaris 8 operating system.
Installing the Sun Solaris 8 Operating System
The Sun Solaris 8 operating system must be installed before you install the Cisco HSI. Instructions for installing Solaris 8 on the Sun Netra T1 100/105, Sun Netra 120, and Sun Fire V120 are in the Cisco Media Gateway Controller Software Release 9 Installation and Configuration Guide, located at the following URL:
http://www.cisco.com/univercd/cc/td/doc/product/access/sc/rel9/swinstl/index.htm
After completing the Solaris 8 operating system installation, return to this document for Cisco HSI installation procedures.
Installing the Cisco HSI
This section provides step-by-step instructions for installing the Cisco HSI.
Before You Start
Complete the preinstallation tasks listed in Table 2-1 before installing the Cisco HSI. Use the checklist to ensure that each task is completed. Detailed instructions for completing some tasks follow the checklist.
Table 2-1 Preinstallation Tasks Checklist
Ensure that Solaris 8 is installed on the Sun Netra T1 100/105, Sun Netra 120, or Sun Fire V120 platform, as described in the "Installing the Sun Solaris 8 Operating System" section.
Note
Configure group and user names, as described in the "Configuring Groups and Users" section.
Gather the information listed in Table 2-2 and note it in the table for reference during the installation.
Have your company internal support information and Cisco support contact information readily available so you can get help with the installation if needed. If you have questions or need assistance, see the "Obtaining Technical Assistance" section on page xvi .
Configuring Groups and Users
You must configure groups and users for the Cisco HSI on each host server. A user must be a member of the "mgcgrp" group to use certain Cisco HSI functions, such as Man-Machine Language (MML).
To configure groups and users, complete the following steps:
Step 1
Step 2
# mkdir -p /export/home/users/mgcusr
# mkdir /export/BUILDS
# mkdir /export/PATCHES
# cd /export/home/users
# groupadd -g 20000 mgcgrp
# useradd -u 20001 -g 20000 -d /export/home/users/mgcusr -s /bin/csh mgcusr
# chown mgcusr:mgcgrp mgcusr
# passwd mgcusr <type password twice>
(Enter and confirm password)
Step 3
Step 4
# pwd
Step 5
# vi .cshrc
Step 6
# i (enter insert mode)
Step 7
source /opt/GoldWing/currentPM/local/setup.gw.csh
Step 8
[Esc] (exit insert mode)
:wq (write file and quit)
Step 9
# chmod 777 .cshrc
Cisco HSI Installation Information
Gather the information listed in Table 2-2 before you begin the Cisco HSI installation. Use the Notes column in this table to record the information. Several steps in the installation procedure require you to provide this information. Refer to this table as you proceed through the Cisco HSI installation steps.
Table 2-2 Cisco HSI Installation Information
Base directory path
Note
Cisco HSI user name
Default: mgcusr
Cisco HSI group name
Default: mgcgrp
Gatekeeper IP address
Gatekeeper port
Default: 1719
Gateway prefix
Terminal alias
Gatekeeper ID
Note
E-ISUP host port
Note
VSC11 name (either the DNS2 host name, if DNS is configured, or the IP address of the Cisco PGW 22003 )
VSC1 port
Note
Installation node ID
Hardware platform
Sun Netra T1
Sun Netra 120
Sun Fire V120 (Default)
Installation location
1 VSC = virtual switch controller
2 DNS = domain name system
3 PGW = PSTN Gateway
The Cisco HSI application software is distributed in the OTTgw000.pkg file, which is in a Sun Packaging Stream file format.
The Cisco HSI application software is distributed as a tar file with a name format GoldWing-xxxx.tar, where xxxx is the version ID: for example, GoldWing-2.21.tar.
The default installation directory is /opt/GoldWing. You can specify a different directory. More than one version of the software can exist. The parent directory is in /opt/GoldWing/2.21.
Links point to the current active version of the Cisco HSI application, as follows:
•
•
Table 2-3 shows the subdirectories of the /opt/GoldWing/currentPM directory.
Exported provisioning files are stored in /opt/GoldWing/export.
Installing the Cisco HSI
This section provides step-by-step instructions for installing a single Cisco HSI for use with a simplex PGW 2200 configuration (a configuration with one Cisco PGW 2200 host). To install a dual Cisco HSI for use with a redundant PGW 2200 configuration (a configuration with two Cisco PGW 2200 hosts), complete the steps in this section and then proceed to the "Installing a Dual Cisco HSI for a Redundant PGW 2200 Configuration" section.
Note
To install the Cisco HSI, complete the following steps:
Step 1
Step 2
Step 3
# cd /export/BUILDS
# tar xvf /mnt/cdrom/GoldWing-2.21.tarThe following text displays:
x ./2.21/APPLICATIONS, 0 bytes, 0 tape blocksx ./2.21/APPLICATIONS/OTTgw000.pkg, 38954496 bytes, 76083 tape blocksx ./2.21/install.sh, 5223 bytes, 11 tape blocksx ./2.21/uninstall.sh, 3053 bytes, 6 tape blocksStep 4
# cd /export/BUILDS/2.21
# ./install.shThe following text displays:
Processing package instance <OTTgw000> from
</export/BUILDS/2.21/APPLICATIONS/OTTgw000.pkg>
GoldWing H323 Adjunct Processor V0.1.6(sparc) 2.21Copyright (c) 2001 Cisco Systems, Ltd.All Rights ReservedThis product is protected by copyright and distributed underlicenses restricting copying, distribution and decompilation.Enter GoldWing base directory path (default /opt/GoldWing) [?,q]Step 5
Caution
The following text displays:
Enter base directory path (default /opt/GoldWing/2.21) [?,q]Step 6
Enter GoldWing user nameStep 7
Enter GoldWing group nameStep 8
Enter GateKeeper IP AddressStep 9
Enter GateKeeper PortStep 10
Enter GateWay PrefixStep 11
Note
The following text displays:
Enter Terminal AliasStep 12
Enter GateKeeper IdStep 13
Note
The following text displays:
Enter E-ISUP Host PortStep 14
Note
The following text displays:
Enter VSC1 NameStep 15
Note
The following text displays:
Enter VSC1 PortStep 16
Note
The following text displays:
Enter Installation NodeIdStep 17
Note
The following text displays:
Enter Hardware PlatformStep 18
Enter Installation LocationStep 19
Note
The following is an example of the screen that displays:
## Executing checkinstall script.Modified Environment is:-------------------------BASEDIR=/opt/GoldWing/2.21GWHOME=/opt/GoldWingGWUSR=mgcusrGWGRP=mgcgrpGWCONF_IP="10.70.54.53"GWCONF_PORT="1719"GWCONF_PREFIX="0208"GWCONF_ALIAS="cisco@OuterLondonDomain.com"GWCONF_GKID="OuterLondon"GWCONF_HOST_PORT=8003GWCONF_VSC1_NAME=goliathGWCONF_VSC1_PORT=8003GWCONF_NODEID="H323-GW1"GWCONF_HARDWARE="Sun Netra T1"GWCONF_LOCATION="H323 - GW1"-------------------------
The selected base directory </opt/GoldWing/2.21> must exist before installation is
attempted.
Do you want this directory created now [y,n,?,q]Step 20
Using </opt/GoldWing/2.21> as the package base directory.## Processing package information.## Processing system information.## Verifying disk space requirements.## Checking for conflicts with packages already installed.## Checking for setuid/setgid programs.This package contains scripts which will be executed with super-userpermission during the process of installing this package.Do you want to continue with the installation of <OTTgw000> [y,n,?]Step 21
Installing GoldWing H323 Adjunct Processor V0.1.6 as <OTTgw000>## Installing part 1 of 1./etc/init.d/CiscoGW/etc/rc3.d/S95CiscoGW <symbolic link>/opt/GoldWing/2.21/bin/GWmain/opt/GoldWing/2.21/bin/PMmain/opt/GoldWing/2.21/bin/mml/opt/GoldWing/2.21/bin/msg.conf/opt/GoldWing/2.21/bin/parse/opt/GoldWing/2.21/etc/GWmain.base.conf/opt/GoldWing/2.21/etc/GWmain.default.conf/opt/GoldWing/2.21/etc/GWmain.static.conf/opt/GoldWing/2.21/etc/H323SkeletonFileSimple.dat/opt/GoldWing/2.21/etc/parse.exclude.list/opt/GoldWing/2.21/etc/parse.list/opt/GoldWing/2.21/lib/libgwMib_shlib.so/opt/GoldWing/2.21/var/prov/active_config <symbolic link>[ verifying class <none> ][ verifying class <script> ]## Executing postinstall script.Installed package instance is: OTTgw000Installation of <OTTgw000> was successful.Installed package instance environment variables are:-----------------------------------------------------PKGINST=OTTgw000VERSION=2.21BASEDIR=/opt/GoldWing/2.21GWHOME=/opt/GoldWingMGCUSR=mgcusrMGCGRP=mgcgrp-----------------------------------------------------Setting link /opt/GoldWing/currentPM.Setting link /opt/GoldWing/currentGW.Installation of the Cisco HSI is now complete. The directory /opt/GoldWing now displays as follows:
drwxr-xr-x 7 cisco sysadmin 512 Jan 9 18:31 2.21lrwxrwxrwx 1 cisco sysadmin 19 Jan 9 18:31 currentGW -> /opt/GoldWing/2.21lrwxrwxrwx 1 cisco sysadmin 19 Jan 9 18:31 currentPM -> /opt/GoldWing/2.21-rwxrwxr-x 1 root other 3053 Jan 9 18:31 uninstall.sh
Note
To check the Cisco HSI installation, enter pkgchk OTTgw000.
Note
Outside of the /opt/GoldWing directory, the start/stop script CiscoGW is copied to the /etc/init.d directory, and the link /etc/rc3.d/S95CiscoGW is created to facilitate automatic startup of the Cisco HSI on system reboot.
When the installation is complete, a file named PKINST is written to the base directory on the installed software.
Caution
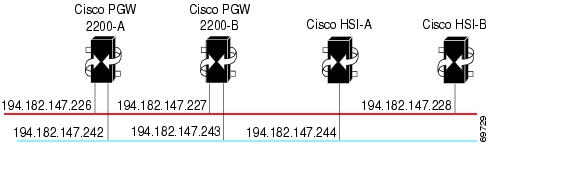
Installing a Dual Cisco HSI for a Redundant PGW 2200 Configuration
A dual Cisco HSI can be installed and configured for use with a redundant Cisco PGW 2200 configuration (ee Figure 2-1).
Figure 2-1 Dual Cisco HSI with a Redundant PGW 2200 Configuration
Caution
Only one active provisioning session is permitted, and provisioning is permitted only on the active Cisco HSI.
Exit the provisioning session on the active host and continue to Step 1 below. If software is not provisioned after it is installed on the active host, the standby host is not synchronized with the active host. As a result, a forced switchover might fail.
To install a dual Cisco HSI for a redundant PGW 2200 configuration (a configuration with two Cisco PGW 2200 hosts), complete the following steps:
Step 1
Step 2
Step 3
Step 4
Installation of the dual Cisco HSI for a redundant PGW 2200 configuration is now complete.
Starting the Cisco HSI
To start the Cisco HSI, execute the start script as the root user and enter the following command:
# /etc/init.d/CiscoGW start
Note
Stopping the Cisco HSI
To stop the Cisco HSI, log in as root user and enter the following command:
# /etc/init.d/CiscoGW stop
Configuring the Cisco HSI
To configure the Cisco HSI, you must first access the user interface. Use the mml command (see Appendix A, "MML User Interface and Command Reference" for more information). If the setup.gw file has been sourced, it is in the user path. Use the provisioning commands to configure the Cisco HSI as required (see Chapter 3, "Provisioning the Cisco HSI" and Appendix A, "MML User Interface and Command Reference" for more information).
Upgrading the Cisco HSI
Before removing an old version of the Cisco HSI, install the new version of the software. A provisioning session can be exported to a flat file in a format that can be used as input to another provisioning session (see prov-exp in Appendix A, "MML User Interface and Command Reference," for more information).
When you upgrade the Cisco HSI version, the following conditions apply:
•
•
•
Note
The uninstall.sh script uses the PKINST file in the version directory to determine which package name to remove.
Removing the Cisco HSI
To remove the Cisco HSI, complete the following steps:
Step 1
Step 2
# /etc/init.d/CiscoGW stop
Step 3
# cd /opt/GoldWing
# ls -l
The following is an example of the screen that displays:
drwxr-xr-x 7 cisco sysadmin 512 Jan 9 18:31 2.21lrwxrwxrwx 1 cisco sysadmin 19 Jan 9 18:31 currentGW -> /opt/GoldWing/2.21lrwxrwxrwx 1 cisco sysadmin 19 Jan 9 18:31 currentPM -> /opt/GoldWing/2.21-rwxrwxr-x 1 root other 3053 Jan 9 18:31 uninstall.shStep 4
# ./uninstall.sh 2.21
The following text displays:
Warning: This script will remove the package OTTgw000Do you wish to proceed? [n] [y,n,?,q]Step 5
Deleting generated files in /opt/GoldWing/2.21The following package is currently installed:OTTgw000 GoldWing H323 Adjunct Processor V0.1.6(sparc) 2.21Do you want to remove this package?Step 6
## Removing installed package instance <OTTgw000>This package contains scripts which will be executed with super-userpermission during the process of removing this package.Do you want to continue with the removal of this package [y,n,?,q]Step 7
## Verifying package dependencies.## Processing package information.## Executing preremove script.## Removing pathnames in class <script>/opt/GoldWing/2.21/local/setup.gw/opt/GoldWing/2.21/local/pmStart.sh/opt/GoldWing/2.21/local/gwhalt/opt/GoldWing/2.21/local/CiscoGW## Removing pathnames in class <none>/opt/GoldWing/2.21/local/opt/GoldWing/2.21/lib/libgwMib_shlib.so/opt/GoldWing/2.21/lib/opt/GoldWing/2.21/etc/parse.list/opt/GoldWing/2.21/etc/parse.exclude.list/opt/GoldWing/2.21/etc/H323SkeletonFileSimple.dat/opt/GoldWing/2.21/etc/GWmain.static.conf/opt/GoldWing/2.21/etc/GWmain.request.conf/opt/GoldWing/2.21/etc/GWmain.default.conf/opt/GoldWing/2.21/etc/GWmain.conf/opt/GoldWing/2.21/etc/GWmain.base.conf/opt/GoldWing/2.21/etc/opt/GoldWing/2.21/bin/parse/opt/GoldWing/2.21/bin/msg.conf/opt/GoldWing/2.21/bin/mml/opt/GoldWing/2.21/bin/PMmain/opt/GoldWing/2.21/bin/GWmain/opt/GoldWing/2.21/bin/opt/GoldWing/2.21/PKGINST/etc/rc3.d/S95CiscoGW/etc/rc3.d <shared pathname not removed>/etc/init.d/CiscoGW/etc/init.d <shared pathname not removed>/etc <shared pathname not removed>## Executing postremove script.## Updating system information.Removal of <OTTgw000> was successful.
![]()
![]()
![]()
![]()
![]()
![]()
![]()
![]()
Posted: Wed Feb 7 12:02:16 PST 2007
All contents are Copyright © 1992--2007 Cisco Systems, Inc. All rights reserved.
Important Notices and Privacy Statement.