|
|

Table Of Contents
Provisioning the Cisco SS7 Interconnect for Voice Gateways Solution by Using MML
Starting the Provisioning Session
Provisioning SS7 Signaling Routes
Adding the SS7 Signaling Service
Verifying the SS7 Signaling Service
Adding C7 IP Links to Cisco SLTs
Verifying NAS Signaling Services
Using a Text File to Add Trunks
Provisioning the Dial Plan/Number Analysis
Provisioning White and Black List Screening
Creating and Processing an MML Batch File for Provisioning
Provisioning the Cisco SS7 Interconnect for Voice Gateways Solution by Using MML
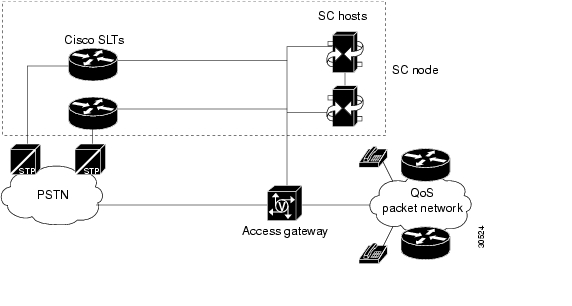
This chapter describes how to provision a sample Cisco SS7 Interconnect for Voice Gateways Solution (shown in Figure 4-1). The chapter describes a sample configuration for the illustration purpose only. Your configuration will vary and depend on your own network configuration.
Tip
Notes are used in this chapter to identify the procedures and other elements that differ in the Cisco Media Gateway Controller (MGC) software Release 7.3(x) and the Cisco MGC software Release 7.4(x). However, most procedures are the same for both software releases.
This chapter presents two ways of provisioning with MML:
•
•
To skip directly to the MML batch file used to provision the sample configuration, see "Creating and Processing an MML Batch File for Provisioning" section.
Figure 4-1 Sample Cisco SS7 Interconnect for Voice Gateways Solution
Caution
Provisioning Outline
Perform the following steps to provision the sample Cisco SS7 Interconnect for Voice Gateways Solution.
Provision SS7 signaling routes
Step 1
Add the OPC1 in your network.
Step 2
Add the DPC2 to identify the destination switch.
Step 3
Add the APCs3 to identify the STPs4 with which the signaling controller communicates signaling information.
Step 4
Add linksets to connect the Cisco SLTs5 to the STPs.
Step 5
Add the SS7 subsystem to identify the mated STPs.
Step 6
Add the SS7 routes for each signaling path from the signaling controller to the destination switch.
Step 7
Add the SS7 signaling service from the signaling controller to the destination switch.
Provision signaling links
Step 1
Add the Ethernet adapters (cards) in the SC host that carry signaling to and from the Cisco SLTs.
Step 2
Add Ethernet interfaces for the cards in the host.
Step 3
Add C7 IP links for each SS7 link from the signaling controller to the SS7 network (through the Cisco SLT).
Provision NAS6 links
Step 1
Add external nodes for the NASes in your network.
Step 2
Add NAS signaling services for each NAS.
Step 3
Add IP links for each NAS to each Ethernet card in the SC host.
Provision trunks
Step 1
Create the trunk file and add trunks from each NAS to the signaling controller.
Step 2
Import the trunk file.
Deploy the session
1 OPC = origination point code
2 DPC = destination point code
3 APCs = adjacent point codes
4 STPs = Signal Transfer Points
5 Cisco SLTs = Cisco Signaling Link Terminals
6 NAS = network access server
Note
Provisioning Worksheet
Table 4-1 shows a provisioning worksheet for the sample configuration shown in this chapter.
Starting the Provisioning Session
Log in to the signaling controller and start an MML session. For more information on MML commands, see the Cisco Media Gateway Controller Software Release 7 Reference Guide.
Caution
To start an MML session:
Step 1
Note
Step 2
machine-name% mmlcopyright © 1998-2000, Cisco Systems, Inc.machine-name mml>If another session is running, you receive a message similar to the following:
machine-name% mmlcopyright © 1998-2000, Cisco Systems, Inc.mml1: Already in useFailure to run MML, reason=Entry was already presentmachine-name%To see other MML sessions that are running, enter ls /opt/TransPath/var (for Cisco media gateway controller software Release 7.4(x), enter ls /opt/CiscoMGC/var). MML session numbers range from 1 through 12. Depending on the number of MML sessions, you will see a list of files similar to the following:
mml0.LOCKmml1.LOCKmml2.LOCK
If MML is already running, enter mml -s x (x = the number of a session that does not appear as locked; range is 1 through 12):
machine-name% mml -s 2Copyright © 1998-2000, Cisco Systems, Inc.machine-name mml>Step 3
machine-name mml> prov-sta::srcver="new",dstver="dialcfg1"Media Gateway Controller 2000-04-04 15:00:57M COMPLD"PROV-STA";machine-name mml>This starts a new provisioning session ("new"), names it CFG_dialcfg1, and saves the configuration files in /opt/TransPath/etc/CONFIG_LIB.
Note
Tip
Example 4-1 Provisioning Session Error
machine-name mml> prov-sta::srcver="new",dstver="dial9"Media Gateway Controller 2000-04-04 15:02:42M DENYSROF"PROV-STA: POM session is already in use by mml2"/* Status, Requested Operation Failed on the component */;To see if another provisioning session is running, enter the prov-rtrv:session command:
machine-name mml> prov-rtrv:sessionMedia Gateway Controller 2000-04-04 15:03:07M RTRV"session=dialcfg1:session"/*Session ID = mml2SRCVER = newDSTVER = dialcfg1*/;This example shows that an active provisioning session named dialcfg1 is in use.
Refer to the Cisco Media Gateway Controller Software Release 7 Provisioning Guide for more information on provisioning with MML and general provisioning steps.
MML Tips
MML commands use the following syntax:
command_name:[target][, target][, target. . .][:Parameter_List][;comments]When entering MML commands, remember the following:
•
•
•
•
•
•
•
•
•
•
•
To obtain on-line help in an MML session, enter help at the command prompt. For more information, refer to the Cisco Media Gateway Controller Release 7 Software Reference Guide.
Tip
Note
Provisioning SS7 Signaling Routes
The SS7 signaling route is the path from the Cisco SC host to a service switching point (SSP) through the Cisco SLTs and signal transfer points (STPs). In the sample configuration in this chapter, the SSP is the PSTN switch. When you provision the SS7 signaling routes, you add the following components:
•
•
•
•
•
•
•
For more information on configuring SS7 signaling routes, see Cisco Media Gateway Controller Software Release 7 Provisioning Guide.
Adding the OPC
A point code is an SS7 network address that identifies an SS7 network node, such as an STP or an SSP.
Note
The following procedure shows how to add the point code for the SC host.
Verifying the OPC
To verify that you have added the opc, enter the prov-rtrv:ptcode:name="opc" command:
machine-name mml> prov-rtrv:ptcode:name="opc"Media Gateway Controller 2000-04-04 15:05:44M RTRV"session=dialcfg1:ptcode"/*NAME = opcDESC = Origination point codeNETADDR = 171.1.4NETIND = 2*/;
Note
Example 4-2 Retrieving All Point Codes
machine-name mml> prov-rtrv:ptcode:"all"

Media Gateway Controller 2000-04-04 15:05:32

M  RTRV

"session=dialcfg1:ptcode"

/*

NAME                  NETADDR      NETIND

----                  -------      ------

opc                   171.1.4      2

*/

;
Adding the DPC
The following procedure shows how to add the point code for the PSTN switch A.
Verifying the DPC
To verify that you have added the DPC, enter the prov-rtrv:ptcode:name="dpc1" command:
machine-name mml> prov-rtrv:ptcode:name="dpc1"Media Gateway Controller 2000-04-04 15:09:25M RTRV"session=dialcfg1:ptcode"/*NAME = dpc1DESC = PPC of PSTN Switch ANETADDR = 171.1.3NETIND = 2*/;
Note
Example 4-3 Retrieving All Point Codes
machine-name mml> prov-rtrv:ptcode:"all"Media Gateway Controller 2000-04-04 15:10:47M RTRV"session=dialcfg1:ptcode"/*NAME NETADDR NETIND---- ------- ------opc 171.1.4 2dpc1 171.1.3 2*/;Adding the APCs
The following procedure shows how to add the adjacent point codes for the STPs.
Note
Verifying the APCs
To verify that you have entered the APCs, enter the prov-rtrv:apc:name="MML name" command for each APC. For example, to verify the first APC:
machine-name mml> prov-rtrv:apc:name="apc1"Media Gateway Controller 2000-04-04 15:13:54M RTRV"session=dialcfg1:apc"/*NAME = apc1DESC = APC for STP ANETADDR = 171.16.1NETIND = 0*/;
Note
Example 4-4 Retrieving All APCs
machine-name mml> prov-rtrv:apc:"all"Media Gateway Controller 2000-04-04 10:45:12M RTRV"session=dialcfg1:apc"/*NAME NETADDR NETIND---- ------- ------apc1 171.16.1 2apc2 171.16.2 2*/;Adding Linksets
A linkset is a logical set of one or more links originating from an SS7 node (STP) and connecting to an adjacent node. In this example, the linkset contains communication links that connect from the signaling controller to an adjacent STP. You must provision one linkset for each connection through the STP to the signaling controller.
Verifying Linksets
To verify that you have entered the linksets, enter the prov-rtrv:lnkset:name="MML name" command for each linkset. For example, to verify the first linkset:
machine-name mml> prov-rtrv:lnkset:name="ls01"Media Gateway Controller 2000-04-04 15:18:40M RTRV"session=dialcfg1:lnkset"/*NAME = ls01DESC = Linkset from signaling controller to STP AAPC = apc1PROTO = SS7-ANSITYPE = IP*/;
Note
Example 4-5 Retrieving All Linksets
machine-name mml> prov-rtrv:lnkset:"all"Media Gateway Controller 2000-04-04 15:20:43M RTRV"session=dialcfg1:lnkset"/*NAME APC PROTO TYPE---- --- ----- ----ls01 apc1 SS7-ANSI IPls02 apc2 SS7-ANSI IP*/;
Note
Adding the SS7 Subsystem
You must add an SS7 subsystem that identifies each pair of mated STPs. This allows the signaling controller to route traffic over the C-links between the STPs in case of a failure between one of the STPs and an endpoint.
Verifying the SS7 Subsystem
To verify that you have added the SS7 subsystem, enter the prov-rtrv:ss7subsys:name="subsys1" command:
machine-name mml> prov-rtrv:ss7subsys:name="subsys1"Media Gateway Controller 2000-04-04 15:22:44M RTRV"session=dialcfg1:ss7subsys"/*NAME = subsys1DESC = Route between STP A and STP BSVC = apc1PRI = 3MATEDAPC = apc2SSN = 0PROTO = SS7-ANSISTPSCPIND = 0TRANSPROTO = SCCP*/;Adding SS7 Routes
An SS7 route is a path through a linkset between the signaling controller and another signaling controller or TDM switch. In this example, the SS7 routes indicate the linksets that carry SS7 signals between the signaling controller and the PSTN switch A.
You must add an SS7 route for each signaling path from the signaling controller to the PSTN switch A. You provision a route for each linkset.
Verifying SS7 Routes
To verify that you have entered the SS7 routes, enter the prov-rtrv:ss7route:name="MML name" command for each SS7 route. For example, to verify the first SS7 route:
machine-name mml> prov-rtrv:ss7route:name="ss7route1"Media Gateway Controller 2000-04-04 15:32:21M RTRV"session=dialcfg1:ss7route"/*NAME = ss7route1DESC = Route 1 to PSTN Switch A through LS01OPC = opcDPC = dpc1LNKSET = ls01PRI = 1*/;
Note
Example 4-6 Retrieving All SS7 Routes
machine-name mml> prov-rtrv:ss7route:"all"Media Gateway Controller 2000-04-04 11:01:18M RTRV"session=dialcfg1:ss7route"/*NAME OPC DPC LNKSETPRI---- --- --- ---------ss7route1 opc dpc1 ls011ss7route2 opc dpc1 ls021*/;Adding the SS7 Signaling Service
The SS7 signaling service specifies the path and the protocol variant that the signaling controller uses to communicate with a remote switch (SSP) that sends bearer traffic to the NASs.
You must add an SS7 signaling service from the signaling controller to the PSTN switch.
Note
Verifying the SS7 Signaling Service
To verify that you have added the SS7 signaling service, enter the prov-rtrv:ss7path:name="ss7sigsvc" command:
mml> prov-rtrv:ss7path:name="ss7sigsvc"Media Gateway Controller 2000-03-03 14:22:12M RTRV"session=dialcfg1:ss7path"/*NAME = ss7sigsvcDESC = SS7 service to PSTN Switch ADPC = dpc1MDO = ANSISS7_STANDARDCUSTGRPID = d125CUSTGRPTBL = 0101SIDE = networkASPPART = N*/;Provisioning Signaling Links
You must provision links for all physical connections bearing signals that enter and exit the signaling controller. This includes SS7 signals from the SSP (PSTN Switch A) and signals to the NASs. You must add the following components:
•
•
•
Adding Adapters (Cards)
You must add a card component for each card in the signaling controller. For the example in this chapter, you add one Ethernet card for each connection to the IP network—one card for the 10-Mb signaling network and one for the 100-Mb signaling network. These cards permit SS7 signaling between the signaling controller and the Cisco SLTs.
Note
Verifying Adapters (Cards)
To verify that you have entered the cards, enter the prov-rtrv:card:name="MML name" command. For example, to verify the first Ethernet card:
machine-name mml> prov-rtrv:card:name="encard1"Media Gateway Controller 2000-03-03 20:38:44M RTRV"session=dialcfg1:card"/*NAME = encard1DESC = Ethernet Card 1TYPE = ENSLOT = 0*/;
Note
Example 4-7 Retrieving All Cards
machine-name mml> prov-rtrv:card:"all"Media Gateway Controller 2000-04-04 11:10:24M RTRV"session=dialcfg1:card"/*NAME TYPE SLOT---- ---- ----encard1 EN 0encard2 EN 1*/;
Note
Adding Ethernet Interfaces
The Ethernet interface provides the physical line interface between the signaling controller's Ethernet card and the physical Ethernet network. You must add an Ethernet interface if you have added an Ethernet card.
Verifying Ethernet Interfaces
To verify that you have entered the Ethernet interfaces, enter the prov-rtrv:enetif:name="MML name" command. For example, to verify the first Ethernet interface:
va-testing mml> prov-rtrv:enetif:name="enetif1"Media Gateway Controller 2000-03-03 20:40:05M RTRV"session=dialcfg1:enetif"/*NAME = enetif1DESC = Ethernet interface for Card 1CARD = encard1*/;
Note
Example 4-8 Retrieving All Ethernet Interfaces
machine-name mml> prov-rtrv:enetif:"all"Media Gateway Controller 2000-04-04 11:27:16M RTRV"session=dialcfg1:enetif"/*NAME CARD---- ----enetif1 encard1enetif2 encard2*/;Adding C7 IP Links to Cisco SLTs
A C7 IP link component identifies a link between the Cisco SLT's IP address and port, and an SSP or an STP in the SS7 network. The C7 IP link identifies one of the links within a linkset.
Note
Release 2.0 uses TDM cards and TDM links.
You must add a C7 IP link for each physical SS7 link that is connected to the SS7 network through the Cisco SLT. These links correspond to the linksets you created in the "Adding Linksets" section.
You must add two links for linkset 1 and two links for linkset 2.
Note
Verifying C7 IP Links
To verify that you have entered the C7 IP links, enter the prov-rtrv:c7iplnk:name="MML name" command. For example, to verify the first C7 IP link:
va-testing mml> prov-rtrv:c7iplnk:name="c7iplink1"Media Gateway Controller 2000-03-03 21:12:47M RTRV"session=dialcfg1:c7iplnk"/*NAME = c7iplink1DESC = Link 1 in Linkset 1LNKSET = ls01IF = enetif1IPADDR = IP_Addr1PORT = 5000PEERADDR = 175.30.241.27PEERPORT = 32767SLC = 0PRI = 1TIMESLOT = 0*/;
Note
Example 4-9 Retrieving All C7 IP Links
machine-name mml> prov-rtrv:c7iplnk:"all"Media Gateway Controller 2000-04-04 11:40:17M RTRV"session=dialcfg1:c7iplnk"/*NAME LNKSET IF IPADDR PORT PEERADDR PEERPORT PRI SLC TIMESLOT---- ------ -- ------ ---- -------- -------- --- --- --------c7iplink1 ls01 enetif1 IP_Addr1 5000 175.30.241.27 32767 1 0 0c7iplink2 ls02 enetif1IP_Addr2 5000 175.30.238.28 32767 1 1 0c7iplink3 ls01 enetif2IP_Addr1 5000 175.30.241.27 32767 1 0 0c7iplink4 ls02 enetif2 IP_Addr2 5000 175.30.238.28 32767 1 1 0*/;Provisioning NAS Links
NAS links indicate the communication path the signaling controller uses to control the bearer traffic that passes through each voice gateway.
To add links to the voice gateway in your network, you must add the following components:
•
•
•
Adding NAS External Nodes
You must add a NAS external node for each voice gateway in your network.
Verifying NAS External Nodes
To verify that you have entered the NASs, enter the prov-rtrv:extnode:name="MML name" command. For example, to verify the first NAS:
va-testing mml> prov-rtrv:extnode:name="nas1"Media Gateway Controller 2000-03-04 11:36:46M RTRV"session=dialcfg1:extnode"/*NAME = nas1DESC = NAS 1*/;
Note
Example 4-10 Retrieving All External Nodes
machine-name mml> prov-rtrv:extnode:"all"Media Gateway Controller 2000-04-04 11:44:41M RTRV"session=dialcfg1:extnode"/*NAME----nas1nas2nas3*/;Adding NAS Signaling Services
You must add a NAS signaling service for each NAS you created in the "Adding NAS External Nodes" section. The NAS signaling service indicates the Q.931 protocol path between the signaling controller and the voice gateways.
Verifying NAS Signaling Services
To verify that you have entered the NAS signaling services, enter the prov-rtrv:naspath:name="MML name" command. For example, to verify the first NAS signaling service was added:
va-testing mml> prov-rtrv:naspath:name="nassvc1"Media Gateway Controller 2000-03-04 11:42:36M RTRV"session=dialcfg1:naspath"/*NAME = nassvc1DESC = Signaling service for NAS 1EXTNODE = nas1MDO = BELL_1268_C3*/;
Note
Example 4-11 Retrieving All NAS Signaling Services
machine-name mml> prov-rtrv:naspath:"all"Media Gateway Controller 2000-04-04 11:49:02M RTRV"session=dialcfg1:naspath"/*NAME EXTNODE MDO---- ------- ---nassvc1 nas1 BELL_1268_C3nassvc2 nas2 BELL_1268_C3nassvc3 nas3 BELL_1268_C3*/;Adding IP Links
You must add an IP link from each voice gateway to each Ethernet card and interface in the signaling controller. In this example, you provision the following IP links:
•
•
•
•
•
•
Note
Note
Verifying IP Links
To verify that you have entered the IP links, enter the prov-rtrv:iplnk:name="MML name" command to verify the first IP link:
va-testing mml> prov-rtrv:iplnk:name="iplink1"Media Gateway Controller 2000-03-04 12:01:23M RTRV"session=dialcfg1:iplnk"/*NAME = iplink1DESC = IP link for NAS 1 to Ethernet Interface 1SVC = nassvc1IF = enetif1IPADDR = IP_Addr1PORT = 3001PEERADDR = 175.30.241.2PEERPORT = 3001PRI = 1SIGSLOT = 0SIGPORT = 0*/;
Note
Example 4-12 Retrieving All IP Links
machine-name mml> prov-rtrv:iplnk:"all"Media Gateway Controller 2000-04-04 12:05:43M RTRV"session=dialcfg1:iplnk"/*Provisioning Trunks
You must add trunks for each connection between the NAS and the PSTN switch. NAS 1 has four T1 lines, NAS 2 has four T1 lines, and NAS 3 has three T1 lines. Each T1 contains 24 trunks, or DS0s. For the examples in this section, you must provision 264 trunks (96 for NAS1, 96 for NAS2, and 72 for NAS3).
Note
You can add trunks using any of the following methods:
•
•
•
Note
Tip
Using a Text File to Add Trunks
Using a text file to add trunks requires you to create a text file that contains the following fields:
•
•
•
Note
•
•
•
Note
•
The following example shows the trunk text file for the sample configuration in this chapter. The fields in the text file correspond to the fields described above.
Example 4-13 Trunk Text File
#format2100 ss7sigsvc ffff 1 nassvc1 1 1101 ss7sigsvc ffff 2 nassvc1 1 2102 ss7sigsvc ffff 3 nassvc1 1 3103 ss7sigsvc ffff 4 nassvc1 1 4104 ss7sigsvc ffff 5 nassvc1 1 5105 ss7sigsvc ffff 6 nassvc1 1 6106 ss7sigsvc ffff 7 nassvc1 1 7107 ss7sigsvc ffff 8 nassvc1 1 8108 ss7sigsvc ffff 9 nassvc1 1 9109 ss7sigsvc ffff 10 nassvc1 1 10110 ss7sigsvc ffff 11 nassvc1 1 11111 ss7sigsvc ffff 12 nassvc1 1 12112 ss7sigsvc ffff 13 nassvc1 1 13113 ss7sigsvc ffff 14 nassvc1 1 14114 ss7sigsvc ffff 15 nassvc1 1 15115 ss7sigsvc ffff 16 nassvc1 1 16116 ss7sigsvc ffff 17 nassvc1 1 17117 ss7sigsvc ffff 18 nassvc1 1 18118 ss7sigsvc ffff 19 nassvc1 1 19119 ss7sigsvc ffff 20 nassvc1 1 20120 ss7sigsvc ffff 21 nassvc1 1 21121 ss7sigsvc ffff 22 nassvc1 1 22122 ss7sigsvc ffff 23 nassvc1 1 23123 ss7sigsvc ffff 24 nassvc1 1 24124 ss7sigsvc ffff 25 nassvc1 1 25125 ss7sigsvc ffff 26 nassvc1 1 26126 ss7sigsvc ffff 27 nassvc1 1 27127 ss7sigsvc ffff 28 nassvc1 1 28128 ss7sigsvc ffff 29 nassvc1 1 29129 ss7sigsvc ffff 30 nassvc1 1 30130 ss7sigsvc ffff 31 nassvc1 1 31131 ss7sigsvc ffff 32 nassvc1 2 1132 ss7sigsvc ffff 33 nassvc1 2 2133 ss7sigsvc ffff 34 nassvc1 2 3134 ss7sigsvc ffff 35 nassvc1 2 4135 ss7sigsvc ffff 36 nassvc1 2 5136 ss7sigsvc ffff 37 nassvc1 2 6137 ss7sigsvc ffff 38 nassvc1 2 7138 ss7sigsvc ffff 39 nassvc1 2 8139 ss7sigsvc ffff 40 nassvc1 2 9140 ss7sigsvc ffff 41 nassvc1 2 10141 ss7sigsvc ffff 42 nassvc1 2 11142 ss7sigsvc ffff 43 nassvc1 2 12143 ss7sigsvc ffff 44 nassvc1 2 13144 ss7sigsvc ffff 45 nassvc1 2 14145 ss7sigsvc ffff 46 nassvc1 2 15146 ss7sigsvc ffff 47 nassvc1 2 16147 ss7sigsvc ffff 48 nassvc1 2 17148 ss7sigsvc ffff 49 nassvc1 2 18149 ss7sigsvc ffff 50 nassvc1 2 19150 ss7sigsvc ffff 51 nassvc1 2 20151 ss7sigsvc ffff 52 nassvc1 2 21152 ss7sigsvc ffff 53 nassvc1 2 22153 ss7sigsvc ffff 54 nassvc1 2 23154 ss7sigsvc ffff 55 nassvc1 2 24155 ss7sigsvc ffff 56 nassvc1 2 25156 ss7sigsvc ffff 57 nassvc1 2 26157 ss7sigsvc ffff 58 nassvc1 2 27158 ss7sigsvc ffff 59 nassvc1 2 28159 ss7sigsvc ffff 60 nassvc1 2 29160 ss7sigsvc ffff 61 nassvc1 2 30161 ss7sigsvc ffff 62 nassvc1 2 31162 ss7sigsvc ffff 63 nassvc1 3 1163 ss7sigsvc ffff 64 nassvc1 3 2164 ss7sigsvc ffff 65 nassvc1 3 3165 ss7sigsvc ffff 66 nassvc1 3 4166 ss7sigsvc ffff 67 nassvc1 3 5167 ss7sigsvc ffff 68 nassvc1 3 6168 ss7sigsvc ffff 69 nassvc1 3 7169 ss7sigsvc ffff 70 nassvc1 3 8170 ss7sigsvc ffff 71 nassvc1 3 9171 ss7sigsvc ffff 72 nassvc1 3 10172 ss7sigsvc ffff 73 nassvc1 3 11173 ss7sigsvc ffff 74 nassvc1 3 12174 ss7sigsvc ffff 75 nassvc1 3 13175 ss7sigsvc ffff 76 nassvc1 3 14176 ss7sigsvc ffff 77 nassvc1 3 15177 ss7sigsvc ffff 78 nassvc1 3 16178 ss7sigsvc ffff 79 nassvc1 3 17179 ss7sigsvc ffff 80 nassvc1 3 18180 ss7sigsvc ffff 81 nassvc1 3 19181 ss7sigsvc ffff 82 nassvc1 3 20182 ss7sigsvc ffff 83 nassvc1 3 21183 ss7sigsvc ffff 84 nassvc1 3 22184 ss7sigsvc ffff 85 nassvc1 3 23185 ss7sigsvc ffff 86 nassvc1 3 24186 ss7sigsvc ffff 87 nassvc1 3 25187 ss7sigsvc ffff 88 nassvc1 3 26188 ss7sigsvc ffff 89 nassvc1 3 27189 ss7sigsvc ffff 90 nassvc1 3 28190 ss7sigsvc ffff 91 nassvc1 3 29191 ss7sigsvc ffff 92 nassvc1 3 30192 ss7sigsvc ffff 93 nassvc1 3 31193 ss7sigsvc ffff 94 nassvc2 4 1194 ss7sigsvc ffff 95 nassvc2 4 2195 ss7sigsvc ffff 96 nassvc2 4 3196 ss7sigsvc ffff 97 nassvc2 4 4197 ss7sigsvc ffff 98 nassvc2 4 5198 ss7sigsvc ffff 99 nassvc2 4 6199 ss7sigsvc ffff 100 nassvc2 4 7200 ss7sigsvc ffff 101 nassvc2 4 8201 ss7sigsvc ffff 102 nassvc2 4 9202 ss7sigsvc ffff 103 nassvc2 4 10203 ss7sigsvc ffff 104 nassvc2 4 11204 ss7sigsvc ffff 105 nassvc2 4 12205 ss7sigsvc ffff 106 nassvc2 4 13206 ss7sigsvc ffff 107 nassvc2 4 14207 ss7sigsvc ffff 108 nassvc2 4 15208 ss7sigsvc ffff 109 nassvc2 4 16209 ss7sigsvc ffff 110 nassvc2 4 17210 ss7sigsvc ffff 111 nassvc2 4 18211 ss7sigsvc ffff 112 nassvc2 4 19212 ss7sigsvc ffff 113 nassvc2 4 20213 ss7sigsvc ffff 114 nassvc2 4 21214 ss7sigsvc ffff 115 nassvc2 4 22215 ss7sigsvc ffff 116 nassvc2 4 23216 ss7sigsvc ffff 117 nassvc2 4 24217 ss7sigsvc ffff 118 nassvc2 4 25218 ss7sigsvc ffff 119 nassvc2 4 26219 ss7sigsvc ffff 120 nassvc2 4 27220 ss7sigsvc ffff 121 nassvc2 4 28221 ss7sigsvc ffff 122 nassvc2 4 29222 ss7sigsvc ffff 123 nassvc2 4 30223 ss7sigsvc ffff 124 nassvc2 4 31224 ss7sigsvc ffff 125 nassvc2 5 1225 ss7sigsvc ffff 126 nassvc2 5 2226 ss7sigsvc ffff 127 nassvc2 5 3227 ss7sigsvc ffff 128 nassvc2 5 4228 ss7sigsvc ffff 129 nassvc2 5 5229 ss7sigsvc ffff 130 nassvc2 5 6230 ss7sigsvc ffff 131 nassvc2 5 7231 ss7sigsvc ffff 132 nassvc2 5 8232 ss7sigsvc ffff 133 nassvc2 5 9233 ss7sigsvc ffff 134 nassvc2 5 10234 ss7sigsvc ffff 135 nassvc2 5 11235 ss7sigsvc ffff 136 nassvc2 5 12236 ss7sigsvc ffff 137 nassvc2 5 13237 ss7sigsvc ffff 138 nassvc2 5 14238 ss7sigsvc ffff 139 nassvc2 5 15239 ss7sigsvc ffff 140 nassvc2 5 16240 ss7sigsvc ffff 141 nassvc2 5 17241 ss7sigsvc ffff 142 nassvc2 5 18242 ss7sigsvc ffff 143 nassvc2 5 19243 ss7sigsvc ffff 144 nassvc2 5 20244 ss7sigsvc ffff 145 nassvc2 5 21245 ss7sigsvc ffff 146 nassvc2 5 22246 ss7sigsvc ffff 147 nassvc2 5 23247 ss7sigsvc ffff 148 nassvc2 5 24248 ss7sigsvc ffff 149 nassvc2 5 25249 ss7sigsvc ffff 150 nassvc2 5 26250 ss7sigsvc ffff 151 nassvc2 5 27251 ss7sigsvc ffff 152 nassvc2 5 28252 ss7sigsvc ffff 153 nassvc2 5 29253 ss7sigsvc ffff 154 nassvc2 5 30254 ss7sigsvc ffff 155 nassvc2 5 31255 ss7sigsvc ffff 156 nassvc2 6 1256 ss7sigsvc ffff 157 nassvc2 6 2257 ss7sigsvc ffff 158 nassvc2 6 3258 ss7sigsvc ffff 159 nassvc2 6 4259 ss7sigsvc ffff 160 nassvc2 6 5260 ss7sigsvc ffff 161 nassvc2 6 6261 ss7sigsvc ffff 162 nassvc2 6 7262 ss7sigsvc ffff 163 nassvc2 6 8263 ss7sigsvc ffff 164 nassvc2 6 9264 ss7sigsvc ffff 165 nassvc2 6 10265 ss7sigsvc ffff 166 nassvc2 6 11266 ss7sigsvc ffff 167 nassvc2 6 12267 ss7sigsvc ffff 168 nassvc2 6 13268 ss7sigsvc ffff 169 nassvc2 6 14269 ss7sigsvc ffff 170 nassvc2 6 15270 ss7sigsvc ffff 171 nassvc2 6 16271 ss7sigsvc ffff 172 nassvc2 6 17272 ss7sigsvc ffff 173 nassvc2 6 18273 ss7sigsvc ffff 174 nassvc2 6 19274 ss7sigsvc ffff 175 nassvc2 6 20275 ss7sigsvc ffff 176 nassvc2 6 21276 ss7sigsvc ffff 177 nassvc2 6 22277 ss7sigsvc ffff 178 nassvc2 6 23278 ss7sigsvc ffff 179 nassvc2 6 24279 ss7sigsvc ffff 180 nassvc2 6 25280 ss7sigsvc ffff 181 nassvc2 6 26281 ss7sigsvc ffff 182 nassvc2 6 27282 ss7sigsvc ffff 183 nassvc2 6 28283 ss7sigsvc ffff 184 nassvc2 6 29284 ss7sigsvc ffff 185 nassvc2 6 30285 ss7sigsvc ffff 186 nassvc2 6 31286 ss7sigsvc ffff 187 nassvc3 7 1287 ss7sigsvc ffff 188 nassvc3 7 2288 ss7sigsvc ffff 189 nassvc3 7 3289 ss7sigsvc ffff 190 nassvc3 7 4290 ss7sigsvc ffff 191 nassvc3 7 5291 ss7sigsvc ffff 192 nassvc3 7 6292 ss7sigsvc ffff 193 nassvc3 7 7293 ss7sigsvc ffff 194 nassvc3 7 8294 ss7sigsvc ffff 195 nassvc3 7 9295 ss7sigsvc ffff 196 nassvc3 7 10296 ss7sigsvc ffff 197 nassvc3 7 11297 ss7sigsvc ffff 198 nassvc3 7 12298 ss7sigsvc ffff 199 nassvc3 7 13299 ss7sigsvc ffff 200 nassvc3 7 14300 ss7sigsvc ffff 201 nassvc3 7 15301 ss7sigsvc ffff 202 nassvc3 7 16302 ss7sigsvc ffff 203 nassvc3 7 17303 ss7sigsvc ffff 204 nassvc3 7 18304 ss7sigsvc ffff 205 nassvc3 7 19305 ss7sigsvc ffff 206 nassvc3 7 20306 ss7sigsvc ffff 207 nassvc3 7 21307 ss7sigsvc ffff 208 nassvc3 7 22308 ss7sigsvc ffff 209 nassvc3 7 23309 ss7sigsvc ffff 210 nassvc3 7 24310 ss7sigsvc ffff 211 nassvc3 7 25311 ss7sigsvc ffff 212 nassvc3 7 26312 ss7sigsvc ffff 213 nassvc3 7 27313 ss7sigsvc ffff 214 nassvc3 7 28314 ss7sigsvc ffff 215 nassvc3 7 29315 ss7sigsvc ffff 216 nassvc3 7 30316 ss7sigsvc ffff 217 nassvc3 7 31317 ss7sigsvc ffff 218 nassvc3 8 1318 ss7sigsvc ffff 219 nassvc3 8 2319 ss7sigsvc ffff 220 nassvc3 8 3320 ss7sigsvc ffff 221 nassvc3 8 4321 ss7sigsvc ffff 222 nassvc3 8 5322 ss7sigsvc ffff 223 nassvc3 8 6323 ss7sigsvc ffff 224 nassvc3 8 7324 ss7sigsvc ffff 225 nassvc3 8 8325 ss7sigsvc ffff 226 nassvc3 8 9326 ss7sigsvc ffff 227 nassvc3 8 10327 ss7sigsvc ffff 228 nassvc3 8 11328 ss7sigsvc ffff 229 nassvc3 8 12329 ss7sigsvc ffff 230 nassvc3 8 13330 ss7sigsvc ffff 231 nassvc3 8 14331 ss7sigsvc ffff 232 nassvc3 8 15332 ss7sigsvc ffff 233 nassvc3 8 16333 ss7sigsvc ffff 234 nassvc3 8 17334 ss7sigsvc ffff 235 nassvc3 8 18335 ss7sigsvc ffff 236 nassvc3 8 19336 ss7sigsvc ffff 237 nassvc3 8 20337 ss7sigsvc ffff 238 nassvc3 8 21338 ss7sigsvc ffff 239 nassvc3 8 22339 ss7sigsvc ffff 240 nassvc3 8 23340 ss7sigsvc ffff 241 nassvc3 8 24341 ss7sigsvc ffff 242 nassvc3 8 25342 ss7sigsvc ffff 243 nassvc3 8 26343 ss7sigsvc ffff 244 nassvc3 8 27344 ss7sigsvc ffff 245 nassvc3 8 28345 ss7sigsvc ffff 246 nassvc3 8 29346 ss7sigsvc ffff 247 nassvc3 8 30347 ss7sigsvc ffff 248 nassvc3 8 31When your file is complete, save it in the /opt/TransPath/etc/cust_specific directory by using filename.extension (for example, trunks.txt.) Then use the prov-add:files command to load the table.
Note
Caution
To provision the trunks:
Step 1
Use a text editor to create the trunk text file.
Provisions the fields needed for creation of trunks.
Step 2
Save the file in /opt/TransPath/etc/cust_specific.
Note
Puts the file in the correct directory.
Step 3
Start a provisioning session. (See "Starting the Provisioning Session" section.)
Begins the session.
Step 4
Enter the prov-add:files command:
machine-name mml>
prov-add:files:name="BCFile",file="trunks.txt",actio
n="import"
Media Gateway Controller 2000-03-04 13:16:43M COMPLD"files";Imports a trunk or bearer channel file (BCFile) called trunks.txt from the opt/TransPath/etc/cust_specific or /opt/CiscoMGC/etc/cust_specific directory.
Verifying Trunks
To verify that you have added the trunks, exit MML and change to the /opt/TransPath/etc/CONFIG_LIB/CFG_dialcfg1 directory.
Note
View the bearChan.dat file to ensure it contains the trunk information from the trunks.txt file you imported. The following example shows part of the bearChan.dat file:
machine-name% cd /opt/CiscoMGC/etc/CONFIG_LIB/CFG_dialcfg1machine-name% more bearChan.dat100 00130002 ffff 1 00140001 2 1101 00130002 ffff 2 00140001 2 2102 00130002 ffff 3 00140001 2 3103 00130002 ffff 4 00140001 2 4104 00130002 ffff 5 00140001 2 5105 00130002 ffff 6 00140001 2 6106 00130002 ffff 7 00140001 2 7107 00130002 ffff 8 00140001 2 8108 00130002 ffff 9 00140001 2 9109 00130002 ffff a 00140001 2 a110 00130002 ffff b 00140001 2 b111 00130002 ffff c 00140001 2 c112 00130002 ffff d 00140001 2 d113 00130002 ffff e 00140001 2 e114 00130002 ffff f 00140001 2 f115 00130002 ffff 10 00140001 2 10116 00130002 ffff 11 00140001 2 11117 00130002 ffff 12 00140001 2 12118 00130002 ffff 13 00140001 2 13119 00130002 ffff 14 00140001 2 14120 00130002 ffff 15 00140001 2 15
Note
machine-name mml> prov-rtrv:nailedtrnk:"all"Media Gateway Controller 2000-04-04 16:55:03M RTRV"session=active:nailedtrnk"/*NAME SRCSVC SRCSPAN SRCTIMESLOT DSTSVCDSTSPAN DSTTIMESLOT---- ------ ------ ----------- ------------- -----------100 ss7sigsvc ffff 1 nassvc12 1101 ss7sigsvc ffff 2 nassvc12 2102 ss7sigsvc ffff 3 nassvc12 3103 ss7sigsvc ffff 4 nassvc12 4104 ss7sigsvc ffff 5 nassvc12 5105 ss7sigsvc ffff 6 nassvc12 6106 ss7sigsvc ffff 7 nassvc12 7107 ss7sigsvc ffff 8 nassvc12 8108 ss7sigsvc ffff 9 nassvc12 9109 ss7sigsvc ffff 10 nassvc12 10110 ss7sigsvc ffff 11 nassvc12 11111 ss7sigsvc ffff 12 nassvc12 12112 ss7sigsvc ffff 13 nassvc12 13113 ss7sigsvc ffff 14 nassvc12 14114 ss7sigsvc ffff 15 nassvc12 15115 ss7sigsvc ffff 16 nassvc12 16116 ss7sigsvc ffff 17 nassvc12 17117 ss7sigsvc ffff 18 nassvc12 18Adding a Nailed Trunk
Although you can add individual trunks with MML, doing so is not recommended if you have a large number of trunks to add. Using MML to add trunks requires that you enter the command to add individual trunks for each of the 264 trunks that you need to provision.
Note
To add individual trunks:
Note
24 times for each T1.
To add multiple trunks in software Release 7.4(x):
Note
Provisioning the Dial Plan/Number Analysis
The signaling controller provides the ability to create a dial plan to perform number analysis on both the A (calling) number and B (called) number. You can set up dial plans to perform routing, send calls to announcement servers, modify dialed digits, and perform other results.
You do not use the advanced features in the dial plan for the Cisco SS7 Interconnect for Access Servers Solution and the Cisco SS7 Interconnect for Voice Gateways Solution. In these solutions, the signaling controller routes calls directly over the IP network and does not perform routing or switching to
trunk groups.Provisioning White and Black List Screening
In the Cisco SS7 Interconnect for Access Servers Solution, you might want to perform white and black list screening to include or exclude calls from certain numbers. You can provision white lists that specify allowed A-numbers (calling numbers) or B-numbers (called numbers). Black lists block specified A-numbers (calling numbers) or B-numbers (called numbers).
For instructions on using the CMM to provision a sample B white list, see "Configuring the B White List" section.
For information on using MML to provision black and white list screening, see Chapter 6, "Adding System Components with MML," in the Cisco Media Gateway Controller Software Release 7 Dial Plan Guide.
Deploying the Session
The example used in this chapter features a continuous-service SC node. You must deploy the session to save it to the machine you are provisioning. The system then copies the files to the standby SC node.
Tip
Procedure
Note
Verify
To verify that you have deployed the configuration, enter the prov-rtrv:all command and verify that the active configuration shown is the one you provisioned:
machine-name mml> prov-rtrv:allMedia Gateway Controller - VSC-01 2000-03-04 13:50:06M RTRV"session=active:all"/*NAME Parent Name TID Description---- ----------- --- -----------"encard1" "VSC-01" CARD "Ethernet Card 1""encard2" "VSC-01" CARD "Ethernet Card 2""enetif1" "encard1" ENETIF "Ethernet interface for Card 1""enetif2" "encard2" ENETIF "Ethernet interface for Card 2""ls01" "apc1" LNKSET "Linkset from signaling controller to STP A""ls02" "apc2" LNKSET "Linkset from signaling controller to STP B""iplink1" "nassvc1" IPLNK "IP link for NAS 1""iplink2" "nassvc2" IPLNK "IP link for NAS 2""iplink3" "nassvc3" IPLNK "IP link for NAS 3""iplink4" "nassvc1" IPLNK "IP link 2 for NAS 1""iplink5" "nassvc2" IPLNK "IP link 2 for NAS 2""iplink6" "nassvc3" IPLNK "IP link 2 for NAS 3""ss7route1" "VSC-01" SS7ROUTE "Route 1 to PSTN Switch A through LS1""ss7route2" "VSC-01" SS7ROUTE "Route 2 to PSTN Switch A through LS1""opc" "VSC-01" PTCODE "Origination point code""dpc1" "VSC-01" PTCODE "DPC of PSTN Switch A""nassvc1" "nas1" NASPATH "Signaling service for NAS 1""nassvc2" "nas2" NASPATH "Signaling service for NAS 2""nassvc3" "nas3" NASPATH "Signaling service for NAS 3"<Press Enter to continue OR Press * and Enter to quit output of command>"ss7sigsvc" "dpc1" SS7PATH "SS7 service to PSTN Switch A""nas1" "VSC-01" EXTNODE "NAS 1""nas2" "VSC-01" EXTNODE "NAS 2""nas3" "VSC-01" EXTNODE "NAS 3""c7iplink1" "ls01" C7IPLNK "Link 1 in Linkset 1""c7iplink2" "ls02" C7IPLNK "Link 1 in Linkset 1""c7iplink3" "ls01" C7IPLNK "Link 1 in Linkset 2""c7iplink4" "ls02" C7IPLNK "Link 2 in Linkset 2""apc1" "VSC-01" APC "APC for STP A""apc2" "VSC-01" APC "APC for STP B""subsys1" "VSC-01" SS7SUBSYS "Route between STP A and STP B"*/;Creating and Processing an MML Batch File for Provisioning
You can create a file of MML provisioning commands for use as a batch file. All commands are in a single ASCII text file; when they are read by MML, the commands are executed sequentially.
Note
If you use an MML batch file, you can cut and paste commands, and you can use the batch files repeatedly to "reprovision" the signaling controller or to quickly provision multiple signaling controllers. However, if you intend to run the batch file multiple times on the same host, plan the source and destination directories carefully.
Tip
Creating the File
To create a batch file, use an ASCII text editor to create a new file with one MML command on each line, ending with a carriage return. You can use any name for the file (follow UNIX file naming conventions), and you can store it in any location. However, the file must be accessible on the machine where you run MML sessions. The following example shows a sample MML batch file for the configuration in this chapter.
Example 4-14 Sample MML Provisioning Batch File
prov-sta::srcver="new",dstver="dialcfg1";prov-add:ptcode:name="opc",netaddr="171.1.4",netind=2,desc="Origination point code";prov-add:ptcode:name="dpc1",netaddr="171.1.3",netind=2,desc="DPC of PSTN Switch A";prov-add:apc:name="apc1",netaddr="171.16.1",desc="APC for STP A";prov-add:apc:name="apc2",netaddr="171.16.2",desc="APC for STP B";prov-add:lnkset:name="ls01",apc="apc1",type="IP",proto="SS7-ANSI",desc="Linkset from signaling controller to STP A";prov-add:lnkset:name="ls02",apc="apc2",type="IP",proto="SS7-ANSI",desc="Linkset from signaling controller to STP B";prov-add:ss7subsys:name="subsys1",svc="apc1",matedapc="apc2",proto="SS7-ANSI",pri=3,ssn=0, desc="Route between STP A and STP B";prov-add:ss7route:name="ss7route1",opc="opc",dpc="dpc1",lnkset="ls01",pri=1,desc="Route 1 to PSTN Switch A through LS1";prov-add:ss7route:name="ss7route2",opc="opc",dpc="dpc1",lnkset="ls02",pri=1,desc="Route 2 to PSTN Switch A through LS1";prov-add:ss7path:name="ss7sigsvc",mdo="ANSISS7_STANDARD",dpc="dpc1",desc="SS7 service to PSTN Switch A";prov-add:card:name="encard1",type="EN",slot=0,desc="Ethernet Card 1";prov-add:card:name="encard2",type="EN",slot=1,desc="Ethernet Card 2";prov-add:enetif:name="enetif1",card="encard1",desc="Ethernet interface for Card 1";prov-add:enetif:name="enetif2",card="encard2",desc="Ethernet interface for Card 2";prov-add:c7iplnk:name="c7iplink1",if="enetif1",ipaddr="IP_Addr1",port=7000,peeraddr="175.3 0.241.27",peerport=32767,pri=1,slc=0,lnkset="ls01",desc="Link 1 in Linkset 1";prov-add:c7iplnk:name="c7iplink2",if="enetif2",ipaddr="IP_Addr2",port=7000,peeraddr="175.3 0.238.28",peerport=32767,pri=1,slc=1,lnkset="ls02",desc="Link 2 in Linkset 1";prov-add:c7iplnk:name="c7iplink3",if="enetif1",ipaddr="IP_Addr1",port=7000,peeraddr="175.3 0.241.27",peerport=32767,pri=1,slc=0,lnkset="ls01",desc="Link 1 in Linkset 2";prov-add:c7iplnk:name="c7iplink4",if="enetif2",ipaddr="IP_Addr2",port=7000,peeraddr="175.3 0.238.28",peerport=32767,pri=1,slc=1,lnkset="ls02",desc="Link 2 in Linkset 2";prov-add:extnode:name="nas1",desc="NAS 1";prov-add:extnode:name="nas2",desc="NAS 2";prov-add:extnode:name="nas3",desc="NAS 3";prov-add:naspath:name="nassvc1",extnode="nas1",mdo="BELL_1268_C3",desc="Signaling service for NAS 1";prov-add:naspath:name="nassvc2",extnode="nas2",mdo="BELL_1268_C3",desc="Signaling service for NAS 2";prov-add:naspath:name="nassvc3",extnode="nas3",mdo="BELL_1268_C3",desc="Signaling service for NAS 3";prov-add:iplnk:name="iplink1",if="enetif1",ipaddr="IP_Addr1",port=6001,peeraddr="172.16.0. 2",peerport=6001,svc="nassvc1",desc="IP link for NAS 1";prov-add:iplnk:name="iplink2",if="enetif1",ipaddr="IP_Addr1",port=6001,peeraddr="172.16.0. 3",peerport=6001,svc="nassvc2",desc="IP link for NAS 2";prov-add:iplnk:name="iplink3",if="enetif1",ipaddr="IP_Addr1",port=6001,peeraddr="172.16.0. 4",peerport=6001,svc="nassvc3",desc="IP link for NAS 3";prov-add:iplnk:name="iplink4",if="enetif2",ipaddr="IP_Addr2",port=6001,peeraddr="172.16.0. 2",peerport=6001,svc="nassvc1",desc="IP link 2 for NAS 1";prov-add:iplnk:name="iplink5",if="enetif2",ipaddr="IP_Addr2",port=6001,peeraddr="172.16.0. 3",peerport=6001,svc="nassvc2",desc="IP link 2 for NAS 2";prov-add:iplnk:name="iplink6",if="enetif2",ipaddr="IP_Addr2",port=6001,peeraddr="172.16.0. 4",peerport=6001,svc="nassvc3",desc="IP link 2 for NAS 3";numan-add:dialplan:custgrpid="t778";numan-add:awhite:custgrpid="t778",cli="7034843000";numan-dlt:awhite:custgrpid="t778",cli="7034843001";prov-cpy;The first command starts a provisioning session, and the last command terminates and commits the provisioning session. If you are not ready to commit a session, use the prov-stp command to save and stop the provisioning session.
The prov-cpy or prov-dply command makes the provisioning session active and automatically stops the provisioning session.
Processing the File
To process the batch file, use the mml -b path/filename UNIX command.
Verifying the File
After you enter the command, MML displays the result of each command as it is executed. When the batch file is done, the MML session is closed.
To verify that you have deployed the configuration, log in and begin an MML session. Enter the prov-rtrv:all command and verify that the active configuration shown is the one you provisioned.
Tip
![]()
![]()
![]()
![]()
![]()
![]()
![]()
![]()
Posted: Wed Oct 20 10:41:26 PDT 2004
All contents are Copyright © 1992--2004 Cisco Systems, Inc. All rights reserved.
Important Notices and Privacy Statement.