|
|

The reports panel provides an interface to produce historical reports based on DS1 and modem activity and utilization, and call disconnects. Reports can either be Immediate Reports, generated when a user requests them, or Scheduled Reports, generated in the background and displayed when the user requests them.
To create and manage reports, you will need to understand the following items:
The following tools are available for selecting and viewing reports:
By default, after Cisco AccessPath Manager (APM) installation, all reports (Traffic Loads, Traffic Profiles, Modem Connections, and Channel Utilization) are scheduled to run. Results for daily reports are saved for 31 days, results for weekly reports are saved for 92 days, and results for monthly reports are saved for 366 days. During these holding periods, the reports can be viewed via the Report Utility and the Report Manager. (For more information, see the sections "Using the Report Utility" and "Using the Report Manager".
The Report Scheduler Administration Tool allows you to modify the default behavior of scheduled reports, turn off reports you are not interested in, and modify the default holding time for reports.
Note Selecting all scheduled reports with the Report Scheduler will slow the system down during report generation. You should only enable reports that are needed on a daily basis.
To run the Report Scheduler Administration Tool:
Step 2 Run report_admin. Enter:
Step 3 Select the reports that will be run and the length of time they will be saved by answering the prompts. Press Return to accept the defaults in square brackets.
Step 4 You will be shown a summary of the changes you have made. If the summary is acceptable, answer y. If it is not acceptable, answer n and begin this procedure again.
The Report Manager allows you to select and display reports. To use the Report Manager, follow these steps. (See Table 7-1 for a description of Report Manager fields.)
Step 2 Click Report, then Report Manager, then Execute. The Report Manager screen appears. (See Figure 7-1.)
Step 3 On any report you would like to see, select the output:
Step 4 If you selected HTML in Step 5, select the HTML format (either Graph or Table).
Step 5 For scheduled reports, select a start date from the Start Date pull-down menu.
Step 6 You can generate either immediate reports or scheduled reports:
The selected report will display in a new browser window. Status messages will appear in the status window at the bottom of the original window while the report output is generated. (See Figure 7-2.)
The Report Manager provides the following data:
The APM Report Utility allows you to view or download scheduled reports that APM has generated, without having to log into APM.
Step 2 Enter the following URL to start the Report Utility:
where apm_server_name is the name of the APM server.
Step 3 Click Login to start your Report Utility session.
Step 4 Click any of the report types (Modem Connections, Traffic Loads, Traffic Profiles, or Channel Utilization) to view a report of that type.
Step 5 Select the specific report that you want. Reports are provided on a daily, weekly, and monthly basis in HTML or CSV (Text) format. (Channel utilization reports are only available on a daily basis.)
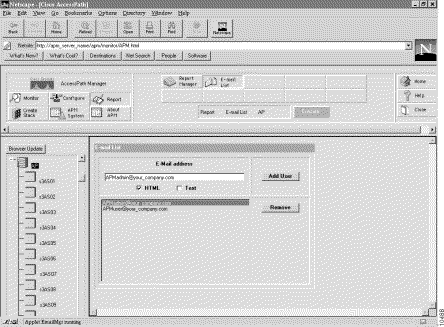
The e-mail list facility allows you to create and modify an e-mail list for the distribution of scheduled reports.
If scheduled reports are being generated in both HTML and CSV (Comma-Separated Value) formats, and all of the available reports are being generated, users whose e-mail addresses are added to the e-mail list will receive 20 e-mail reports per AccessPath stack per day. To manage this, use the report_admin tool to turn off reports you do not want to receive or to generate reports in either HTML or CSV format. In addition, you should limit your e-mail list to people who need to monitor AccessPath system performance.
To add a user to the e-mail list:
Step 2 In the E-Mail Address field, type the e-mail address.
Step 3 Select one or both of the boxes to choose the format the e-mail should be in for this user (HTML and/or Text).
Step 5 Repeat Step 2 through Step 4 for each user you want to add.
To remove a user from the e-mail list:
Step 2 Select the user whose profile you want to remove.
Step 4 Repeat Step 2 and Step 3 for each user whose profile you want to remove.
Scheduled reports are generated automatically by APM. By default, all reports (traffic loads reports, traffic profiles reports, and modem connections reports) are generated on a daily, weekly, and monthly basis. The data collection for these reports is conducted at 1:30 a.m., after which time the reports are generated.
You may turn off the generation of any reports you do not want using the report_admin Report Scheduler tool.
Scheduled reports are saved on disk for a specified time period and are available for viewing during that period through the Report Utility and the Report Manager. (For more information, see the sections "Using the Report Utility" and "Using the Report Manager.")
After these periods, the report data is deleted. You can modify the length of time report data is saved using the report_admin tool.
When scheduled reports are run, log information is written to the file CSCOapm.report.log in the CSCOapm/etc/log directory.
Each of these reports is generated based on a specified report granularity.
Traffic Loads reports provide minimum and maximum information for BPS (bits per second), PPS (packets per second) and call count over a specified time range. Data points are collected at a certain granularity within the time range.
A BPS or PPS data point value is the average BPS or PPS rate between the time at which the previous data point was collected and the time for the current data point. A call count data point value represents the number of calls that terminated between the time at which the previous data point was collected and the time for the current data point.
Minimum and maximum data point values and the time at which they occurred are determined and displayed in a tabular format. The information is produced at the stack, shelf, and DS1 level.
To produce a traffic loads report:
Step 2 Click Report, then Report Manager, then Execute.
Step 3 Scroll down to the traffic loads report you would like to view.
Step 4 Select HTML or CSV (Text) (Comma-Separated Value) format.
Step 5 If you selected HTML, select the format of that HTML. Choose from:
Step 6 Run and/or display your report:
The Traffic Loads report provides the following data:
Traffic Profiles reports display bits per second (BPS), packets per second (PPS) and call count information in a histogram or tabular format, over a specified time range. Data points are collected at a certain granularity within the time range. The information is produced at the stack, shelf, and DS1 level.
A BPS or PPS data point value is the average BPS or PPS rate between the time at which the previous data point was collected and the time for the current data point.
Note A call count data point value represents the number of calls that terminated between
the time at which the previous data point was collected and the time for the current data
point. This value is a delta value between the two polling times.
Consider the following example (which applies for daily reports only, where the polling
interval (granularity) is 15 minutes). If polling for one or more call count data points fails,
the next successfully polled call count delta value will be shown as an average value over
the complete period. For example, if two polls were unsuccessful and the third poll showed
15 calls, two data points would show no calls and the third would show 5.
To produce a Traffic Profiles report:
Step 2 Click Report, then Report Manager, then Execute.
Step 3 Scroll down to the traffic profiles report you would like to view.
Step 4 Select HTML or CSV (Text) (Comma-Separated Value) format.
Step 5 Run and/or display your report:
The following information is provided in the Traffic Profiles report:
Modem Connections reports allow detailed tracking of analog modem connections, per initial line speed (that is, the speed at which a connection was initially established), over a specified time range, down to the individual modem level. Data is collected at a certain granularity within the time range.
To produce a Modem Connections report:
Step 2 Click Report, then Report Manager, then Execute.
Step 3 Scroll down to the modem connection report you would like to view.
Step 4 Select HTML or CSV (Text) (Comma-Separated Value) format.
Step 5 Run and/or display your report:
The following information is displayed in the Modem Connections report:
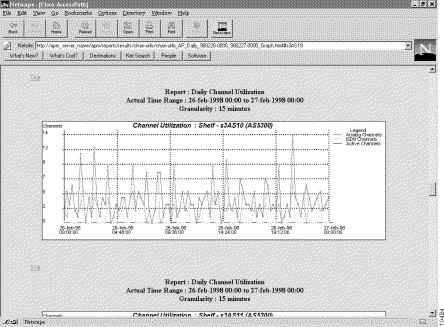
The Channel Utilization report displays the number of channels in use, and the types of calls carried by the DS0s for the AccessPath stack and its shelves.
To produce a Channel Utilization report:
Step 2 Click Report, then Report Manager, then Execute.
Step 3 In the report generation options, scroll down to the channel utilization report.
Step 4 Select HTML or CSV (Text) (Comma-Separated Value) format.
Step 5 If you selected HTML output, select Graph or Table HTML output. (If you selected CSV (Text) output, you can only generate a tabular report.)
Step 6 Run and/or display your report:
The data is collected as a snapshot and is not cumulative. The data reflects channel utilization data at the moment of the polling. If the points of time when the poller collects data happen to have a low call volume, this will be reflected in the report, even though there might have been a higher call volume between polls. This is why only the daily report, with a 15-minute granularity, is supported.
In graphical reports, a graph is presented for the stack as a whole, followed by graphs for each of the individual shelves. The graphs display the number of channels in use (on the Y axis) and the data collection times (on the X axis).
You can click the shelf name under Select a Shelf to see specific data regarding that shelf, or scroll down through all of the data for all of the shelves. To return to the stack data, click Top next to any of the shelf names.
Note No Data State—If a poll is missed for a shelf, then the report will display the comment "No data" in the fields of the report. If a poll in missed for an entire stack, due to the AccessPath system being down or heavily loaded with data traffic, the report will not display that specific poll cycle.
The following information is provided in the channel utilization report:
![]()
![]()
![]()
![]()
![]()
![]()
![]()
![]()
Posted: Mon Jan 20 22:01:41 PST 2003
All contents are Copyright © 1992--2002 Cisco Systems, Inc. All rights reserved.
Important Notices and Privacy Statement.