|
|

This chapter describes and illustrates the procedure for cabling the DC fuse panels after you mount them in an Cisco AccessPath-TS Integrated Access System.
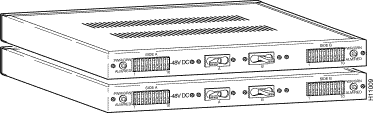
The DC fuse panels accept two 50 amp, -48 VDC circuits of input power. Each panel can supply a total of 100 amps of steady-state output current.
Note Your DC fuse panel might look slightly different, but its functionality is the same as the panel described and illustrated below. For example, grey DC fuse panels have input circuit breakers and black panels do not.
| Warning Before working on equipment that is connected to power lines, remove jewelry (including rings, necklaces, and watches). Metal objects will heat up when connected to power and ground and can cause serious burns or weld the metal object to the terminals. |
| Warning Before performing any of the following procedures, confirm that there is no power DC circuit. To ensure that all power is OFF, locate the circuit breaker on the panel board that services the DC circuit, switch the circuit breaker to the OFF position, and tape the switch handle of the circuit breaker in the OFF position. |
The following steps explain how to connect the internal power supplies to the DC fuse panels:
Note Grey DC fuse panels have input circuit breakers and black panels do not.
| Caution There are 2 sets of independent input DC power connectors and, on grey DC fuse panels, 2 separate circuit breakers on grey versions of the DC fuse panel. Each of the 2 circuit breakers on a grey DC fuse panel is associated with only 1 side of the panel and 1 group of 10 DC output connections. |
Step 2 Cut sets of wires (1 red, 1 black) to the lengths specified in Step 6 through Step 12.
Note Red wires are positive (+) and black wires are negative (-).
Step 3 Remove about 0.25 inch of insulation from each end of the wire and tin both ends to confirm that the wire does not fray or cause a bad connection.
| Warning When stranded wiring is required, use approved wiring terminations, such as closed-loop or spade-type with upturned lugs. These terminations should be the appropriate size for the wires and should clamp both the insulation and conductor. |
Step 4 Connect a spade-type terminal lug to an end of each wire, as necessary.
The wires to the Access Server Shelves, System Controller, and the Router Shelf (or shelves) do not require terminal lugs at the shelf end of the wires.
Step 5 The following steps explain how to connect each shelf (see Figure 2-2):
Note Your DC fuse panel might look slightly different, but its functionality is the same as the panel described and illustrated below.
| Caution The illustration shows the DC fuse panel terminal block. Install each wire from the designated DC fuse panel terminal to the designated shelf location (terminal) using 14 gauge copper wire. The proper wiring sequence is positive to positive (line to +) and negative to negative (neutral to -). Route all power wiring away from all sharp edges and the interface cards on the Access Server shelves to avoid possible damage to the wires. |
Step 6 For either the single or dual router configuration, wire the Failsafe/Console Management Shelf as follows:
| DC Power Termination | DC Fuse Panel and Terminal | 14 gauge wire spec |
|---|---|---|
Failsafe/Console Management Shelf |
Step 7 For either the single or dual router configuration, wire the Switch Shelf as follows:
Step 8 For either the single or dual router configuration, wire the first Router Shelf as follows. In the dual router configuration, the first Router Shelf is the lower of the 2 router shelves.
Step 9 For the dual router configuration, wire the second Router Shelf as follows. In the dual router configuration, the second Router Shelf is the upper of the 2 router shelves.
Step 10 For either the single or dual router configuration, wire the upper tier of Access Server Shelves (AS1 through AS6) as follows:
Step 11 For either the single or dual router configuration, wire the first 4 lower tier Access Server Shelves (AS7 through AS10) as follows:
Step 12 For the single router configuration, wire the other 2 Access Server Shelves (AS11 and AS12), if present, as follows:
The following steps explain how to connect input power to the DC fuse panels:
The DC fuse panels require that a frame ground be placed on the actual frame ground stud on the system rack. Use a green 6-gauge wire to connect a ground to the frame ground stud located at the top (or bottom) right rear corner of the system rack. The frame ground should be grounded at the main input to the system system.
| Warning This equipment is intended to be grounded. Ensure that the host is connected to earth ground during normal use. |
| Warning When installing the unit, the ground connection must always be made first and disconnected last. |
| Warning Never defeat the ground conductor or operate the equipment in the absence of a suitably installed ground conductor. Contact the appropriate electrical inspection authority or an electrician if you are uncertain that suitable grounding is available. |
A readily accessible two-pole disconnect device must be incorporated in the fixed wiring.
Step 2 Confirm that every AccessPath shelf is properly grounded.
Step 3 Connect the 14 AWG green ground wires from the earthing terminal of each shelf to the tap angles:
(a). For each shelf, cut 10 in. of 14 AWG wire.
(b). Remove 0.25 inch of insulation from an end of the 14 AWG wire.
(c). Double-crimp a ring-lug to an end of the wire and connect it to the tap angle at the right of each shelf using a screw and lock washer.
(d). Ground each shelf by securing the other end of its grounding wire to the earthing terminal of the shelf.
Step 4 Confirm that the main power circuit breakers are OFF at the building feed; lockouts are mandatory.
Step 5 Confirm that the 2 main circuit breakers on the DC fuse panel are in the OFF position. The switches point away from each other in the OFF position.
| Caution There are 2 sets of independent input DC power connectors and 2 separate circuit breakers. Each of the 2 sets of input DC power connectors on the DC fuse panel is associated with only 1 side of the panel and 1 group of 10 DC output connections. |
Step 6 Cut 2 sets of 6-gauge copper wires (2 white, 2 black) to the lengths necessary to reach the DC power source from the DC fuse panels when they are mounted in the system rack.
Note White wires are positive (+) and black wires are negative (-).
Step 7 Remove 0.5 inch of insulation from an end of every wire.
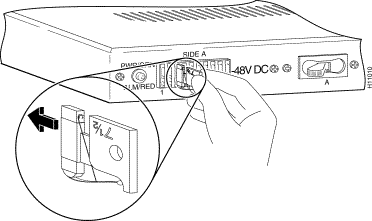
Step 8 Remove the DC input terminal connectors on the rear panel by first removing the plastic safety shield, then loosening both locking nuts on each connector.
Step 9 Solder the uninsulated end of each wire into the terminal connector so that no bare wire is exposed.
Step 10 Replace the terminals on the appropriate connectors (positive to positive and negative to negative) on the DC fuse panels and tighten both locking nuts, as shown in Figure 2-3.
Note Your DC fuse panel might look slightly different, but its functionality is the same as the panel described and illustrated below.
Step 11 Replace the plastic safety shield that covers the DC input connectors.
Step 12 After connecting 2 sets of input feed wires to each of the DC fuse panels, connect each 50-amp input feed connection to the DC power source. Confirm that the polarity of all connections is correct.
The following steps explain how to install the correct fuses in the correct positions:
| Caution There are 2 sets of independent input DC power connectors and 2 separate circuit breakers. Each of the 2 sets of input DC power connectors on the DC fuse panel is associated with only 1 side of the panel and 1 group of 10 DC output connections. |
Step 2 Install individual GMT-style fuses as listed in Table 2-1 (Single Router Configuration) or Table 2-2 (Dual Router Configuration) to protect the system at the component level.
| Caution When the fuse is correctly installed, the rating stamped on the fuse is upside down as shown in Figure 2-4. The fuse is keyed to prevent incorrect insertion; do not force it. |
Note Your DC fuse panel might look slightly different, but its functionality is the same as the panel described and illustrated below.
Step 3 Verify that you installed GMT-style fuses of the correct rated current in the correct locations, as specified in either Table 2-1 (for Single Router Configurations) or Table 2-2 (for Dual Router Configurations).
Step 4 After installing all the fuses correctly, continue with the procedure "Powering On the System."
| DC Power Termination | DC Fuse Panel and Terminal | Fuse Size |
|---|---|---|
| DC Power Termination | DC Fuse Panel and Terminal | Fuse Size |
|---|---|---|
The following steps explain how to power on the system:
| Warning Do not work on the system or connect or disconnect cables during periods of lightning activity. |
| Warning Before performing any of the following procedures, confirm that power is removed from the DC circuit. To ensure that all power is OFF, locate the circuit breaker on the panel board that services the DC circuit, switch the circuit breaker to the OFF position, and tape the switch handle of the circuit breaker in the OFF position. |
Step 2 Confirm that the 2 main circuit breakers on each of the DC fuse panels are in the OFF position. The switches point away from each other in the OFF position.
Note The grey DC fuse panels have input circuit breakers and the black panels do not.
Step 3 There are 2 sets of independent input power connectors and, on grey DC fuse panels, 2 separate circuit breakers. Each of the 2 sets of power connectors on a DC fuse panel is associated with only 1 side of the panel and 1 group of 10 DC output connections.
Step 4 Confirm that the main power feeds to the DC fuse panels are the correct polarity.
Step 5 Confirm that all connections from the DC fuse panels to the DC power supplies are the correct polarity.
Step 6 Turn OFF all DC power supplies at the component level.
Step 7 Go to the main circuit breakers off the input feeds and place the circuit breakers in the ON position.
| Warning After wiring the DC fuse panel, remove the tape from the circuit breaker switch handle and reinstate power by moving the handle of the circuit breaker to the ON position. |
| Caution Power is now present on thesystem rack. Hazardous conditions exist; use caution. |
Step 8 Turn on both of the DC fuse panel Main Power A circuit breakers.
Note The grey DC fuse panels have input circuit breakers and the black panels do not.
Step 9 Turn on the DC fuse panel Main Power B circuit breaker on panel 1 only.
Step 10 Turn on all DC power supplies at the component level.
Step 11 Check the power supplies and systems for power-on LED indications and airflow. Make this visual check inside the cabinet on each power supply and each system.
If a power system failure occurs, 1 or more DC fuses will open. In case of multiple failures, 1 or both of the main circuit breakers will trip, shutting down several units in the system system if not the entire system.
The following steps explain how to troubleshoot the system:
When equipment installed in an system system rack fails because of overheating or power loss, try operating the equipment by itself. Power OFF other equipment in the rack (and in adjacent racks) to allow the failing unit maximum cooling air and clean power.
Step 2 Replace any defective fuse with a fuse of the correct rating.
| Warning Never change fuses with live power present. Lethal currents are present on and in the DC fuse panels. |
| Caution Never use a larger fuse than what is specified for the individual locations. Refer to Table 2-1 or Table 2-2 for the correct fuse size for every location. |
Step 3 Follow the power-on sequence of operations. See the section "Powering On the System".
Step 4 Verify that the proper LED power on indications are present and that airflow has resumed.
![]()
![]()
![]()
![]()
![]()
![]()
![]()
![]()
Posted: Wed Jan 22 04:40:08 PST 2003
All contents are Copyright © 1992--2002 Cisco Systems, Inc. All rights reserved.
Important Notices and Privacy Statement.