|
|

This chapter describes the equipment and site requirements for installing the Cisco AccessPath Integrated Access System. The chapter contains the following sections:
Before installing your Cisco AccessPath Integrated Access System, you should consider the power and cabling requirements that must be in place at your installation site, the equipment you will need to install the system, and the environmental conditions your installation site must meet to maintain normal operation. This chapter guides you through the process of preparing for your Cisco AccessPath Integrated Access System installation. For further information on AccessPath system physical specifications, refer to Table 1-2.
The following guidelines will help to ensure your safety and protect the equipment. This list does not cover all potentially hazardous situations, so be alert.
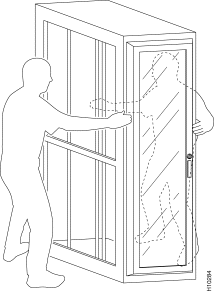
A fully configured Cisco AccessPath Integrated Access System weighs approximately 800 lb (263.6 kg). The chassis is not intended to be moved frequently. Before you install the system, make sure that your site is properly prepared so you can avoid having to move the chassis later to accommodate power sources and network connections.
Whenever you move the AccessPath system or any heavy object, follow these guidelines:
An example of these guidelines in use is shown in Figure 2-1.
The port adapters and power supplies in the Router Shelves and the Switch Shelf are designed to be removed and replaced while the AccessPath system is operating without presenting an electrical hazard or damage. However, you must power down the Switch Shelf before removing or replacing its I/O controller and network processing engine. Additionally, you must power down Access Server Shelves when replacing their port adapters or power supplies.
Follow these basic guidelines when working with any electrical equipment.
In addition, use the guidelines that follow when working with any equipment that is disconnected from a power source, but still connected to telephone wiring or other network cabling.
Electrostatic discharge (ESD) damage, which occurs when electronic cards or components are improperly handled, can result in complete or intermittent system failures. The network processing engine, I/O controller, and each port adapter consists of a printed circuit board that is fixed in a metal carrier. Electromagnetic interference (EMI) shielding, connectors, and a handle are integral components of the carrier. Although the carrier helps protect the boards, use an antistatic strap whenever handling the network processing engine, I/O controller, and port adapters. Handle the carriers by the handles and the carrier edges only; never touch the boards or connector pins.
Following are guidelines for preventing ESD damage:
The environmental monitoring functionality in the AccessPath system protects it and its components from potential damage from overvoltage and overtemperature conditions. To assure normal operation and avoid unnecessary maintenance, plan your site configuration and prepare your site before installation. After installation, make sure the site maintains an ambient temperature of 32\xb0 F to 104\xb0 F (0\xb0 C to 40\xb0 C), and keep the area around the chassis as free from dust as is practical.
The following sections address the site environment requirements for the Cisco AccessPath Integrated Access System.
The AC-input power supplies uses a power factor corrector that allows the AccessPath system to operate on input voltage and frequency within the ranges of 100 to 240 VAC and 50/60 Hz.
Note We recommend attaching the dual power supplies on the Switch Shelf and the Router Shelves to independent power sources for full redundancy. We also recommend an uninterruptible power source to protect against power failures at your site. Each AC-input power supply operating at 120 VAC requires a minimum of 5A service. We recommend powering the AccessPath system from a 15A receptacle at the power source.
The DC-input power supply allows the AccessPath shelves to operate at -48 VDC nominal in North America and -60 VDC in the European Community.
For information on the dimensions and weight of a fully populated AccessPath system, refer to Table 1-2.
For system power specifications, including input voltage and operating frequency ranges, refer to the following tables in the chapter "Cisco AccessPath Integrated Access System Product Overview":
Following are guidelines for setting up the plant wiring and cabling at your site. When planning the location of the new system, consider the distance limitations for signaling, electromagnetic interference (EMI), and connector compatibility, as described in the following sections.
When wires are run for any significant distance in an electromagnetic field, interference can occur between the field and the signals on the wires. This fact has two implications for the construction of plant wiring:
Note To predict and remedy strong EMI, you may also need to consult experts in radio frequency interference (RFI).
If you use twisted-pair cable in your plant wiring with a good distribution of grounding conductors, the plant wiring is unlikely to emit radio interference. If you exceed the recommended distances, use a high-quality twisted-pair cable with one ground conductor for each data signal when applicable.
If wires exceed recommended distances, or if wires pass between buildings, give special consideration to the effect of a lightning strike in your vicinity. The electromagnetic pulse caused by lightning or other high-energy phenomena can easily couple enough energy into unshielded conductors to destroy electronic devices. If you have had problems of this sort in the past, you may want to consult experts in electrical surge suppression and shielding.
The size of your networks and the distances between connections depend on the type of signal, the signal speed, and the transmission media (the type of cabling used to transmit the signals). For example, standard coaxial cable has a greater channel capacity than twisted-pair cabling. The distance and rate limits in the following descriptions are the IEEE recommended maximum speeds and distances for signaling; however, you can usually get good results at speeds and distances far greater than these. For example, the recommended maximum rate for V.35 is 2 Mbps, but it is commonly used at 4 Mbps without any problems. If you understand the electrical problems that might arise and can compensate for them, you should get good results with rates and distances greater than those shown here; however, do so at your own risk.
When preparing your site for network connections to the AccessPath system, you must consider a number of factors related to each type of interface:
Before installing the AccessPath system, have all additional external equipment and cables available.The information listed above is contained in the documentation that is shipped with each port adapter.
For ordering information, contact a customer service representative. See the section "Cisco Connection Online" in the chapter "About This Guide" for more information.
To easily access field replaceable units (FRUs) while the AccessPath system has routers, switches, and access servers installed in it, we have given you access to the shelves from both the front and the rear of the system.
Do not substitute a third-party vendor's rack mounting system for the one provided with the AccessPath system.
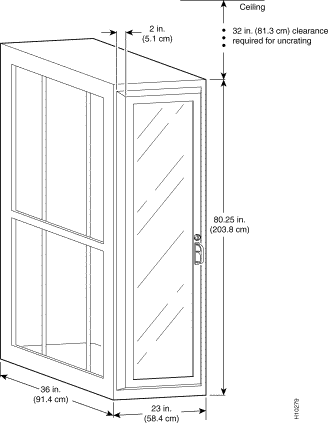
For an illustration of the Cisco AccessPath Integrated Access System rack footprint and outer dimensions, see Figure 2-2.
When planning your rack installation, consider the following guidelines:
In addition to the preceding guidelines, review the precautions for avoiding overtemperature conditions in the following section "Site Environment."
Table 2-1 lists the operating and nonoperating environmental site requirements. The following ranges are those within which the Cisco AccessPath Integrated Access System will continue to operate; however, a measurement that is approaching the minimum or maximum of a range indicates a potential problem. You can maintain normal operation by anticipating and correcting environmental anomalies before they approach a maximum operating range.
Planning a proper location for the AccessPath system and the layout of your equipment rack or wiring closet are essential for successful operation. Equipment placed too close together or inadequately ventilated can cause system overtemperature conditions. In addition, chassis panels made inaccessible by poor equipment placement can make system maintenance difficult. Following are precautions that can help avoid problems during installation and ongoing operation.
Follow these general precautions when planning your equipment locations and connections:
Follow these precautions and recommendations when planning power connections to the AccessPath system:
Your AccessPath system has been fully configured at the factory; no assembly is required. However, you will need the following tools and equipment to install the AccessPath system:
In addition, you might need the following external equipment:
After you install the chassis and verify that all the hardware is operating properly, you must make sure that the AccessPath system and the individual interfaces are correctly configured before you can connect to external networks. Cisco may have preconfigured your AccessPath system with this information or you may have elected to do it. In either case, refer to the Cisco AccessPath Integrated Access System Software Configuration Guide for information on checking configurations or entering them.
To assist you with your installation and to provide a historical record of what was done, by whom, use the Cisco AccessPath Integrated Access System Installation Checklist in Table 2-2. Make a copy of this checklist and indicate when each procedure or verification is completed. When the checklist is completed, place it in your site log (described at the end of this chapter) along with the other records for your AccessPath system.
When you receive your AccessPath system, use the following procedure to check the contents of the shipping container. Use the Cisco AccessPath Integrated Access System Installation Checklist in Table 2-2 and the Cisco AccessPath Integrated Access System Component List in Table 2-3 to ensure you received all the components you ordered.
Note Do not discard the shipping container. You will need the container if you move or ship the AccessPath system in the future.
Step 2 Check the contents of the accessories box against the Installation Checklist and the packing slip to verify that you received all listed equipment, which should include the following:
Note The entire printed documentation set for each of the AccessPath shelves does not ship with each system. However, the Documentation CD-ROM and Cisco's web site include all the pertinent documentation. In order to receive printed copies of this documentation, you must specifically order it. To order documents, contact a customer service representative.
Step 3 Verify that the port adapters installed in your AccessPath system match the port adapter types on the packing list.
Step 4 Proceed to the section "Site Log" in this chapter, then to the chapter "Installing and Configuring the Cisco AccessPath Integrated Access System," to begin installation.
To help ensure a successful installation, verify the preinstallation requirements discussed earlier in this guide and complete and return the Site Preparation Checklist in Table 2-4 to Cisco Systems. All site requirements must be met prior to shipment.
Have the installation site contact person fill out the Site Preparation Checklist. After you have completed the form, fax it to Cisco Systems. Please retain a copy of this checklist for your records.
Table 2-4 Site Preparation Checklist
Table 2-4  Site Preparation Checklist (Continued)
1. The site modem telephone number must be within 10 ft (3 m) of the AccessPath system.
2. The AccessPath system will require large door access and/or a freight elevator.
3. These circuits include T1 or E1 lines and backhaul WAN or LAN connections.
4. Software configuration development is your responsibility. If you need assistance, consult your sales representative.
5. Contact your sales representative for the e-mail address or fax number to submit your information.
6. The enable and virtual terminal password.
A site log provides a historical record of all actions relevant to the AccessPath system operation and maintenance. Keep your site log in a common place near the chassis where anyone who performs tasks has access to it. Site log entries might include the following:
Table 2-5 shows a sample site log page. Make copies of the sample or design your own site log to meet the needs of your site and equipment.
![]()
![]()
![]()
![]()
![]()
![]()
![]()
![]()
Posted: Tue Jan 21 00:21:06 PST 2003
All contents are Copyright © 1992--2002 Cisco Systems, Inc. All rights reserved.
Important Notices and Privacy Statement.