|
|

This chapter describes how to use the CiscoSecure EasyACS web-based interface to provide network security and to track activity on your network. The web-based interface lets you easily manage your database through the same type of web browser you use to view the internet. You can use the web-based interface to easily perform network administrator tasks such as adding and deleting user and group profiles and assigning attributes and permissions. All changes made using the web-based interface are reflected in the database and all changes made to the database are visible on the web interface.
The following description and instructions for using the graphical user interface (GUI) assume that you are familiar with the operation of your web browser and that you have already installed and configured CiscoSecure EasyACS using the Quick Installation quick reference card shipped with the product and Chapter 2, "First-Time Configuration of CiscoSecure EasyACS Software."
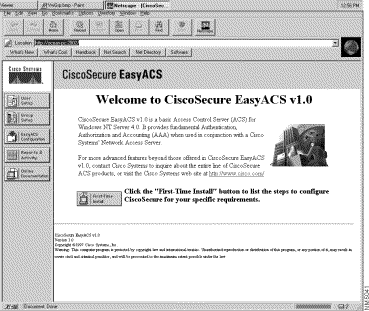
The CiscoSecure EasyACS welcome screen displays a vertical navigational bar for performing network administration tasks and viewing online documentation. (See Figure 3-1.)
The navigational bar lists the following selections:
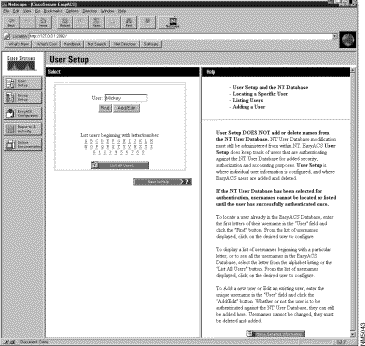
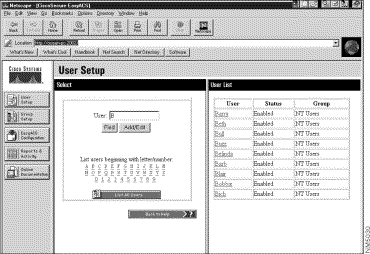
When you choose one of the selections from the navigational bar on the CiscoSecure EasyACS welcome screen, the GUI presents a divided screen layout. While the navigational bar continues to display on the left, two windows now appear side-by-side to the right of the navigational bar. In Figure 3-2, for example, you see the User Setup window with its divided screen layout.
Of the five navigational bar selections, only User Setup, Group Setup, and EasyACS Configuration have input fields. In all three cases, all editing and modifying of parameters occurs in the left window. The right window displays various kinds of information. It either provides a Help window with specific information to assist you in performing the steps in the left window along with a More Detailed Information button to display relevant sections in the user documentation or it displays the output that is the result of performing the steps. Clicking the Back to Help button at the bottom of the left window will return you to the top of the right Help window.
Select User Setup on the navigational bar to perform the following tasks:
To add a user account, follow these steps:
The Select and Help windows appear. (See Figure 3-2.)
Note The only CiscoSecure EasyACS account limits are as follows: usernames are 1 to 32 characters in length; passwords are 0 to 64 characters and cannot include the following characters: space.,;:"'~^*?|\
Step 2 Enter the username to be added (for example, Rex) to the EasyACS database in the User field.
Step 3 Click Add/Edit.
The Edit form appears in the left window. The username being added appears at the top of the window. (See Figure 3-2.)
Step 4 Select a database for password authentication
(a). To authenticate users and passwords against the Windows NT User Database, click the button to the left of Use the NT Database. Go to Step 5.
(b). To authenticate against the EasyACS User Database, enter the EasyACS user password in the appropriate field.
The next section on the form allows you to assign a group. This group refers to the TACACS+ settings for that group. To assign or modify a group's TACACS+ settings, see the section "Group Setup" later in this chapter.
Step 5 To assign this user account to a group, select a group from the "User assigned to group" pulldown list.
If the group's TACACS+ settings have not yet been specified, go to Step 7.
Step 6 If the group's TACACS+ settings have been specified, click View Group Settings... to view the group's current TACACS+ settings in the right window.
(See Figure 3-3.)
The next section on the form allows you to specify account status information. which provides additional checks to the user account after the password has been verified. Here, you can set accounts to never expire, expire on a given date, expire after n unsuccessful authentications, or disable the account altogether. (For more information, see the section"Account Expiration" in the chapter "Overview of CiscoSecure EasyACS").
Note Disabling an account does not, however, remove the account from either the EasyACS database or the NT User Database. (For more information, see the section "Deleting A User Account" later in this chapter.)
Step 7 Enter the expiration information for this user account in the appropriate fields.
Step 8 If you are pulling the IP address for this user from an IP pool, leave the Address Pool field blank. Otherwise, enter the user's assigned IP address. (See the section, "Configuration #2: Using the Windows NT User Database for Authentication and Assigning an Individual IP Address to Each User" or "Configuration #5: Using the EasyACS User Database for Authentication and Assigning an Individual IP Address to Each User" in the chapter "First-Time Configuration of CiscoSecure EasyACS Software.")
Step 9 When you have completed this form, click Submit.
To edit a user account, follow these steps:
The Select and Help windows appear.
Step 2 Enter the full or partial name to be edited in the EasyACS Database in the User field (no wildcard such as * is needed).
Step 3 Click Add/Edit.
The Edit form appears, displaying the user account information
Step 4 Edit the user account information, as desired.
Step 5 Click Submit.
Note To change a username in the CiscoSecure EasyACS User Database, you must first delete the user and then add the renamed user. (See the next section, "Deleting A User Account.")
To delete a user account from the CiscoSecure EasyACS Database, follow these steps.
The Select and Help windows appear.
Step 2 Enter the full or partial name to be deleted in the EasyACS Database in the User field (no wildcard such as * is needed).
Step 3 Click Add/Edit.
Step 4 At the bottom of the Edit window, Click Delete User.
The Confirm Deletion action window appears. (See Figure 3-4.)
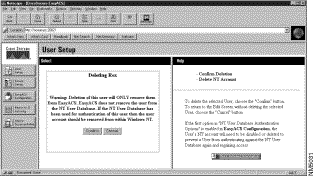
Step 5 Click Confirm.
The information window displays the user account as deleted from the CiscoSecure EasyACS User Database.
Note If you are authenticating against the Windows NT User Database, you must also delete the user account from the Windows NT User Database. This prevents the username from being automatically re-added to the CiscoSecure EasyACS User Database the next time the user tries to log in.
In the User Setup Select window, you can start a database search for user accounts using any of three options:
If you select a user by specifying List users beginning with letter/number or List All Users, you see the account information in the window to the right for modification or deletion. (See Figure 3-5.)
Note Users who are being authenticated against the Windows NT User Database will not appear on either list until they have been successfully authenticated once. Then, their username will be displayed. Removing the NT User from the list does not prevent them from authenticating again if they are still listed in the Windows NT User Database.
Select Group Setup on the navigational bar to perform the following tasks:
To list all users in a specified group, follow these steps:
The Group Setup Select and Help windows appear. (See Figure 3-6.)
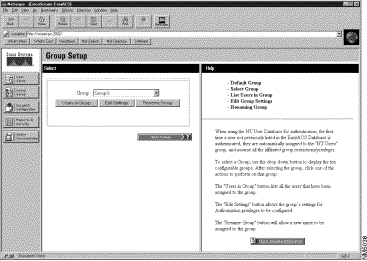
Step 2 Select a group profile from the Group: pulldown list.
Step 3 Click Users in Group to get a listing of users assigned to that group.
The User List displays in the window to the right. If you select a user from this list, the User X form appears, displaying this user's account information. Use this form to view, modify settings, or delete the user from the group.
Step 4 Click Group Setup to return to the Select and Help windows.
To assign or edit a group's authorization settings, follow the steps:
Note A user is assigned to the default group, NT Users, until the user has been reassigned to another group under User Setup.
Step 2 Select a group profile from the pulldown list in the Select window.
Step 3 Click Edit Settings.
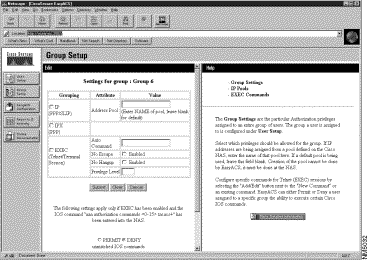
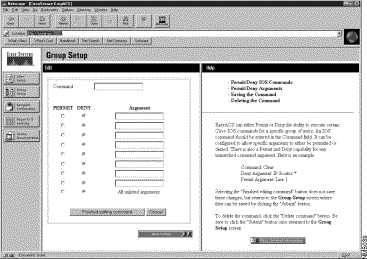
The group settings for the selected group appear in the left window. (See Figure 3-7.)
This form lists the group's network services which will be authorized during a dial-in session. Below the services is the list of commands and arguments to be permitted or denied. Commands only apply to the EXEC service not to IP/IPX. (For a detailed description of the services, attributes, and commands, refer to the documentation that accompanied your network access server.)
Step 4 Click Permit to allow all unmatched Cisco IOS command strings; or click Deny to not allow any mismatched Cisco IOS command strings.
Step 5 To enable a particular network service, select the checkbox immediately to the left of the service listed under Grouping.
Attributes are defined for each service. Authorization attributes are designed specifically to help you modify the network environment of users when they log in. When you set these attributes, their values are returned to the network access server on successful completion of an authentication exchange. These attributes allow system-wide controls to be administered from CiscoSecure EasyACS.
For more information, refer to the documentation that came with your Cisco network access server. CiscoSecure EasyACS supports a subset of the TACACS+ attributes.
Step 6 Enter the value to the right of the attribute where appropriate; or click Enable to define the attribute for the selected service.
Note If you leave the Address Pool field blank, the default IP pool configured on the network access server will be used. (See the section, "Configuration #2: Using the Windows NT User Database for Authentication and Assigning an Individual IP Address to Each User" or "Configuration #5: Using the EasyACS User Database for Authentication and Assigning an Individual IP Address to Each User" in the chapter "First-Time Configuration of CiscoSecure EasyACS Software.")
The list of commands that are currently authorized for this profile is displayed at the bottom of the Settings window.
Step 7 If you have finished editing the group settings, either click Submit to save these group settings or Clear to clear all values.
Note In Group Setup, clicking Submit saves any additions or changes to the network settings and the CiscoSecure EasyACS services are automatically stopped and restarted. For service status, select EasyACS Configuration from the navigational bar.
Step 8 To modify a command name and specify (or change) which arguments are permitted or denied, click Add/Edit. (The Add/Edit button is located at the very bottom of the Group Setup window. Depending on the size of your monitor, you might have to scroll down the window to view the Add/Edit button.)
The Cisco IOS Commands form appears in the active window. (See Figure 3-8.)
To enable the network access server to authorize Cisco IOS commands, you must first enter the following commands in the network access server:
The Cisco IOS debug command can also be used to provide valuable information about authentications and authorizations. Depending on your needs, you can enter the following debug commands on your network access server console:
(Refer to the network access server documentation for additional command information.)
Step 9 Enter the command name that you want to add, modify or delete in the group profile.
Step 10 Enter the arguments for each command in the appropriate field.
Step 11 Click to the left of each argument to specifically permit or deny its expression
Step 12 Click Permit or Deny all unlisted arguments.
Step 13 Either click Finish Editing Commands to save additions or changes to the command list or click Delete Command; then click Submit to save the commands configured for the group.
To rename a group, follow these steps:
Step 2 Enter the new name in the Name field.
Step 3 Click Submit to save the new group name or click Cancel to return to the Choose a group window without saving a new group name.
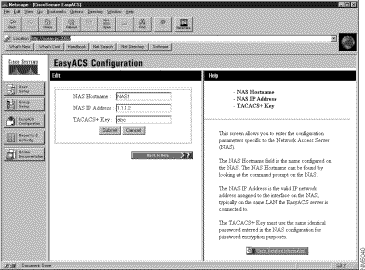
Select EasyACS Configuration from the navigational bar to edit your current CiscoSecure EasyACS configuration.
Note When you installed CiscoSecure EasyACS, you were asked the following questions: if the service should be started, which database to use for authentication, and your network access server configuration. If you responded correctly, Remote Administration should be the only parameter left to set up.

The configuration window allows you to set the following parameters:
To restart or stop the CiscoSecure EasyACS services, do the following:
To change your database preference for authentication, follow these steps:
Step 2 If you are authenticating against the Windows NT User Database, click the checkbox to the left of "Verify the Grant dialin permission to user..." to enable or disable the preference.
Step 3 If you've changed your database preference, click Submit to save this change and start the services. (Clicking Submit will automatically stop and restart the services causing the changes to take effect immediately.)
To change your network access server information, follow these steps:
A form appears in the active window in which you can edit the network access server information. (See Figure 3-10.)
The EasyACS Configuration window reappears.
You can administer CiscoSecure EasyACS from any workstation in the network as long as the workstation is running either Microsoft Internet Explorer 3.0 or Netscape Navigator 3.0. The address to enter in the remote administrators's browser is: http://<<Windows NT Server ip-address>>:2002.
To enable remote administration, follow these steps:
A form appears in the left window in which you can edit the Remote Administration settings. (See Figure 3-11.)
Step 2 To enter a single address, enter the same address in both the Starting IP Address and the End IP Address fields.
Step 3 To set up a range of valid IP addresses to accommodate the use of IP Pools or DHCP, enter the first address in the Starting IP Address field and the last address in the End IP Address field.
Step 4 Click Submit to save these changes and stop and start the appropriate services.
The EasyACS Configuration window reappears.
Select Reports & Activity from the navigational bar to view the following information:
You can import these files into most database and spreadsheet applications.
Use Online Documentation to generate a list of help topics from the CiscoSecure EasyACS User Guide.
The Table of Contents appears in the left window.
Step 2 Click the topic that you want to display.
The online documentation displays in the right window.
Step 3 To print the online documentation, click the right window then click Print on your browser's navigational bar.
Note You can also access Online Documentation by clicking More Detailed Information in any `Quick Help...' window.
![]()
![]()
![]()
![]()
![]()
![]()
![]()
![]()
Posted: Sun Jan 19 10:46:26 PST 2003
All contents are Copyright © 1992--2002 Cisco Systems, Inc. All rights reserved.
Important Notices and Privacy Statement.