|
|

You can use BeyondMail to create, send, and receive electronic mail over your company's network and over the Internet.
To use BeyondMail, you must have an e-mail account (username, address, and password) with your company's network (which also provides access to the Internet) or an e-mail account with an Internet service provider that has a server using Post Office Protocol version 3 (POP3) or the Simple Mail Transport Protocol (SMTP). The server accepts and stores the mail you send and receive and manages the transmission of your mail.
BeyondMail has many features for creating, addressing, sending, receiving, and storing e-mail messages and files. If you need more information about BeyondMail, use the online help or refer to the document CiscoRemote Plus Administrator Guide, which is available on the CiscoRemote Plus CD.
If you don't have an address or password, see your company's network administrator or your Internet service provider. You must also have the e-mail addresses of the persons to whom you are sending messages.
An e-mail address typically consists of an e-mail name and a service name.
Your e-mail name is usually a variant of your name, such as jane_doe, or jdoe.
The service name is the Internet address of your service provider, such as cisco.com:
A complete e-mail name might be jane_doe@cisco.com.
If you have questions about specifying your e-mail address, contact your network administrator or your internet service provider.
Note Before you start BeyondMail, check with your network administrator to see if you were assigned a password for your e-mail account (a POP password). You will need your password to start BeyondMail.
Take the following steps to set up BeyondMail:
A message appears asking if you want to create a user inbox.
Step 2 Click on Yes.
The Registration window opens.
Step 3 Enter your full name in the field and click on Next.
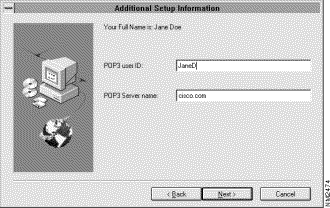
The Additional Setup Information window opens. (See Figure 6-1.)
Step 4 Enter your e-mail address in the POP3 user ID field.
Step 5 Enter the name of your service in the POP3 Server name field and click on Next.
A window then displays information about your SMTP and return address. This information is based on your previous address entry and is usually correct.
Step 6 Click on Next to accept the entries, or enter different entries and click on Next.
A message appears asking if you want to have BeyondMail automatically search for helper applications.
Step 7 Click on Yes.
A message appears asking if you want to have your original messages erased from the server after you receive them.
Step 8 Click on Yes.
A message appears asking if you want to create another inbox.
Step 9 Click on No.
The Setup Complete window appears.
Step 10 Click on Finish.
Review the Read Me file to read the latest information about BeyondMail.
You are now ready to use BeyondMail.
You use the BeyondMail window, to view, compose, and send your e-mail. (See Figure 6-2.)
The BeyondMail for Windows window includes a toolbar that you can use to select the e-mail tasks you want to perform. The window displays your mail organized in folders. You open folders to see the e-mail messages in them and double-click on messages to see their contents. You can also drag and drop messages from one folder to another. You use commands from the Message menu to open, forward, move, copy, delete, and reply to mail.
When displaying folders, the BeyondMail for Windows window shows several folders that hold your mail, and different types of mail you've received from other BeyondMail users.
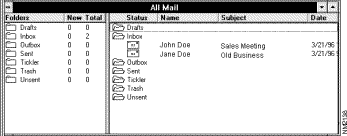
For example, you can open the New Mail window which shows all the new mail you've received in your different folders. You can also open the All Mail window which displays all your mail. (See Figure 6-3.)
BeyondMail provides seven types of message forms to help you create and organize your mail. The seven message forms are as follows:
You can open these different forms to see the types of information they hold. When you receive mail from other BeyondMail users, you see an icon for the message that tells you the type of message it is, for example, a memo or meeting announcement.
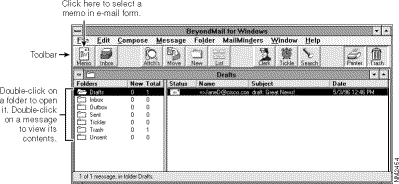
To send a simple memo to another person, you open the Memo form. (See Figure 6-4.)
Fill in the information on the form and then select Send from the Message menu. The message is placed in your Outbox folder, and the next time BeyondMail transmits mail, your message is sent.
As you read, compose, and send messages, you can have BeyondMail place the messages in the appropriate folder automatically. See the BeyondMail Help menu for more information about having BeyondMail organize and even respond to your e-mail. For more information, refer to the document CiscoRemote Plus Administrator Guide, which is available on the CiscoRemote Plus CD.
When you double-click on a message, or select a message and then select Open from the Message menu, you see the contents of the message displayed. (See Figure 6-5.)
When you have read a message, you can reply automatically to the sender, forward the message to another e-mail recipient, print the message, and or place the message in the trash.
You can record the e-mail addresses of people to whom you send mail in an address book. BeyondMail offers two types of address books, a public and a private address book.
The public address book is maintained by your network administrator and provides a public listing of addresses, such as e-mail addresses of employees in your company. All BeyondMail users on your network have access to this address book.
You maintain the private address book, recording specific addresses that are important to you. Only you have access to your private address book, where you can record as many addresses as you want. You can record individual names and e-mail addresses, or create group names or distribution lists that represent many addresses. When you create a distribution list, you can send the same message to all the people in the list.
When you have recorded entries in your private address book, you can quickly address your e-mail by entering a name or selecting it from the address book.
Take the following steps to add an address to your private address book:
The Select Inbox window opens.
Step 2 Select your Inbox and click on Next.
Step 3 Select Manage Address Book from the File menu.
Step 4 Click on the Private Address Book button, if necessary.
Step 5 Click on the Name button in the New field.
The Add Name To Address Book window opens. (See Figure 6-6.)
Step 6 Enter the full name in the Name field.
You can also enter a comment in the Comment field, if you wish.
Step 7 Enter the e-mail address in the Address field.
Step 8 Click OK.
Step 9 Click OK.
The address is added to your address book in alphabetical order.
Note If you are using an Internet service, you must connect to it before BeyondMail can send your message out over the network. If you are not connected to the Internet when you send the message, the message is placed in the outbox until you make a connection.
Take the following steps to create a mail message:
The Select Inbox window opens.
Step 2 Select your inbox and click on Next.
Step 3 Select the type of message you want to send by choosing a form from the Compose menu.
An empty form window opens (in this example, a memo form). (See Figure 6-7.)
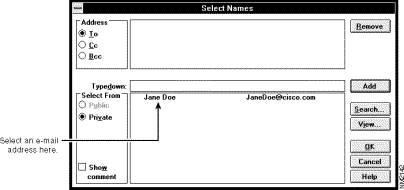
Step 4 Enter the e-mail address of the recipient in the To line, or click on the To: button to select a name from an address book.
You can enter more than one address by placing a comma between each address.
If you opened the address book, the Select Names window appears. (See Figure 6-8.)
If you entered the recipient's e-mail address in the To: line, proceed to Step 9; otherwise proceed to Step 5.
Step 5 Click on the Public or Private buttons to open the address book you want.
Step 6 Select an address from the list.
Step 7 Click on Add.
You can select and add as many addresses as you want.
Step 8 Click OK.
Step 9 Enter a subject in the Subject: line.
You can if you wish enter addresses in the Cc: and Bcc: lines to send copies of your message to other people.
Step 10 Enter your message in the text area.
Step 11 Click on the Send button on the toolbar or select Send from the Message menu.
When you start BeyondMail and while you are using it, the status line tells you when new messages arrive. You can also set BeyondMail to display an alert message or sound a tone to notify you of new mail.
BeyondMail checks for new mail at regular intervals. You can also check your mail whenever you want. (You must be connected to your Internet service, if you use one for e-mail.)
Take the following steps to check for mail:
Step 2 Enter your password if requested.
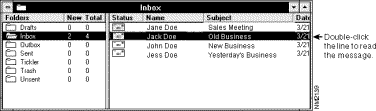
Step 3 Click on the Inbox icon to open the Inbox folder to see your messages.
The Inbox window opens. (See Figure 6-9.)
Step 4 Double-click on a message to read it.
For more information about the many other features of BeyondMail, refer to the document CiscoRemote Plus Administrator Guide, which is available on the CiscoRemote Plus CD. BeyondMail's additional features allow you to do the following:
![]()
![]()
![]()
![]()
![]()
![]()
![]()
![]()
Posted: Sat Jan 18 23:54:34 PST 2003
All contents are Copyright © 1992--2002 Cisco Systems, Inc. All rights reserved.
Important Notices and Privacy Statement.