|
|

To install and configure the Cisco 6510 Service Selection Gateway you need an ASCII terminal or a computer with serial communications software installed and running. The computer can be any computer such as a Windows workstation or a UNIX system.
Note Read the document Regulatory Compliance and Safety Information for the Cisco 6510 Service Selection Gateway before installing. Even though you probably read safety guidelines for the other products in your network, studying the material in this guide and the brief section that follows can help keep you safe and focused as you continue preparing your Cisco 6510 for service.
Follow these guidelines to ensure general safety:
For instructions on installing the Cisco 6510 software, refer to the Cisco 6510 Service Selection Gateway Software Installation and Configuration Guide.
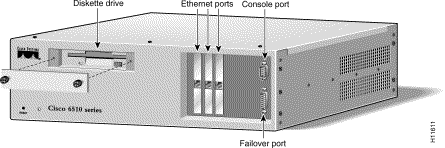
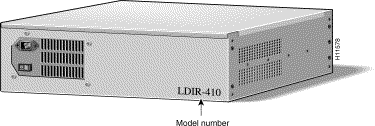
Figure 1-1 and Figure 1-2 show the front and back of the Cisco 6510.
Install the Cisco 6510 as follows:
Warning Ultimate disposal of this product should be handled according to all national laws and regulations. |
Step 2 Connect the power cord to the Cisco 6510 and plug it in.
Step 3 If it is not already assembled, assemble the console cable.
The console cable consists of three components.
Step 4 Connect one end of the console cable to the Cisco 6510 DB-9 console port.
Step 5 Connect the other end of the Cisco 6510 console cable to the DB-25 or DB-9 connector on your ASCII terminal or computer. Use a gender adapter if necessary (gender adapter not provided).
Figure 1-3 shows the serial cables provided with the Cisco 6510.
Step 6 Configure the serial port in your computer or terminal with these settings: 9600 baud, 8 data bits, no parity, and 1 stop bit; that is, set 9600, 8-N-1. Ensure that your communications software is running.
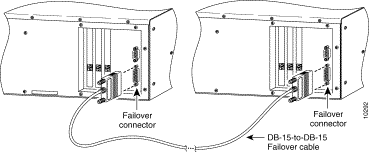
Step 7 If you are configuring the Cisco 6510 for failover, obtain a DB-15-to-DB-15 failover cable from Cisco.
The order number for the failover cable is CAB-FO-SSG6510=.
Connect the end of the cable labeled Primary to the failover port at the lower right of the active unit's front panel and the end of the cable labeled Secondary to the failover port of the standby unit.
The following figure shows two Cisco 6510s connected with a failover cable.
Step 8 Turn ON the power switch (see Figure 1-2). Because the Cisco 6510 ships with its software already in Flash memory, the Cisco 6510 can boot without a system disk.
As the Cisco 6510 boots, messages similar to the following appear on your computer or terminal:
Step 9 Connect the network cable from the hub or switch connected to the Asynchronous Digital Subscriber Line (ADSL) signal source to the network interface connections for interface card 0 (the far left card) on the front of the Cisco 6510.
Note As you connect the Cisco 6510 network interface cards to network
communications equipment, make a note of which interface card port is
connected to each piece of equipment. You will need this information later when
you configure the Cisco 6510 software.
From left to right, the Cisco 6510 software addresses the interface cards as
interface card 0 (FEI0), interface card 1 (FEI1), and interface card 2 (FEI2).
Step 10 Connect the network cable from the router on the remainder of your network to interface card 2 on the front of the Cisco 6510 (the far right card).
Caution The Cisco 6510 must see all network traffic to make sure that the translation of IP headers occurs in both directions. You cannot allow any traffic to bypass the Cisco 6510. |
Step 11 Connect the network cable from the router or network jack that is connected to the system that is running the Cisco User Control Point (UCP) or another authentication, authorization, and accounting (AAA) server to interface card 1 on the front of the Cisco 6510 (the middle card).
You are ready to configure the Cisco 6510 as described in Chapter 2 of the Cisco 6510 Service Selection Gateway Software Installation and Configuration Guide, "Installing and Configuring the Cisco 6510 Software."
![]()
![]()
![]()
![]()
![]()
![]()
![]()
![]()
Posted: Sun Jan 19 10:44:04 PST 2003
All contents are Copyright © 1992--2002 Cisco Systems, Inc. All rights reserved.
Important Notices and Privacy Statement.