|
|

Electrostatic discharge damage (ESD) occurs when electronic printed circuit cards are improperly handled and can result in complete or intermittent failures. ESD can impair electronic circuitry and equipment. Follow ESD prevention procedures when removing and replacing cards.
Following are recommendations for safely handling printed circuit cards:
To ensure that the resistor in the ESD strap is providing proper ESD protection, use an ohmmeter to check the ESD wrist strap. For adequate safety and ESD protection the measurement should be in the range 1 to 10 Mohms.
Following are the caveats associated with the CSC-1R card:
Select and read through the sections you will be using before beginning any procedures in this document.
The following procedures are included in this document:
The following sections discuss how to configure the CSC-1R card.
The speed of the Token Ring port on the CSC-1R card must be configured immediately after the first reboot (following installation) using the configuration dialog routine, the config terminal command, or the setup command.
The speed of the port on the CSC-1R must be configured by the user; there is no factory default for port speed. Following is sample output of how to configure the port on the CSC-1R Token Ring card for 16 MHz (using the config terminal command):
| Caution Port speed must equal ring speed. Failure to match the port speed to the ring speed will bring down the ring. The port inserts on the ring when you press Return after entering the command ring-speed 16. Only values of 4 or 16 Mbps will be accepted by the system because these are the only selectable speeds for the CSC-1R port. |
Card numbers are what the processor uses to distinguish one card from another. CSC-1R card numbers must be unique within the set of all Token Ring cards in the chassis, but will not interfere with non-Token Ring card numbers. The problem created with duplicate card numbers is called bus contention.
Note A CSC-1R with a card number of 1 will not interfere with an MCI or SCI card also numbered as 1 in the same chassis; however, if other Token Ring cards are in the same chassis with the CSC-1R card, the card number of each Token Ring card must be unique to prevent bus contention.
There is no bus contention between the CSC-1R card and the cBus controller (CSC-CCTL) card in the AGS+. A CSC-1R can be configured as card number 0, while the CSC-CCTL is also configured as card number 0 by default (providing all above requirements are met); however, using a car number other than 0 is strongly recommended.
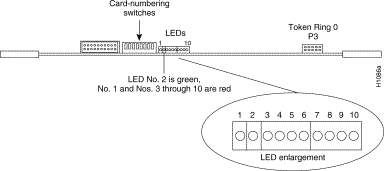
Software-readable switches, 1-3 on the front edge of the CSC-1R card (see Figure 1) control card numbering within the chassis (switches 4-8 have no function). Configure the switches on the CSC-1R card to select the desired card number (see Table 1). These switches are labeled from left to right as they appear in Figure 1.
Table 1 Switch Settings for Card Number Selection
| Caution When the processor polls the system to discover which cards are installed, CSC-R16M cards are identified first, and then the CSC-1R cards are identified. The interfaces on the CSC-R16M cards will be assigned unit addresses first, and then the interfaces on the CSC-1R cards will be assigned unit addresses; however, there is no slot hierarchy regarding physical placement of these cards in the chassis slots. Card numbers apply to the cards themselves, while unit addresses apply to the individual interfaces or ports on the cards. |
Following is an example of card numbering with respect to unit addressing:
Consider three cards installed in a system: two CSC-R16M cards configured as card number 0 and 1 and one CSC-1R card configured as card number 2. The interface on the first CSC-R16M will be assigned a unit address of 0; the interface on the second CSC-R16M will be assigned a unit address of 1; and the interface on the third CSC-1R will be assigned a unit address of 2.
Now consider a system with the same three cards installed, but configure the CSC-1R as card number 0 and the two CSC-R16M cards as numbers 1 and 2.
The system will arbitrarily assign the interfaces on the CSC-R16M cards (card numbers 1 and 2) with unit addresses of 0 and 1 respectively, while the CSC-1R interface will still be assigned unit addresses of 2.
Note Card numbers are assigned by the user with software-readable switches, and unit addresses are assigned by the system based on the hierarchy of unit address assignments.
The hierarchy of unit address assignments is as follows:
The CSC-1R interoperates with the CSC-R and CSC-R16M Token Ring cards, with any of the MCI or SCI family of cards, and with any cards in the cBus complex.
The CSC-1R Token Ring interface card will operate from any slot in the chassis except the slots reserved for the environmental monitor card in the AGS+ and the processor card (typically the first or second slot from the top of the card cage is reserved for the processor card). If cBus cards (FCTL, MEC, and so forth) are required in the AGS+, the center cBus slot is reserved for the cBus controller card (CSC-CCTL).
Note The CSC-1R will not interoperate with the older Type 1 and Type 2 Ethernet cards or with the CSC-S and CSC-T cards.
Table 2 shows the maximum number of CSC-1R cards that can be configured with different card combinations and supported in the A+, A, and M chassis. These CSC-1R configurations assume that one of the available slots in the A+, A, M, and C chassis is taken by a processor card, and a second slot by the CSC-ENVM in the A+.
Table 2 Maximum Chassis Configurations with the CSC-1R Card
Along the front edge of the CSC-1R card are ten status LEDs: nine red and one green. The order of the LEDs is left to right when looking at the front edge of the card (see Figure 1).
The red LED (on the far left end of the bank of LEDs) is the Power-On LED (Number 1). The next LED (green) is the Processor LED (Number 2).
The remaining eight LEDs (3-10) are red. At system boot, these eight LEDs will change state to indicate that the CSC-2R card is being initialized.
The seven initialization states of LEDs 3-10 are shown in Table 3.
Table 3 CSC-1R Status LED States at System Boot
In the first initialization state, all eight status LEDs (3-10) are on. During the next four states, LEDs 7-10 will be on, while LEDs 6-3 will consecutively turn on then off. States 6 and 7 will indicate a successful initialization.
The first seven LED states display consecutively at system boot. If a problem occurs during this initialization, the state that the LEDs were in when the problem occurred will flash on and off.
When the port inserts onto the ring, LEDs 3-10 will flash a series of patterns too fast to see, but following this, LEDs 3-10 will strobe back and forth to indicate correct operation. The speed of this strobing will change with the volume of data traffic; the heavier the traffic, the slower the strobing, and so forth.
| Caution If a CSC-R Token Ring card is to be replaced with a CSC-1R card, the CSC-MT Multibus memory card (required with the CSC-R card) may have to be removed from the chassis, so the system configuration (stored in NVRAM on the CSC-MT) will be lost. To prevent losing the system configuration, upload it to a TFTP server before removing the CSC-MT card; this saved configuration must then be downloaded after the new NVRAM card is installed. If a CSC-MC NVRAM card or a CSC-MC+ (Flash memory) NVRAM card is currently installed in the chassis, this upload/download procedure will not be required. |
If this upload/download procedure is not required, proceed to "Installation Procedures for the CSC-1R Card."
If this upload procedure is required, proceed to "Uploading the Configuration File to a TFTP File Server."
The following procedure is required only if the system configuration resides in a NVRAM memory card that will be permanently removed from the chassis as a result of the CSC-1R installation.
The following upload procedure works on SUNOS 4.1.1. Before you upload (save) the running configuration to the TFTP file server, ensure the following:
Use the following procedure to create a file on the TFTP file server and to upload the running configuration to this file:
Step 2 Once on the TFTP file server, change to the default TFTP boot directory using the UNIX command cd /directory name.
Note The name "/tftpboot" is a typical Sun default TFTP directory name. To locate and verify the name of the default TFTP directory, use the UNIX command more /etc/services. The default directory will be listed on the line starting with TFTP. Consult your network administrator to ensure that a TFTP file service is available.
Step 3 Create a temporary file using the UNIX command touch filename (where filename is the name you create for your temporary configuration file).
Note Some implementations of TFTP file service require that the temporary file does not exist on the destination system. Conversely, Sun's TFTP daemon requires that a file that is being transferred must first exist (as a "dummy" file) on the destination system. For example, if using NetCentral or CiscoWorks, make certain the TFTPTYPE variable has the default value of OVERWRITE in place (OVERWRITE is the Sun default). This value indicates that the file must exist and can be overwritten. Consult your network administrator to determine which implementation of TFTP file service is available.
Step 4 Give this file read/write permission using the UNIX command chmod 666 filename.
Step 5 Return to the router enable mode using the UNIX commands exit or logout.
Step 6 Use the commands write term and show config to verify that the running configuration and the NVRAM configuration are the same.
Step 7 Use the write net command to upload the running configuration to the TFTP file server.
A sample output of the write net command follows:
The !!!! and [ok] indicate that the operation is successful and that the configuration is safely stored in the temporary file on the TFTP file server. A failure is indicated with ... [timed out] or [failed]. This failure would suggest a net fault or the lack of a writable, readable file on the TFTP file server.
Proceed to "Installation Procedures for the CSC-1R Card."
Before beginning the following procedures, it is strongly recommended that the chassis be removed from the rack if the chassis rear panel is not otherwise accessible.
| Warning Before accessing the chassis interior and removing any cards, turn off power to the chassis and unplug the power cord. Attach appropriate ESD protection at this time. |
Following is a list of tools, materials, and parts needed to perform these procedures:
If you only need to install the CSC-1R card, proceed to the section, "Accessing the A+, A, and M Chassis Card Cage."
If you need to install the CSC-1R card and the appropriate applique on the chassis back panel, proceed to the section, "Accessing the A+, A, and M Chassis Interior."
Select and use the procedure that matches your chassis type.
Proceed to the section, "Installing the CSC-1R Card."
Select and use the following procedure that matches your chassis type.
To install the Token Ring applique, proceed to section, "Installing Token Ring Appliques."
Use Table 4 as a guide for the type of chassis you have and the applique you will be installing.
Table 4 Token Ring Applique-types by Chassis
APP-IB11
APP-JB12
APP-SB23
2 J = an individual plate with a long internal cable.
3 S = a medium plate with short internal cables, and B = a Token Ring applique. Before accessing the chassis interior and removing any cards, turn off power to the chassis and unplug the power cord. Attach appropriate ESD protection at this time.
Following is the procedure for installing a Token Ring applique on the rear panel of the chassis. The applique and the internal cable are one piece and cannot be disconnected.
Step 2 Gain access to the back panel of the chassis and label and disconnect all the exterior cables. The power cable should already be disconnected. Step 3 Rotate the chassis so the back panel is facing you and determine which type of applique you will be using from Table 4. The individual (I) plates are located on the left side of the back panel just below the console/terminal applique; the long plates (L) are to the right. Step 4 Use the No. 1 Phillips screwdriver to remove the appropriate blank filler plate (or old applique) from the chassis back panel and set this aside (save the screws to use with the new applique). Step 5 Attach the new applique to the inside of the chassis back panel using the No. 1 Phillips screwdriver and the screws from the removed plate or applique. Note Referring to Figure 1, use the
relative position of the Token Ring connector (P3) on the CSC-1R card as a starting point for routing
internal cables. Cable 0 would be routed underneath the left side of the rear of the card cage (with
the rear of the card cage facing you).
Step 6 Rotate the chassis so the card cage is facing you (back panel to your right). Step 7 Pass the internal cable underneath the card cage until its connector emerges from the front of the chassis. Do not force the cable past the other cables already beneath the card cage. Step 8 Position the internal cable connector so that it is located to the right side of the card cage (with the front of the card cage facing you). Be careful not to force this cable past the other cables already beneath the card cage. Do not attach the Token Ring cable at this time.
Proceed to the section, "Installing the CSC-1R Card."
Following is the procedure for installing a Token Ring applique to the back panel of the M chassis. The applique and the internal cable are one piece and cannot be disconnected.
Step 2 Access the back panel of the chassis and label and disconnect all exterior cables. The power cable should already be disconnected. Step 3 Rotate the chassis so the back panel is facing you and determine which type of applique you will be using from Table 4. The individual (I) plates are located (left of center) on the back panel below the console/terminal applique; the medium plates are located on the left side of the back panel. Step 4 Use the No. 1 Phillips screwdriver to remove the appropriate blank filler plate (or old applique) from the chassis back panel and set these aside (save the screws to use with the new applique). Step 5 Attach the new applique to the inside of the back panel using the No. 1 Phillips screwdriver and the screws from the removed plate or applique. Step 6 Rotate the chassis so the card cage is facing you (back panel to your right). Note With the chassis card cage facing you, the relative position of the back panel on the M chassis
is to the right of the card cage, and the internal Token Ring cable will be routed underneath the card
cage coming in from the right side.
Step 7 Pass the internal Token Ring cable underneath the card cage until its connector emerges from the front of the chassis. Position the internal cable connector so that it is located to the right side of the card cage (with the card cage facing you). Be careful not to force this cable past the other cables already beneath the card cage. Do not attach the Token Ring cable.
Proceed to the section, "Installing the CSC-1R Card."
Before installing the CSC-1R card in the chassis, specific card number and unit address requirements must be satisfied. The following requirements are intended to simplify the CSC-1R installation and the application of cable and applique labels.
Note To determine the unit addresses of the Token Ring cards already installed, i t may be necessary
to boot the system and use the show controller token command. The card numbers are established
by switches 1-3 (use the same left to right orientation as for the CSC-1R switches) on the front edge
of the CSC-R16M card and by jumper (W9) settings on the CSC-R cards (see
Table 5).
Note The W9 jumper on the CSC-R is located just left of the center of the card (the card orientation
is with the edge ejectors away from you).
Before beginning the CSC-1R installation procedure, use the following worksheet (Table 6) to determine the card numbers and unit addresses of the Token Ring cards and interfaces already installed in the chassis. Determine the card numbers and unit addresses of the CSC-1R cards to be installed.
Following are the instructions for using this worksheet:
Step 2 In the column "Type of Token Ring card," write in the card type of each Token Ring card installed: card types would be CSC-R, CSC-R16M, CSC-1R, and CSC-2R (this dual-port card requires two unit addresses per card number). Step 3 In the columns "Unique Unit Address First Token Ring Port" and "Unique Unit Address Second Token Ring Port," assign a unique unit address to each Token Ring card as follows:
Assign to the newly installed CSC-1R card a card number and unit address of N+1 (where N = the highest card number and unit address existing in the chassis before the installation of the new card).
Following is an example of how the system assigns unit addresses:
If a CSC-R (card number of 0) a CSC-R16M (card number of 1) are currently installed in a chassis and a CSC-1R card is added, the following unit address assignments will be made by the system:
If 1 is the highest card number and unit address assigned before the new CSC-1R is added, the new CSC-1R will be card number 2, with unit address 2.
Step 4 When the worksheet is completed, make sure that all card numbers and unit addresses are unique. This worksheet will help to keep the card numbers and unit addresses of the various Token Ring cards in order and will greatly simplify the application of Token Ring interface labels.
Table 6 Card Number and Unit Address Worksheet
2 First and second Token Ring ports are oriented right to left respectively.
Following is the unit addressing hierarchy. Adhering to this order of hierarchy will ensure that the Token Ring labels are applied correctly.
Following is the procedure for installing or replacing the CSC-1R card and applying Token Ring interface labels:
Step 2 Referring to the worksheet, use the software-readable switches on the front edge of the new CSC-1R card to select the desired unique card number. This card number will depend upon the card numbers of the Token Ring cards currently installed in the chassis. Step 3 Insert the new CSC-1R card into the card guides in the desired card cage slot (do not insert the card into the backplane or attach cables at this time). Step 4 Repeat Steps 2-3 for each CSC-1R card to be installed. Step 5 Attach the appropriate internal interface cable to the Token Ring connector (P3) on the CSC-1R card. Connector P3 is on the right front edge of the CSC-1R card (use Figure 1 as orientation). Verify the correct relationship from the connectors back through to the appropriate Token Ring applique on the back panel. Step 6 Using the worksheet as a reference, apply the Token Ring interface label to the appropriate internal cable attached to the newly installed CSC-1R card (for example, an interface with a unit address of 2 would get the Token Ring 2 label). Wrap each label around the cable (just below the connector) so that the label is readable from the front of the card cage opening. Step 7 Using the worksheet as a reference, apply the back panel Token Ring interface label to the appropriate applique attached to the back panel of the chassis. Apply each label directly below the applique connector so that the label is readable from the back of the chassis. Step 8 Repeat Steps 5-7 for each CSC-1R card, internal cable, and applique installed. Note In the M chassis, it may be necessary to reinstall all removed cards before attaching the Token
Ring cable to the CSC-1R card., depending upon the slot placement chosen for the CSC-1R card.
Step 9 Reattach the NVRAM or Flash memory 50-pin flat cable (if installed) into the 50-pin connector on the top CSC-1R card in the A+ and A chassis or on the bottom CSC-1R card in the M chassis. Step 10 Insert the newly installed CSC-1R cards into the backplane. Follow card replacement procedures described earlier. Step 11 Eliminate the extra length of internal cable in the front of the card cage by doing one of the following:
This completes "Installing the CSC-1R Card."
Proceed to one of the following sections:
The following procedure is necessary only if the system configuration was uploaded to a TFTP server before the old NVRAM card was removed and before the new CSC-1R card was installed.
After the new NVRAM card is installed, the saved configuration must be downloaded (restored) to the system NVRAM.
Following is a list of what to do after the new NVRAM card is installed, but before the saved configuration can be restored:
Note If the Token Ring interface is used, the port speed will have to be configured (see "Selecting
Port Speed") before the TFTP download can take place.
Step 2 Power the system ON and reply yes to the configuration dialog query. Step 3 Go through the configuration dialog routine and enable one interface to act as the path to the TFTP file server. Step 4 Reply no to the query "Is this interface in use?" for all interfaces other than the interface connected to the TFTP file server. Reply yes only for the interface connected to the TFTP file server. Note If the Token Ring interface is being used, the port speed must be entered at this time. Make
certain to match the port speed with the ring speed.
Step 5 Verify the connection to the TFTP file server by transmitting a ping to the TFTP file server. The syntax for the ping command is as follows:
Connectivity is indicated by !!!!!, while ... [timed out] or [failed] indicates none. If the connection fails, reconfigure the interface, check the physical connection to the TFTP file server, and re-transmit a ping.
The file name (gsxx) used in the following example is intended as a sample. Use the following procedure to download the saved configuration from the TFTP file server and to write this configuration to NVRAM:
Step 2 Use the command write term to verify that the configuration is present in the running memory of the router. Step 3 Use the router command write memory to write the configuration into NVRAM. Step 4 Turn the system off, wait approximately thirty seconds, turn the system back on (power-cycle), and reboot. Step 5 Use the router command show config to verify that the configuration is present in NVRAM.
This completes "Downloading the Configuration File from a TFTP File Server."
Proceed to the section, "Testing the Installation."
Following is the procedure for testing the CSC-1R installation:
Step 2 Verify that the boot screen and all installed CSC-1R Token Ring interfaces are displayed. If a CSC-1R card is not seen by the system, the card may be inserted incorrectly. To check this, turn off the power, disconnect the power cable and Token Ring cable, reseat the CSC-1R card, reattach all internal cables, and reboot. Note If the system does not boot properly, refer to
Table 3 and verify the LED
initialization sequence. If the LED sequence is incorrect, check the card installation and reboot.
Step 3 After the system boots correctly, turn the power OFF and unplug the chassis. Step 4 Replace the card access panel and top cover (if removed) on the A+, A, or M chassis. Step 5 Attach the external Token Ring cables to the appropriate back panel Token Ring appliques at this time. Step 6 Power ON the system and go through the configuration dialog routine (or use the setup command) and enter the IP addresses, subnet masks, and ring speeds for the Token Ring interfaces you just installed. Port speed must equal ring speed. Failure to match the port speed to the ring speed will bring down the ring. The port inserts on the ring when you press Return after entering the command ring-speed 16. Step 7 After the new Token Ring interfaces are configured, use the show controller token unit (where unit is the unit address number of the Token Ring port) command to verify that the unit addresses assigned by the system match those assigned in the worksheet. If the hierarchy of unit addressing was observed when installing the CSC-1R cards, all system assigned unit addresses will match the Token Ring labels.
This completes Installing and Configuring the CSC-1R Single-Port Token Ring Interface Card.
Applique type
A+
A
M
1 I = an individual plate with a short internal cable.
![]()
Warning
Installing Appliques on the A+ or A Chassis
Step 1 If you are replacing older the Token Ring card (CSC-R), the applique for this card must be removed as well. This will require disconnecting the internal Token Ring cable from the CSC-R card and removing the card.
Installing Appliques on the M Chassis
Step 1 If you are replacing the older Token Ring card (CSC-R), the applique for this card must be removed as well. This will require disconnecting the internal cable from the CSC-R card and removing the card. Also remove the CSC-MT memory card since the CSC-1R does not require the CSC-MT to operate.
Installing the CSC-1R Card
Completing the Card Number and Unit Address Worksheet
Step 1 Referring to the switch settings on the following worksheet, verify the card numbers of all of the Token Ring cards currently installed in the chassis. In the column "Unique Card Number," cross out those card numbers already used because a card number cannot be used for more than one card. Refer to the section "Numbering CSC-1R Cards with Software-Readable Switches" as needed.
Software-Readable
Switch Settings 1-31
Unique
Card Number
Type of
Token Ring Card
Unique Unit Address
Second TR Port2
(CSC-2R only)
Unique Unit Address
First TR Port
1 D = Down, U = up.
Installing the CSC-1R Card and Token Ring Labels
Step 1 If you are replacing an existing CSC-1R card, disconnect the internal Token Ring cable (if not done already) and the NVRAM or Flash memory cables (if installed), and remove the card from the chassis card cage. Follow card removal procedures described earlier.
Downloading the Configuration File from a TFTP File Server
Step 1 Make certain that one interface (not the CSC-1R Token Ring interface if possible) is physically connected to the network with the TFTP file server.
Procedure
Step 1 Use the config net command to upload from the TFTP file server. A sample output of the config net command follows:
Testing the Installation
![]()
Warning The next part of this procedure requires chassis operation with all covers removed. Use extreme caution because potentially hazardous voltages are present within. To avoid the chassis overheating during the following steps, apply power to the chassis only long enough to see the interfaces displayed and the correct LED functions.
Step 1 Plug in the power cord and turn chassis power ON for an installation check.
![]()
Caution 

![]()
![]()
![]()
![]()
![]()
![]()
![]()
![]()
Posted: Thu Nov 6 16:10:40 PST 2003
All contents are Copyright © 1992--2003 Cisco Systems, Inc. All rights reserved.
Important Notices and Privacy Statement.