|
|

The CSC-MC+ is an add-on applique card of Flash memory storage. With the CSC-MC+, system software images may be stored, booted, and rewritten as necessary. The Flash card connects to all the configurations (CSC-2E2T, CSC-1E1S, and so forth) of the revision 3 multiport communications interface card (MCI-3), to the CSC-2R(1R) Token Ring card, and to the Environmental Monitor card (CSC-ENVM). The CSC-MC+ card replaces the nonvolatile random access memory (NVRAM) card (CSC-MC) that can be used in all of the A, M, and C chassis platforms.
Following is a list of the features of the CSC-MC+ Flash memory card:
Use of the Flash memory is subject to the terms and conditions of the software license agreement that accompanies your product.
Before beginning any procedures, read the following outline and the sections you will be using.
Successful use of the CSC-MC+ card requires that certain prerequisites and caveats be satisfied.
Note If the CSC-MC+ card was shipped to you preinstalled in a chassis, proceed to the section "Configuring Flash." If the CSC-MC+ card was shipped to you as an individual spare part requiring installation and configuration, continue with this section.
| Caution For the CSC-MC+ to CSC-ENVM connection, the CSC-ENVM must be revision 4 |
Electrostatic discharge damage (ESD) occurs when electronic printed circuit cards are improperly handled and can result in complete or intermittent failures. ESD can impair electronic circuitry and equipment. Follow ESD prevention procedures when removing and replacing cards.
Following are steps for safely handling printed circuit cards:
Step 2 Connect the strap to an unpainted chassis frame surface or another proper grounding point or chassis surface to safely channel unwanted ESD voltages to ground.
Step 3 Use the edge ejectors to remove the card. Handle the card by its sides. Place the card on an antistatic surface or in a static shielding bag. To prevent further damage to the card by ESD voltages, defective cards must remain in the static shielding bag when returned for repair or replacement.
Step 4 Handling the new card by its edges only, insert it into the chassis. Avoid contact between the card and clothing. The wrist strap only protects the card from ESD voltages on the body; ESD voltages on clothing can still damage the card.
Note To ensure that the resistor in the ESD strap is providing proper ESD protection, use an ohmmeter to check the ESD wrist strap. For adequate safety and ESD protection the measurement should be in the range 1 to 10 Mohms.
The following upload procedure works on SUNOS 4.1.1. Before you upload (save) the running configuration to the TFTP file server, ensure the following:
Use the following procedure to create a file on the TFTP file server and to upload the running configuration to this file:
Step 2 Once on the TFTP file server, change to the default TFTP boot directory using the UNIX command cd /directory name.
Note The name "/tftpboot" is a typical Sun default TFTP directory name. To locate and verify the name of the default TFTP directory, use the UNIX command more /etc/services. The default directory will be listed on the line starting with TFTP. Consult your network administrator to ensure that a TFTP file service is available.
Step 3 Create a temporary file using the UNIX command touch filename (where filename is the name you create for your temporary configuration file).
Note Some implementations of TFTP file service require that the file does not exist on the destination system. Conversely, Sun's TFTP daemon requires that a file that is being transferred must first exist (as a dummy file) on the destination system. For example, if using NetCentral or CiscoWorks, make certain the TFTPTYPE variable has the default value of OVERWRITE in place, which indicates the file must exist and can be overwritten. Consult your network administrator to determine which implementation of TFTP file service is available.
Step 4 Give this file read/write permission using the UNIX command chmod 666 filename.
Step 5 Return to the router enable mode using the UNIX commands exit or logout.
Step 6 Use the commands write term and show config to verify that the running configuration
and the NVRAM configuration are the same.
Step 7 Use the write net command to upload the running configuration to the TFTP file server.
A sample output of the write net command follows:
The !!!! and [ok] indicate that the operation is successful and that the configuration is safely stored in the temporary file on the TFTP file server. A failure is indicated with ... [timed out] or [failed] and suggests a net fault or the lack of a writable readable file on the TFTP file server.
Following is a list of tools, materials, and parts needed to perform this installation procedure:
Note The No. 2 Phillips must have a shaft no less than seven inches long to allow vertical clearance in the M chassis card cage.
| Warning Before gaining access to the chassis interior and removing any cards, turn off power to the chassis and unplug the power cord. Attach appropriate ESD protection. |
The following three procedures describe how to gain access to the A+ or A chassis, the M chassis, or the C chassis. Follow the procedure that matches your chassis type.
| Caution Version 9.0 system software or later is required to use the CSC-MC+. With the newer version of system software on a CSC/3 processor, a PAL chip (U55) must be replaced to allow the processor card to operate with the 2 MB EPROMs used. |
If your processor card already has the newer system software, do one of the following:
Note If your CSC/3 processor card does not have the newer system software, proceed to the section "Replacing the EPROM and PAL Chip on the CSC/3 Processor Card."
Following is the procedure for replacing the EPROMs and PAL chip on the CSC/3 processor. The CSC/4 does not require this PAL change.
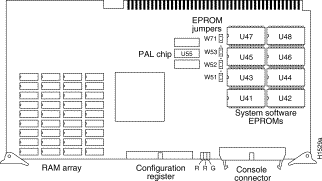
Step 2 Refer to Figure 1 and locate the eight EPROMs on the right side of the CSC/3 card. The EPROMs are arranged in two vertical columns of four EPROMs each. The left column is labeled U41-U47 (all odd) and the right column is labeled U42-U48 (all even).
Step 3 Note the orientation of the notches on the left end of each EPROM to aid in inserting the new EPROMs. Do not rely on the orientation of the labels on the new EPROMs for correct positioning.
Step 4 Use an EPROM removal tool, chip removal tool, or a small flat-blade screwdriver to gently remove one EPROM.
Step 5 Install the new EPROM whose number corresponds to the old EPROM you just removed. Observe the correct notch orientation for the new EPROM.
Step 6 Repeat Steps 4 and 5 until all new EPROMs are installed. Be careful not to bend or break any of the pins. To straighten a bent pin, use needle-nosed pliers. If a pin breaks contact your service representative to obtain a replacement.
Step 7 When all new EPROMs are installed, refer to Figure 1 to locate the PAL chip
(Part No. 15/105 or 17-0628A) at socket position U55 on the CSC/3 card.
Step 8 Use a chip removal tool or a small flat-blade screwdriver to gently lift the PAL chip
(Part No. 15/105 or 17-0628A) from the U55 socket and set it aside. Note the orientation of the notch on the left end of the PAL chip to aid in inserting the new PAL chip. Do not rely on the orientation of the label on the new PAL chip for correct positioning.
Step 9 Carefully insert the new PAL chip (Part No. 17-0930-01) into the U55 socket. Be careful not to bend or break any of the pins. To straighten a bent pin, use needle-nosed pliers. If a pin breaks contact your service representative to obtain a replacement.
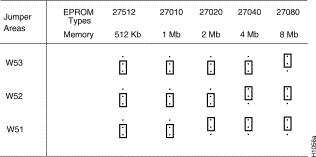
Step 10 After the new PAL chip is inserted, refer to Figure 1 to locate the jumpers labeled W51, W52, and W53 on the CSC/3 card. Figure 2 shows in what positions the W51-W53 jumpers are installed in the factory.
Step 11 Adjust the W51 jumper for 2 MB Memory as shown in Figure 2. It should not be necessary to change W52 and W53, but if it is, use the default settings shown for these jumpers in Figures 1 and 2.
Step 12 Reinsert the CSC/3 card in its card cage slot, but do not reinstall the console cable.
Note If it is necessary to return to the older version of system software, the old PAL chip
(Part Number 15/105 or 17-0628A) will have to be reinstalled as well. Use the empty box from the
new PAL chip and EPROMs.
This completes "Replacing the EPROM and PAL Chip on the CSC/3 Processor Card."
Read the following and choose the procedure which best suits your needs:
Following is the procedure for upgrading the EPROM on a CSC-ENVM card to the current firmware version:
Note Do not proceed with this section if you do not need to upgrade the EPROM in your CSC-ENVM card.
| Caution The correct placement of the EPROM is most important. If improperly positioned, the EPROM may be damaged when the system is powered on. It is imperative that you read through all of the instructions before proceeding. To prevent damage to the EPROM from electrostatic discharge, follow the ESD procedures described earlier when handling the cards and their components. |
Following are the tools for upgrading the EPROM on the CSC-ENVM card:
Following is the procedure for upgrading the EPROM on the CSC-ENVM card:
Step 2 Disconnect all cables attached to the CSC-ENVM; note their position for reinstallation.
Step 3 Remove the CSC-ENVM card from its chassis card cage slot and place it on an antistatic mat or antistatic foam. Follow the card removal procedure described earlier.
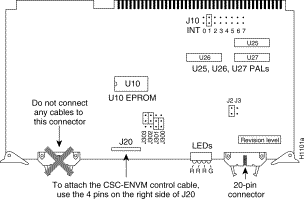
Step 4 Refer to Figure 5 on page 15, orient the CSC-ENVM card as shown, and locate the EPROM (socket position U10) on the CSC-ENVM card.
Step 5 Use the chip extractor tool or the small flat-blade screwdriver to carefully remove the old EPROM from its socket. Note the position of the notch (see Figure 5) in the EPROM and socket; use this notch to position the new EPROM. Do not rely upon the orientation of the label on the new EPROM for proper insertion.
Step 6 Align the new EPROM notch with the notch in the socket. If the new EPROM is shorter than the socket (fewer pins), insert the EPROM into the holes starting furthest from the notch. When inserting the new EPROM be very careful not to break or bend any of the pins. To straighten a bent pin, use needle-nozed pliers. If a pin breaks, contact your service representative to obtain a replacement.
Step 7 When the new EPROM has been installed, check for proper jumper settings. The factory default settings shown in Figure 5 should match the settings on your card. There are no user-configurable jumpers on the CSC-ENVM card.
Step 8 Insert the CSC-ENVM card into the top card cage slot following the card insertion procedures described earlier.
Step 9 Attach the CSC-ENVM control cable to connector J20. The control cable must attach to the four pins on the right side (with the card front edge facing you) of J20 (see Figure 5). The opposite end of the control cable is attached to the analog power switch (APS) and the power supply and should be already connected.
Step 10 Carefully route the control cable through the cable space provided at the top right of the card cage (facing the unit). Ensure that the control cable will not be crimped or cut.
Step 11 Connect any other cables previously attached to the CSC-ENVM card.
This completes "Upgrading the EPROM on the CSC-ENVM Card."
Proceed to the section "Connecting the CSC-MC+ to the CSC-ENVM Card."
Following are the procedures for installing the CSC-MC+ card in the A+, A, M, or C chassis, and for attaching the CSC-MC+ card to the MCI-3 card:
Following is the procedure for installing the CSC-MC+ card in an A+ or A chassis and for connecting the CSC-MC+ to an MCI-3 card:
Step 2 For the A chassis only—Remove the CSC-M memory card if present. Follow the card removal procedures described earlier. Do not remove any other cards or cables.
Step 3 Before mounting the card in the chassis, attach the 50-pin flat cable to the 50-pin connector (see Figure 3) on the CSC-MC+ card. Both ends of this cable are keyed to ensure proper connection.
Step 4 Refer to Figure 3 and locate the jumper on the front edge of the CSC-MC+ card, which should be in the write-enable position. Make certain this jumper is installed on the card before proceeding. If this jumper is removed, the Flash memory will be write-protected, making a write operation impossible.
Step 5 Position the CSC-MC+ card over the four screw studs on the top of the card cage so that the 50-pin flat cable and 50-pin connector are toward the front of the card cage. Align the four screw holes on the CSC-MC+ card with these four screw studs (contact your service representative if your chassis does not have these screw studs).
Step 6 Attach the CSC-MC+ card to the four screw studs using the four No. 2 Phillips screws
(6/32 x 1/4'') supplied.
Step 7 With the MCI-3 card oriented as in Figure 4, locate the 50-pin NVRAM connector on the MCI-3 card. The 50-pin connector is located toward the lower left corner of the card. The CSC-MC+ will attach to this connector via the 50-pin flat cable.
Step 8 Route the 50-pin cable from the CSC-MC+ card down to the MCI-3 card and attach the cable to the NVRAM connector on the MCI-3 card (see Figure 4).
Step 9 Insert the MCI-3 card all the way into the card slot. Be careful not to stress or strain the 50-pin flat cable.
This completes "Installing Flash in the A+ or A Chassis."
Proceed to the section "Testing the CSC-MC+ Installation".
Following is the procedure for installing the CSC-MC+ card in an M or C chassis and for connecting the CSC-MC+ to an MCI-3 card:
Step 2 Remove the CSC-MC (NVRAM) card located on the bottom of the chassis. The CSC-MC is attached to the chassis with four Phillips screws (6/32 x 1/4''). After they are removed, set the CSC-MC and screws aside.
Step 3 Place all removed cards on an antistatic mat or antistatic foam. Do not stack the cards on top of one another.
Step 4 Before mounting the card in the chassis, attach the 50-pin flat cable to the 50-pin connector (see Figure 3) on the CSC-MC+ card. Both ends of this cable are keyed to ensure proper connection.
Step 5 Refer to Figure 3 and locate the jumper on the front edge of the CSC-MC+ card, which should be in the write-enable position. Make certain this jumper is installed on the card before proceeding. If this jumper is removed, the Flash memory will be write-protected, making a write operation impossible.
Step 6 Position the CSC-MC+ card over the four screw studs on the bottom of the chassis so that the 50-pin flat cable and 50-pin connector are toward the front of the card cage. Align the four screw holes on the CSC-MC+ card with these four screw studs (contact your service representative if your chassis does not have these screw studs).
Step 7 Attach the CSC-MC+ card to the four screw studs, using the four No. 2 Phillips screws (6/32 x 1/4'') supplied and the long No. 2 Phillips screwdriver.
Step 8 Place the MCI-3 card in the card guides of the bottom slot of the card cage (directly above the CSC-MC+ card) and reattach the serial and Ethernet cables to the MCI-3 card. Do not insert the MCI-3 card all the way into the chassis card slot.
Step 9 Route the 50-pin cable from the CSC-MC+ card up and over the serial and Ethernet cables currently attached to the MCI-3 card. Attach the 50-pin cable to the NVRAM connector on the MCI-3 card.
Step 10 Insert the MCI-3 all the way into the card slot. Carefully push the exposed part of the 50-pin cable under the MCI-3 card.
| Caution To prevent an electrical short circuit, check the clearance above the end of the 50-pin flat cable attached to the NVRAM connector on the MCI-3 card. There should be minimal contact between this cable and surrounding cards. |
This completes "Installing Flash in the M or C Chassis."
Proceed to the section "Testing the CSC-MC+ Installation."
Following is the procedure to for connecting the CSC-ENVM (the CSC- ENVM is the top card in the AGS+ chassis) to the CSC-MC+ card in the AGS+ chassis:
| Caution Before connecting any cables to the 20-pin connector on the Flash card, check the cable type. Connect only the cable specified in the following procedure. Connecting any cables other than those specified may cause damage to the card or to the system in general. Do not connect anything to the 20-pin connector on the Flash card other than the 20-pin flat cable specifically named in the following procedure. |
Note During the following procedure, do not remove the control cable attached to J20 on the CSC-ENVM (see Figure 5).
Step 2 Refer to Figure 3 and locate the jumper on the front edge of the CSC-MC+ card, which should be in the write-enable position. Make certain this jumper is installed on the card before proceeding. If this jumper is removed, the Flash memory will be write-protected, making a write operation impossible.
Step 3 Position the CSC-MC+ card over the four screw studs on the top of the card cage in the A+ chassis so that the 50-pin connector on the front edge of the card, is toward the front of the card cage. Align the four screw holes on the CSC-MC+ card with these four screw studs (contact your service representative if your chassis does not have these screw studs).
Step 4 Attach the CSC-MC+ card to the four screw studs, using the four No. 2 Phillips screws (6/32 x 1/4'') supplied.
Step 5 Refer to Figure 3 and locate the 20-pin connector on the right edge (relative to the chassis front) of the CSC-MC+, and attach one end of the 20-pin flat cable to this connector. Attach no other cables to this connector.
Step 6 Refer to Figure 5 and locate the 20-pin connector on the right front edge of the CSC-ENVM, and attach the remaining end of the 20-pin flat cable to this 20-pin connector. Attach no other cables to this connector.
This completes "Connecting the CSC-MC+ to the CSC-ENVM Card."
Proceed to the section "Testing the CSC-MC+ Installation."
Depending upon your requirements, proceed with the one of the following:
Following is the procedure for installing the CSC-MC+ card in an A+ or A chassis and for connecting the CSC-MC+ to a CSC-2R(1R) card:
Step 2 A chassis only—Remove the CSC-M memory card if present. Follow the card removal procedures described earlier. Do not remove any other cards or cables.
Step 3 Before mounting the card in the chassis, attach the 50-pin flat cable to the 50-pin connector (see Figure 3) on the CSC-MC+ card. Both ends of this cable are keyed to ensure proper connection.
Step 4 Refer to Figure 3 and locate the jumper on the front edge of the CSC-MC+ card, which should be in the write-enable position. Make certain this jumper is installed on the card before proceeding. If this jumper is removed, the Flash memory will be write-protected, making a write operation impossible.
Step 5 Position t the CSC-MC+ card over the four screw studs on the top of the card cage so that the 50-pin flat cable and 50-pin connector are toward the front of the card cage. Align the four screw holes on the CSC-MC+ card with these four screw studs (contact your service representative if your chassis does not have these screw studs).
Step 6 Attach the CSC-MC+ card to the four screw studs using the four No. 2 Phillips screws
(6/32 x 1/4'') supplied.
Step 7 Locate the 50-pin connector on the CSC-2R(1R) card. The 50-pin connector is located toward the lower left corner of the card (see Figure 6).The CSC-MC+ will attach to this connector via the 50-pin flat cable.
Step 8 Route the 50-pin cable from the CSC-MC+ card down to the CSC-2R(1R) card and attach this cable to the50-pin connector on the CSC-2R(1R) card (see Figure 6).
Step 9 Insert the CSC-2R(1R) card all the way into the card slot. Be careful not to stress or strain the 50-pin flat cable.
Proceed to the section "Testing the CSC-MC+ Installation."
Following is the procedure for installing the CSC-MC+ card in an M or C chassis and for connecting the CSC-MC+ to a CSC-2R(1R) card:
Step 2 Remove the CSC-MC (NVRAM) card located on the bottom of the chassis. The CSC-MC is attached to the chassis with four Phillips screws (6/32 x 1/4''). After they are removed, set the CSC-MC and screws aside.
Step 3 Before mounting the card in the chassis, attach the 50-pin flat cable to the 50-pin connector (see Figure 3) on the CSC-MC+ card. Both ends of this cable are keyed to ensure proper connection.
Step 4 Refer to Figure 3 and locate the jumper on the front edge of the CSC-MC+ card, which should be in the write-enable position. Make certain this jumper is installed on the card before proceeding. If this jumper is removed, the Flash memory will be write-protected, making a write operation impossible.
Step 5 Position the CSC-MC+ card over the four screw studs on the bottom of the chassis so that the 50-pin flat cable and 50-pin connector are toward the front of the card cage. Align the four screw holes on the CSC-MC+ card with these four screw studs (contact your service representative if your chassis does not have these screw studs).
Step 6 Attach the CSC-MC+ card to the four screw studs, using the four No. 2 Phillips screws (6/32 x 1/4'') supplied and the long No. 2 Phillips screwdriver.
Step 7 Route the 50-pin cable from the CSC-MC+ card up to the CSC-2R card and attach this cable to the 50-pin connector on the CSC-2R(1R) card (see Figure 6).
Step 8 Insert the CSC-2R(1R) card all the way into the card slot and reattach the internal Token Ring cables to the appropriate connectors on the card.
Proceed to the section "Testing the CSC-MC+ Installation."
Following is the procedure for testing the CSC-MC+ installation:
| Warning The following procedure requires chassis operation with all covers removed. Use extreme caution around the chassis, because potentially hazardous voltages are present. |
| Caution To prevent chassis overheating during the following steps, apply power to the chassis only long enough to see the interfaces displayed and the green LED lit. |
Step 2 Plug in the power cord and power up the chassis for an installation check. The boot screen and all connected interfaces should be displayed. If not, power down and check all cable and card connections, then retry.
Step 3 If the system does not boot properly, either an EPROM or the PAL chip may be inserted incorrectly. To check this, turn off the power, locate the offending component, straighten the pins, then reinsert the component and try again.
Step 4 On the right front edge of the CSC-MC+ are two LEDs. The green LED, the power indicator, should be lit when power is on. The yellow LED should not be lit at this time. It will be discussed in a later section. If the green LED does not light, check the flat cable between the host card and the CSC-MC+ card for correct installation. If the green LED still fails to light, contact your service representative.
Step 5 After successful testing, power down and unplug the chassis.
Step 6 Replace the card access panel and top cover on the A+, A, or M chassis or the card clips and top cover on the C chassis. Before replacing the top cover on the C chassis, reinstall the card clips on the card cage.
If the running configuration was uploaded to the TFTP file server before installing the CSC-MC+, proceed to the section "Downloading the Configuration File from a TFTP File Server." If the running configuration was not uploaded, read the following note:
Note If the running configuration was not uploaded, then the system will have to be reconfigured using the configuration dialog routine: Power up the router and reply yes to the configuration dialog query; proceed with the configuration dialog routine until the entire configuration is re-entered. If the router has CSC-2R(1R) cards installed, the ring speeds of these cards will have to be reconfigured at this time. After the router is completely reconfigured, proceed to the section "Configuring Flash: Write Protection."
After the CSC-MC+ is installed, the saved configuration must be downloaded (restored) to the system NVRAM.
Following is a list of what to do after the CSC-MC+ is installed, but before the saved configuration can be restored to NVRAM:
Step 2 Power the system on and reply yes to the configuration dialog query.
Step 3 Go through the configuration dialog routine and enable one interface to act as the path to the TFTP file server.
Step 4 Reply no to the query "Is this interface in use?" for all interfaces other than the interface connected to the TFTP file server. Reply yes only for the interface connected to the TFTP file server.
Step 5 Verify the connection to the TFTP file server by transmitting a ping to the TFTP file server; the syntax for the ping command is as follows:
Connectivity is indicated by !!!!!, while ... [timed out] or [failed] indicates none. If the connection fails, reconfigure the interface, check the physical connection to the TFTP file server and retransmit a ping.
Note The acronym ping stands for packet internet groper, which is a program used to test reachability of destinations by sending an Internet Control Message Protocol (ICMP) echo and receiving a reply. Each send/receive cycle is displayed on the screen as an exclamation point (!).
Following is the procedure for downloading the saved configuration from the TFTP file server, and for writing this retrieved configuration to NVRAM:
Step 2 Use the command write term to verify that the configuration is present in the running memory of the router.
Step 3 Use the router command write memory to write the configuration into NVRAM.
Step 4 Turn the system off, wait approximately 30 seconds, turn the system back on (power-cycle), and reboot.
Step 5 Use the router command show config to verify that the configuration is present in NVRAM.
Proceed to the section "Configuring Flash."
Following are the procedures for configuring the Flash memory card:
| Caution This caution only applies to users who performed the TFTP download. If, during the configuration dialog routine, you responded yes for only the interface connected to the TFTP file server, then all other interfaces were placed in a shutdown state. Make certain to re-enable these interfaces after rebooting the system. Do this in the config terminal mode, and use the no shut command for each interface shut down. After all interfaces are turned back on, use the write memory command to write this configuration into NVRAM, otherwise the changes made will be lost after a reload. |
Following is sample output of how to re-enable one Ethernet interface:
The Flash Memory Card provides write-protection against accidental erasure or reprogramming of the Flash memories. The write-protect jumper (located on the front edge of the Flash memory card) may be removed in order to prevent reprogramming of the Flash memories, but this is not recommended for remote sites. The write-protect jumper must be installed when programming is required. The system image stored in the Flash Memory Card can only be changed from a privileged EXEC command session, which offers system-wide security as well.
Following is an overview of what needs to be done to configure the Flash card. The overview assumes that you have removed any existing CSC-MC cards, installed the CSC-MC+ card, and installed the appropriate level of system software EPROMs.
Note Pattern 0-0-0-0 (ROM monitor) means that no auto-boot from ROM will be executed. Pattern 0-0-0-1 (ROM-boot) means that a ROM-boot will be executed. Pattern 0-0-1-0 (ROM monitor and configuration file boot) means that a configuration file boot will be executed. The pattern 0-0-0-1 is part of the factory default jumper positions for the processor card configuration register. The second default jumper is at position 8 (see Figure 7). Although this jumper is not used for the Flash function, it is required for normal operation and should not be removed at any time.
To verify that the MCI-3, CSC-2R(1R), or CSC-ENVM card is properly connected to the CSC-MC+ card, use the show flash or show flash all commands. The show flash command displays the total amount of Flash memory present on the Flash card, the type of card connected to the Flash card (via MCI, via ENVM, and so forth), any files that may currently exist in Flash memory and their size, and the amounts of Flash memory used and remaining. The show flash all command displays all the above information and also shows all the information about each Flash memory device.
Once you configure Flash, the show flash or show flash all commands will display the names of the system software images.
Following is sample output of the show flash command:
Following is sample output of the show flash all command:
Note the [invalidated] flag at the end of the second example, which will appear due to a recopied file, user abort, network timeout, or Flash memory overflow. A prompt will tell you that the identical file already exists and that it will be invalidated. The first (now invalidated) copy of the file is still present within Flash memory, but it is rendered unusable in favor of the newest version.
To eliminate any files from Flash (invalidated or otherwise) and free up all available memory space, the entire Flash memory must be erased; individual files cannot be erased from Flash memory.
Both examples illustrate that the Flash memory can store and display multiple, independent software images (gsxx and tsyy), which would be most useful for storing default system software as a back-up. These images may also be stored in compressed format.
In the second example, ROM 0 is at location U2 on the Flash Memory Card. The code is a vendor code; size is in hex bytes; INTEL is the vendor name; and the last number is the chip part number.
The copy tftp flash command copies (writes) a TFTP image into the current Flash configuration:
| Caution Use of the Flash memory requires System Software Version 9.0 or later in the host processor. The TFTP image copied to the Flash memories must be at least System Software Version 9.0 or later. If system software earlier than this version is copied into the Flash memories and then booted, the CSC-MC+ card will not be recognized by the host processor card after the boot. The command to boot from this pre-9.0 file in Flash will have to be removed or altered before rebooting. |
Note You must make certain there is ample space available before copying a file to Flash. Use the show flash command and compare the size of the file you wish to copy to the amount of available Flash memory shown. If the space available is less than the space required by the file you wish to copy, the copy process will continue, but the entire file will not be copied into Flash. A failure message (buffer overflow - xxxx/xxxx) will appear, where xxxx/xxxx is the number of bytes read in/number of bytes available.
With the copy tftp flash command, you are prompted for the IP address (or domain name) of the TFTP server, which may be another Cisco router serving ROM or Flash system software images. You are then prompted for the filename of the software image and you are given the option to erase the existing Flash memory before writing onto it only when there is free space available in Flash memory. If no free Flash memory space is available or if the Flash memory has never been written to, the erase routine is required before new files can be copied.
You will be prompted for these two conditions by the system. The Flash memory is erased at the factory before shipment.
Following is sample output (copying a system image named gsxx) of the prompt you will see under these conditions:
Note Entering no after the "Erase flash before writing?" prompt would continue with the copy process. Entering yes would proceed with the erase routine. Make certain you have ample Flash memory space before entering no at the erasure prompt.
When you erase the existing Flash, the system clears and initializes each Flash memory, and a pound sign (#) prompt is displayed for each cleared and initialized device (sixteen total). The entire copying process takes several minutes and this time will differ from network to network.
Note The filename (gsxx) can be lower or uppercase; the system will see GSxx as gsxx. If both are copied to Flash, the second file copied will become the valid file.
Following is sample output from copying a system image (named gsxx) into the current Flash configuration:
| Caution For systems with the CSC-MC+ card connected to the CSC-ENVM card only—If (after the erase and write procedures are complete) the system returns the following error message: |
The series of !s in the above sample output indicates that the copying process is taking place. The series of Vs indicates that a checksum verification of the Flash memory is occurring as it is loaded into memory for boot, which is verified only through data compare during programming of the Flash memory. The last line in the sample configuration indicates that the copy is successful.
Note To abort the copy process, simultaneously press <Control> <Shift> 6. The process will abort; however, the partial file copied before the abort was issued will remain until the entire Flash memory is erased.
In the event of a flash memory load failure, the following error message is displayed:
If you see this message, contact Cisco Systems Customer Engineering immediately and inform them of the situation. Additionally, you can perform the following steps which might recover from the error. These steps can be repeated:
Step 2 Erase the flash memory and try to download the file again. To erase the flash memory, type Return or y at the erase flash before writing? [confirm] prompt.
Having successfully copied an image onto the Flash, the output of show flash all will provide the image name, as in the following sample output:
During the actual copy process, the yellow LED on the CSC-MC+ will be lit indicating the security (write-protect) jumper is installed. If the security jumper was removed from the Flash card, this would be indicated with the show flash command.
Following is sample out put of this write-protected condition:
In this condition, no files could be copied to Flash until the jumper was reinstalled.
You are now ready to boot from Flash. The following sections describe how to automatically and manually boot from the Flash Memory card.
You can auto-boot from Flash using the boot system flash system configuration command:
Note The no boot system configuration command disables all boot system configuration commands regardless of argument. Specifying the arguments flash, filename, or IP address with the no boot system command will disable only the command specified by these arguments.
The boot system flash command will boot the first valid file in Flash memory. The boot system flash filename will boot the file specified by this filename. To use the boot system flash command, the boot jumper on the processor card configuration register must have a pattern of 0-0-1-0 or greater for the correct operation of this feature (refer to the section "Configuration Overview" and to
Figure 7).
For more information on the configuration register jumpers, refer to the AGS+ Hardware Installation and Maintenance publication that accompanied your chassis.
Configure the system to automatically boot from the desired file in Flash memory using the configure terminal command and the boot system flash filename system configuration command.
Note If only one file is present in Flash memory, the filename argument is not necessary. The command boot system flash will boot that file.
Write the configuration to NVRAM with the write memory command. Following this, boot the system with the reload command. The following illustrates this sequence of commands:
Use the b flash command at the ROM monitor level to manually boot the system. Refer to Figure 7 and remove the ROM-boot jumper in position 0 (pattern 0-0-0-1) before powering on the system. Following is an example of how this command is used:
You can copy an image back to a TFTP server using the copy flash tftp command. This copy of the system image can serve as a backup copy and may also be used to verify that the copy in Flash is the same as in the original file on disk.
Following is an example of how this command is used:
Once you have successfully installed and tested the CSC-MC+ card and configured Flash memory, you may want to configure the system (configure terminal) with the no boot system flash config command in order to revert to booting from ROM. After this command is entered, use the write memory command to save this new config command to NVRAM, which also requires changing the jumper on the configuration register of the processor back to pattern 0-0-0-1 (see Figure 7).
An alternative would be to use the no boot system config command followed by the boot system rom command; then use the write memory command, which also requires changing the jumper on the configuration register (see Figure 7) of the processor to the pattern 0-0-1-0 (Position 1).
The Flash memory card can be used as a TFTP file server for other routers on the network, which allows remote routers to copy system software images (files) into their Flash memories from this centralized Flash server and to boot a remote router with an image residing in the Flash server memory.
In the following examples, one router (with a Flash memory card installed) is referred to as the Flash server and a second router is referred to as the client router. The configurations for the Flash server and client router appear in the following example configurations for each, with commands included as necessary.
The Flash server (Server#) and client router (Client#) must be able to communicate before this TFTP function can be implemented. Verify the connection between these routers by transmitting a ping from one to the other.
The syntax for the ping command is as follows:
In this example, the Internet Protocol (IP) address of 131.131.101.101 belongs to the client router. Connectivity is indicated by !!!!!, while ... [timed out] or [failed] indicate none. If the connection fails, reconfigure the interface, check the physical connection between the Flash server and client router, and retransmit a ping.
After this connection is verified, ensure that a TFTP servable image is present in the Flash memory, which is the system software image the client router will boot. The copy tftp flash command can be used to copy this software image to the Flash server memory. Note the name of this software image, so it can be verified after the first client boot (the filename gs3-bfx.90-1 will be used in this example). The Flash server can be configured once the presence of a bootable image in Flash memory is verified.
Note The filename used must represent a bootable software image that is present in the Flash memory. If no bootable image resides in Flash memory, the Flash server's ROM image will be booted by the client router as a default.
| Caution The type of software (bfx, and so forth) residing in the Flash memory (which is to be booted by the client router) must be of the same type as the ROM software installed on the client router. If the client router has gs3-bfx.90-1 software (capable of X.25 bridging) in ROM, and gs3-bf.90-1 software is booted from the Flash server, the client router will operate under the control of the gs3-bf.90-1 software and will not have X.25 bridging capability. |
The Flash server is configured by adding the tftp-server system filename access-list and access-list list {permit|deny} address wildcard-mask commands to the configuration memory. To enter these commands into the configuration memory of the Flash server, use the configure terminal command.
Following is sample output of these commands:
In the above example, the filename of the software image in the Flash server and one access list (1) are given. The access list must include the network within which the client router resides. In other words, the network 131.131.101.0 and any client routers on it are "permitted" access to the Flash server file named gs3-bfx.90-1. For this exercise, the IP address of the Flash server is 131.131.111.111.
Note For more information on access lists, refer to the Router Products Configuration and Reference: Volume II in the section, "Configuring IP Access Lists."
| Caution Using the no boot system command in the following example will disable all other boot system commands currently in the client router system configuration. Before proceeding, determine if the system configuration, stored in the router you will use as the client, must first be saved (uploaded) to a TFTP file server. |
The client router is configured using the following commands: no boot system, boot system filename address, and boot system rom. Using these commands requires changing the jumper on the configuration register of the processor to the pattern 0-0-1-0 (see Figure 7). To enter these commands into the configuration memory of the client router, use the configure terminal command.
Following is sample output of these commands:
In this example, the no boot system command disables all other boot system commands currently in the configuration memory, but any boot system commands entered after this command will be executed first. The boot system filename address command tells the client router to look for the filename gs3-bfx.90-1 in the (Flash) server that has an IP address of 131.131.111.111. If booting from the Flash server fails, the client router will boot from its system ROM using the boot system rom command, which is included as a backup in case of a network problem.
| Caution The system software (gs3-bfx.90-1) to be booted from the Flash server (131.131.111.111) must reside in the Flash memory on the server. If this system software is not in the Flash memory, the system ROM of the Flash server will be booted by the client router as a default. |
Use the show version command on the client router to verify that the software image booted from the Flash server is the same image present in the Flash memory.
Following is sample output of the show version command:
The important information in the preceding example is contained in the first line (starting with
GS Software) and the last full line (starting with System image file). Verify that the software version and type, currently running in RAM in the client router (first line), is the same software version and type that was booted from the Flash server (last line).
Note If no bootable image was present in the Flash server memory when the client server was booted, the version currently running (first line of the above example) will be the system ROM version of the Flash server by default.
This completes Installing and Configuring the CSC-MC+ Memory Card. The system is ready to be installed in the network.
Occasional network failures make booting across the network impossible. To reduce the effects of network failure, consider the following alternative boot strategy.
After Flash is installed and configured, you can configure the system to boot in the following order:
2. Boot an image from a system server (netboot)
This boot order will provide a more fault-tolerant alternative in the netbooting environment. The order of the commands needed to implement this strategy is shown in the following example:
In addition to the preceding commands, the ROM boot jumper on the configuration register of the processor card (see Figure 7) must be changed to pattern 0-0-1-0 (Position 1) or greater. Using this strategy, a system used primarily to boot across the network would have three alternative sources from which to boot. These alternative sources would help cushion the negative effects of a failure with the TFTP file server and the network in general.
Note For technical assistance, contact a service representative or the Cisco Systems Technical Assistance Center (TAC) at 800 553-2447, 415 903-7209, or tac@cisco.com. For upgrade or product information, contact the Customer Response Center at 800 553-6387, 415 903-7208, or cs-rep@cisco.com.
Cisco Systems' Customer Information Online (CIO) system provides online information and electronic services to Cisco direct customers and business partners. Basic CIO services include general Cisco information, product announcements, descriptions of service offerings, and download access to public and authorized files, including release notes, and software. Maintenance customers receive a much broader offering, including technical notes, the bug database, and electronic mail access to the TAC. (Maintenance customers must have authorization from their Cisco contract administrators to receive these privileges.)
For dialup or Internet users, CIO supports Zmodem, Kermit, Xmodem, FTP PUT, Internet e-mail, Telnet, rlogin, and fax download options. Internet users also can retrieve files from CIO using FTP.
Registration for CIO is handled on line. To reach CIO via the Internet, use Telnet or FTP to cio.cisco.com (131.108.89.33). To reach CIO by dialup, use 415 903-8070 (Mountain View, California) or 33 1 6446 4082 (Paris, France).

![]()
![]()
![]()
![]()
![]()
![]()
![]()
![]()
Posted: Thu Nov 6 16:13:45 PST 2003
All contents are Copyright © 1992--2003 Cisco Systems, Inc. All rights reserved.
Important Notices and Privacy Statement.