|
|

Table Of Contents
10/100BASE-T Ethernet Switch High-Speed WAN Interface Cards
Cisco 10/100BASE-T Ethernet Switch HWICs
Cisco 10/100BASE-T Ethernet Switch HWIC LEDs
Installing Inline Power Daughter Cards on Cisco 10/100BASE-T Ethernet Switch HWICs
Installing a Daughter Card on the HWIC-4ESW Card
Installing a Daughter Card on the HWIC-D-9ESW Card
Verifying Daughter Card Installation
Scenarios for Cisco 10/100BASE-T Ethernet Switch HWICs
Connecting Cisco 10/100BASE-T Ethernet Switch HWICs to Your Network
Stacking of Cisco 10/100BASE-T Ethernet Switch HWICs
Obtaining Documentation, Obtaining Support, and Security Guidelines
10/100BASE-T Ethernet Switch High-Speed WAN Interface Cards
Revised: 6/7/07, OL-12850-01Overview
This document describes Cisco 10/100BASE-T Ethernet switch high-speed WAN interface cards (HWICs) and how to connect Cisco 10/100BASE-T Ethernet HWICs to the network, and contains the following sections:
•
Cisco 10/100BASE-T Ethernet Switch HWICs
•
•
•
•
•
For an overview of Cisco interface cards used for Cisco access routers see the Cisco Interface Cards for Cisco Access Routers document.
Cisco 10/100BASE-T Ethernet Switch HWICs
The Cisco 10/100BASE-T Ethernet switch HWIC is available as a 4-port single-wide HWIC (HWIC-4ESW), and as an (8+1)-port double-wide HWIC (HWIC-D-9ESW), providing Layer 2 switching for Cisco modular access routers.
Caution
Note
The Cisco 10/100BASE-T Ethernet switch HWIC provides Layer 2 switching for traffic between one port on the HWIC and any other port on the same HWIC. The HWIC also supports Layer 3 traffic to and from the HWIC and any of the other platform interfaces. Traffic between different VLANs on the switch is routed through the router platform.
Two Cisco 10/100BASE-T Ethernet switch HWICs can be stacked in a router chassis to provide expanded switching capability. See the "Stacking of Cisco 10/100BASE-T Ethernet Switch HWICs" section for a detailed description.
Each version of the Cisco 10/100BASE-T Ethernet switch HWIC is capable of providing -48 volts of inline power through its ports. Inline power is used to provide power to an IP phone or to a wireless access point attached to a port.
Note
To provide inline power, an HWIC must be provisioned with an optional daughter card that distributes inline power. Inline power is provided by a -48 volt power supply within the router. The daughter card distributes the -48 volt power to the ports of the HWIC.
Note
Cisco 10/100BASE-T Ethernet Switch HWIC LEDs
The Cisco 10/100BASE-T Ethernet switch HWIC uses two LEDs per port to indicate link status and inline power status. See Figure 109, Figure 110, and Table 30 for a description of these LEDs.
Figure 109 HWIC-4ESW Faceplate
Figure 110 HWIC-D-9ESW Faceplate
Installing Inline Power Daughter Cards on Cisco 10/100BASE-T Ethernet Switch HWICs
This section describes the installation of inline power daughter cards on HWIC-4ESW and HWIC-D-9ESW Ethernet switch HWICs. Table 31 shows the inline power card mapping for the two HWICs.
Table 31 HWIC and Inline Power Card Mapping
HWIC-4ESW
ILPM-4
HWIC-D-9ESW
ILPM-8
Note
Note
Installing a Daughter Card on the HWIC-4ESW Card
To install an inline power daughter card on the HWIC-4ESW card, perform the following steps:
Step 1
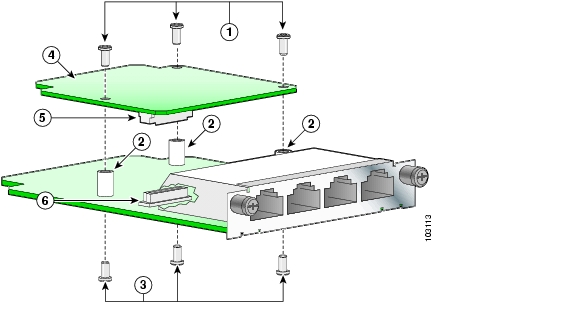
Figure 111 Installing an Inline Power Card on the Cisco 10/100BASE-T Ethernet Switch HWIC-4ESW Card
Fastening screws: daughter card to standoffs
Daughter card
Standoffs (3)
Daughter card connector
Fastening screws: standoffs to motherboard
Motherboard connector
Step 2
Step 3
Installing a Daughter Card on the HWIC-D-9ESW Card
To install an inline power daughter card on the HWIC-D-9ESW card, perform the following steps:
Step 1
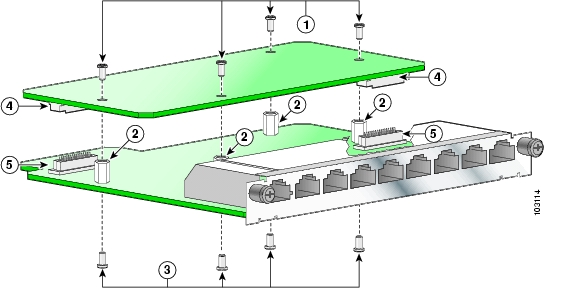
Figure 112 Installing an Inline Power Card on the Cisco 10/100BASE-T Ethernet Switch HWICD-9ESW Card
Fastening screws: daughter card to standoffs
Daughter card connectors
Standoffs
Motherboard connectors
Fastening screws: standoffs to motherboard
Step 2
Step 3
Verifying Daughter Card Installation
Perform the following steps to verify correct installation of the daughter card:
Step 1
Step 2
Step 3
Scenarios for Cisco 10/100BASE-T Ethernet Switch HWICs
Cisco 10/100BASE-T Ethernet switch HWICs are designed for use in the following scenarios:
•
•
Tip
Connecting Cisco 10/100BASE-T Ethernet Switch HWICs to Your Network
To connect the Cisco 10/100BASE-T Ethernet switch HWIC to the network, perform the following steps:
Step 1
Step 2
Caution
Step 3
•
•
Step 4
Stacking of Cisco 10/100BASE-T Ethernet Switch HWICs
Stacking is the connection of two Ethernet switch HWICs resident in the same chassis so that they behave as a single switch. Stacking is accomplished by daisy-chaining the two cards together with an external RJ-45 crossover cable that is connected to the specified stacking port on each switch.
When a chassis is populated with two Ethernet switch HWICs, the user must configure the cards to operate in stacked mode.
Note
You must designate one port on each switch to be the stacking port. On the HWIC-4ESW card, this port is nominally the first port (port 0), although any port can be chosen. On the HWIC-D-9ESW card, this port is nominally the ninth port (port 8), although any port can be chosen. We recommend the use of port 8 as the stacking port, because it has been designed as an extra port on the HWIC-D-9ESW card and does not provide inline power.
Note
All combinations of Ethernet switch HWICs may be stacked: two HWIC-D-9ESW cards, an HWIC-D-9ESW card with an HWIC-4ESW card, or two HWIC-4ESW cards.
See the Configuration Guidelines for HWIC-4ESW and HWIC-D-9ESW Interface Cards document for information on how to configure stacking ports.
Related Documentation
Related documentation is available on Cisco.com or on the Product Documentation DVD. For more information, see the "Obtaining Documentation, Obtaining Support, and Security Guidelines" section.
•
•
•
•
Obtaining Documentation, Obtaining Support, and Security Guidelines
For information on obtaining documentation, obtaining support, providing documentation feedback, security guidelines, and also recommended aliases and general Cisco documents, see the monthly What's New in Cisco Product Documentation, which also lists all new and revised Cisco technical documentation, at:
http://www.cisco.com/en/US/docs/general/whatsnew/whatsnew.html
Any Internet Protocol (IP) addresses used in this document are not intended to be actual addresses. Any examples, command display output, and figures included in the document are shown for illustrative purposes only. Any use of actual IP addresses in illustrative content is unintentional and coincidental.
© 2007 Cisco Systems, Inc. All rights reserved.
![]()
![]()
![]()
![]()
![]()
![]()
![]()
![]()
Posted: Mon Nov 26 23:54:29 PST 2007
All contents are Copyright © 1992--2007 Cisco Systems, Inc. All rights reserved.
Important Notices and Privacy Statement.