|
|

This chapter describes how to connect Cisco WAN interface cards to a network and contains the following sections:
This section describes the following Cisco WAN interface cards:
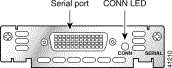
The 1-port serial WAN interface card, shown in Figure 3-1, and the 2-port serial WAN interface card, shown in Figure 3-2, provide an EIA/TIA-232, EIA/TIA-449, V.35, X.21, data terminal equipment/data communications equipment (DTE/DCE), EIA-530 DTE, or nonreturn to zero/nonreturn to zero inverted (NRZ/NRZI) serial interface to a Cisco modular router.
 |
Note In Cisco 3600 and Cisco 2600 series routers, the 2-port serial WAN interface card supports both asynchronous (up to 115.2 kbps) and synchronous (up to 2.048 Mbps) data rates. The 1-port serial WAN interface card supports only synchronous data rates up to 2.048 Mbps. |
|
Note In the Cisco 1720 router, the 1-port and 2-port serial WAN interface cards support both asynchronous (up to 115.2 kbps) and synchronous (up to 2.048 Mbps) data rates. |
|
Note In Cisco 1600 series routers, the 1-port serial WAN interface card supports asynchronous data rates up to 115.2 kbps, and synchronous data rates up to 2.048 Mbps. The 2-port serial WAN interface card is not supported on this platform. |
Each serial card has one LED, labeled CONN for each port, which lights when the serial port is connected. When the port is in DTE mode, the CONN LED indicates that Data Send Ready (DSR), Data Carrier Detect (DCD), and Clear To Send (CTS) have been detected. When the port is in DCE mode, it indicates that Data Terminal Ready (DTR) and Ready To Send (RTS) have been detected.

The 2-port asynchronous/synchronous (A/S) WAN interface card, shown in Figure 3-3, provides an EIA/TIA-232, EIA/TIA-449, V.35, X.21, DTE/DCE, EIA-530, or EIA-530A serial interface to a Cisco modular router.
|
Note In Cisco 3600 series, 2600 series, and 1720 routers, the 2-port A/S WAN interface card supports both asynchronous (up to 115.2 kbps) and synchronous (up to 128 kbps) data rates. |
|
Note The 2-port A/S WAN interface card is not supported in Cisco 1600 series routers. |
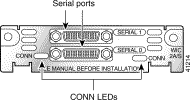
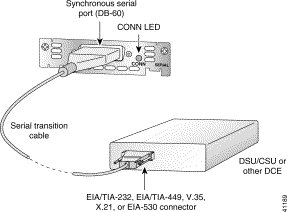
The 1-port serial WAN interface card has a DB-60 serial port, whereas the 2-port serial WAN interface card and the 2-port A/S WAN interface card have "smart serial" ports. Use the correct cable for your serial WAN interface card.
The serial cable attached to this receptacle determines the port's electrical interface type and mode (DTE or DCE).
Six types of serial cables (also called serial adapter cables or serial transition cables) are available from Cisco Systems:
All serial cables provide a universal plug at the interface card end. The network end of each cable provides the physical connectors most commonly used for the interface. For example, the network end of the EIA/TIA-232 serial cable is a DB-25 connector, the most widely used EIA/TIA-232 connector.
All serial interface types except EIA-530 are available in DTE or DCE format: DTE with a plug connector at the network end and DCE with a receptacle at the network end. V.35 is available in either mode with either gender at the network end. EIA-530 is available in DTE only.
After you install the serial WAN interface card, use the appropriate serial cable to connect the interface card's serial port to one of the following types of equipment (see Figure 3-4):
|
Note For connection limitations, see the "1-Port and 2-Port Serial Cards" section, and the "2-Port Asynchronous/Synchronous Serial Card" section. |
Take the following steps to connect the serial card to the WAN:
Step 2 Connect one end of the appropriate serial cable to the card's DB-60 port.
Step 3 Connect the other end of the cable to the appropriate type of equipment, as shown in Figure 3-4.
Step 4 Turn on power to the router by pressing the power switch to the ON ( | ) position.
Step 5 Check that the CONN LED goes on, which indicates that the card's serial port detects the WAN serial connection.
If you have additional cards to install, proceed to the appropriate sections in this manual. When you have finished all installations, see the software configuration guide that shipped with your hardware.
This section describes the following Cisco ISDN BRI WAN interface cards:
You can distinguish between WIC36 and WIC models of a BRI WAN interface card by the location and labeling of the LEDs, and the number and location of cutouts in the faceplate.
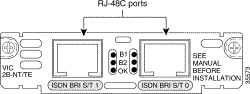
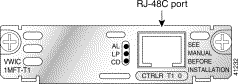
The 1-Port ISDN-BRI WAN interface cards (WIC36-1B-S/T, WIC-1B-S/T) connect to an ISDN WAN through an external NT1 device. (See Figure 3-5 and Figure 3-6.) This interface is also known as an S/T interface.


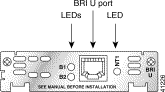
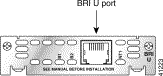
The 1-Port ISDN-BRI with NT1 WAN interface cards (WIC36-1B-U, WIC-1B-U) connect to an ISDN WAN using a built-in NT1 device. (See Figure 3-7 and Figure 3-8.) This interface is also known as a U interface.
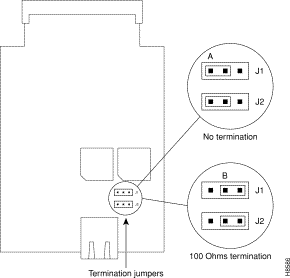
The older BRI S/T WAN interface cards (product numbers WIC36-1B-S/T, WIC36-1B-U, CPAWIC36-1B-S/T, CPAWIC36-1B-U) have two termination jumpers, labeled J1 and J2. Before installing this card, ensure that the termination jumpers are set appropriately for your installation.
The jumpers are factory-configured in the B position (100-ohms termination). Keep the jumpers in this position to use the BRI S/T WAN interface card in a point-to-point connection or as the last device on the line of a passive-bus connection. Set the termination jumpers to the A position to use the BRI S/T WAN interface card in a passive-bus connection where it is not the last device on the line. The jumpers are shown in Figure 3-9.
The newer BRI interface cards (product numbers WIC-M1B-S/T or WIC-M1B-U) do not have termination jumpers.
|
Note The older BRI WAN interface cards mount only in the W1 slot of a two-slot module and provide a single BRI interface. The newer BRI WAN interface cards can mount in either slot of a two-slot module. |
For more information on BRI network modules, see the Cisco Network Modules Hardware Installation Guide.
Use a BRI cable (not included) to connect the BRI WAN interface card directly to an ISDN. See the online document Cisco Modular Access Router Cable Specifications for pinouts. This document is located on both the Documentation CD-ROM that accompanied your router package, and Cisco Connection Online.
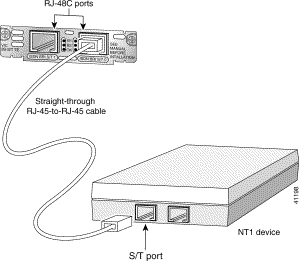
Take the following steps to connect an ISDN BRI S/T WAN interface card to an NT1 device:
Step 2 Connect one end of a straight-through RJ-48C-to-RJ-48C cable to the card's RJ-48C connector.
Step 3 Connect the other end of the cable to the NT1, as shown in Figure 3-10.

Step 4 Connect the NT1 to the ISDN wall jack according to the documentation that came with the NT1.
Step 5 Turn on power to the router.
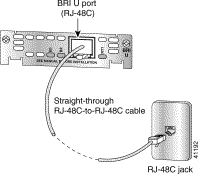
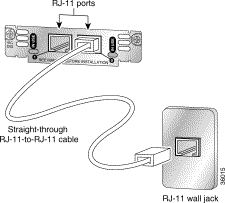
Take the following steps to connect an ISDN BRI with NT1 WAN interface card to an ISDN network:
Step 2 Connect one end of a straight-through RJ-48C-to-RJ-48C cable to the card's RJ-48C connector.
Step 3 Connect the other end of the cable directly to the ISDN wall jack as shown in Figure 3-11.
Step 4 Turn on power to the router.
BRI S/T WAN interface cards have three LEDs as shown in Figure 3-12 for WIC-1B-S/T and Figure 3-13 for the WIC36-1B-S/T, which are described in Table 3-1. The B1 and B2 LEDs indicate call activity on the two ISDN BRI B channels. The OK LED indicates that the ISDN port has synchronized with the central office switch (the D channel is active).
| LED | Meaning |
|---|---|
B1 | Active connection on B1 channel. |
B2 | Active connection on B2 channel. |
OK | ISDN port has established a connection with the central office switch. |
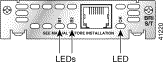
BRI U WAN interface cards also have three LEDs as shown in Figure 3-14 for WIC-1B-U and Figure 3-15 for WIC36-1B-U, which are described in Table 3-2. The B1 and B2 LEDs indicate call activity on the two ISDN BRI B channels. The NT1 LED indicates synchronization status of the NT1.

| LED | Meaning |
|---|---|
B1 | Active connection on B1 channel. |
B2 | Active connection on B2 channel. |
NT1 | NT1 has established a connection with the central office switch. |
If you have additional cards to install, proceed to the appropriate sections in this manual. When you have finished all installations, see the software configuration guide that shipped with your hardware.
The ISDN BRI S/T Leased-Line card provides a single B channel operating in leased-line mode. (See Figure 3-16.)

You must provide an RJ-48C-to-RJ-48C cable and an external NT1 for this connection.
|
Note Turn the router off before making cable connections to the WAN interface card ISDN BRI S/T leased-line port. |
Take the following steps to connect the ISDN cables:
Step 2 Connect one end of the RJ-48C cable to the card's ISDN BRI leased-line port.
Step 3 Connect the other end of the cable to the NT1, as shown in Figure 3-17.
Step 4 Connect the NT1 to the ISDN wall jack according to the documentation that came with the NT1.

Step 5 Turn on power to the router by pressing the power switch to the ON ( | ) position.
Step 6 Check that the OK LED goes on, which indicates that the card's ISDN port has synchronized with the central office switch.
After you connect the ISDN cable, you can configure the ISDN interface. The leased-line WAN interface card supports a 64-kbps leased line on the B1 channel only. The WAN interface card is automatically configured in leased-line mode. Refer to the software configuration guide that came with your router for information on how to configure the ISDN interface.
ISDN BRI S/T Leased-Line card has three LEDs, which are described in Table 3-3.
| LED | Meaning |
|---|---|
B1 | ISDN connection on B1 channel. |
B21 | ISDN connection on B2 channel. |
OK | ISDN port has synchronized with the central office switch. |
| 1Always off for 64 kbps, which is available on B1 only. |
If you have additional cards to install, proceed to the appropriate sections in this manual. When you have finished all installations, see the software configuration guide that shipped with your hardware.
The 1-port 56/64-kbps WAN interface card includes an integral DSU/CSU and can be configured to provide circuit-switched, dedicated, or leased-line service at 56 kbps. This card also supports 64-kbps dedicated lines.
You must provide a straight-through RJ-48S-to-RJ-48S or a straight-through
RJ-48C-to-RJ-48C cable for this connection.
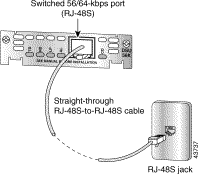
Step 2 Connect one end of the cable to the card's 56/64-kbps port.
Step 3 Connect the other end to the 56/64-kbps services wall jack, as shown in Figure 3-18.
Step 4 Turn on power to the router.
The 56/64-kbps card has five LEDs, which are shown in Figure 3-19 and described in Table 3-4.
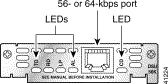
| LED | Meaning |
|---|---|
TD | Data is being transmitted to the DTE interface. |
RD | Data is being received from the DTE interface. |
LP | Internal DSU/CSU is in loopback mode. |
AL | One of these alarm conditions is present: no receive signal, loss of frame signal from the remote station, or out of service signal from the remote station. This LED is off during normal operation. |
CD | Internal DSU/CSU in the WAN interface card is communicating with another DSU/CSU. |
If you have additional cards to install, proceed to the appropriate sections in this manual. When you have finished all installations, see the software configuration guide that shipped with your hardware.
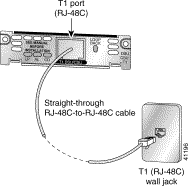
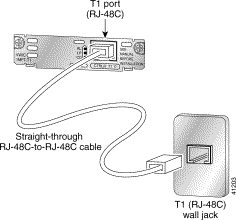
The 1-port T1/Fractionalized T1 (FT1) WAN interface card includes an integrated data service unit/channel service unit (DSU/CSU) and can be configured for either full T1 or fractionalized T1 services.
For this connection, use the straight-through RJ-48C-to-RJ-48C cable that came with your card.
Step 2 Connect one end of the cable to the T1 port on the card.
Step 3 Connect the other end to the T1 wall jack (RJ-48C) at your site, as shown in Figure 3-20.
Step 4 Turn on power to the router.
Step 5 Check that the CD LED goes on, which means that the card's internal DSU/CSU is communicating with the DSU/CSU at the T1 service provider's central office.
The T1/FT1 card has three LEDs and a loopback button, which are shown in Figure 3-21 and described in Table 3-5.

| Feature | Color | Description |
|---|---|---|
LP LED | Yellow | Line or loopback state is detected or is manually set by the user. |
| Off | Normal operation. |
AL LED | Red | No receive signal. |
| Yellow | Remote station has an alarm condition. |
| Blue | The remote station is probably out of service. If the remote station is an IOS-based router, its interface may be shut down. |
| Off | Normal operation. |
CD LED | Green | Internal DSU/CSU in the WAN interface card is communicating with another DSU/CSU. This LED is on during normal operation. |
| Push this button to place the WAN interface card into loopback mode. The service provider can send a signal to test the connection from your site to the central office switch. Push this button again to turn loopback mode off. |
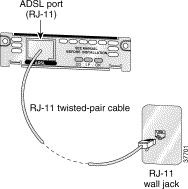
The 1-port digital subscriber line (DSL) WAN interface cards support one DSL line of the applicable type (Asymmetric DSL (ADSL), ITU-compliant Symmetric High Bit Rate DSL(G.SHDSL)) between a single customer premises equipment (CPE) subscriber and the central office.
Use a straight-through RJ-11 cable for this connection.
|
Note The port on this interface card is color-coded lavender. |
|
Note If you are connecting a DSL card to an RJ-11 wall jack that has the DSL pair wired for pins 2 and 5, you must use an RJ-11 crossover cable (lavender with blue stripe). The RJ-11 crossover cable is orderable separately as a spare. |
Complete the following steps to connect a 1-port ADSL or G.SHDSL card to the network.
Step 2 Connect one end of the cable to the ADSL or G.SHDSL port on the card.
Step 3 Connect the other end to the wall jack (RJ-11) at your site, as shown in Figure 3-22.
Step 4 Turn on power to the router.
Step 5 To connect the card to the network, you must configure the ADSL or G.SHDSL card in the router to the no shutdown state. Enter the no shut command in the router configuration. Check that the CD LED goes on, indicating that the card is connected to the network.
The ADSL and G.SHDSL cards have three LEDs, which are shown in Figure 3-23 and described in Table 3-6.

| Feature | Color | Description |
|---|---|---|
CD LED | Green | The unit is connected to the network. On during normal operation. |
LP LED | Yellow | DSL interface is in loopback mode. |
| Off | Normal operation. |
OK LED | Green | Enabled when the card is detected by the router. |
Table 3-7 shows the ADSL card pinouts.
| Pin | Signal |
|---|---|
3 | Tip |
4 | Ring |
If you have additional cards to install, proceed to the appropriate sections in this manual. When you have finished all installations, see the software configuration guide that shipped with your hardware.
Voice network modules convert telephone voice signals into a form that can be transmitted over an IP network, and have no connectors. Voice interface cards provide the connection to the telephone equipment or network.
This section contains the following topics:
The following requirements apply to only the Cisco 2600 and Cisco 3600 series routers. Grounding on a Cisco 1700 series router is done on the router chassis itself, not on the voice interface cards. For information on chassis grounding, refer to the Cisco 1750 Hardware Installation Guide or the Cisco 1751 Hardware Installation Guide.
If you find that a router chassis does not have a permanent earth connection and you do not have a grounding kit, take one of the following actions:
 |
Caution This product in not intended for Scandinavian countries. |
A Foreign Exchange Station (FXS) interface connects directly to a standard telephone, fax machine, or similar device. This interface supplies ringing voltage, dial tone, and so on to the station. The ports are shown in Figure 3-24.

Use a standard RJ-11 modular telephone cable to connect this card to a telephone or fax machine.
|
Note Ports on this interface card are color-coded gray. |
Step 2 Connect one end of the cable to an RJ-11 port on the card. (See Figure 3-25.)
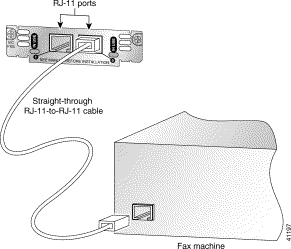
Step 3 Connect the other end to the RJ-11 port on the telephone or fax machine.
|
Caution Do not connect an FXS interface directly to the public switched telephone network. |
A Foreign Exchange Office (FXO) interface connects local calls to a central office or PBX. This is the interface a standard telephone provides. The card is illustrated in Figure 3-26.
|
Note Ports on this interface card are color-coded pink. |
VIC-2FXO and VIC-2FXO-M1 are intended for use in North America (United States, Canada, and Mexico).
VIC-2FXO-EU and VIC-2FXO-M2 are intended for use in Europe.
VIC-2FXO-M3 is intended for use in Australia.

Most modern central office equipment, such as DMS-100 and 5ESS switches, provides calling party control (CPC) and Ring on Seize on loop-start lines. CPC allows quicker disconnection, and Ring on Seize minimizes glare (collision of inbound and outbound calls on the same interface). If your central office does not provide these features on loop start, you may want to configure the FXO card for ground-start operation instead by moving the jumpers to positions 1 and 2.
For proper operation, both jumpers must be configured identically. In most cases, jumper setting should have little or no effect on operation.
|
Note This setting does not apply to VIC-2FXO-EU. |
Use a standard RJ-11 modular telephone cable to connect the VIC-2FXO voice interface card to the PSTN or PBX through a telephone wall outlet.
Step 2 Connect one end of the cable to an RJ-11 port on the card. (See Figure 3-27.)

Step 3 Connect the other end to the telephone wall outlet (RJ-11 port).
VIC-2FXO-EU is intended for use in Europe; VIC-2FXO-M3 is intended for use in Australia.
In countries where PSTNs do not use RJ-11 wall outlets, use a suitable adapter to convert the plug on an RJ-11 modular cable to the type of wall outlet connector used locally. These adapters are not sold by Cisco Systems but are available from other vendors.
|
Caution Connect only an FXO interface approved for use in your country to the PSTN. Otherwise, connect the FXO interface only to a PBX. Connections from the PBX to the PSTN are permitted. |
RecEive and transMit (E&M) is a signaling technique for two-wire and four-wire telephone and trunk interfaces. The E&M interface typically connects remote calls from an IP network to a PBX. The card is illustrated in Figure 3-28.
|
Note Ports on the E&M voice interface card are color-coded brown. |

|
Caution Do not connect an E&M interface directly to the PSTN. |
Step 2 Connect one end of a straight-through RJ-48C-to-RJ-48C cable to the card's RJ-48C port. (See Figure 3-29.)

Step 3 Connect the other end to the RJ-48C wall outlet.
Each voice interface card has two IN USE LEDs, one for each channel. Figure 3-30 shows a voice interface card with E&M interface as an example.

There are two 2-Port ISDN BRI voice interface cards for the Cisco 2600 series and Cisco 3600 series routers.
The ISDN BRI S/T voice interface card provides a client-side (TE) ISDN S/T physical interface for connection to an NT1 terminating an ISDN telephone network. Each of its two ports can carry two voice calls (one over each ISDN B channel), for a total of four calls per ISDN BRI card.
The ISDN BRI NT/TE voice interface card has the same capabilities as the S/T card, but can also be configured to provide a network termination (NT) interface with phantom power.
The Cisco 1751 router supports the ISDN BRI NT/TE voice interface card, which you can install in any WAN or voice interface card slot in the back panel of the router.
The card is illustrated in Figure 3-31.
|
Note The ISDN BRI restrictions in this section do not apply to the Cisco 1751 router. You can install the ISDN BRI NT/TE voice interface card in any slot in the Cisco 1751 router. |
To use all four voice channels, you must install the ISDN BRI card in slot 0 of a two-slot voice network module (Cisco part number NM-2V). Slot 1 should remain empty.
|
Note If slot 0 is unoccupied, the system treats it as a pair of analog voice ports. |
If you install any of the following configurations, the Cisco IOS software disables certain ports, as shown in Table 3-8:
| Network Module | Slot | Voice Interface Card | Port | Status |
|---|---|---|---|---|
NM-1V | 0 | VIC-2BRI-S/T-TE, | 0 | Up |
|
|
| 1 | Down |
NM-2V | 0 | VIC-2BRI-S/T-TE, | 0 | Up |
|
|
| 1 | Up |
NM-2V | 0 | VIC-2BRI-S/T-TE, | 0 | Up |
|
|
| 1 | Up |
| 1 | VIC-2BRI-S/T-TE, | 0 | Down |
|
|
| 1 | Down |
NM-2V | 0 | VIC-2BRI-S/T-TE, | 0 | Up |
|
|
| 1 | Up |
| 1 | Analog voice interface card | 0 | Down |
|
|
| 1 | Down |
NM-2V | 0 | Analog voice interface card | 0 | Up |
|
|
| 1 | Up |
| 1 | VIC-2BRI-S/T-TE, | 0 | Up |
|
|
| 1 | Down |
Use the straight-through RJ-48C cable to connect the two-port ISDN BRI card to the ISDN network through a telephone wall outlet or other device.
|
Caution To prevent damage to the router, be sure to connect the BRI cable to the BRI connector only, and not to any other RJ-48C connector. |
To connect the two-port ISDN BRI card to the router, follow these steps:
Step 2 Connect one end of a straight-through RJ-48C-to-RJ-48C cable to the card RJ-48C port. (See Figure 3-32.)
|
Note When the interface is configured as NT and is connecting to a TE device, the cable must have the transmit and receive pins swapped (crossover cable). (See Table 3-9.) |
| ISDN BRI NT/TE | NT Interface (use straight-through cable) | TE Interface (use crossover cable) |
|---|---|---|
Pin 3/T+ | Pin 3/R+ | Pin 3/T+ |
Pin 4/R+ | Pin 4/T+ | Pin 4/R+ |
Pin 5/R- | Pin 5/T- | Pin 5/R- |
Pin 6/T- | Pin 6/R- | Pin 6/T- |
Step 3 Connect the other end to the RJ-48C wall outlet or other device.
ISDN BRI voice interface cards have three LEDs, as listed in Table 3-10.
| LED | Meaning |
|---|---|
B1 | Call active on B1 channel |
B2 | Call active on B2 channel |
OK | Interface is connected to an ISDN network |
If you have additional cards to install, proceed to the appropriate sections in this manual. When you have finished all installations, see the software configuration guide that shipped with your hardware.
A Direct Inward Dial (DID) voice interface enables a Cisco 3600, Cisco 2600, or Cisco 1700 series router to provide DID service to extensions on a PBX. Figure 3-33 shows the VIC-2DID card.
Use a standard RJ-11 modular telephone cable to connect the VIC-2DID card to the PSTN or PBX.
Grounding on the Cisco 1700 series routers is done on the router chassis, not on the voice interface cards. For information on chassis grounding, refer to the Cisco 1750 Hardware Installation Guide or the Cisco 1751 Hardware Installation Guide.
Step 2 Verify that the router is still turned off.
Step 3 Connect one end of the cable to an RJ-11 port on the card. (See Figure 3-34.)
Step 4 Connect the other end of the cable to a telephone wall outlet or to a PBX.
|
Caution The VIC-2DID card may be damaged if connected to a standard PSTN line. Ensure that lines to the PSTN are provisioned for DID. |
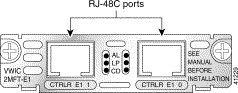
The 1- and 2-port T1 and E1 multiflex trunk interface cards support generic single- or dual-port T1 or E1 trunk interfaces for voice, data, and integrated voice/data applications. These cards provide basic structured and unstructured service for T1 or E1 networks.
They can be used as trunk interfaces for voice/data services, as fractional n x 64-kbps service for WANs (Frame Relay or leased line), or for time-division multiplexing (TDM) drop-and-insert (voice/data integration) services.
This section contains the following topics:
This section describes the following Cisco 1-port multiflex trunk interface cards:
You can distinguish between T1 and E1 interface cards by the labeling on the faceplate, as shown in Figure 3-35, Figure 3-36, and Figure 3-37.
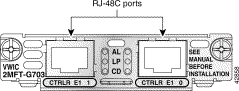
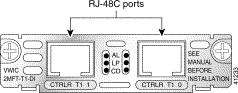
The 1-port T1 and E1 multiflex trunk interface cards provide voice and data access to the Public Switched Telephone Network (PSTN) domain through time-division multiplexing (TDM) ports. The multiflex trunk interface cards are generic single-port trunk interfaces for voice, data, and integrated voice/data applications. These cards provide basic structured and unstructured service for T1 networks and structured service for fractional E1 networks and include an integrated data service unit/channel service unit (DSU/CSU). The EI Multiflex VWICs with G.703 support allow unstructured E1 traffic that conforms to the ITU-T G.703 standard.


For this connection, use the straight-through RJ-48C-to-RJ-48C cable that came with your card.
Step 2 Connect one end of the cable to the T1 or E1 port on the card.
Step 3 Connect the other end to the T1 or E1 wall jack (RJ-48C) at your site, as shown in Figure 3-38.
Step 4 Turn on power to the router.
Step 5 Check that the CD LED goes on, which means that the card's internal DSU/CSU is communicating with the DSU/CSU at the T1 or E1 service provider's central office.
The 1-port multiflex trunk interface card has three LEDs, which are shown in Figure 3-35 and Figure 3-36 and described in Table 3-11.
| LED | Description | Color |
|---|---|---|
LP LED | On means that a loopback or line state is detected or is manually set by the user. This LED is off during normal operation. | Yellow |
AL LED | On means that there is a local or remote alarm state. This LED is off during normal operation. | Yellow |
CD LED | On means that a carrier has been detected and the internal DSU/CSU in the WAN interface card is communicating with another DSU/CSU. This LED is on during normal operation. | Green |
This section describes the following Cisco 2-port multiflex trunk interface cards:
You can distinguish between T1, E1, and drop and insert interface cards by the labeling on the faceplate, as shown in Figure 3-39, Figure 3-40, Figure 3-42, and Figure 3-43.
The 2-port multiflex trunk interface card provides voice and data access to the PSTN domain through TDM ports. The 2-port multiflex trunk interface cards are generic dual-port trunk interfaces for voice, data, and integrated voice/data applications. This card provides basic structured and unstructured service for T1 networks and structured service for fractional E1 networks and includes an integrated DSU/CSU. Some 2-port multiflex trunk cards also support the drop and insert process, which adds data to a T1 or E1 data stream, or terminates data from a T1 or E1 data stream to other devices connected to the drop and insert equipment. The E1 VWICs with G.703 support allows unstructured E1 traffic that conforms to the ITU-T G.703 standard.


For this connection, use the straight-through RJ-48C-to-RJ-48C cable that came with your card.
Step 2 Connect one end of the cable to the T1 or E1 port on the card.
Step 3 Connect the other end to the T1 or E1 wall jack (RJ-48C) at your site, as shown in Figure 3-44.

Step 4 Turn on power to the router.
Step 5 Check that the CD LED goes on, which means that the card's internal DSU/CSU is communicating with the DSU/CSU at the T1 or E1 service provider central office.
The 2-port multiflex port interface cards have three LEDs as listed in Table 3-12.
| LED | Description | Color |
|---|---|---|
LP LED | On means that a loopback or line state is detected or is manually set by the user. This LED is off during normal operation. | Yellow |
AL LED | On means that there is a local or remote alarm state. This LED is off during normal operation. | Yellow |
CD LED | On means that a carrier has been detected and the internal DSU/CSU in the WAN interface card is communicating with another DSU/CSU. This LED is on during normal operation. | Green |
The following analog modem WAN interface cards originate or terminate analog telephone transmissions through RJ-11 modular jacks:
The following warning applies in Australia:
 |
Warning This equipment will be inoperable when main power fails. |
The following warning applies in New Zealand:
The analog modems described in this chapter support the following protocols:
Cisco IOS software identifies each modem uniquely by its slot number and port number.
Some Cisco IOS configuration commands identify asynchronous ports by an interface number (or a line number, which is the same as the interface number). The interface number of a port on an 1-port or 2-port analog WAN interface card is related to the slot number where the module is installed and the number of the port in the module.
Cisco 3600 series slot numbering is explained in the "Cisco 3600 Series Interface Numbering" section. The Cisco 2600 series router's single network module slot is always 1.
Ports in the 1-port and 2-port analog modem WAN interface cards are numbered in the same pattern as slot numbers, beginning at 0 at the lower right and continuing from right to left.
The interface number of a port is determined in the following way:
interface-number = (32 x slot-number) + port-number + 1
For example, modem port 2 in slot 1 corresponds to interface number
(32 x 1) + 2 + 1 = 35. This is also the line number for the port. Port 2 in slot 1 is always assigned interface number 35, regardless of what is in slot 0. If you move the module from slot 1 to a different slot, however, its interface numbers change.
Table 3-13 shows the range of interface numbers available for each type of analog modem network module in each router slot. (Interface 0 is automatically assigned to the console.)
| Slot Number | Interface Numbers (1-Port WICs) | Interface Numbers (2-Port WICs) |
|---|---|---|
0 | 1 | 1-2 |
1 | 33 | 33-34 |
2 | 65 | 65-66 |
3 | 97 | 97-98 |
4 | 129 | 129-130 |
5 | 161 | 161-162 |
6 | 193 | 193-194 |
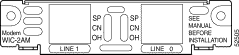
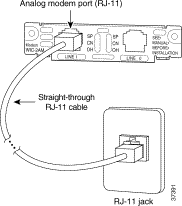
Each analog modem WAN interface card provides 1 or 2 RJ-11 jacks for standard modular cables. These ports are color-coded pink. Cables are not provided with the network module.
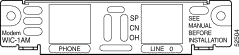
The 1-port analog modem WAN interface card has a jack labled PHONE. An analog telephone can be connected to this jack to allow the dialout line to be shared between the telephone and the modem.
To establish an analog connection, use a straight-through RJ-11 modular cable to connect the jack to a wall telephone outlet. (See Figure 3-47.)
|
Caution The RJ-11 cable must be disconnected before the analog modem WAN interface card is removed. |
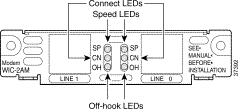
The analog modem WAN interface card has a set of three LEDs for each port as listed in Table 3-14. (See Figure 3-48.)
| LED | Description |
|---|---|
SP | Speed indication On = High speed (V.56/V.90) |
CN | Connect (carrier detect) |
OH | Off-hook status |
![]()
![]()
![]()
![]()
![]()
![]()
![]()
![]()
Posted: Wed Sep 26 17:57:27 PDT 2001
All contents are Copyright © 1992--2001 Cisco Systems, Inc. All rights reserved.
Important Notices and Privacy Statement.