|
|

Table Of Contents
Cisco Video Management and Storage System Enhanced Network Modules
Cisco Video Management and Storage System Enhanced Network Modules
Shutting Down Cisco Video Management and Storage System Enhanced Network Modules
Connecting Cisco Video Management and Storage System Network Modules
Connecting to an External Storage Device using iSCSI
Establishing a Gigabit Ethernet Internal Connection
Online Insertion and Removal of Cisco Network Modules Procedure
Cisco Video Management and Storage System Enhanced Network Modules
This chapter describes Cisco Video Management and Storage System enhanced network modules for Cisco integrated services routers, and contains the following sections:
•
Cisco Video Management and Storage System Enhanced Network Modules
•
•
Tip
Cisco Video Management and Storage System Enhanced Network Modules
The Cisco Video Management and Storage System enhanced network module is a network video recorder for Cisco integrated services routers, which archives video captured by the Cisco Analog Video Gateway network module (EVM-IPVS-16A) or other cameras connected to your network.
All models ship from the factory with the following hardware preinstalled. (See Table 40-1.)
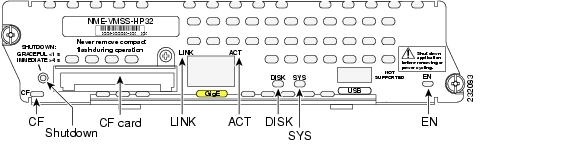
The Cisco Video Management and Storage System enhanced network module LEDs are shown in Figure 40-1 and described in Table 40-2.
Figure 40-1 NME-VMSS Faceplate
Shutting Down Cisco Video Management and Storage System Enhanced Network Modules
Press the SHUTDOWN button on the network module faceplate for less than 2 seconds to perform a graceful shutdown of the network module before removing power from the router or before starting an online insertion and removal (OIR) sequence on the router. The application may take up to 2 minutes to fully shut down.
Caution
Connecting Cisco Video Management and Storage System Network Modules
To connect Cisco Video Management and Storage System network modules to an external device, use a straight-through two-pair Category 5e unshielded twisted-pair (UTP) cable, and connect the RJ-45 Gigabit Ethernet port on the network module to a switch, hub, repeater, server, or other Gigabit Ethernet network device.
Note
Connecting to an External Storage Device using iSCSI
The Cisco Video Management and Storage System enhanced network module supports an Internet SCSI (iSCSI) connection to an external storage device. The Gigabit Ethernet port on the faceplate of the network module and the Gigabit Ethernet port on the router can be configured as iSCSI connections.
To connect Cisco Video Management and Storage System enhanced network modules to an external storage device using iSCSI, use a straight-through two-pair Category 5e unshielded twisted-pair (UTP) cable.
Note
For details about configuring iSCSI connections, see the TBD (software document) on Cisco.com:
TBD
Establishing a Gigabit Ethernet Internal Connection
Use the Cisco High-Speed Intrachassis Module Interconnect (HIMI) feature to establish a Gigabit Ethernet internal logical connection between two network modules, or between an onboard small-form-factor pluggable (SFP) Gigabit Ethernet module and a network module on a Cisco 3825 router or a Cisco 3845 router.
Connections can be established only as follows:
•
•
•
Note
Note
For details about configuring High-Speed Intrachassis Module Interconnect (HIMI) connections, see the Cisco High-Speed Intrachassis Module Interconnect (HIMI) Configuration Guide on Cisco.com:
http://www.cisco.com/en/US/products/ps5855/prod_configuration_guide09186a008068ea83.html
Online Insertion and Removal of Cisco Network Modules Procedure
Some Cisco routers allow you to replace network modules without switching off the router or affecting the operation of other interfaces. This feature is called online insertion and removal (OIR). OIR of a module provides uninterrupted operation to network users, maintains routing information, and ensures session preservation.
Caution
Caution
For a description of informational and error messages that may appear on the console during this procedure, see the hardware installation guide for your router.
To perform online removal of a network module and insertion of a replacement, follow these steps, with the router in privileged EXEC mode:
Step 1
Router# service-module integrated-Service-Engine slot/unit session
Trying 10.10.10.1, 2065 ... Open
SE-Module> enableSE-Module#Step 2
SE-Module#prompt:SE-Module# copy running-config tftp tftp-server-address filenameStep 3
Step 4
Router# service-module integrated-Service-Engine slot/unit session clear
Step 5
Router# service-module integrated-Service-Engine slot/unit shutdownStep 6
Router (config)# interface integrated-Service-Engine slot/unitRouter (config-if)# shutdownRouter (config-if)# exitStep 7
Step 8
Step 9
Step 10
Note
Step 11
Step 12
Step 13
Step 14
Router# service-module integrated-Service-Engine slot/unit sessionTrying 10.10.10.1, 2129 ... OpenSE-Module> enableSE-Module#Step 15
SE-Module# copy tftp running-config tftp-server-address filenameStep 16
Step 17
Router# service-module integrated-Service-Engine slot/unit session clear
Additional References
For additional information, see the following documents and resources.
Regulatory compliance and safety information
Cisco Network Modules and Interface Cards Regulatory Compliance and Safety Information
Cisco Analog Video Gateway software website and reference documentation
Cisco Network Modules Configuration Guides http://www.cisco.com/en/US/products/hw/modules/ps2797/products_installation_and_configuration_guides_list.html
Cisco Video Management and Storage System software website and reference documentation
Cisco Network Modules Configuration Guides http://www.cisco.com/en/US/products/hw/modules/ps2797/products_installation_and_configuration_guides_list.html
Cisco Video Management and Storage System network module (NME-VMSS) hardware documentation
Cisco Network Modules Install and Upgrade Guides http://www.cisco.com/en/US/products/hw/modules/ps2797/prod_installation_guides_list.html
Cisco product support and technical documentation
Product Support
http://www.cisco.com/web/psa/products/index.htmlTechnical documentation, including feedback and assistance
What's New in Cisco Product Documentation (including monthly listings of new and revised documents) at http://www.cisco.com/en/US/docs/general/whatsnew/whatsnew.html
![]()
![]()
![]()
![]()
![]()
![]()
![]()
![]()
Posted: Fri Dec 14 12:17:09 PST 2007
All contents are Copyright © 1992--2007 Cisco Systems, Inc. All rights reserved.
Important Notices and Privacy Statement.