|
|

This document explains how to replace the system-code SIMM (a single-bank Flash memory SIMM) on your AccessPro PC card with a dual-bank Flash memory SIMM. A dual-bank Flash memory SIMM provides additional memory and the ability to load two system codes into Flash memory (one system code in each bank).
Electrostatic discharge (ESD) is a discharge of stored static electricity that can damage equipment and impair electrical circuitry. It occurs when electronic components are improperly handled and can result in complete or intermittent failures.
Following are guidelines for preventing ESD damage:
 | Caution To avoid damaging the equipment, periodically check the resistance value of the antistatic strap. The measurement should be between 1 and 10 megohms (Mohms). |
The following tools and equipment are required for installation:
To remove the system-code SIMM installed on your AccessPro PC card, follow these steps:
Step 1 Back up the system code (software) on the system-code SIMM following the instructions in the publication Router Products Configuration Guide.
 | Caution Dual-bank Flash memory SIMMs are shipped without preinstalled system code. Be sure to back up the system code on the system-code SIMM before removing it. |
Step 2 Turn OFF power but, to channel ESD voltages to ground, do not unplug the power cord.
Step 3 Remove the PC chassis cover, if it has not already been removed, following the instructions in your PC system manual.
Step 4 Attach an ESD-preventive wrist strap.
Step 5 Locate the AccessPro card in its ISA-bus slot. Remove the screw that secures the card bracket to the PC chassis. If a daughter card is installed, remove the screw that secures the daughter card bracket to the PC chassis.
Step 6 Remove the AccessPro card from its ISA-bus slot.
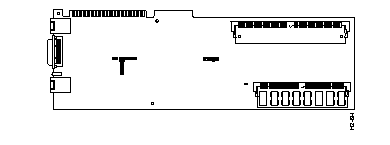
Step 7 Turn the card so it is oriented in the position shown in Figure 1, with the DRAM SIMM toward you.
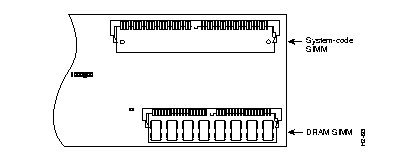
Step 8 Locate the system-code SIMM on the system card. (See Figure 2.)
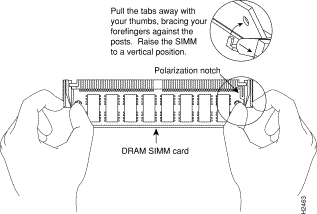
Step 9 Remove the existing system-code SIMM by pulling outward on the connectors to unlatch them. The connector holds the SIMM tightly, so be careful not to break the holders on the SIMM connector. (See Figure 3.)
 | Caution To prevent damage, do not push on the center the SIMM. Handle the SIMM with care. |


Step 1 Turn the AccessPro card so it is oriented in the position shown in Figure 1, with the DRAM SIMM toward you.
Step 2 Position the new dual-bank Flash memory SIMM so that the polarization notch is located at the right end of the SIMM socket, as shown in Figure 3.
Step 3 Insert the new SIMM by sliding the end with the metal fingers into the SIMM connector socket at approximately a 45-degree angle to the AccessPro card. Gently rock the SIMM back into place until the latch on either side snaps into place. Do not use excessive force, or the connector could break.
Step 4 Insert the AccessPro card into its ISA-bus slot on the PC motherboard. Carefully align the edge connector on the ISA-bus slot, and use a rocking motion to seat the card in the proper position. Secure the card in the ISA-bus slot with the bracket screw.
Step 5 Replace the cover of the PC following the directions provided by the manufacturer and turn on the power.
Step 6 Restore the system code you backed up in Step 1 of the previous section, "Removing the System-Code SIMM." Refer to the publication Router Products Configuration Guide for detailed instructions about restoring the system code.
Cisco Information Online (CIO) is Cisco Systems' primary, real-time support channel. You can use your product serial number to activate CIO for a single user during your warranty period. Maintenance customers and partners can self-register on CIO to obtain additional content and services.
Available 24 hours a day, 7 days a week, CIO provides a wealth of standard and value-added services to Cisco's customers and business partners. CIO services include product information, software updates, release notes, technical tips, the Bug Navigator, configuration notes, brochures, descriptions of service offerings, and download access to public and authorized files.
CIO serves a wide variety of users through two interfaces that are updated and enhanced simultaneously--a character-based version and a multimedia version that resides on the World Wide Web (WWW). The character-based CIO (called "CIO Classic") supports Zmodem, Kermit, Xmodem, FTP, Internet e-mail, and fax download options, and is excellent for quick access to information over lower bandwidths. The WWW version of CIO provides richly formatted documents with photographs, figures, graphics, and video, as well as hyperlinks to related information.
You can access CIO in the following ways:
http://www.cisco.com.
cio.cisco.com (198.92.32.130).
For a copy of CIO's Frequently Asked Questions (FAQ), contact cio-help@cisco.com. For additional information, contact cio-team@cisco.com.
tac@cisco.com. To obtain general information about Cisco Systems, Cisco products, or upgrades, contact 800 553-6387, 408 526-7208, or cs-rep@cisco.com.
|
|