|
|

This chapter explains the use of the Cisco 200 for Windows 95 Make New Connection utility, which is designed to create new network connections after the installation of the Cisco 200 for Windows 95 software. This chapter consists of the following sections:
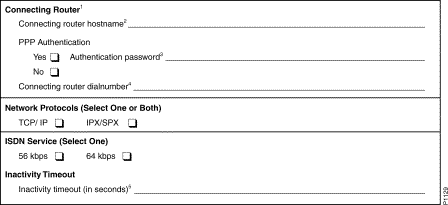
Before you start to make a new connection, your system administrator must provide information about the connection to be created. Use the Cisco 200 for Windows 95 New Connection Worksheet below to record the necessary information.
The worksheet in Table 3-1 lists the information needed to create a new connection using the Cisco 200 for Windows 95 software. Have your system administrator fill out the worksheet with the appropriate information for your installation. If you are making two or more connections, make a copy of the worksheet for each connection. Place the completed worksheet in your Site Log for future reference.

To start the Cisco 200 for Windows 95 Make New Connection utility, follow these steps:
Step 1 Start Windows 95.
Step 2 Double-click the Cisco 200 folder on your Windows 95 desktop.
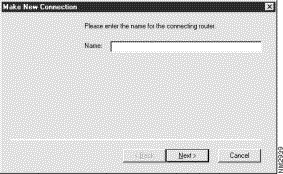
Step 3 Double-click the Make New Connection icon. The Make New Connection utility will appear. See Figure 3-1.

Step 4 Enter the hostname of the connecting router. This information should be provided by your system administrator. Click Next. The Authentication dialog box will appear.
Step 5 Click one of the boxes to indicate whether or not you will be using PPP with authentication (password protection). This configuration must match that on the connecting router. (Consult your system administrator for more information, if necessary.)
Click Next. If you selected PPP without Authentication, go to Step 7.
Step 6 If you selected PPP with Authentication, you will be prompted to enter a password. Enter the password provided by your system administrator in the Password box, then click Next.
Step 7 Enter the dialnumber (telephone number) of the connecting router and click Next. The number should include in a single string all numbers necessary to dial the remote router. Do not separate the numbers with spaces, hyphens, or any non-numeric character.
Step 8 Select the desktop protocol(s) you will be using. Click the boxes to choose one or both of:
Click Next.
Step 9 Select the appropriate ISDN service data transfer rate for your connection. From the ISDN Service menu, select one of the following:
Step 10 Enter an inactivity timeout in the box provided for it. When the connection has been inactive for the specified amount of time, it will automatically be brought down to the inactive state. It will become active again whenever you activate it or when data begins to transfer again. (The default inactivity timeout value is 120 seconds.)
Click Finish.
The Make New Connection utility will create the new connection. You will find a new icon in the Cisco 200 for Windows 95 Application folder on your Windows 95 desktop. The name of the icon is the name you specified for the connecting router.
To use the new connection, or to modify the configuration, double-click its icon and refer to Chapter 2, "Using the ISDN Connection Manager."
![]()
![]()
![]()
![]()
![]()
![]()
![]()
![]()
Posted: Tue Dec 17 18:46:13 PST 2002
All contents are Copyright © 1992--2002 Cisco Systems, Inc. All rights reserved.
Important Notices and Privacy Statement.