This chapter describes the procedures for the Cisco 200 for Windows 95 ISDN Connection Manager, the software utility designed to manage and configure Cisco 200 for Windows 95 network connections. The Cisco 200 for Windows 95 ISDN Connection Manager is a Windows 95-based utility for using, monitoring, and reconfiguring connections after they have been initially configured. This chapter is divided into the following sections:
If you need to create a new network configuration, refer to the chapter "Making New Connections" for more information.
To start the Cisco 200 for Windows 95 ISDN Connection Manager, follow these steps:
Step 1 Start Windows 95.
Step 2 Double-click the Cisco 200 folder on your Windows 95 desktop.
Step 3 Double-click the connection icon, which will have the name you specified for the connecting router. The ISDN Connection Manager utility will appear. See Figure 2-1.
Figure 2-1: The Cisco 200 for Windows 95 ISDN Connection Manager
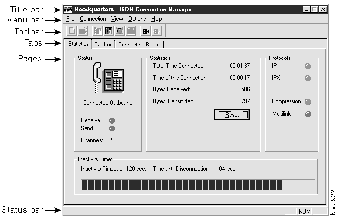
The Cisco 200 for Windows 95 ISDN Connection Manager has a drop-down menu and toolbar structure that will be familiar to Windows 95 users. This section describes the menu and toolbar commands.
File Menu
Use the File menu to open and create files and to exit the ISDN Connection Manager. The File menu contains the following items:
- Make New Connection--Starts the Make New Connection utility, which is described in the chapter "Making New Connections."
- Open--Opens a connection file for configuration or use. Recently opened connection files will appear as a numbered list, with the most recently opened file designated as number 1.
- Exit--Closes the ISDN Connection Manager.
Connection Menu
Use the Connection menu to modify connections. The Connection menu contains the following items:
- Connect--Establishes a connection to the configured connecting router.
- Disconnect--Disconnects from the connection.
- Disable--Disables the connection. The connection cannot be brought up by network traffic until it is connected.
- Wait for Incoming Call--Sets the Cisco 200 for Windows 95 to wait for an incoming call.
- Add B Channel--Adds an ISDN B channel for this connection.
- Remove B Channel--Removes an ISDN B channel for this connection.
View Menu
Use the View menu to change the appearance of the ISDN Connection Manager. The View menu contains the following items:
- Toolbar--When checked, this item makes the toolbar visible. When unchecked, this item hides the toolbar. For more information on the ISDN Connection Manager's toolbar, see the section "Toolbar" below.
- Status Bar--Makes the status bar visible. The status bar, which appears on the bottom of the screen, displays limited status information.
- Hide Window--Hide the current window. (To restore the window, double-click the telephone icon in the right corner of the Windows 95 Start menu bar.)
Options Menu
Use the Options menu to change local, date and time, and network configurations. The Options menu contains the following items:
- Local Configuration--Use this menu option to edit the Cisco 200 for Windows 95 configuration of the Cisco 200 for Windows 95 PC. This feature is described in more detail in the section "Managing Connections" below.
- Date and Time--Use this menu option to launch the Windows 95 Regional Settings Properties tool. With the Regional Settings page selected, use the pull-down menu to select your language group. This will configure the display of numbers, currency, time, and date on your PC to conform to local standards. For more information on editing regional settings using this tool, refer to your Microsoft documentation.
- Network Configuration--Use this menu option to launch the Windows 95 Network Configuration tool. Use this tool to change the configuration of your network protocol(s), that is TCP/IP or IPX/SPX. For more information on editing network configuration settings using this tool, refer to your Microsoft documentation.
About ISDN Connection Manager--Provides information on this version of the ISDN Connection Manager.
Use the Cisco 200 for Windows 95 ISDN Connection toolbar to quickly perform some of the most common Connection Manager functions without using the pull-down menus. See Figure 2-2.
Figure 2-2: The Cisco 200 for Windows 95 ISDN Connection Manager Toolbar
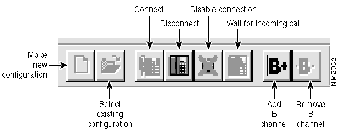
The icons in the toolbar function as follows:
- Make New Configuration--Displays the Make New Connection utility, which is described in the chapter "Making New Connections."
- Select Existing Configuration--Opens a previously configured connection file.
- Connect--Establishes a connection to the configured connecting router. This icon appears dimmed when the connection has already been established.
- Disconnect--Disconnects the active connection. This icon appears dimmed when the connection is not active.
- Disable Connection--Disables the Cisco 200 for Windows 95 from placing or receiving any calls. This icon appears dimmed when the Cisco 200 for Windows 95 is disabled.
- Wait for Incoming Call--Makes the Cisco 200 for Windows 95 wait for an incoming call. This icon appears dimmed when the Cisco 200 for Windows 95 is enabled.
- Add B Channel--Adds an ISDN B channel for this connection. This icon appears dimmed when there are already two B channels active.
- Remove B Channel--Removes an ISDN B channel for this connection. This icon appears dimmed if only one B channel is active or if the connection is not configured to have multilink PPP.
Managing a connection involves using the three selectable pages of the Cisco 200 for Windows 95 ISDN Connection Manager. To display a page, click its tab. See Figure 2-3. This section describes the procedures for using the ISDN Connection Manager pages.
Figure 2-3: ISDN Connection Manager Sheets

The Cisco 200 for Windows 95 ISDN Connection Manager keeps statistics on your connection. It displays its current status, as well as time, data transmission statistics, and protocols in use.
To use the ISDN Connection Manager's Managing Statistics page, follow these steps:
Step 1 Start Windows 95.
Step 2 Double-click the Cisco 200 folder on your Windows 95 desktop.
Step 3 Double-click the connection icon, which will have the name you specified for the connecting router. The ISDN Connection Manager utility will appear.
Step 4 Click the Statistics tab. The Statistics page will appear. See Figure 2-4.
Figure 2-4: ISDN Connection Manager Statistics Page
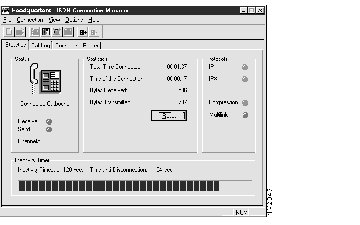
The Statistics page has four sections, as follows:
- Status, which contains the following items:
- A telephone icon representing the connection--The telephone will be Green, Blue, Gray, Yellow, Red, or Red within a circle with a line through it. A textual explanation of the state of the connection appears below the telephone icon. See Table 2-1.
- Receive/Send--These LEDs display current data activity.
- Channels--Number of B channels currently operating: 0, 1, or 2.
Table 2-1: Cisco 200 for Windows 95 Connection Status
| Color
| Description
| State
|
|---|
| Green
| The call is active. ISDN and PPP are both up. The Cisco 200 is connected to the specified connecting router.
| Active
|
Yellow
| The call is coming up to an active state.
| Connecting
|
| The call is disconnecting due to inactivity.
| Disconnecting
|
| Blue
| The Cisco 200 is waiting for a call from the connecting router.
| Waiting for an Incoming Call
|
| Red
| The call is down due to inactivity or because the user brought it down. Renewed activity will bring it up.
| Inactive
|
| Red within a circle with a line through it
| The Cisco 200 will no longer place or accept calls.
| Disabled
|
- Statistics--This section of the page contains statistics regarding the connection. The collected statistics are as follows:
- Total Time Connected--Total time in this connection since the last reset.
- Time of This Connection--Total time in this connection during the current call.
- Bytes Received/Transmitted--Number of bytes received or transmitted since you last pressed the Reset button.
- Reset--Resets the data for the Time Connected and Bytes Received/Transmitted statistics on this part of the page.
- Charges for This Connection--Charges for the current call. (This feature is available only in Europe because non-European ISDN service providers do not dynamically supply call charge information over the connected line.)
- Total Charges--Total charges for all calls using this connection are displayed here. (This feature is available only in Europe because non-European ISDN service providers do not dynamically supply call charge information over the connected line.)
- Protocols--These LEDs display the status of the IP and IPX protocols. The LEDs display protocol status as follows:
- Bright Green--The protocol is both enabled and negotiated with the connecting router.
- Red--The protocol is enabled, but has not been successfully negotiated with the connecting router.
- Dark Green--The protocol is neither enabled nor negotiated. The Cisco 200 for Windows 95 software is not configured for this protocol, so it has not attempted to negotiate the protocol with the connecting router.
- Inactivity Timer--This section displays two pieces of information relating to the inactivity timer:
- Inactivity Timeout--The amount of time the Cisco 200 will wait for data transfer before timing out and disconnecting. (To configure the inactivity timeout, use the Connecting Router page. Refer to the section "Viewing and Editing Basic Connecting Router Information" later in this chapter.)
- Time Until Disconnection--If no data is exchanged over the connection during this dynamically displayed time, the connection will time out.
To view the ISDN Connection Manager's Call Log page, follow these steps:
Step 1 Start Windows 95.
Step 2 Double-click the Cisco 200 folder on your Windows 95 desktop.
Step 3 Double-click the connection icon, which will have the name you specified for the connecting router. The ISDN Connection Manager utility will appear.
Step 4 Click the Call Log tab. The Call Log page will appear. See Figure 2-5.
Figure 2-5: The Call Log Page
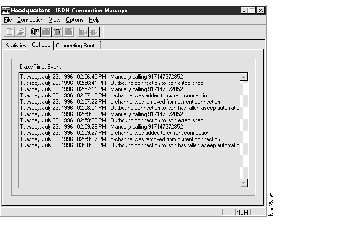
The Call Log page displays a short description of network events and the date and time these events occurred. Use this data for connection monitoring and troubleshooting. If you are having problems with your connections, your network administrator will need to know the information that appears in the Call Log page.
Additionally, the call log information is saved as a Windows Notepad file, allowing for printing and/or electronic transfer of call log data. The Call Log Notepad file is located in the Cisco 200 folder on the Windows 95 desktop. Each time the ISDN Connection Manager is closed, call log data is written to this file. To open the Call Log file, double-click the file Call_Log.txt.
Use the Connecting Router page to view and edit basic information about your connecting router. Follow these steps:
Step 1 Start Windows 95.
Step 2 Double-click the Cisco 200 folder on your Windows 95 desktop.
Step 3 Double-click the connection icon, which will have the name you specified for the connecting router. The ISDN Connection Manager utility will appear.
Step 4 Click the Connecting Router tab. The Connecting Router page will appear. See Figure 2-6.
Figure 2-6: The Connecting Router Page
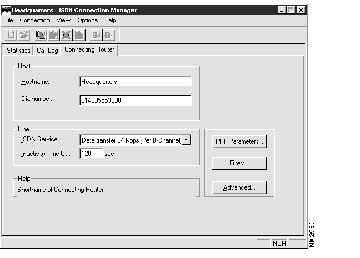
The Connecting Router Page is divided into the following sections:
- Host--This section of the page contains information about the host (connecting router).
- Hostname--The name of the connecting router.
- Dialnumber--The entire number to be dialed to connect to the router.
- The dialnumber should include all numbers necessary to dial the connecting router, including public access codes, international access codes, long distance access codes, signalling system 7 codes, country codes, area codes, and local telephone numbers.
- The dialnumber was first configured during the software installation.
- Line--This section of the page contains information about the ISDN connection.
- ISDN Service--The appropriate data transfer rate for your site (either 56 kbps or 64 kbps per B channel).
- Inactivity Time Out--This field configures the amount of time without data activity (in seconds) before the connection times out. When this amount of time has passed without any activity over the connection, the connection will become inactive. Renewed activity will bring the connection up.
- The default inactivity time out is 120 seconds. To disable the inactivity time out, set it to zero.
- Additional Configuration Options--Buttons on the right side of the Connecting Router page can open three additional connecting router configuration dialog boxes: PPP Parameters, Filters, and Advanced. These options are described in the following sections.
Click OK to configure any settings you have made on this page. The new settings will become effective the next time you open the connection by double-clicking its icon.
To view and edit Connecting Router PPP parameters, follow these steps:
Step 1 Start Windows 95.
Step 2 Double-click the Cisco 200 folder on your Windows 95 desktop.
Step 3 Double-click the connection icon, which will have the name you specified for the connecting router. The ISDN Connection Manager utility will appear.
Step 4 Click the Connecting Router tab. The Connecting Router page will appear. Click the "PPP Parameters..." button. The Connecting Router PPP Parameters dialog box will appear. See Figure 2-7.
Figure 2-7: The Connecting Router PPP Parameters Dialog Box
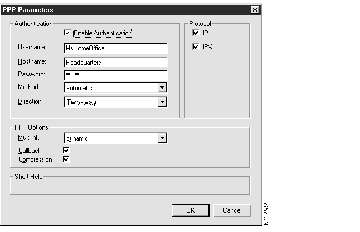
The Connecting Router PPP Parameters dialog box is divided into several sections, each of which provides a certain type of information about the connection's PPP configuration. All of the configuration information in this section should be provided by your system administrator.
- Authentication--To enable authentication, select the Enable Authentication box. Make sure that the following boxes are correctly configured.
- Username--The name of the Cisco 200 for Windows 95 PC.
- Hostname--The name of the connecting router.
- Password--Cisco 200 for Windows 95 PC's authentication password. For security reasons, the password will appear as asterisks.
- Method--The drop-down list allows you to select one of: Automatic, CHAP, or PAP. (The default is automatic authentication.)
- Direction--The drop-down list allows you to select either: Two-way or One-way. (The default is two-way authentication.)
- PPP Options--Use this to configure PPP multilink, PPP callback, and compression over PPP.
- Multilink--Use the drop-down list to select one of: Static, Dynamic, or Disabled. (The default is dynamic.)
- Callback--To enable PPP callback, select this box. To disable PPP callback, clear the box.
- Compression--To enable compression over PPP, select the Compression box. To disable compression, clear the box.
- Protocol--Click the boxes to select one or both of:
- IP--Transmission Control Protocol/Internet Protocol (TCP/IP), for Internet-type communications
- IPX--Internetwork Packet Exchange/Sequenced Packet Exchange (IPX/SPX), for Novell NetWare-type communications
To configure any settings you have made in this dialog box, click OK here and again on the Connecting Router page. The new settings will take effect the next time you open the connection by double-clicking its icon.
To view and edit the Connecting Router confirm dial-up parameter, follow these steps:
Step 1 Start Windows 95.
Step 2 Double-click the Cisco 200 folder on your Windows 95 desktop.
Step 3 Double-click the connection icon, which will have the name you specified for the connecting router. The ISDN Connection Manager utility will appear.
Step 4 Click the Connecting Router tab. The Connecting Router page will appear. Click the "Filters..." button. The Connecting Router Filters Configuration dialog box will appear.
The Connecting Router Filters Configuration dialog box is divided into three sections, as follows:
- Filters--Do not change these parameters unless directed to do so by qualified technical service personnel.
- Emulation--Do not change these parameters unless directed to do so by qualified technical service personnel.
- Confirm Dial-Up--To confirm dial-up, select this box. To disable the confirm dial-up feature, clear the box.
To configure any settings you have made in this dialog box, click OK here and again on the Connecting Router page. The new settings will take effect the next time you open the connection by double-clicking its icon.
To view and edit Connecting Router advanced parameters, follow these steps:
Step 1 Start Windows 95.
Step 2 Double-click the Cisco 200 folder on your Windows 95 desktop.
Step 3 Double-click the connection icon, which will have the name you specified for the connecting router. The ISDN Connection Manager utility will appear.
Step 4 Click the Connecting Router tab. The Connecting Router page will appear. Click the "Advanced..." button. The Connecting Router Advanced dialog box will appear. See Figure 2-8.
Figure 2-8: The Connecting Router Advanced Dialog Box
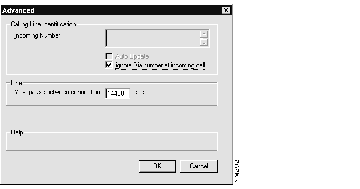
The Connecting Router Advanced dialog box has the following sections:
- Calling Line Identification--This feature, also known as caller ID, allows you to identify the number that the caller to the Cisco 200 for Windows 95 is dialing from, providing another level of security.
- To enable calling line identification, clear the Ignore Dialnumber at Incoming Call box and enter the accepted dialnumbers in the Incoming Number box. Press Return between accepted telephone numbers.
- To disable calling line identification, select Ignore Dialnumber at Incoming Call. The Auto Update box and the numbers in the Incoming Number box will appear dimmed, but will be available if you want to turn caller ID back on.
- Line--To configure the maximum pause between connections, enter the number of seconds in the Max. Pause Between Connections box. The default is 14400 seconds (four hours).
- When the Cisco 200 for Windows 95 has been idle (inactive) for the amount of time configured in this box, it places a call to activate the connection.
To configure any settings you have made in this dialog box, click OK here and again on the Connecting Router page. The new settings will take effect the next time you open the connection by double-clicking its icon.


