32.3. Introduction to WML
At last we arrive at the nitty-gritty of wireless applications -- WML. This section should give you a flavor of how WML works, but it falls far short of a complete education. For more information, refer to one of the complete resources listed at the end of this chapter. The complete set of WML elements and attributes is summarized in the following section.
32.3.1. Document Structure
Because of the unique viewing environment on handheld devices, the whole notion of the "page" and page-based design as they are thought of in HTML is abandoned. WML applications use a "card" metaphor instead. An application is made up of one or more decks (.wml documents), each containing some number of cards (WML elements defined within a document). A card contains a limited amount of information, equal to just a few screenfuls where a screen holds only three to six lines of text.
Because WML is an application of XML (see Chapter 30, "Introduction to XML"), WML documents need to be both valid (using WML elements properly according to the DTD) and well-formed (abiding by the stringent rules of XML markup syntax).
The following is a very simple WML document called jenskitchen.wml. It is a "deck" containing two "cards."
<?xml version="1.0"?>
<!DOCTYPE wml PUBLIC "-//WAPFORUM//DTD WML 1.2//EN"
                     "http://www.wapforum.org/DTD/wml_1.2.xml">
<wml>
   <card id="intro">
      <p>Welcome to Jen's Cookbook Nook</p>
   </card>

   <card id="book1">
      <p>101 Things to Do with Wild Mushrooms</p>
      <p>Jennifer Niederst</p>
      <p>Price: $19.95</p>
   </card>
</wml>
Looking at this example piece by piece, we see that it begins with the standard XML and DOCTYPE declarations (for more information on XML document prologs, see Chapter 30, "Introduction to XML"). The <wml> element defines a WML deck; every WML document opens and closes with <wml> tags, and there can be only one set per document.
Decks may contain one or many cards. Our sample deck contains two cards, defined by the aptly named <card> element. Cards can contain a variety of elements, but their contents must always be placed within paragraph (<p>) tags. Because WML is an XML application, each paragraph element must have a closing </p> tag (this is different from HTML, in which the paragraph element can be left unclosed). Note that each card is given a name using the id attribute so it can be referred to later.
32.3.2. Formatting Text
According to the WML specification, all text (in fact, all content elements) must be contained in paragraphs (<p> tags). The <p> element has two attributes: align and mode. align works just like text alignment in HTML. The mode attribute can be set to wrap or nowrap. Text wraps by default, but you can set it to nowrap to keep a paragraph on one line. Be warned, however, that while some devices can scroll to the right, others can't, so text set to nowrap may be inaccessible to some users. Both alignment and the mode settings may be ignored by some browsers, so be sure your information still works without them.
Line breaks are added within text using the <br/> tag. Because WML follows XML syntax, it is necessary to include the slash at the end of the tag to make it a self-closing element.
The specification also includes elements for adding inline styles to text, including:
|
<b> |
Bold |
|
<big> |
Slightly bigger than surrounding text |
|
<em> |
Emphasized (bold or italic) |
|
<i> |
Italic |
|
<small> |
Slightly smaller than surrounding text |
|
<strong> |
Strong text (bold, italic, or bold italic) |
|
<u> |
Underlined |
Unfortunately, there is no guarantee that a device will display text in the tagged style. Some devices ignore style information entirely, so it is best not to rely on styles for meaning.
32.3.3. Adding Links
Just as on the Web, linking from one page to another is an integral part of using WAP applications. WML uses the familiar anchor (<a>) element for creating simple links. In the following example, I've created a link from one card to another by calling the card by name in the anchor tag. This is similar to creating a link to a named anchor in HTML. When a user selects the linked text, the second card loads in the browser window.
<wml>
   <card id="intro">
      <p>Welcome to Jen's Cookbook Nook<br/>
      <a href="#book1">Check out our featured book!</a>
      </p>
   </card>

   <card id="book1">
      <p>101 Things to Do with Wild Mushrooms</p>
      <p>Jennifer Niederst</p>
      <p>Price: $19.95</p>
   </card>
</wml>
The <a> element only allows you to link to other specific cards or decks. The WML specification provides a more versatile tool for navigating between cards: the <anchor> element. The anchor element can be used to link to a specific card or a card for which you may not know the location ahead of time, such as the previous card or a card chosen based on user input (via a set variable). The <anchor> tag acts as a container for two other WML elements, <go> and <prev>, which give it its functionality.
The following example uses the <anchor> tag with the <go> element to create a simple link (it functions exactly the same as the link in the previous example).
<anchor>
   Check out our featured book!
   <go href="#book1" />
</anchor>
The <anchor> element can also be used to create a custom "Back" button by using the <prev> element as shown in this example.
<anchor>
   Go back!
   <prev/>
</anchor>
32.3.4. Images
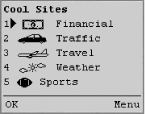
Although WAP<> applications are primarily text, it is possible to add simple images to a card (see Figure 32-3). In order for an image to be displayed in a WAP application, it must be in the specially optimized Wireless Bitmap (WBMP) format. WBMP files are 1-bit graphics capable of displaying only black and white pixels. It is recommended that you keep any graphic image as small as possible. No graphic should exceed 150 pixels square. Be aware that some microbrowsers do not support graphics at all, so always provide alternative text.

Figure 32-3. Examples of WMBP graphics in a WAP application
Images are added to the document with the <img/> element. Make sure that it is placed within <p> tags, as shown in this example:
<card>
<p><img src="logo.wbmp" alt="Cookbook Logo"></p>
</card>
Some mobile devices have stored in their memory a library of small images that can be placed in the WML document using the localsrc attribute in the image tag. The advantage of local images is that they reduce the amount of data that needs to be transferred from the server, so they display more quickly than external WBMP files. It is a good idea also to provide a pointer to an external graphic in case local images are not supported. The following example requests a generic credit card icon from the local image library and specifies an alternative .wbmp file. The alt text will display on devices that do not support graphics at all.
<img localsrc="creditcard" src="card.wbmp" alt="credit card symbol">
A complete list of library images and their names is available at http://developer.phone.com/htmldoc/41/wmlref/taglist.html#575099.
Creating WBMP Graphics
There are few tools available that can create WBMP files at this time. However, you can download the free UnWired plug-in from RCP Distributed Systems that enables you to create WBMP files in Adobe Photoshop 5 and higher and JASC Paint Shop Pro (or any graphics package that supports plug-ins). It is available at http://www.rcp.co.uk/distributed/downloads/.
There is also a Java utility called pic_2_wbmp that converts existing BMP files to WBMP format. It is available at http://www.gingco.de/wap/.
32.3.5. Tables
WML uses the same basic elements as HTML for creating tables. The table itself is defined with <table> tags. A table contains some number of rows (<tr>), and each row contains some number of table data cells (<td>) that contain the content. Unlike HTML tables, you can explicitly define the number of columns in a WML table using the columns attribute in the <table> tag. Text alignment is set for each column at the table level (see the tag summary later in this chapter for alignment syntax).
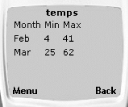
The following sample code creates a table with three columns; the content in the first column is aligned left, and the content in the remaining two columns is aligned right. The result is shown in Figure 32-4.
<table columns="3" align="LRR">
<tr>
   <td>Month</td>
   <td>Min</td>
   <td>Max</td>
</tr>
<tr>
   <td>Feb</td>
   <td>4</td>
   <td>41</td>
</tr>
<tr>
   <td>Mar</td>
   <td>25</td>
   <td>62</td>
<tr>
</table>

Figure 32-4. WML table in emulator
Tables should be used with caution in WML applications. It is easy for tables to grow too wide to display on the screen, so that users without the ability to scroll horizontally miss information. Some devices may ignore tables altogether, just displaying the cell contents in a list, in the order they appear in the source document. If you do choose to use tables, keep the number of columns and cell content to a minimum, make sure the information makes sense as it appears in the file, and be sure to test the table thoroughly on a number of devices.
32.3.6. Programming Softkeys
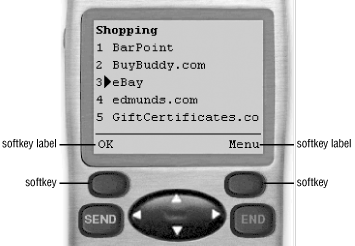
Mobile phones and other handheld devices usually feature softkeys, buttons that can be programmed to function however you like (see Figure 32-5). Most often, softkeys are physical buttons on the device, but they may also be rendered graphically in the display area. Because softkey implementation varies considerably from device to device, count on users having varied experiences of your application.

Figure 32-5. Softkey examples on the Openwave Simulator
Softkeys are good for functions and links that don't necessarily have a place in the text flow, such as a Back button or a link to a menu of options that serve the whole application. Actions are assigned to softkeys via the <do> element. This element has one required attribute, type, that specifies the sort of action being defined. There are seven values for the type attribute:
|
Okay or confirm information |
|
|
Go to the previously viewed card (like a Back button) |
|
|
Request help |
|
|
Clear the state (variables) for the card or deck |
|
|
Select from a list of choices |
|
|
Delete an item |
|
|
A generic action |
The <do> element uses the label attribute to specify the text that is assigned to the button. It is recommended that label values be limited to approximately six characters or fewer for best cross-device performance.
Softkey programming is a rich topic that is beyond the scope of this brief WML overview, so we will look only at some simple examples. The first example uses the <do> element to create a softkey "Back" button. How the task is assigned to a button is left up to the individual device, so it is for the most part out of the designer's control. Note that because tasks are not part of the content flow, they do not need to be put within paragraph tags.
<do type="prev" label="Back">
   <prev/>
</do>
Another common action assigned to softkeys is a link to another document or card, as shown in this example.
<do type="accept" label="List">
   <go href="list.wml"/>
</do>
To add multiple tasks to a card, use the options task type. Options may appear on the browser as a pop-up menu of choices or as a link to a separate page with a list of links. The way it is implemented is up to the user's device. This example adds three functions to the page: a link to a search page, a link to a list, and a Back button.
<do type="options" label="Search">
   <go href="search.wml"/>
</do>
<do type="options" label="List">
   <go href="list.wml"/>
</do>
<do type="options" label="Back">
   <prev/>
</do>
32.3.7. Interactivity
An application is nothing without interactivity. The WML specification provides several elements for the collection of user input and dynamic content generation based on that input. Like HTML, WML contains basic form elements: <input> for placing a text input field in the application, <select> for defining a list of <option>s, and <fieldset> for grouping form content into logical sections.
The <setvar> element is used to set a variable, a mechanism for temporarily storing a bit of information such as user input, a URL, or any text information. In this example, variables containing information about the book (an abbreviation of the title and its price) are set when the user clicks on the "Purchase this book" link. This information is stored and used later in the application, perhaps in a list of selected items.
<card id="book1" title="101 Mushrooms">
<p><b>101 Things to Do with Wild Mushrooms</b></p>
<p>Written by Jennifer Niederst<br/>
   Price: $19.95<br/>
   This book will save your dinner parties.
   <anchor>
      Purchase this book!
      <go href="purchase.wml">
         <setvar name="B" value="101Mushrooms"/>
         <setvar name="P" value="19.95"/>
      </go>
   </anchor>
</p>
</card>
WMLScript is the client-side scripting language that gives WML applications true functionality. WMLScript is beyond the scope of this chapter, but if you are serious about building mobile applications, it is recommended that you add WMLScript to your repertoire. Unfortunately, it is only supported in the latest WAP-enabled browsers (Version 4 and higher), but it will be an important tool in WAP development in the coming years. Resources for WMLScript are listed at the end of the chapter.

Copyright © 2002 O'Reilly & Associates. All rights reserved.


