
Chapter 6. Colors and Backgrounds
Contents:
Many of you will no doubt remember the first time you changed the colors of a web page. Instead of the old black text on a gray background with blue links, all of a sudden you could use any combination of colors you desired -- perhaps light blue text on a black background with lime green hyperlinks. From there, you probably moved on to putting images in the background and combining background images with appropriately colored text to make some really cool-looking pages.
Eventually, though, one comes to realize that setting a single color for all of the text in a page just isn't enough. That's how <FONT COLOR="..."> came into being. Without it, you wouldn't be able to have pages where some text is black, some red, and some white, for example.
Now, thanks to the power of CSS, you can have many, many different colors within a single page, and without using a single FONT tag. This gives authors the ability to set up pages where the main text is black with a white background, but the navigational hyperlinks along the side of the page are black on a light purple background. There are almost infinite possibilities: defining red text for warnings, using a dark purple to make boldfaced text even more obvious, setting each heading to be a different shade of green, and on and on.
Of course, this means that when you're designing a page, you need to put some thought into it first. That's generally true in any case, but with colors, it's even more so. For example, if you're going to set all hyperlinks to be yellow, will that clash with the background color in any part of your document? If you use too many colors, will the user be too overwhelmed? If you change the default hyperlink colors, will users still be able to figure out where your links are? If you set both regular text and hyperlink text to be the same color, for instance, then it will be much harder to spot links -- in fact, almost impossible if the user's links aren't underlined.
Despite all these issues, the ability to change the colors of elements is something almost every author will want to use, probably quite often. Used properly, colors can really strengthen the presentation of a document. Once you've decided how you plan to use color, you have to decide how you'll apply it, since some approaches will require the use of classes as well as simple element selectors.
As an example, let's say you have a design where all H1 elements should be green, most H2 elements should be blue, and all hyperlinks should be dark red. However, in some cases H2 elements should be dark blue because they're associated with different types of information. The simplest way to handle this is to put a class of dkblue on each H2 that needs to be dark blue and declare the following:
H1 {color: green;}
H2 {color: blue;}
H2.dkblue {color: navy;}
A:link {color: maroon;}   /* a good dark red color */
Any H2 which should be dark blue would then be marked up as <H2 CLASS="dkblue">...</H2>.
TIP
It's actually better to pick class names that are descriptive of the type of information contained within, not of the visual effect you're trying to achieve at the moment. For example, let's say that we want the dark blue color to be applied to all H2 elements that are subsection headings. It would be much better to pick a class name like subsec or even sub-section. Both of these names have the advantage of actually meaning something -- and, furthermore, of being independent of any presentational concepts. After all, you might decide later to make all subsection titles dark red instead of dark blue, and the statement H2.dkblue {color: maroon;} is a little silly.
From this simple example, we draw the general lesson that when you're planning to use styles, it's generally to your advantage to plan ahead and use all of the tools you can. To take the preceding example a little further, suppose that a navigational bar is added to the page. Within this bar, hyperlinks should be yellow, not dark red. If the bar is marked with an ID of navbar, then you need only add this rule:
#navbar A:link {color: yellow;}This will change the color of hyperlinks within the navigation bar without affecting other hyperlinks throughout the document.
6.1. Colors
There is really only one type of color in CSS, and that's plain, solid color. If you set the background of a page to be red, then the entire background will be the same shade of red. This is no different than what's been possible in HTML up until now, of course. When you declare <BODY LINK="blue" VLINK="blue">, you probably expect that all hyperlinks will be the same shade of blue, no matter where they are in the document.
Well, don't change that thinking when you're using CSS. If you use CSS to set the color of all hyperlinks (both visited and unvisited) to be blue, then that's what they'll be. In the same way, if you use styles to set the background of a page to be green, then the entire page background will be the same shade of green throughout the entire document. If you set the background of H1 elements to be navy, then the whole background of every H1 will be the same dark blue color.
In CSS, you can set both the foreground and background colors of any element, from the BODY down to the underline and italics tags, and almost everything in between -- list items, entire lists, headings, hyperlinks, table cells, form elements, and even (in a limited fashion) images. In order to understand how this works, though, it's important to understand what's in the foreground of an element and what isn't.
What's the foreground of an element? Generally speaking, it's the text of an element, although that isn't the whole story: the borders around an element are also considered to be part of its foreground. Thus, there are two ways to directly affect the foreground color of an element: by using the color property and by setting the border colors using one of a number of border properties. Primarily there is the border-color property, as well as shorthand properties such as border-top, border-right, border-bottom , border-left, and border.
The background of an element is all of the space behind the foreground, out to the edge of the borders; thus, the content box and the padding are all part of an element's background. There are two ways to set the background color: the background-color and background properties.
6.1.1. Foreground Colors
The easiest way to set the foreground color of an element is with the property color.
color
- Values
<color>
- Initial value
UA specific
- Inherited
yes
- Applies to
all elements
This property accepts as a value any valid color, as discussed in Chapter 3, "Units and Values", such as #FFCC00 or rgb(100%,80%,0%). It has the effect of setting the color of the text in the element, as shown in Figure 6-1:
<P STYLE="color: gray;">This paragraph has a gray foreground.</P>
<P>This paragraph has the default foreground.</P>
Figure 6-1. Declared color versus default color
TIP
In Figure 6-1, the default foreground color is black. That doesn't have to be the case, since users might have set their browsers (or other user agents) to use different foreground (text) colors. If the default text were set to green, the second paragraph in the preceding example would be green, not black -- but the first paragraph would still be gray.
You need not restrict yourself to such simple operations, of course. There are plenty of ways to use color. You might have some paragraphs that contain text warning the user of a potential problem. In order to make this text stand out more than usual, you might decide to color it red. All that's needed is a class of warn on each paragraph that contains warning text (<P CLASS="warn">) and the following rule:
P.warn {color: red;}In the same document, you decide that any links within a warning paragraph should be green. Thus:
P.warn {color: red;}
P.warn A:link {color: green;}
Then you change your mind, deciding that warning text should be gray and that links in such text should be silver. The preceding rules need only be changed to reflect the new values:
P.warn {color: gray;}
P.warn A:link {color: silver;}
Another use for color is to draw attention to certain types of text. For example, boldfaced text is already fairly obvious, but you could give it a different color to make it stand out even further:
B {color: maroon;}Then you decide that you want all table cells with a class of highlight to contain yellow text:
TD.highlight {color: yellow;}This sets the foreground color of all elements within any table cell with a class of highlight to be yellow, as shown in Figure 6-2:
Figure 6-2. Highlighting a table cell contents
6.1.1.1. BODY attributes
There are many uses for color, of course, the most basic of which is to replace the BODY attributes TEXT, LINK , ALINK , and VLINK. In conjunction with the anchor pseudo-classes, color can replace these BODY attributes outright. The first line in the following example can be rewritten with the subsequent CSS, and either will have the result depicted in Figure 6-3:
<BODY TEXT="black" LINK="#808080" ALINK="silver" VLINK="#333333">

BODY {color: black;}     /* replacement CSS */
A:link {color: #808080;}
A:active {color: silver;}
A:visited {color: #333333;}
Figure 6-3. Replacing BODY attributes with CSS
While this may seem like a lot of extra typing, consider that using the old method of BODY attributes, you could only make changes at the document level. For example, if you wanted some links to be medium gray and others a relatively dark gray, you couldn't do that with the BODY attributes. Instead, you'd have to use <FONT COLOR="#666666"> on every single anchor that needed to be relatively dark. Not so with CSS; all you need to do is add a class to all anchors that need to be this shade of gray and modify your styles accordingly, with the result seen in Figure 6-4:
BODY {color: black;}
A:link {color: #808080;}      /* medium gray */
A.external:link  {color: silver;}
A:active {color: silver;}
A:visited {color: #333333;}   /* a very dark gray */
Figure 6-4. Changing colors of hyperlinks
This sets all anchors with the class external (<A CLASS="external" HREF="...">) to be silver, instead of medium gray. They'll still be a dark gray once they've been visited, of course, unless you add a special rule for that as well:
BODY {color: black;}
A:link {color: #808080;}      /* medium gray */
A.external:link  {color: #666666;}
A:active {color: silver;}
A:visited {color: #333333;}   /* a very dark gray */
A.external:visited {color: black;}
This will cause all external links to be medium gray before they're visited and black once they've been visited, while all other links will be dark gray when visited and medium gray when unvisited -- as Figure 6-5 makes clear.

Figure 6-5. Setting different colors for different hyperlink classes
This sort of thing simply isn't possible with the old BODY attributes. Furthermore, if you're going to use the BODY attributes, you have to define them in each and every document. If you ever decide to change those values ...well, you have a lot of files to edit, don't you? On the other hand, if you set up these colors as an external style sheet, and then link all of your pages to the style sheet, then you only have to edit one file in order to change the text colors of every last one of your pages.
6.1.1.2. Affecting borders
The value of color can also affect the borders around an element. Let's assume that you've declared these styles, which have the result shown in Figure 6-6:
P.aside {color: gray; border-style: solid;}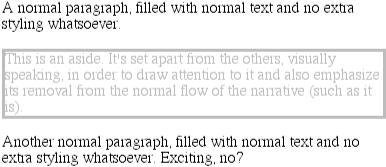
Figure 6-6. Border colors are taken from the content's color
This will result in the element <P CLASS="aside"> having gray text and a gray medium-width solid border. That's because the foreground color is applied to the borders by default. The basic way to override that is with the property border-color:
P.aside {color: gray; border-style: solid; border-color: black;}This will make the text gray, but the borders will be black in color, as we can see from Figure 6-7. Any value set for border-color will always override the value of color.
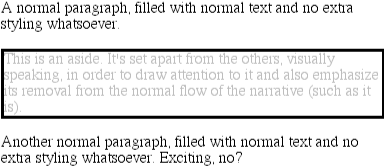
Figure 6-7. Overriding the default border color
It's in the borders, incidentally, where you can have an effect on the foreground color of images. Since images are already composed of colors, you can't really affect them using color, but you can change the color of any border that appears around the image. This can be done using either color or border-color. Therefore, the following rules will have the same visual effect on images of class type1 and type2, as shown in Figure 6-8:
IMG.type1 {color: gray; border-style: solid;}
IMG.type2 {border-color: gray; border-style: solid;}
Figure 6-8. Setting the border color for images
Border colors, and borders in general, are all discussed in much greater detail in the Chapter 7, "Boxes and Borders".
6.1.1.3. Inheriting color
By this time, you may have guessed that color is inherited, and you're right. This makes good sense, since if you declare P {color: maroon;}, you probably expect that any text within that paragraph will also be maroon, even if it's emphasized or boldfaced or whatever. Of course, if you want such elements to be different colors, that's easy enough, as illustrated by Figure 6-9:
P {color: maroon;}
EM {color: #999999;}
Figure 6-9. Different colors for different elements
Thanks to the inheritability of color, it's theoretically possible to set all of the ordinary text in a document to be a color such as red by declaring BODY {color: red;}. This should cause all text which is not otherwise styled (such as anchors, which have their own color styles) to be red. This should not affect elements such as horizontal rules ( HR ) or images. However, early versions of Explorer did inherit colors onto HR elements, while they didn't allow the colors to inherit onto form elements. This is more of a problem with inheritance than it is with color, but unfortunately the problem is still there. In fact, even today it's possible to find browsers that have predefined colors for things like tables, which prevent BODY colors from inheriting into table cells:
BODY {color: red;}
TABLE {color: black;}
That's because the combination of your style, and the browser's built-in styles looks like Figure 6-10.
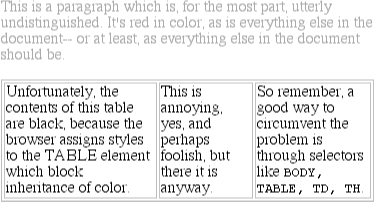
Figure 6-10. The result of combining author styles and browser styles
Since there is a color value defined by the browser for TABLE elements, it will take precedence over the inherited value. This is annoying and unnecessary, but it is an obstacle to be overcome. You can overcome it (usually) with selectors that list various table elements. For example, in order to get all your table content to be red along with your document's body, try this:
BODY, TABLE, TD, TH {color: red;}This will often solve the problem. I say "often" because it doesn't always work, for reasons that are poorly understood. Navigator 4 has the most trouble getting it right, but its failures are not consistent. The best minds in CSS analysis have yet to come up with a recipe for predicting Navigator's behavior, unfortunately.
WARNING
Something else to watch out for is Navigator 4's handling of values for color that it doesn't recognize. If Navigator 4 encounters an unknown word (such as invalidValue) somehow, through mechanisms known only to itself, it actually arrives at and uses a color. It doesn't do so randomly, exactly, but the effect is practically the same. For example, invalidValue comes out as a dark blue, and inherit, which is a valid value under CSS2 but not CSS1, will come out as a really awful shade of yellow-green. This is not correct behavior, but you'll need to remember it as you write your styles.
6.1.1.4. Affecting form elements
Setting a value for color should (in theory, anyway) apply to form elements. As Figure 6-11 proves, declaring SELECT elements to have dark gray text is as simple as this:
SELECT {color: rgb(33%,33%,33%);}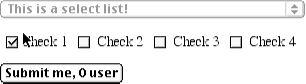
Figure 6-11. Setting color on form elements
You could also set the foreground color of INPUT elements, although as we can see in Figure 6-12, this would have the effect of setting that color on all inputs, from text to radio-button to checkbox inputs:
SELECT {color: rgb(33%,33%,33%);}
INPUT {color: gray;}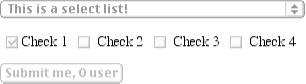
Figure 6-12. Changing form element foregrounds
Note in Figure 6-12 that the text color next to the checkboxes is still black. This is because we've only assigned styles to elements like INPUT and SELECT, not normal paragraph (or other) text.
One limitation under CSS1 is that there isn't a way to distinguish between different types of INPUT elements. If you need to have checkboxes be a different color than radio buttons, then you'll need to assign them classes so that you get the desired result (seen in Figure 6-13):
INPUT.radio {color: #666666;}
INPUT.check {color: #CCCCCC;}

<INPUT TYPE="radio" NAME="r2" VALUE="A" CLASS="radio">
<INPUT TYPE="checkbox" NAME="c3" VALUE="one" CLASS="check">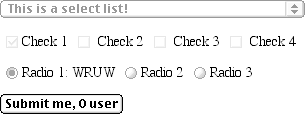
Figure 6-13. Using classes to apply styles to different INPUT elements
In CSS2, it's a little easier to distinguish between different elements based on what attributes they have. As an example, the rules shown here will match the following two INPUT tags, respectively:
INPUT[type="radio"] {color: #333333;}
INPUT[type="checkbox"] {color: #666666;}

<INPUT TYPE="radio" NAME="r2" VALUE="A ">
<INPUT TYPE="checkbox" NAME="c3" VALUE="one ">
This allows you to dispense with the classes altogether, at least in this instance. See the Chapter 10, "CSS2: A Look Ahead", for more details on how this kind of selector works.
WARNING
Navigator 4 does not apply colors to form elements, but setting the colors for form elements does work in Internet Explorer 4 and 5, and Opera 3.5 and later.
6.1.2. Background Color
In a fashion very similar to setting the foreground color, it's possible to declare a color for the background of an element. For this, you use the property background-color, which accepts (unsurprisingly) any valid color.
background-color
- Values
<color> | transparent
- Initial value
transparent
- Inherited
no
- Applies to
all elements
The background is the area of the content box and the padding and is always behind the foreground of the element. Therefore, the declared background color is applied to both the element's content box and its padding, as illustrated in Figure 6-14:
P {background-color: gray;}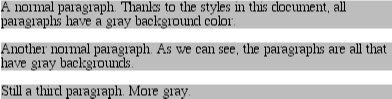
Figure 6-14. Background gray for paragraphs
If you wish the color to extend out a little bit from the text in the element, then you need only add some padding to the mix, with the result shown in Figure 6-15:
P {background-color: gray; padding: 10px;}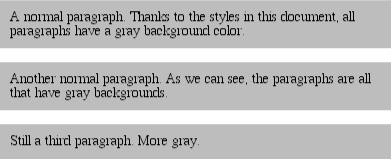
Figure 6-15. Backgrounds and padding
(Padding will be discussed in detail in Chapter 7, "Boxes and Borders".)
The background color of just about any element can be set, from BODY all the way down to inline elements such as EM and A. Even form elements should be affected by the property, although not all user agents can do this correctly. Also, background-color is not inherited. Its default value is transparent , which makes sense; if an element doesn't have a defined color, then its background should be transparent so that the background of its ancestor elements will be visible. Imagine for a moment that the default value were something else, such as silver. Then you would always see something along the lines of Figure 6-16. This could be quite a problem, if that's how browsers behaved! Fortunately, they don't.
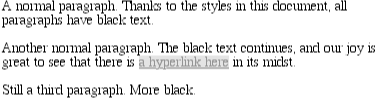
Figure 6-16. Nontransparent backgrounds
Most of the time, you'll have no reason to use the keyword transparent. On occasion, though, it can be useful. Although it's the default value, users might set their browsers to make all links have a white background. When you design your page, though, you set anchors to have a white foreground, and you don't want a background on those anchors. In order to make sure that this happens, you would declare:
A:link {color: white; background-color: transparent;}If you left out the background color, then your white foreground would combine with the user's white background to yield totally unreadable links.
6.1.2.1. Real-world issues
That's pretty much all there is to setting a background color. Well, except for one more small warning: Navigator 4 gets the placement of background colors completely wrong. Instead of applying the background color to the entire content box and padding, the color only appears behind the text itself, as shown in Figure 6-17.
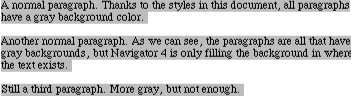
Figure 6-17. Navigator's incorrect behavior
Let me reiterate: this is totally wrong. However, there is a way around it, which is to set a border on the element. You can do this by setting the border the same color as the background color of your document:
BODY {background: silver;}
P {background-color: gray; padding: 1px; border: 0.1px solid gray;}
It is necessary to set a border-style for this technique to work. Whether you use that specific property, or simply a value of the border property, doesn't really matter.
Of course, by doing this, you're setting a border on the element, and that border will show up in other user agents as well. And, just to top things off, Navigator doesn't handle padding very well, so the previous example would result in a small amount of blank space between the content box and the borders. Altogether, it isn't a very pretty picture.
6.1.3. Special Effects
Let's return to the happier realm of how things should work. Thanks to color and background-color, you can create some nice effects. This example is shown in Figure 6-18:
P {color: black;}
H1 {color: white; background-color: rgb(20%,20%,20%);}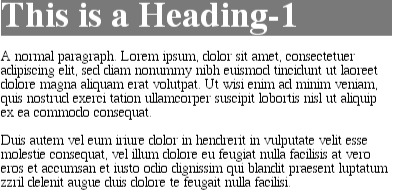
Figure 6-18. A nifty effect for H1 elements
This shows but one example of how displays can be dramatically changed with just a few styles. Of course, there are as many combinations as there are colors, but we can't exactly show them here -- being stuck in grayscale as we are -- however, we'll try to give you some idea of what you can do. Here are a few ideas to get you started.
This is a simple style sheet, as shown in Figure 6-19:
BODY {color: rgb(0%,50%,0%); background-color: #CCFFCC;}
H1, H2 {color: yellow; background-color: rgb(0,51,0);}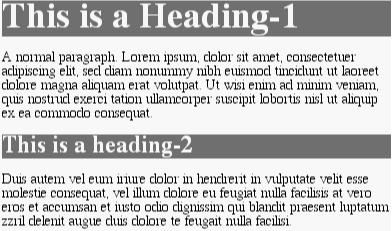
Figure 6-19. The results of a simple style sheet
This style sheet is more sophisticated (shown in Figure 6-20):
BODY {color: black; background-color: white;}
P {color: #333;}
PRE, CODE, TT {color: rgb(50%,50%,50%); background-color: #FFFFCC;}
A:link {color: blue; background-color: yellow;}
A:visited {color: navy; background-color: white;}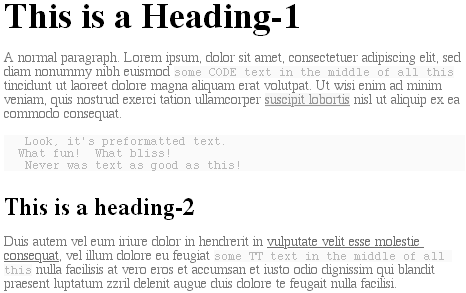
Figure 6-20. The results of a more sophisticated style sheet
This is but the tiniest beginning of what's possible, of course. By all means, try some examples of your own!
6.1.4. Good Practices
You may have noticed that in almost every circumstance, where we set a foreground color, we also set a background color. In general, this is a good idea. Since you don't know what styles a user may have predefined, you don't know how your styles might interact with them. Remember the example where links ended up being white on white? That's the sort of thing we want to avoid.
Let's explore this in a little more detail. Assume the following:
/* reader styles */
BODY {color: white; background-color: black;}

/* author styles */
BODY {color: black;}
Since, in this circumstance, the author's styles will outweigh the reader's styles -- that's how it is under CSS1, anyway -- then the new style sheet for this document will be as follows (shown in Figure 6-21):
/* combined styles */
BODY {color: black; background-color: black;}
Figure 6-21. Black on black
Not exactly readable, is it? Only the hyperlinks are visible, thanks to their default styles. That's why it's always a good idea to combine foreground and background colors in the same declaration. If it's important enough that you declare one, then it's definitely important enough to declare both.
 |  |  |
| 5.7. Summary |  | 6.2. Complex Backgrounds |

Copyright © 2002 O'Reilly & Associates. All rights reserved.