
2.3. Class and ID Selectors
So far, we've been grouping selectors and declarations together in a variety of ways, but for all that, the selectors we've been using are very simple ones. They only refer to document elements, and while that's often just what you need, there are times when something a little more specialized is required.
In addition to raw document elements, there are two other kinds of selectors: class and ID selectors, which allow the assignment of styles in a way that is independent of document elements. These selectors can be used on their own or in conjunction with element selectors. However, they only work if you've marked up your document appropriately, so using them generally involves a little forethought and planning.
Of course, you probably want to know why you should go to the effort. What will it get you? Let's consider a document about the handling of plutonium, in which there are various warnings on things to do (or not do) while working with such a dangerous substance. You want to make each warning use boldface text so that it will stand out from everything else.
However, you don't know what kind of elements these warnings will be. Sometimes there will be a whole paragraph of warning text, but other times there might be a single warning list item out of a lengthy list, or just a given section of a paragraph. In any case, you can't define a rule using simple selectors of any kind. If you did this:
P {font-weight: bold;}then all paragraphs will be bold, not just those that contain warnings. You need a way to only select the paragraphs that are warnings, or more precisely, a way to select only those elements that are warnings.
Another scenario involves ways of styling different kinds of links. You might wish to set a different color for links that point to pages not found on your site. Once more, you can't just write:
A {color: maroon;}because that will select all anchors, regardless of whether they point to pages on your site or off it.
So what we need is a way to apply styles to parts of the document that have been marked in a certain way, independent of the elements involved -- and that's just what CSS gives us.
2.3.1. Class Selectors
The most common way to apply styles without worrying about the elements involved is to use class selectors. Before you can use them, however, you need to modify your actual document markup so that the class selectors will work. Why? Since we aren't going to be selecting according to the elements, we need something else to grab onto. Enter the CLASS attribute:
<P CLASS="warning">While handling plutonium, care must be taken to avoid
the formation of a critical mass.</P>
<P>During this step, <SPAN CLASS="warning">the possibility of implosion is
very real, and must be avoided at all costs</SPAN>. This can be accomplished
by keeping the various masses separate...</P>
In order to associate the styles of a class selector to an element, that element must have the appropriate value set to a CLASS attribute. In the previous code, we've assigned a class value of warning to two elements: the first paragraph and the SPAN element in the second paragraph.
All we need now is a way to apply styles to these classed elements. Here it is:
.warning {font-weight: bold;}That simple rule will have the effect shown in Figure 2-8, when combined with the example markup shown earlier. In fact, given the style sheet shown, the style of font-weight: bold will be applied to any element with a CLASS attribute with a value of warning.
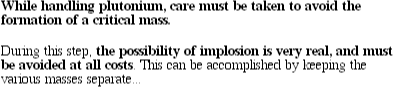
Figure 2-8. Results of using a class selector
As you can see, the class selector works by directly referencing a value that will be found in the class attribute of an element. This reference is always preceded by a period (.), which marks it as a class selector. The period is necessary because it helps keep the class selector separate from anything with which it might be combined -- like an element selector. For example, maybe we only want boldface text when an entire paragraph is a warning. Thus:
P.warning {font-weight: bold;}As you can see in Figure 2-9, only the first paragraph is bold, whereas the text in the second paragraph is no longer bold, because it no longer matches the SPAN element. The simplest way to translate the selector P.warning is like this: "Any paragraph whose CLASS attribute has a value of warning will take the following styles." Since the SPAN element is not a paragraph, the rule's selector doesn't match, and so its text is not made bold.
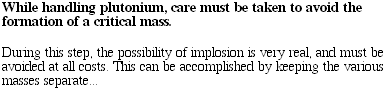
Figure 2-9. Combining a class selector with an element selector
Of course, you could use the selector SPAN.warning to assign different styles to that element. See Figure 2-10 for the results of these styles:
P.warning {font-weight: bold;}
SPAN.warning {font-style: italic;}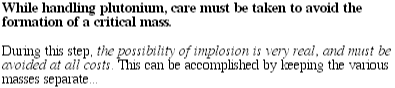
Figure 2-10. Making selectors more specific
In this case, the warning paragraph is boldfaced, while the warning SPAN is italicized. Each rule applies only to a specific type of element-class combination, and so does not "leak over" to other elements.
In addition, you could use a combination of a general class selector and an element-specific class selector to make the styles even more useful, as shown in Figure 2-11:
.warning {font-style: italic;}
SPAN.warning {font-weight: bold;}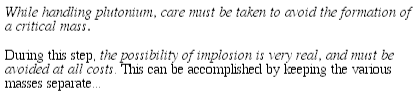
Figure 2-11. Using generic and specific selectors to combine styles
Now we have a situation where any warning text will be italic, but only text within a SPAN element with a class of warning will be boldface as well.
2.3.2. ID Selectors
In many ways, ID selectors are just like class selectors -- but there are a few crucial differences. The first difference is the fact that ID selectors are preceded by an octothorpe (#) -- otherwise known as a pound sign, hash mark, or tic-tac-toe board -- instead of a period. Thus, you might see a rule like this one:
#first-para {font-weight: bold;}This will apply boldface text to any element whose ID attribute has a value of first-para.
That's the second difference: instead of referencing values of the CLASS attribute, ID selectors refer to values found in ID attributes. This likely does not come as a surprise to you. Here's an example of an ID selector in action:
#first-para {font-weight: bold;}

<P ID="first-para">This is the first paragraph, and will be boldfaced.</P>
<P>This is the second paragraph, which will NOT be bold.</P>
As Figure 2-12 shows, the paragraphs are rendered just as the text within describes: the first is boldfaced, whereas the second is not.
Figure 2-12. Using an ID selector
Note that the value first-para didn't have to be applied to a paragraph. It could have been assigned to any element within the document.
2.3.3. Class? ID? What's the Difference?
Up until now, we've been using both class and ID selectors in very similar ways. In effect, we've been using both to usurp the structural nature of HTML, since styles can be applied to any element, regardless of its function in the structure of the document. This is not generally recommended, since one could in theory use class and ID selectors to make any element behave like any other element, which runs somewhat counter to the purpose of HTML as a structural language. But all this aside, what's the difference between classes and IDs?
In the first place, classes may be assigned to any number of elements, as we saw earlier -- the class warning was applied to both a paragraph and some SPAN text, and it could have been applied to many more elements. IDs, on the other hand, are supposed to be used once, and only once, within an HTML document. In this way, they're somewhat similar to the values of the attribute NAME in form elements like INPUT. Each value of NAME should be unique, and so it is with IDs.
TIP
In the real world, browsers don't usually check for the uniqueness of IDs in HTML, which means that if you sprinkle an HTML document with several elements, all of which have the same value for their ID attributes, you'll probably get the same styles applied to each. This isn't correct behavior, but it happens anyway. Note, by the way, that I was careful to say that this is incorrect for HTML documents. Other markup languages may not have the same restrictions on ID values, although there's no way to know that until you actually go look at a given language's specification. In HTML, it is forbidden to have ID values that are identical to other IDs within the same document.
The other difference between class and ID is that IDs carry a higher weight when trying to determine which styles should be applied to a given element. This is explained in greater detail in Section 2.8, "The Cascade", later in this chapter.
Like classes, IDs can also be declared independently of an element, although since they are supposed to be unique anyway, this generally makes less sense. Still, there may be circumstances in which you know that a certain ID value will appear in a document, but not the element on which it will appear, so it is useful to be able to declare standalone ID selectors. For example, you may know that in any given document, there will be an element with an ID value of mostImportant. You don't know whether that most important thing will be a paragraph, a short phrase, a list item, or a section heading. You know only that it will exist in each document, that it will be on an arbitrary element, and that it will appear no more than once in a given document. In that case, you would write a rule like this:
#mostImportant {color: red; background: yellow;}This rule would match any of the following elements (which, as noted before, should not appear together in the same document, because they all have the same ID value):
<H1 ID="mostImportant">This is important!</H1>
<EM ID="mostImportant">This is important!</EM>
<LI ID="mostImportant">This is important!</LI>
 |  |  |
| 2.2. Grouping |  | 2.4. Pseudo-Classes and Pseudo-Elements |

Copyright © 2002 O'Reilly & Associates. All rights reserved.