
2.2. Grouping
So far, things have been pretty simple -- as long as you only want to apply a single style to a single selector, that is. No doubt you'll want to go further than that, though: sometimes you'll want the same style to apply to multiple elements, which means you'll want to use more than one selector, and other times, you'll want to apply more than one style to an element or group of elements.
2.2.1. Grouping Selectors
Let's say you have a document in which both H2 elements and paragraphs should have gray text. The easiest way to accomplish this is to use the following.
H2, P {color: gray;}By placing both the H2 and P selectors on the left side of the rule and separating them with a comma, we've defined a rule where the style on the right (color: gray;) is applied to both selectors. The comma tells the browser that there are two different selectors involved in the rule. Leaving out the comma would give the rule a completely different meaning, which we'll explore later, in Section 2.5.1, "Contextual Selectors".
It is possible to group any number of selectors together. If you wanted to make sure that every element in your document had a color of gray, you might use the following rule:
BODY, TABLE, TH, TD, H1, H2, H3, H4, P, PRE, STRONG, EM, B, I {color: gray;}As you can tell, grouping allows an author to drastically compact certain types of style assignments which might otherwise result in a very long style sheet. The following two alternatives will have exactly the same result, but it's pretty obvious which one is easier to type:
H1 {color: purple;}
H2 {color: purple;}
H3 {color: purple;}
H4 {color: purple;}
H5 {color: purple;}
H6 {color: purple;}
or:
H1, H2, H3, H4, H5, H6 {color: purple;}Grouping can make for some interesting choices. For example, all of the style sheets in the following example are equivalent -- each merely shows a different way of grouping both selectors and declarations -- and any of them will yield the result shown in Figure 2-3:
H1 {color: purple; background: white;}
H2 {color: purple; background: green;}
H3 {color: white; background: green;}
H4 {color: purple; background: white;}
B {color: red; background: white;}

H1, H2, H4 {color: purple;}
H2, H3 {background: green;}
H1, H4, B {background: white;}
H3 {color: white;}
B {color: red;}

H1, H4 {color: purple; background: white;}
H2 {color: purple;}
H3 {color: white;}
H2, H3 {background: green;}
B {color: red; background: white;}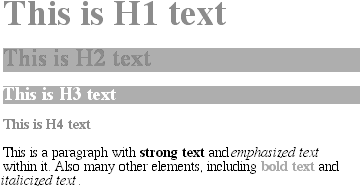
Figure 2-3. The result of equivalent style sheets
2.2.2. Grouping Declarations
Since it is possible to group selectors together into a single rule, it makes sense that you can also group declarations. The importance of using the semicolon to end each declaration becomes even more clear once we consider the fact that there can be more than one declaration in a given rule. This helps keep style sheets compact, organized, and easier to read. For example, assume that you want all H1 elements to have purple text on an aqua background, and use 18-point Helvetica for the font. You could write your styles like this:
H1 {font: 18pt Helvetica;}
H1 {color: purple;}
H1 {background: aqua;}
That's rather inefficient, though -- imagine having to do this for an element to which you're assigning 10 or 15 styles! Instead, you can group your declarations together:
H1 {font: 18pt Helvetica; color: purple; background: aqua;}This will have exactly the same effect as the three-line style sheet shown before, yielding the result shown in Figure 2-4.
Figure 2-4. Grouping declarations
When you group declarations together into a single rule, the semicolons are used to separate the declarations. This is especially important since whitespace is ignored in style sheets, so the user agent (UA) must rely on correct syntax to parse a style sheet. There is nothing wrong with formatting your styles like this:
H1 {
  font:      18pt Helvetica;
  color:     purple;
  background:   aqua;
}
If the second semicolon is omitted, the user agent will interpret the style sheet as follows:
H1 {
  font: 18pt Helvetica;
  color: purple background: aqua;
}
Since background: is not a valid value for color, and also since color can be given only one keyword, the entire statement should be ignored completely. A user agent in this case might incorrectly render H1s as purple text without an aqua background. However, since only a single keyword is permitted for color, the user agent should ignore the entire declaration as being invalid, meaning that you won't even get purple H1s; instead, they'll be the default color (usually black) with no background at all. The declaration font: 18pt Helvetica will still take effect, since it was correctly terminated with a semicolon, but the other styles shouldn't work at all.
TIP
While it is not technically necessary to follow the last declaration of a rule with a semicolon, it is generally good practice to do so. In the first place, it will keep you in the habit of terminating your declarations with semicolons, the lack of which is one of the most common ways to cause errors in rendering. Second, if you decide to add another declaration to a rule, you don't have to worry about forgetting to insert an extra semicolon. Finally, some older browsers such as Internet Explorer 3.x have a greater tendency to become confused if the semicolon is omitted from the final declaration in a rule. My advice is to avoid all these problems and always follow a declaration with a semicolon.
As with selector grouping, declaration grouping is a convenient way to keep your style sheets short, expressive, and easy to maintain. The following example shows two ways of assigning six different styles to H1 elements. The first uses a separate rule for each property, and the second uses declaration grouping to apply all six styles to a single selector. The primary advantage of the second method is that it allows you to change the element to which the styles are applied by editing one selector, instead of six. Either way, though, you'll get the result depicted in Figure 2-5:
H1 {color: gray;}
H1 {background: white;}
H1 {border: 1px solid black;}
H1 {padding: 0.5em;}
H1 {font: 20pt Charcoal,sans-serif;}
H1 {text-transform: capitalize;}


H1 {color: gray; background: white; border: 1px solid black; padding: 0.5em;
  font: 20pt Charcoal,sans-serif; text-transform: capitalize;}
Figure 2-5. With or without grouping, the results are the same
2.2.3. Grouping Everything
All right, so we can group selectors, and we can group declarations. By combining both kinds of grouping in single rules, it is possible to define very complex styles using only a few statements. Let's assume that we wish to assign some complex styles to all of the headings in a document. Thus:
H1, H2, H3, H4, H5, H6 {color: gray; background: white; padding: 0.5em;
  border: 1px solid black; font-family: Charcoal,sans-serif;}
The grouping of the selectors means that the styles on the right side of the rule will be applied to all the headings listed, and the grouping of declarations means that all of the listed styles will be applied to the selectors on the left side of the rule. The result of this rule is shown in Figure 2-6.
This approach is obviously preferable to the alternative, which would start out something like this and would continue for quite a while:
H1 {color: gray;}
H2 {color: gray;}
H3 {color: gray;}
H4 {color: gray;}
H5 {color: gray;}
H6 {color: gray;}
H1 {background: white;}
H2 {background: white;}
H3 {background: white;}
You can write your styles like this, of course, if that's what you really want to do -- but I wouldn't recommend it. The problems you'd face in trying to edit your styles would be almost as bad as if you were back to using FONT tags everywhere!
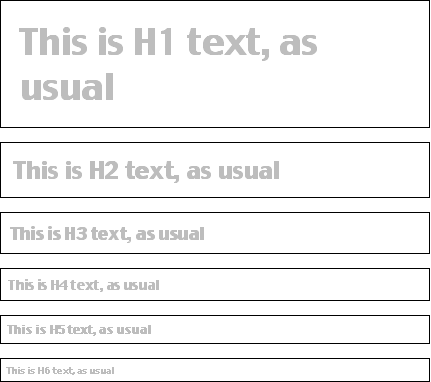
Figure 2-6. Grouping both selectors and rules
It's largely thanks to grouping that CSS files look the way they do. Here is a typical style sheet, with Figure 2-7 showing the result:
BODY {background: white; color: gray;}
H1, H2, H3, H4, H5, H6 {font-family: Helvetica, sans-serif;
  color: white; background: black;}
H1, H2, H3 {border: 2px solid gray; font-weight: bold;}
H4, H5, H6 {border: 1px solid gray;}
P, TABLE {color: gray; font-family: Times, serif;}
PRE {margin: 1em; color: maroon;}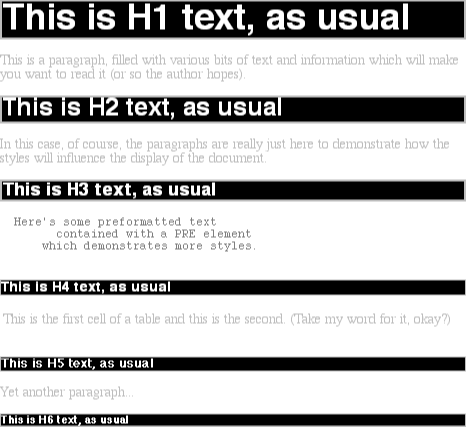
Figure 2-7. The result of a typical style sheet
For all the power and complexity we've introduced, there is even more with regard to selectors. It's possible to add more expression to selectors, and in so doing, apply styles in a way that cuts across elements in favor of types of information. Of course, to get something so powerful, you'll have to do a little work in return, but it's well worth it.
 |  |  |
| 2. Selectors and Structure |  | 2.3. Class and ID Selectors |

Copyright © 2002 O'Reilly & Associates. All rights reserved.