8.4. Making MP3 files
There are three steps to creating MP3 files for Internet distribution:
-
Your first step will often be to save your audio stream into AIFF or WAV format. This typically starts with a compact disc, in which case the raw bits on the CD need to be turned into a computer-recognizable audio format. The process of extracting audio CD data is called ripping. However, you can also encode live audio streams to a raw format, which is typically not ripping but rather recording.
-
The next step is to encode your raw audio stream into the MP3 format. Fortunately, most modern encoding tools handle ripping and encoding all in one step, even if they work in two steps behind the scenes.
-
Optionally, and assuming the user holds the legal copyright to the music in question, you may want to upload your MP3 files to the Internet.
To work with and create MP3 audio, you need:
-
An MP3 ripping/encoding tool
-
An MP3 player so you can audition your MP3s for quality control before adding them to your permanent archive
-
A digital audio file, compact disc, or live audio stream to encode
You'll find an abundance of free MP3 players and encoders online (see Section 8.8, "MP3 resources" later in this chapter for more information).
8.4.1. Encoding MP3 files
Since most encoding is done directly from compact discs, we'll look at that process most closely, but keep in mind that most of these steps apply equally to audio streams coming from pre-existing WAV or AIFF audio files and to live streams. The single most important thing you'll need to keep in mind when encoding is the quality level, or bitrate. Here's a general guideline; a more complete quality comparison chart is shown in Table 8-1 later in this chapter:
-
64 Kbps and below: voice, lectures, streaming over modems
-
96 Kbps: low-fi music or hi-fi voice (such as newscasts)
-
128 Kbps: music files destined for Internet distribution
-
160 Kpbs or 192 Kbps: music files destined for your personal collection
-
256 Kbps or 320 Kbps: files for the most demanding audiophiles -- virtually perfect quality, but much larger files
These bitrates all use the CD-quality 44.1 kHz sample rate, except the 64 Kbps settings and below, which use lesser rates of 22 kHz and 11 kHz, respectively, to achieve adequate compression for the lower bitrates.
In addition, you'll need to decide whether you want to create CBR or VBR files. CBR is constant bitrate and generates files in which every frame has the same bitrate, regardless of the complexity of the passage. Use the list above to determine a CBR setting. VBR means variable bitrate and generates files in which the bitrate is different for each frame. In VBR mode, the bitrate is adjusted dynamically, on the fly, to accommodate the simplicity or complexity of the passage in question. In VBR mode, quality thresholds are set by adjusting a slider from low quality to high quality (much as you would when saving a JPEG image, adjusting the quality level at output time). In VBR mode, a setting of 60% to 80% creates files that sound roughly equivalent to 128 Kbps to 160 Kbps CBR files.
CBR encoding is recommended for general purposes; in our opinion, VBR doesn't actually win you that much, and CBR files are more broadly compatible with a wide range of players and are less prone to glitches and errors. Some encoders create VBR files with track length written to incorrect portions of the file, which really messes up some non-mainstream players and players on other operating systems.
VBR files
Some older MP3 players may not be capable of playing VBR files or may yield inaccurate time/progress indicators. However, most modern players handle VBR files just fine.
8.4.1.1. Working with the CDDB
If you've ever played a CD through your computer, you know that you are presented with only Track 1, Track 2, Track 3, and so on, in the information window and not with the names of the actual songs. Many people don't realize that artist, album, and track names are not on the disc itself. This is where the CDDB (compact disc database) servers come in to play. On the Internet is a collection of servers that provide access to an extremely large database of CD titles. If you run a CDDB-savvy CD or MP3 player or encoder, you have access to the CD database. When you insert a CD, it is identified by a special "hash" number, and a few seconds later, the CDDB returns artist, album, and track names, giving you much more useful information to work with. The main database is at http://www.cddb.com, though there are many mirrors and competing CD database servers out there.
You'll find CDDB lookups so powerful that you probably won't want to use an encoder without this feature. All the encoders featured in this chapter contain CDDB. By using a CDDB-savvy encoder, you can have meaningful ID3 tags (covered later in this chapter) inserted into your MP3 files automatically, rather than having to enter them by hand.
8.4.1.2. Getting started
For the purposes of this chapter, we will encode an MP3 file using two encoders: Xing AudioCatalyst and MusicMatch Jukebox. Xing has long been a pioneer in MPEG encoding, and its encoding algorithms are reliable and popular. In fact, MusicMatch also used Xing's codec in Jukebox until late 1999, when they switched to a slightly faster and better quality codec from Fraunhofer and Thomson. Xing's AudioCatalyst also features faster-than-real-time encoding on modern machines, which is essential if you need to encode live streams. The downside is that you have to pay for the quality and extended features, but the price is modest. However, you can download a trial version of AudioCatalyst at http://www.xingtech.com, so you can try before you buy.
The second encoder we will use is MusicMatch Jukebox, a shareware encoder available at http://www.musicmatch.com. While early versions of MusicMatch were limited in encoding quality until you paid for the upgrade, MusicMatch changed their policy in early 2000; you can now download the free version and get full CD-quality encoding. MusicMatch Jukebox is an all-in-one ripping /encoding / playback/database application, and offers very good encoding capabilities. New users may find MusicMatch a little easier to use than AudioCatalyst, while more practiced users often gravitate toward AudioCatalyst.
Copyright issues
You should be aware that copyright issues are involved when using other people's music. You may legally encode CD tracks of music you have already purchased for your own use. However, you may not post or trade them over the Internet unless you hold the copyright. The Recording Industry Association of America (RIAA) is deeply involved in protecting artists and their copyrighted work from unauthorized distribution on the Internet. You should always be aware of who holds the copyright to a piece of music you intend to distribute. Furthermore, you must receive permission from the copyright holder to post any copyrighted work for distribution (and it's highly unlikely that any label will grant you this permission). For more information about the legalities of MP3, see Section 8.7, "Legalities of MP3" later in this chapter.
8.4.2. Using Xing AudioCatalyst
Encoding tracks from CD with the Xing AudioCatalyst is a straightforward and relatively easy process. The interface is easy to follow, with the features you will use most often arranged in the main window, as shown in Figure 8-8.

Figure 8-8. The most important features in the AudioCatalyst interface, Add from File, Add from CD, Player, and Encode, are all located in the main window.
8.4.2.1. Selecting tracks
When you launch AudioCatalyst, the first step is to select the audio file or files you wish to encode. You can encode files from a hard disk or a CD. If you select Add from CD, a prompt will ask you to select the file or files to add. If you want all the files on a CD, just click Add All. The Add All feature lets you batch-process several tracks or files at once, a handy time-saving feature.
8.4.2.2. Choosing your encoding options
The next step is to select your
encoding options by choosing File ![]() Preferences, as shown in Figure 8-9. The most
important option in this dialog box is the bitrate setting -- use
the guidelines presented earlier to choose CBR or VBR and a quality
threshold. You may also want to take a look at the stereo/joint
stereo/mono options, as described earlier in this chapter. Again, we
recommend joint
stereo for most purposes.
Preferences, as shown in Figure 8-9. The most
important option in this dialog box is the bitrate setting -- use
the guidelines presented earlier to choose CBR or VBR and a quality
threshold. You may also want to take a look at the stereo/joint
stereo/mono options, as described earlier in this chapter. Again, we
recommend joint
stereo for most purposes.

Figure 8-9. AudioCatalyst's Preferences dialog, showing the preferred, default settings: constant bitrate, joint stereo, 128 Kbps.
These default settings have emerged as the general standard with which the majority of MP3 files on the Internet are encoded, though 128 Kbps won't give you fidelity high enough to satisfy demanding listeners. Remember, the size of an MP3 file encoded at 128 Kbps is around 11 times smaller than the original, uncompressed audio file, and maintains a sound quality comparable to CDs. We recommend 160 Kbps for most purposes. Just remember: the higher the bitrate, the better the audio quality and the bigger the file.
8.4.2.3. 128 Kbps Internet standard
The MP3 quality standard that has emerged for general Internet distribution is 128 Kbps, which maintains near-CD quality sound at a 44.1 kHz sampling rate and provides a fairly good quality-to-file-size ratio for Internet delivery. You can use the next higher encoding levels (160 Kbps or 192 Kbps) for your personal collection or the next lower (112 Kbps) if you need lower file sizes. Anything higher than 192 Kbps is overkill for most purposes, and anything lower than 112 Kbps loses the benefit of high fidelity sound. For perspective, consider that one minute of stereo 16-bit, 44.1 kHz CD-quality digital audio is roughly 10 MB, whereas the 128 Kbps encoded MP3 version will occupy less than 1 MB. At this rate, the average 4 1/2 minute song uses less than 4 MB, instead of the over 45 MB needed for the standard, uncompressed 44.1 kHz WAV or AIFF file. At the reduced file size of 128 Kbps, 44.1 kHz MP3 encoding, distributing near CD-quality music over the Internet is attainable and sensible, even when delivered at analog modem speeds. Table 8-1 details the relationship between bitrate, file size, and quality.
Table 8-1. Results of encoding at different bitrates
|
Bitrate (Kilobits per Second) |
Size of Song |
Quality |
|---|---|---|
|
1,411 |
41.3 MB |
CD |
|
192 |
5.6 MB |
Very close to CD quality, indistinguishable for all but the most demanding audiophiles |
|
160 |
4.7 MB |
High quality |
|
128 |
3.8 MB |
Approaches CD quality |
|
112 |
3.3 MB |
Below CD quality |
|
96 |
2.8 MB |
Well below CD quality MP3; "swishiness" almost always present |
|
64 |
1.9 MB |
Acceptable for voice, but not music; very noticeable quality artifacts |
|
32 |
0.9 MB |
Tinny, AM radio quality, lots of artifacts |
|
16 |
0.5 MB |
Shortwave radio quality -- pretty much unusable |
8.4.2.4. Working with ID3 tags
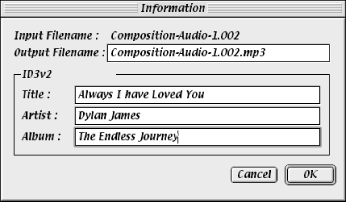
Storing additional information such as title, artist, album, year, comments, and so on, is performed by creating or editing ID3 tags. ID3 tags are bits of information stored within the MP3 file itself and are accessible and editable using most of MP3 players. A good MP3 encoding tool will also offer to store ID3 data within the files it creates as it's running. In other words, ID3 data can be created along with the file, or added or changed later through an MP3 player or with a third-party utility. To have AudioCatalyst store ID3 data, select a file or CD track within the main window and choose Track Information in the edit menu to display the window shown in Figure 8-10. Be sure to check the box next to ID3 in the Preferences window.

Figure 8-10. Use the Track Information window to include output filename, title, artist, and album.
8.4.2.5. CDDB database support
AudioCatalyst includes CDDB support, as described earlier, so you can get meaningful artist, album, and track data for your CDs automatically, and also have appropriate ID3 tag data inserted in your files.
To have AudioCatalyst automatically add the track information for your CDs, select Fetch Track Informationfrom the CDDB menu. AudioCatalyst will then make the connection to the CDDB servers (via your standard Internet connection) and download the relevant information behind the scenes. If you're already online, this happens seamlessly. If you are not yet connected, AudioCatalyst makes the connection for you. Within 2 to 30 seconds (depending on the speed of your connection), your CD track names and play times are updated and can be included with the MP3 files you want to encode.
If you encounter a CD that can't be found in the CDDB (though this is quite rare), you can enter the album, artist, and track names manually and have them uploaded to the CDDB. Once approved by human editors, the listing for that CD will be accessible to others. Be advised that once you enter the information into the CDDB database, the entry becomes the property of CDDB.
Trial download
Trial versions of AudioCatalyst are available for download from Xing's web site at http://www.xingtech.com.
8.4.2.6. Encode
Once you have selected your encoding options, the next step is to rip and encode the file by clicking the Encode button on the main window. You will be prompted to select a folder or a directory to save the encoded files to. AudioCatalyst will encode the file as quickly as it can, limited only by the speed of your computer's processor and by how quickly audio data can be extracted from the CD-ROM drive. Since MP3-encoding is processor-intensive, you should use at least a Pentium running at 75 MHz or better, but using a Pentium II running at 200 MHz or better is ideal and will shorten the time it takes your files to be encoded. AudioCatalyst is currently one of the fastest encoders on the market (but not the fastest as of this writing -- that award currently goes to the commercial Fraunhofer codec, now used in MusicMatch Jukebox). This feature, along with batch and real-time encoding, can make the money spent on the application worth the investment in time saved.
8.4.2.7. Play
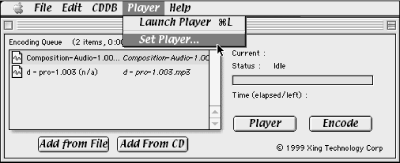
After the encoding is complete, you'll find a new file with an .mp3 extension in the output directory. You can now listen to your MP3 file by clicking the Play button, which launches your MP3 player. Before you select Play for the first time, you must tell AudioCatalyst which player to use; set this setting with the SetPlayer option under the Player menu, as shown in Figure 8-11.

Figure 8-11. Before you can play your new MP3 files, you must click on SetPlayer and select the player you want Audio Catalyst to launch.
8.4.3. Using MusicMatch Jukebox
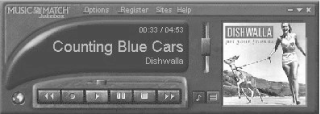
Using MusicMatch Jukebox is similar to using AudioCatalyst, though the interface differs somewhat. MusicMatch is an all-in-one tool that combines all the features you need to create and database your MP3 files. MusicMatch Jukebox also includes a built-in player, whereas AudioCatalyst requires you to install a separate player.
Recorder or encoder?
Though MusicMatch uses the term "recorder," this isn't technically correct. The signal you are working with, whether it comes from CD, a file, or a live stream, has already been recorded. The application really should call this feature "encoder," because that's what it is and does. MusicMatch probably calls it "recorder" just to make things easy for new users, but we feel MusicMatch is doing a disservice to the community by confusing -- not clarifying -- the difference.
To encode to MP3 from MusicMatch, place an audio CD into your computer's CD drive and launch MusicMatch Jukebox. Click the button that says Recorder and the encoding recorder window will appear as shown in Figure 8-12. The tracks on the CD will be listed with track numbers.

Figure 8-12. Click Recorder in the MusicMatch Jukebox interface to enter the encoding section of Jukebox.
8.4.3.1. Selecting tracks
The next step is to select the tracks you wish to encode by clicking the checkbox next to each desired track. You may also select other audio files from your hard drive. When you have finished selecting your tracks, click the Start button found in the upper-right side of the window.
Blame it on the Rio -- and other MP3 hardware
Diamond's Rio player is a compact, portable music player capable of playing MP3 music files downloaded from the Internet or created from a CD or other digital audio source. This type of device signals a new era in personal music listening.
The player is about the size of a deck of cards and roughly the same weight. Even better, it has no moving parts so it won't skip, which is an important feature for people who use portable devices while driving or exercising. Because the device is energy-efficient, a single AA battery will power the Rio for up to 12 hours.
The low-end version of the Rio comes with 32 MB of rewriteable, built-in flash memory that holds about 30 to 35 minutes of 128 Kbps MP3 audio. External flash memory cards can increase playing time and are available where you purchase the Rio.
User accounts of the Rio in action are largely positive. Like the Sony Walkman of old, the Rio seems to be defining a lifestyle. With music moving from disc to chip, the Rio was the first of many players ushering in the new era of file-based music consumption. Samsung, Sony, Fisher, and Sanyo have introduced MP3 players similar to the Rio, as well as a new line-up of other personal home and car audio players.
Another product of interest is called the Personal Jukebox PJB-100 from HanGo, a Korean manufacturer. This product holds over 1,000 hours of music on a 4.5 GB internal hard drive. The beauty of this product is that it not only can it store so much music (roughly 3.2 days of continuous, nonrepeating music, assuming 128 Kbps files), but it also includes other handy features. It features a built-in organizer, which is ID3-ready, allowing easy access and categorization of your music titles from http://www.cddb.com databases, including song title, artist, album, and other information. HanGo's Personal Jukebox, like similar products, includes its own ripping/encoding utility.
Yet another product, the Yamakawa AVPhile 715 player, has taken the concept one step further and included the ability to play back multiple formats of audio and video. Besides playback of MP3 files, this unit will play back DVD, CD, VCD (MPEG-1 video), and SVCD (MPEG-1 supervideo) files. This type of player paves the way for a centralized player that is connected to the Internet and will play all types of media in your home (or anywhere else for that matter).
Beyond these new products, larger companies such as Sony, Sanyo, and Fisher have released next-generation portable and home players. These devices play both MP3 and other, more secure file formats and are destined to be compliant with SDMI (Secure Digital Music Initiative), which will give music retailers a modicum of security against piracy. One such device is the sleek and slender Sony Music Clip. It can hold 64 MB of MP3s (actually, the unit converts your MP3s into the less common but more efficient ATRAC format) and has a futuristic look, like a small microphone or fountain pen. However these product lines continue, the direction has been established. Future MP3 hardware devices will be smaller, play longer, and hold more music than previous generations of this new technology.
8.4.3.2. Specify encoding quality
As with AudioCatalyst, the default values for MusicMatch are 128bit, 44.1 kHz and are the Internet standard for bitrate and quality. However, if your needs differ and you want to increase the quality or decrease the file size, you can alter the bitrate and sample rate accordingly. Again, for personal collections we recommend 160 Kbps or 192 Kbps, 44.1 kHz. For Internet distribution, choose 128 Kbps.
8.4.3.3. Encode
Click the Start
button,
sit back, and wait for a few minutes while the track is encoded to
MP3. When MusicMatch is finished encoding, you will find the new MP3
files named as the originals, with the .mp3
extension added to each newly encoded file. Your files will appear in
your MusicMatch database automatically. You'll find the actual
files in a subdirectory of the MusicMatch installation directory.
It's poor computing practice to store data files alongside
application files, so we strongly recommend choosing a more neutral
location for MP3 output, such as c:\data\mp3.
You can change the output directory via Options ![]() Recorder
Recorder
![]() Songs Directory.
Songs Directory.
8.4.3.4. Play
You may now play your MP3 files. This feature can also be performed within MusicMatch Jukebox. Simply click the Database button found at the bottom of the Recorder window. This will open the Database window. In the upper-left corner, you will see a field that says Add Songs From and prompts you with three choices: CD, Disk, and HTTP://WWW. Click the Disk button. Open the appropriate directory. In this case, the default directory should be C:\Program Files\Brava\MusicMatch Jukebox\Music. Highlight the tracks you want to add to the database; if you want to add more than one track, hold down the Shift or Ctrl key while you select tracks. The database differs from the playlist in that it holds a listing of all available MP3 files, while the playlist holds only the tracks ready to go in the play queue.
When you have highlighted all the tracks you want to add to the database, click OK. The database window will come up again with the list of the tracks you selected. Simply double-click the tracks to add them to the current playlist. When you've finished adding MP3 files to the database, you can hear any of them by clicking the Play button.
8.4.3.5. CDDB database support
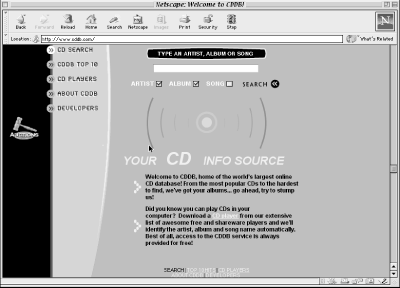
Also included in MusicMatch is CDDB support, as described earlier in this chapter. This option allows you connect to the online CD database at http://www.cddb.com, as shown in Figure 8-13, to automatically include artist, album, and track information with your encoded files. This feature is a great time-saver because it relieves you from having to locate and enter the appropriate track information for each track on a given CD.

Figure 8-13. The CDDB web site features track information for a variety of CDs from around the world.

Copyright © 2002 O'Reilly & Associates. All rights reserved.


