
8.3. Playing MP3 files
Later in this chapter, we will discuss how to encode, upload, and broadcast MP3 files, but first let's take a look at two of the most common playback software applications: Nullsoft's Winamp[1] for Windows and SoundJam for Mac OS. Both are downloadable shareware or freeware applications with a familiar, CD player-like interface, and graphic equalizers. The Winamp interface is shown in Figure 8-1.
[1]Nullsoft is now owned by AOL.
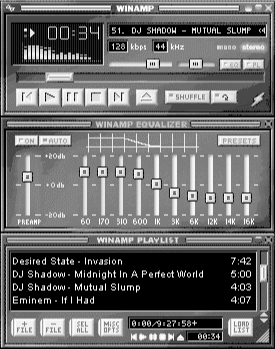
Figure 8-1. The Winamp interface is similar to standard CD player interfaces.
First, you need to download the Winamp
(http://www.winamp.com) or the SoundJam player
(http://www.soundjam.com) and one or more MP3
files from the Internet (see Section 8.8, "MP3 resources" later in this chapter for a listing of good MP3 sites). Thus
playing your files will be as easy as pulling down File ![]() Open
in Word or dragging a file onto an application window.
Open
in Word or dragging a file onto an application window.
Winamp consists of four separate modules: the player interface, a graphic equalizer, the playlist window, and a mini-browser. The first time you start Winamp, all four windows are grouped in a neat square, but you can grab any module and position it anywhere on your screen. You can also close or minimize the modules with the standard top-right-corner controls. To play back an MP3 file, just drag it from the desktop or Explorer into the Winamp window, or tap the L key to access a Windows file panel. You can also click the Open button on the Winamp interface. Alternatively, drag any folder containing MP3 files onto Winamp to play all the files in that folder sequentially. That's all well and good, but to start having real fun, you need to start working with the playlist window.
Winamp tip
To minimize the amount of real estate Winamp takes on your desktop, double-click in the title bar of any of the Winamp modules. They'll immediately roll up into a thin, horizontal strip showing just enough controls to operate the player. This is known as the "Window Shade" mode.
8.3.1. Playlists
One of the most powerful aspects of maintaining a file-based digital music collection is that you can mix and match tracks at will. If you've ever made custom cassette tapes, you know how time-consuming it can be. But because playlists simply reference the locations of arbitrary tracks scattered around on your machine (or on the Internet), you can create custom "sets" within your collection quickly and easily.
The easiest way to create a playlist in Winamp is to drag and drop your MP3 files onto the Winamp icon or into the open playlist window. There is no limit to the number of MP3 files you can add, and you may even drag and drop entire folders.
Another alternative is to simply press the L key on your keyboard, which brings up a Windows file panel (you can also load in a whole directory, including subdirectories, or a URL from the Internet -- right-click on the Add button to access these options). Repeat this step as often as you like, and reorder your playlist in whatever manner you choose -- either by selecting and dragging entries up or down in the list or by selecting Sort with a right-click on the Misc button (you can then sort by title, filename, or path, or reverse or randomize the list). Figure 8-2 shows a Winamp playlist containing several songs. Be sure to experiment with each of the buttons at the bottom of the playlist window; these allow you to add, remove, sort, and organize your playlist in various ways. Try right-clicking the buttons for additional options.
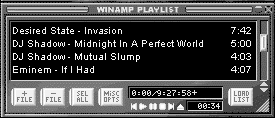
Figure 8-2. The Winamp playlist has multiple songs in its queue, ready to play in the order in which they appear in the playlist.
When you're finished arranging your playlist, save it by selecting Save Playlist (Ctrl-S) from the List Opts button. If you want to replay that particular playlist at another time, just choose Open Playlist (Ctrl-O) from the List Optsbutton, or double-click or drag a playlist file onto the player or into the list window.
If you want to save your current playlist to an HTML document for
future reference or to show other people what you're listening
to, right-click the Misc button and select Misc ![]() Generate HTML
Playlist. A non-linked playlist will be launched in your preferred
browser. To save the list, just pull down File
Generate HTML
Playlist. A non-linked playlist will be launched in your preferred
browser. To save the list, just pull down File ![]() Save in your
browser.
Save in your
browser.
If you accepted all of the default options during Winamp installation, you can also right-click on MP3 files on the desktop or in Explorer and choose "Enqueue in Winamp." This adds the selected track or tracks to the end of the current playlist.
8.3.2. Basic MP3 player controls
Now that you have your files queued up, you're ready to play some music. Most MP3 players feature a standard set of CD-like controls for start, stop, rewind, fast forward, and so on. Figure 8-3 shows Winamp's set of controls. Right-clicking Winamp's control buttons reveals additional controls. For example, right-click on the fast forward or rewind button, and you can move to the next or previous track, advance or rewind the track five seconds, or jump to the beginning or end of the playlist. In the main interface, you'll find displays and controls for total elapsed time, basic spectral analysis, bitrate, stereo balance, volume, and repeat modes.
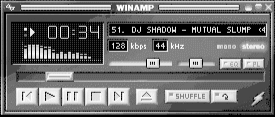
Figure 8-3. Use Winamp's basic controls to play, pause, stop, and shuffle your MP3 files.
8.3.3. Using the equalizer
The graphic equalizer is similar to other graphic equalizers you may have used. Each slider represents a frequency range, from 60 Hz (bass) on the left to 16 kHz (treble) on the right. The slider's values can be set to -20 dB at the bottom to +20 dB at the top. The best way to understand the equalizer may be to think of the bass and treble controls on your home stereo -- these sliders operate similarly but slice up the frequency spectrum into much finer cross-sections.
Since MP3 encoders effectively remove most of the original digital audio information, many MP3 files may exhibit a "hollow" or "swishy" sound. It is true that equalizers can help to boost or cut levels to defeat some of the hollow sound and to allow for a more personalized listening environment. However, the real purpose of equalization is to compensate for less than optimal speaker placement, room dynamics, speakers, and frequency response from any of your equipment, or in some cases, poor original recordings. Equalization cannot be used to entirely defeat the swishy or warbly effect found in poorly encoded MP3s.
Always take care when playing with equalizers. Many novices immediately pump up the bass and high frequencies to get a brighter, punchier sound. This, however, seldom accomplishes much beyond creating a sound that's untrue to the original source. The goal of equalization, and the goal of any audiophile, is to achieve fidelity, or truthfulness in sound. Just as a brighter light is not necessarily a better light, a brighter sound is not necessarily better sound. Approach equalizers with care, and make small adjustments. Live with your changes for a while and listen to them carefully. Audiophiles rarely use equalizers except to compensate for awkward room dynamics or poor speakers and speaker placement. A popular equalization pattern is shown in Figure 8-4 where both the bass and the treble tones are boosted slightly to create a more full range of sound for an MP3 file. This curve is sometimes referred to as the "Fletcher-Munsen" curve and is similar to what you get when you press the Loudness button on your home stereo. The effect is to enhance frequencies that aren't easily heard at low volumes. If you're listening to your MP3s at normal or loud volumes, you won't need this curve. In any case, experiment with the equalizer controls, and you'll quickly find your own preferred settings for different types of music. The equalization curves you're happy with can be saved for future use by clicking the Presets button and selecting Save.
Winamp comes bundled with several preset equalization patterns, from
Classical to Techno. Click on the Preset button at the top right and
choose Load ![]() Preset from the pop-up menu.
Preset from the pop-up menu.
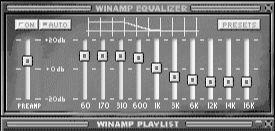
Figure 8-4. This graphic equalizer pattern balances the bass and treble frequencies slightly to create the illusion of a fuller sound to MP3 files.
8.3.4. Skins
Most MP3 players, including Winamp, allow the user to make cosmetic and functional enhancements by way of third-party plug-ins and "skins." Skins are the equivalent of wallpaper on your PC; they are bitmaps cut to the dimensions of each component of the MP3 player. Taken together, these custom bitmaps exactly fit the dimensions of the player, hence the name "skin." Designing skins for Winamp and other players is something of a cottage industry with thousands of skins available from various web sites. Check out us web sites. Check out us web sites. Check out http://www.winamp.com/skins for starters.Figure 8-5 shows four examples of skins.
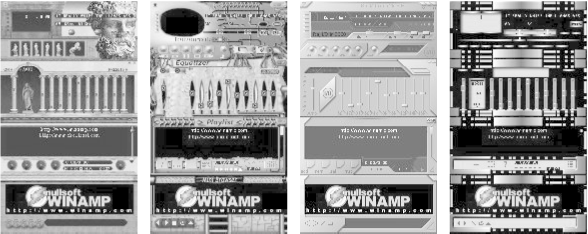
Figure 8-5. Skins featuring Star Wars, Titanic, X-Files, and Star Trek's Enterprise are just some of the endless patterns that you can create for your MP3 player.
While most popular MP3 players have their own skin format, the Winamp skin format is by far the most popular. Winamp skins can be used by non-Winamp players and are not restricted to Windows users. Popular MP3 players for BeOS, Mac OS, and Linux can use Winamp skins as well.
To use alternative skins, download them into the Skins subdirectory
of the Winamp installation directory. To access the skin chooser,
right-click any blank area of the Winamp interface and then choose
Skins ![]() Skin Browser, or tap Alt-S.You can
even choose to have Winamp select a random skin at startup. If
you're using an older version of Winamp, you need to unzip your
skins in the Skins directory. Later versions will unzip skins on the
fly, saving you the extra step.
Skin Browser, or tap Alt-S.You can
even choose to have Winamp select a random skin at startup. If
you're using an older version of Winamp, you need to unzip your
skins in the Skins directory. Later versions will unzip skins on the
fly, saving you the extra step.
If you use multiple operating systems that can mount Windows partitions, or multiple players that utilize Winamp skins, you may want to store the skins in a universal directory such as c:\data\skins, rather than keeping them under Winamp's roof.
8.3.4.1. Skin-making tutorial
Making your own skins to use with Winamp or other compatible MP3 players can be fun and easy. Before you begin, there are two things you need:
-
A graphics and imaging application such as Photoshop or Paint Shop Pro.
-
Winamp's skin template. You can download the template after you join their skin developers group at http://www.winamp.com/authentication/join.jhtml. If you'd rather not join, you can use any existing skin just as easily.
Now follow these basic steps:
-
Download and unzip the Skin Template zip file into a new directory located in your Winamp Skins directory. For example, you can call it Winamp/Skins/MySkins.
-
After you have installed the Base Skin, take a look at the files in that directory. There should be a number of cursor (.cur) files, several bitmap (.bmp) files, and a few text (.txt) files. It's important to note that all of these files are optional -- Winamp uses the built-in default files if it finds any pieces of the skin collection missing.
The filenames for the cursor files are fairly self-explanatory. For example, EQTitle.cur is the cursor for the equalizer's title bar. Likewise, normal.cur is the default cursor used in Winamp's main window. The Playlist Editor WindowShade sizing area is referred to as PWSSize.cur. If you have questions about which file is which, try making changes to see where the change takes effect. You will need a third-party utility such as Microangelo (http://www.impactsoft.com) to create custom cursors.
The process of editing the bitmap files can be a bit more complicated. As with the cursor files, the bitmap files are named according to their functions and have the .bmp extension. The file pledit.bmp alters the look of the Playlist Editor. The file eqmain.bmp changes the look of the graphic equalizer, and all the other .bmp files change the look of individual controls of the main controls.
-
To create your skin, open and edit each .bmp file in your graphics editor; be sure to use the same filenames. To be safe, you should save your new skin files to a separate directory -- always keep the same filenames.
-
After you've made changes to the different bitmap files, you'll want to see the changes you've made in action. To do this, either restart Winamp or hit the F5 key to refresh.
-
You can change other aspects of Winamp via the three .txt files included in the Skin template archive. Again, after making changes to these files, be sure to restart Winamp or hit F5 to reload the skin.
The pledit.txt file changes the font and color of the playlist text. The format is:
[Text]
Normal=#00FF00
Current=#FFFFFF
NormalBG=#000000
SelectedBG=#000080
Font=Arial
After the [Text] line, the first line specifies the text color (in hexadecimal values) for unselected entries; the second line specifies the text color for selected entries; the third and fourth lines specify the background colors for unselected and selected entries, respectively. The fifth line, obviously, specifies the font.
The viscolor.txt file has 24 lines, with each line consisting of an RGB triplet and a comment. For example, a line in the file could look like this:
32,37,21, // comment
These 24 lines define the colors used in Winamp's built-in visualizer. The default viscolor.txt is well commented, and will tell you which lines change which colors.
region.txt is for specifying transparent regions in your skin, which lets you create nonrectangular shapes or cut-outs in Winamp's main and EQ windows. Careful editing of this file will let you include the parts you wish to show, and make the rest transparent. Remember, if you have trouble with this or other files, you may simply delete them and the default Winamp settings will be used.
-
When you're finished creating your skins, zip them up and upload them to an Internet skins archive so others can enjoy your creations as well.
8.3.5. Plug-ins
While skins let you customize the appearance of your MP3 player, you can improve or extend the functionality of your player by adding modules to the plug-ins subdirectory. While most MP3 players support plug-ins, not all of them do.
There is a seemingly infinite variety of third-party plug-ins available, but they all fall into a few overarching categories:
-
Input plug-ins allow your player both to play audio file formats that are not built into the player itself and to accept signals from external devices such as keyboards or stereo components.
-
Output plug-ins allow your MP3 player to export signals to other audio file formats.
-
DSP/Effects plug-ins let you apply any number of audio special effects, such as distortion, echo, reverb, and more.
-
Visualization plug-ins, which are perhaps the most popular of the lot, let you "see" your music in displays far more sophisticated and psychedelic than the simple visualizers built into most MP3 players.
In addition, some plug-ins let you do things that aren't easily categorized, such as handling incoming signals from universal remote control units. Visualization plug-ins cover the gamut from 3-D graphics, to spectral analysis, to other exciting visual arrays, some of which are shown in Figure 8-6. If your platform is Be, check out the BeOS skin as shown in Figure 8-7.
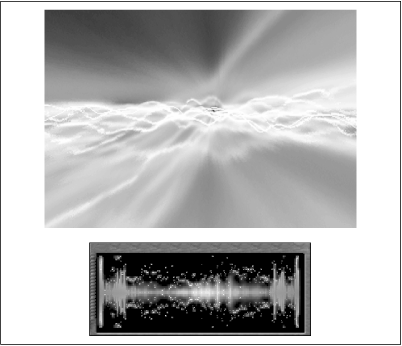
Figure 8-6. A visualization plug-in based on the popular Geiss screensaver module
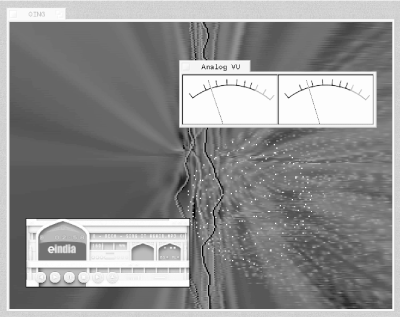
Figure 8-7. SoundPlay for BeOS wearing a Winamp skin and displaying two visualization plug-ins (QING and VU Meter)
Other plug-ins include audio processors, audio input and output modules, and general plug-ins that allow such functions as infrared remote control of your player. One such plug-in even allows control of MP3 playback over a local area network (LAN). Interest in MP3 plug-in development shows no signs of slowing down, which should lead to more and more sophisticated plug-ins and supported devices over time.

Copyright © 2002 O'Reilly & Associates. All rights reserved.


