
6.4. Advanced RealAudio applications
Now that you are familiar with broadcasting prerecorded content, let's explore some of the advanced capabilities of the RealSystem, such as synchronizing media presentations, indexing regions of a large file, broadcasting through firewalls, archiving and delivering RealMedia content with a database, creating RealFlash content, and broadcasting over an Intranet.
6.4.1. Broadcasting through firewalls
When RealAudio first hit the market, many listeners behind corporate firewalls could not receive RealAudio content because all UDP traffic was blocked from their networks. RealAudio, similar to other streaming media formats, uses UDP for bandwidth efficiency. UDP is more efficient because it streams multimedia content without tediously checking for transmission errors. Therefore, in congested networks, UDP tends to step on TCP traffic. TCP, on the other hand, is designed to throttle back during congestion. Primarily for this reason, most firewalls block UDP traffic.
Thus, RealNetworks has incorporated TCP and HTTP streaming in RealSystem 5.0 for broadcasting through firewalls. TCP and HTTP are better than UDP for broadcasting through firewalls since TCP ports are generally open to allow FTP, HTTP, and Telnet traffic through, and HTTP ports are usually always open.
Make sure your RealServer is not set to multicast delivery only. Enable HTTP Cloaking in the RealServer config file (rmserver.cfg ) located in the application root directory. Open the file and change the value with a text editor.HTTP Cloaking disguises a UDP stream with HTTP headers. With HTTP Cloaking enabled, a player will try to connect with UDP first, then TCP, and finally HTTP Cloaking if the first two methods fail to connect. For live events, RealNetworks uses the following protocols in the following order, which is also the order of decreasing efficiency:
-
Multicast IP
-
UDP
-
TCP
-
HTTP
The process works as follows:
-
First, the user, either via the plug-in or a .ram file, is directed to the RealServer via a TCP connection from within the firewall to the RealServer.
-
Next, the server, via a TCP connection, sends the stream information (header, if you will) to the player.
-
Third, the server sends the stream to the client via the most efficient mechanism, as noted above. If no data is received after a specific amount of time, usually two seconds for the RealPlayer, the player notifies the server and the server streams the content via the next most efficient protocol. This continues until there is no connectivity even via HTTP. The player then gives an error message and stops trying.
If you need to stream audio from behind a firewall to the public Internet, you have two options:
-
Place your server outside the firewall or configure the firewall to ignore traffic to and from your individual IP address.
-
Configure the firewall to map a port or address through the firewall to your server's IP address. You can pass PNM traffic through a firewall using a proxy kit available at http://www.real.com/firewall/index.html.
6.4.2. Creating custom player controls
The RealSystem provides three basic playback choices:
-
Bypass the player interface so that your audio content will begin playing immediately when a user enters a web page.
-
Build the player interface directly into your web page.
-
Use the standalone RealPlayer controls.
Embedding controls into your web page is a visually more attractive option than having another window pop up in front of your content. Individual interactive components, such as a play button or volume slider, can be placed anywhere on your web page, just as you would place an image using the <IMG> tag in HTML. Here is the HTML source for the embedded player controls used in Raspberry Media's Radio CounterCulture page (http://www.counterculture.com), as shown in Figure 6-8:
<OBJECT ID="RVOCX" CLASSID="CLSID:CFCDAA03-8BE4-11CF-B84B-
    0020AFBBCCFA" WIDTH="350" HEIGHT="100" BORDER="0"
    NAME="player">
<PARAM NAME="SRC" VALUE="/ram/radio/003-y2k.ram">
<PARAM NAME="CONTROLS" VALUE="All">
<PARAM NAME="CONSOLE" VALUE="cons">
<EMBED SRC="/ram/radio/003-y2k.ram"
    TYPE="audio/x-pn-realaudio-plugin" WIDTH="350" HEIGHT="100"
    CONTROLS="All" CONSOLE="cons" BORDER="0" NAME="player"></EMBED>
</OBJECT>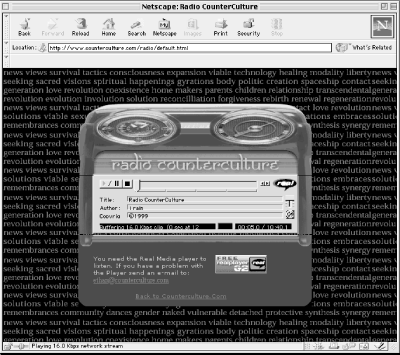
Figure 6-8. The Radio CounterCulture page with embedded RealPlayer controls
The drawback to using embedded controls is that the audio will stop playback when a user leaves the site. Many listeners prefer to listen to audio while they view other web sites. If you want to cater to the "listen while they surf" crowd, you will have to hide the player by embedding the player in a zero height or width frame or by simply not embedding the player in the web page. By hiding the player in a zero height or width frame, you can continue to play the content until the user manually enters a new URL or until a _top or _parent frame target is used.
6.4.2.1. Creating custom controls with JavaScript
With JavaScript, you can use custom graphics to build your own RealPlayer console with unique start, stop, and play buttons. The following JavaScript example, by Nick DelRegno from MCI Enterprise Information Systems, is designed to create a RealMedia interface with customized GIF or JPEG start and stop video playback buttons. (RealSystem G2 offers more customizable controls besides start, stop, and pause, such as volume control.)
Here is the JavaScript and appropriate embed tags necessary to create the customized RealPlayer console:
<head>
<script language=JavaScript>
function PlayClip(clipname)
{
        //alert(clipname);
        if (navigator.appName == "Netscape") {
                document.video.DoStop();
                document.video.SetSource(clipname);
                document.video.DoPlayPause();
        }
        else
        {
                video1.DoStop();
                video1.Source=clipname;
                video1.DoPlayPause();
        }
}
</script>
</head>

<OBJECT ID="video1"
CLASSID="clsid:CFCDAA03-8BE4-11cf-B84B-0020AFBBCCFA"
ALIGN="baseline" BORDER="0" WIDTH="240" HEIGHT="180">
<PARAM NAME="console" VALUE="Clip1">
<PARAM NAME="controls" VALUE="imagewindow">
<PARAM NAME="autostart" VALUE="false">
   <EMBED SRC="empty.rpm" ALIGN="baseline" BORDER="0"
WIDTH="240" HEIGHT="180" NAME="video" CONTROLS="imageWindow"
CONSOLE="Clip1" AUTOSTART="false">
</OBJECT>

<A IMG="image.gif" onMouseOver="PlayClip('pnm://server_name/
filename.rm')"><IMG SRC="imagelocation/start.gif" BORDER="0"
WIDTH="80" HEIGHT="40"></a>

<A onMouseOver="PlayClip('pnm://server_name/filename.rm')">
<IMG SRC="image_location/start.gif" BORDER="0" WIDTH="80"
HEIGHT="40">
</a>
<A onClick="PlayClip('pnm://server_name/filename.rm')">
<IMG SRC="image_location/start.gif" BORDER="0" WIDTH="80"
HEIGHT="40">
</A>
The "Stop, Load Clip, and Start Video" function that JavaScript placed within the header tag allows you to activate the playback of audio and video content based on a user action such as a mouseover or mouseclick. It can also be used with additional scripting to launch audio or video playback based on the time of day, day of the week, or season. You could also use a variation of the code to build a virtual radio or jukebox. It is best to define this function in the header tag.
For an explanation of the JavaScript code, read the descriptions in Table 6-6.
Table 6-6. JavaScript code descriptions
|
Code |
JavaScript Description |
|---|---|
function PlayClip(clipname) |
Defines the function used to initiate playback of the clip. |
|
Tests for Netscape compatibility (Netscape and IE properties are a bit different). |
document.video.DoStop(); |
Stops current clip; does nothing if the current clip has already stopped. |
document.video.SetSource(clipname); |
Sets the source of the player to the value passed into clipname from the calling location document.video. |
document.video.DoPlayPause(); |
Starts the video (since we stopped it before). If used elsewhere when the video is running, it pauses the video. |
} else |
Non-Netscape browser assumed to be IE (for Internet use, further testing may be required; for Intranet use, limited browser assumptions are valid). |
|
Stops current clip; does nothing if the current clip has already stopped. Note slight difference from above. |
video1.Source=clipname; |
Sets the source of the player to the value passed into clipname from calling location. |
video1.DoPlayPause(); |
Starts the video. |
The object tag embedded within the body of the HTML page actually places the player on a web page:
<OBJECT ID="video1"
CLASSID="clsid:CFCDAA03-8BE4-11cf-B84B-0020AFBBCCFA"
ALIGN="baseline" BORDER="0" WIDTH="240" HEIGHT="180">
<PARAM NAME="console" VALUE="Clip1">
<PARAM NAME="controls" VALUE="imagewindow">
<PARAM NAME="autostart" VALUE="false">
   <EMBED SRC="empty.rpm" ALIGN="baseline" BORDER="0"
WIDTH="240" HEIGHT="180" NAME="video" CONTROLS="imageWindow"
CONSOLE="Clip1" AUTOSTART="false">
</OBJECT>
The image tag placed within the body of the HTML page acts like a normal hyperlink, except that when clicked the browser executes the JavaScript function instead of changing page location:
<A IMG="image.gif"
onMouseOver="PlayClip('pnm://server_name/filename.rm')">
<IMG SRC="imagelocation/start.gif" BORDER="0" width="80"
height="40"></A>
The mouseover tag can also be accomplished with an onMouseOver or onClick event handler. onMouseOver activates the player when the mouse is over the link or the link is clicked; however, it is not widely used this way. It is more often used with onClick. Here is the onMouseOver version:
<A onMouseOver="PlayClip('pnm://server_name/filename.rm')">
<IMG SRC="image_location/start.gif" BORDER="0" WIDTH="80"
HEIGHT="40">
</A>
<A onClick="PlayClip('pnm://server_name/filename.rm')">
<IMG SRC="image_location/start.gif" BORDER="0" WIDTH="80"
HEIGHT="40"></a>
A popular way to use a mouseover image to play the audio file is to use a picture of a CD player. Use an image map to define the areas containing the play button and the stop button. Use the JavaScript stop and start commands to activate those regions.
6.4.2.2. Note of caution
This script should work fine for Internet Explorer 3.x or higher and Netscape 4.x and higher. With older browser versions, you may see JavaScript errors and other anomalies, especially if you embed the player within a table.
Internet Explorer understands the <object> with the clsid as an ActiveX object. Since the second embed is within the <object> tag and has no bearing on the ActiveX object, IE ignores it. Netscape understands embed and not ActiveX objects. Netscape understands the <object> tag, but not the identifier, so it ignores it. Instead, Netscape uses the information within the <embed> tag.
Note that the embed text refers to an empty.rpm file. This is truly an empty file created with a simple text editor like Notepad. This is necessary because Netscape uses the MIME information associated with a file extension to determine which plug-in to load. ActiveX objects explicitly define which ActiveX control is to be used. Netscape must rely on the web server to send the MIME information. Since this embed tag is part of a dynamic page, which can load any number of source files, you do not want to explicitly define one source.
Therefore, the empty.rpm allows for the passing of the appropriate MIME information without passing any other information. If you want a default source, you can place a pnm://servername/filename.rm statement within the .rpm file just as you would with a .ram metafile.
6.4.2.3. Embedding custom player controls with RealPublisher
One of the easiest ways to embed custom player controls, such as play, stop, and pause buttons, into a web page is to use the RealPublisher to generate the necessary HTML. The publish function in the RealPublisher grabs the .ram, .rm, and HTML files, edits the links in the HTML and the .ram file, and sends them to their respective locations on your web server. Once you have generated the appropriate HTML with the RealPublisher, you can copy it to any other web authoring application such as Macromedia Dreamweaver. If you upload your new page from another editor, make sure to update the links to the audio files. When you have finished editing your web page, use the RealPublisher to upload the page to the server or to manually change the link names in the RealPublisher-generated HTML yourself.
To properly upload RealPublisher-generated player controls to your web server, use one of three methods:
-
Create your HTML in the RealPublisher, and then publish it to the server.
-
Create your HTML in the RealPublisher, copy and paste it into another HTML editor, and then use RealPublisher to upload the finished web page.
-
Create your HTML in the RealPublisher, copy and paste the HTML into your HTML editor, and then manually edit the links in the RealPublisher-generated HTML to point to the server. Once you have manually changed the links, upload the page with your favorite HTML editor.
6.4.2.4. Playing clips with a hidden control or plug-in
If you want to play RealAudio or RealVideo clips without having a visible plug-in control, hide the control by embedding a plug-in in a page that has its size set to width=2 height=0, and no image will appear on your web page. You can control the plug-in with JavaScript. This example works in both Netscape and Internet Explorer:
<script Language=JavaScript>
function playSource()
{if (navigator.appName == "Netscape")
{document.javaPlug1.DoPlayPause();}
else
{RAOCX.DoPlayPause();}
}
</script
<A HREF="#" onClick="playSource()">
<IMG SRC="button.gif"></A>
<OBJECT ID="RAOCX" CLASSID="clsid:CFCDAA03-8BE4-11cf-B84B-
0020AFBBCCFA" WIDTH="2" HEIGHT="0">
<PARAM NAME="SRC" VALUE="pnm://audio.real.com/welcome.rm">
<PARAM NAME="CONTROLS" VALUE="PlayButton">
<embed src="start.rpm" WIDTH="2" HEIGHT="0"
CONTROLS="PlayButton" NAME="javaPlug1">
</OBJECT>
6.4.3. Indexing RealMedia clips: creating a table of contents
Use an index to make repeat listening of a longer-playing file easier or to point listeners to important content items within an audio clip. An index prevents you from having to break up a contiguous audio file into smaller parts. Short clips do not increase server performance. While short files would make playback more convenient for the listener who wants to jump from section to section, they are a hassle for those who want to listen to the whole program at once. An index is the perfect solution: it helps listeners get the specific information they want and simplifies encoding and cataloging for the developer. With an index, you can present one stream while giving users access to points within the stream.
For example, a one-hour music CD or instructional video could be indexed by utilizing the start and stop tags within a .ram or .rpm file. To create a .ram file for indexing a RealMedia clip, simply add the start and stop parameters to the URL in your metafile as shown below:
pnm://servername.com/yourfile.rm?start=2:23.4&end=2:59.2
Most of the time, these files are preset when the clips are published, but if you enter your start and stop information in a database, you can generate the .ram file on the fly. By doing this, you can place a table of contents on the page with each topic pointing to a .ram file with the appropriate start and stop information. This technique gives you the ability to use one file to provide full-length playback or random (shuffle) play.
Another common technique for indexing files is to use CGI or JavaScript to generate a metafile using a timestamp that you pass to it. The following example is a JavaScript function and the call to the function, provided by Steve McMillen, senior systems engineer for RealNetworks. This example starts a RealVideo or RealAudio clip at a specified time.
In the head part of your HTML document, insert the <script> tag with the following function:
<script language="JavaScript">
function startClip(Clip,Start,End,Title,Author,Copyright) {
// uncomment next two lines or set server in HREF below
// server = 'pnm://yourRealServer.com/'
// Clip = server + Clip;
if(Start == null) Start = '0';
Clip = Clip + "?start=" + '"' + Start + '"';
if(End != null) {
Clip = Clip + "&end=" + '"' + End + '"';
}
if(Title != null) {
Clip = Clip + "&title=" + '"' + Title + '"';
}
if(Author != null) {
Clip = Clip + "&author=" + '"' + Author + '"';
}
if(Copyright != null) {
Clip = Clip + "©right=" + '"' + Copyright + '"';
}
// uncomment following line for testing:
// alert("URL: " + Clip);
if (navigator.appName == "Netscape") {
document.VideoObjName.DoStop();
document.VideoObjName.SetSource(Clip);
document.VideoObjName.DoPlayPause();
} else {
VideoObjName.DoStop();
VideoObjName.Source= Clip;
VideoObjName.DoPlayPause();
}
}
</script>This function pastes together the necessary URL to play a clip, stops the previous clip (if any), sets the source of the plug-in to the new clip, and starts playing at the indicated start time. The server location is included in the call to the function. You can also hardcode the function itself at the indicated location within the function. The only required parameter is the clipname. Use 'null' (notice the single quotes) if there is no value for an argument. clipnameincludes the complete address and filename.
At the minimum, the plug-in should look something like this:
<embed name="VideoObjName" type="audio/x-pn-realaudio-plugin"
width="176" height="144" controls="ImageWindow">
This code will work in both IE 3.0 and greater and Netscape 2.0 and greater. It is strongly recommended that you not put the <embed> tag within a table for cross-platform compatibility.
When you link to the content, call the startClip function, as follows:
<br> <A HREF="JavaScript:startClip( 'pnm://your.realserver.com/
glasr56.rm', '00:00:27.0', '00:00:54.1', null, null, null)"> TimeN
</A>
Or you can use an image and call JavaScript using the onClick function, as follows:
<IMG SRC="button.jpg" onClick=startClip(video1.rm, 00:02:37.0,
    00:03:34.1, null, null, null)>
The downside to this solution is that you are hardcoding your times into the HTML.
6.4.4. Creating RealFlash content
RealFlash is a hybrid file format utilizing the bandwidth-friendly vector animation and image compression of Macromedia Flash with the reliability and superior streaming efficiency of RealNetwork's RealServer. Flash is better suited for short interactive event sounds or sound effects such as buttons and transitions that call for immediate playback. Flash does not reliably stream long-playing audio files or feature sophisticated server-side applications such as bandwidth negotiation, multicasting, or splitting. In contrast, RealMedia is suited for broadcasting long-playing media files over short interactive sounds. Thus the marriage of the two formats into RealFlash results in the ideal solution for interactive presentations with audio files of several minutes or longer in length.
To broadcast RealFlash, you need to purchase an extra license from RealNetworks. For specific pricing information, visit http://www.real.com. For more information about Flash, see Chapter 10, "MIDI: Quick and Easy Audio for the Web".
For some of the most cutting edge RealFlash content, such as riding a motor scooter through Montmartre on a virtual web tour of Paris (shown in Figure 6-9), visit http://www.shockwave.com/.
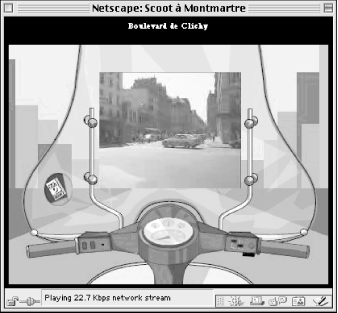
Figure 6-9. The Club Internet RealFlash motor scooter tour of Montmartre in Paris with a RealVideo window embedded in a Flash animation screen
To create your own RealFlash content, build a multimedia presentation in Macromedia Flash, and then export the animation as a Shockwave movie file and the streaming audio portion as a separate AVI video file. Use the RealNetworks tools to convert the Flash video file into the RealAudio format. Your final RealFlash presentation will consist of two files:
If you are using RealSystem G2, read the RealFlash G2 section in Chapter 7, "Designing Multimedia Presentations with SMIL and RealSystem G2".
To properly export your Flash animation file, follow these steps:
-
Open the Flash file in Macromedia Flash, and select File
 Export Movie.
-
In the dialog box, choose .swf as the file type. Make sure to type the .swf extension at the end of the filename before clicking OK.
-
From the Export Shockwave Flash dialog box, set JPEG quality to 50 or less.
-
From the Audio Steam and Audio Event drop-down boxes, choose Disable to turn off the Flash Audio tracks.
-
Click OK to create the animation-only Shockwave file.
To create a RealAudio file, follow these steps:
-
With the same Flash file still open, select File
Export Movie.
-
In the dialog box, choose AVI as the file type. Make sure to use the .avi file extension in your filename.
-
In the Export Windows AVI dialog box, select dimension 32 x 32 regardless of the movie's true dimensions. Click OK to create the AVI file. This minimizes file size and creation time.
-
Open the RealEncoder or RealPublisher and choose File
Open
Session.
-
On the Source panel, click File and add your AVI file to the list box. On the Destination panel, click RealMedia and specify an output filename with the .rm extension. Click OK.
-
In the Templates panel, click Advanced and deselect video. Then select an audio codec. This tells the encoder to save only the synchronized audio portion of the AVI file.
-
Enter a template name and click Save. Then click Close.
-
In the Templates panel, click Start to create your audio file, and you are ready to go with RealFlash.
Once you have created the .swf and .rm files necessary for a RealFlash presentation using the RealSystem 5.0, your web pages will need to link to the appropriate metafile, which in turn points to the DNS name or IP address of the computer on which your RealServer and RealMedia files are located.
For a RealFlash Animation metafile, you should combine the audio filename with the RealFlash filename by using the plus (+) sign, as follows:
pnm://www.server1.com/hello.rm+hello.swf
One of the challenges to creating RealFlash presentations is optimizing the bandwidth consumption of the separate audio and animation files. You can optimize your RealFlash media with the RealFlash Bandwidth Tuner. The Bandwidth Tuner is included in the RealFlash Content Creation Kit for Windows and is designed to graphically analyze and adjust the bandwidth consumption of a RealFlash presentation. The utility, swftune, optimizes or tunes "audioless" Shockwave Flash files and allows the user to compare and adjust bitrate and buffering time for an optimal balance.
To broadcast RealFlash, you need a RealServer to perform the synchronization of the RealAudio track (.rm) and the Flash animation (.swf ). Additionally, the two datatypes are married together using a URL syntax not recognized by web browsers:
pnm://server.domain.com/realaudio.rm+realflash.swf
6.4.5. Creating synchronized RealAudio presentations with RealSystem 5.0
While synchronized media is easier to create and broadcast with the newer multimedia-enhanced RealSystem G2, many web producers still use RealSystem 5.0 due to pre-existing infrastructure constraints and the number of viewers with older RealAudio plug-ins. If you are not already using RealSystem 5.0 or are not tied to 5.0 for a compelling reason, we recommend you use G2's SMIL, RealPix, and RealText to create and broadcast synchronized media presentations.
If you are using RealSystem 5.0, there are two basic options for creating real-time multimedia presentations with fast forward, rewind, and pause controls:
-
You can use the Cevents utility to create a binary event file for synchronizing web pages with audio. (RealAudio 3.0)
-
You can create an output presentation file using the RMMerge.exe tool to synchronize RealAudio content. (RealAudio 4.0 and 5.0)
Next, we look at how David Dadekian from Internet News Services used RealAudio to produce a guided tour of the TV Guide Entertainment Network.
At an All-Star Game Fan Fest, News Corp. hosted a booth to educate people about its media presence on the Web. News Corp. developed a RealAudio-guided tour for large screen video display to promote their various web site properties such as TV Guide Entertainment Network. RealAudio, combined with the Cevents command-line tool included in the RealServer package, provided a simple solution.
By simply adding an extra Cevent text file containing all the URL links and their time specifications into the same directory as the .ra file, Dadekian quickly generated an audio-visual guided tour.
To create your own 12-page guided tour, follow these three steps:
-
Create a text file containing the written display time for each page in the tour. With a standard text editor, create an input file with a total of 12 lines of text specifying the display time for each URL in the tour. For example, the first line specifies the start time for the URL, http://www.tvguide.com, at seconds and the end time at 30 seconds. The next line specifies a new URL at a start time of 31 seconds and an end time of 60 seconds, and so forth. Repeat this process for all 12 pages. See the tvgentour.txt example text file below.
You can also add comment lines to the .rae (RealAudio Event) file by beginning them with the # symbol:
#u <starttime> <endtime> <URL>
#i <starttime> <endtime> <Title>
#a <starttime> <endtime> <Author>
#c <starttime> <endtime> <Copyright>
u 00:00:00.0 00:00:29.9 http://www.tvguide.com/index.sml
u 00:00:30.0 00:00:59.9 http://www.tvguide.com/tv/
u 00:01:00.0 00:01:29.9 http://www.tvguide.com/tv/listings/
u 00:01:30.0 00:01:59.9 http://www.tvguide.com/tv/listings/
    editions/ny/g10.sml
u 00:02:00.0 00:02:29.9 http://www.tvguide.com/tv/listings/
    editions/ny/quickpicks.sml
u 00:02:30.0 00:02:59.9 http://www.tvguide.com/tv/listings/
    editions/ny/search.sml
u 00:03:00.0 00:03:29.9 http://www.tvguide.com/tv/watch/
u 00:03:30.0 00:03:59.9 http://www.tvguide.com/tv/circuits/
u 00:04:00.0 00:04:29.9 http://www.tvguide.com/area52/
u 00:04:30.0 00:04:59.9 http://www.tvguide.com/soapdish/
u 00:05:00.0 00:05:29.9 http://www.tvguide.com/movies/
u 00:05:30.0 00:05:59.9 http://www.tvguide.com/movies/
    database/
This code launches a browser window external to the player. While this code is suitable for using with the standalone RealPlayer, it won't work when the player is embedded in a web page. This code causes the web browser to load the synchronized web page, changing away from the web page with the embedded Player. If the player is embedded, embed the player in one frame and leave a large secondary frame for the synchronized content. Point the events at the secondary frame by appending &&secondary_frame_name&& to the front of the URL.
-
Convert the text file to a Cevent file. To create a RealAudio Event file, run the cevent32.exe program in the raencode directory from a DOS prompt (command line). For example:
cevent32 tvgentour.txt tvgentour.rae
-
Upload your RealAudio (.ra) and RealAudio Event (.rae) files to the RealServer.For example,after creating the Cevent file, Dadekian uploaded a six-minute .ra file along with the .rae file to the same directory on the RealAudio Server. When a .rae file is placed within the same directory as the corresponding .ra file on the RealServer, the server default setting is automatically configured to recognize the .rae file (pnmn://av.newscorp.com/tvtour.rae).
When a user accesses the guided tour, the server goes to play the tour.ra file but notices there is a tour.rae file in the same folder. As the RealAudio Event file plays, it triggers the web browser to display web pages at the proper times.
RealAudio 5.0 uses the RMMerge tool to generate timeline files. To create a synchronized media presentation with RealAudio 5.0, follow these two steps:
-
Using a text editor, create an input events file specifying the display time for each URL, title, author, or copyright.
-
After creating a text version of the input events file, generate an output presentation file. This is done with the rmmerge.exe tool that comes with RealEncoder 5.0 and RealPublisher 5.0. For more information, see the RealAudio 5.0 Content Creation Guide at http://www.realaudio.com.
To find out more about synchronized presentations with SMIL, read Chapter 7, "Designing Multimedia Presentations with SMIL and RealSystem G2".
6.4.6. Database management and tracking of RealAudio content
If you have hundreds or thousands of RealMedia files, archive management becomes a difficult issue. One method for archiving and managing RealAudio content is to store the .ram and .rpm text files in a database. Since .ram and .rpm files are text-based, they can be generated by Java servlets or CGI scripts.
A database can also be useful for implementing a variety of interesting applications besides simply organizing your content. For example, with Cold Fusion from Allaire you can select a particular .ram file in a tree and then execute it according to the day of the week or a particular category selection made by a user. Further, MCI's Nick DelRegno reports that their database is tied to their live scheduling system to dynamically return live events upon request and generate the appropriate .ram or .rpm file for the user.
Larry Bouthillier, head of multimedia production at Harvard Business School, recommends building a database of all the metadata of your content, including title, filename and path, servername, start time, end time, and so on. A Java servlet can then be used to piece together a .ram file-type string and return it to the browser with the appropriate MIME type header.
One good thing about having all the metadata in a database is that you can make a web form that enters new entries into the database. According to Bouthillier, "Creating a new video clip is as easy as filling in the filename, start and end times, and saving it to the database. You also have the beginnings of a primitive online video editing system."
For more on Java servlets, see Java Servlet Programming by Jason Hunter (O'Reilly, 1998).
6.4.7. Load balancing
If you need to deliver simultaneous streams to a large audience, consider clustering several servers together. In order to set up a cluster of RealServers to handle the load of RealPlayer file requests, you should use a Perl script to manage load balancing, according to Kim Ayers, software engineer for RealNetworks. The following Perl script, written by Rob Bowden, can be used to balance the load across multiple RealServers:
#!/usr/bin/perl
# usage:
http://www.webserver.com/cgi-bin/load?anything.rm
#@ip = ( 'server1', 'server2', 'server2', 'server2', 'server3' );
#$content = $ENV{'QUERY_STRING'};
srand($$ + time);
$count = int(rand($#ip + 1));
print "Content-type: audio/x-pn-realaudio\n\n";
print "pnm://$ip[$count]/$content\n";
To get the Perl script up and working, follow these steps:
-
Put the Perl script in the cgi-bin directory of a web server.
-
Make the content link point to this script with the argument being the requested content. For example:
http://www.webserver.com/cgi-bin/load?anything.rm
Note that the Perl script is called load.pl but the .pl suffix is not included because the RealNetwork's web server is configured to recognize Perl scripts in its cgi-bin. The argument following the "?" is the name of the content.
-
When the link is hit, the script returns text that combines a server chosen randomly from the list of servers specified in load.pl with the content name.
In the code above, the ip array contains five elements:
ip[1] = server1
ip[2] = server2
ip[3] = server2
ip[4] = server2
ip[5] = server3
Using this list, server1 will get 20% of the load, server2 will get 60%, and server3 will get 20%. By adding multiple entries, you can obtain any prescribed balance.
You can easily modify this Perl script to randomly select RealAudio clips. For example, if you want visitors to your site to be able to listen to a different audio file each time they visit a particular page, you could modify the Perl script to randomly call 1 of 10 files.
Another method of load balancing is the use of a hardware-based solution like the Local Director from Cisco. For example, MCI achieves load balancing by having several servers, whose content is fully replicated among them, sitting behind a Local Director router. Whenever a request hits the router, it routes the TCP connection to the machine with the lowest load. This hardware load balancing is completely transparent to the user and allows for greatly improved fault tolerance, reliability, and the ability to easily take systems out of service for maintenance by migrating traffic off of the server in question. In the wide area, MCI is using a similar system, aptly called Distributed Director, to route the request to the closest cluster.
Now that you have explored some of the advanced capabilities of the RealSystem, let's take a look at one of the more popular advanced applications: live broadcasting.
 |  |  |
| 6.3. Professional webcasting |  | 6.5. Live broadcasting with RealAudio |

Copyright © 2002 O'Reilly & Associates. All rights reserved.