
4.3. Web mastering: optimizing sound files for Internet broadcasting
Mastering refers to the process of preparing a group of sound files (i.e., music tracks of a CD) for final delivery in one uniform manner, medium, and level of quality. This means that each sound file has little unwanted noise and shares the same relative decibel (volume) levels and equalization characteristics with the rest of the audio files.
The practical reason for mastering groups of sound files is to prevent people from having to continually adjust the volume and equalization settings of their sound system or computer each time a new song or sound passage is played. For example, it is generally undesirable to have one song where the bass guitar frequencies stand out in the mix and another song where the bass frequencies are relatively quiet. Nor would you want to have one voice-over track significantly louder than the following voice-over track. Mastering helps to balance each song and sound file so the mix or web soundtrack is consistent. Mastering also disguises the sonic variation between songs that may have been recorded in different environments or recording studios.
Mastering for the Web is the final optimization process before converting sound files to their respective web formats. The main web mastering tools you'll work with are normalization, compression, and equalization. Achieved with a sound editor, normalization helps guarantee that your files share the same relative loudness and optimal dynamic range for web conversion. Additional compression of the sound file with a compressor or peak limiter effect ensures the highest fidelity when converting to low-bandwidth formats with reduced bit-depths and sampling rates.Equalization (EQ) ensures the tonal consistency and quality between all the sound files you will incorporate into your web site.
Professional encoding services
Do you have a few more files to encode than your band's last live recording? Perhaps you've been asked to encode your company's entire archive of audio and video content. Don't worry, there are a few people in the industry you can turn to when you have to post hundreds or thousands of audio and video files. Loudeye is one of them.
Loudeye, formerly encoding.com, specializes in helping companies manage, encode, and stream large quantities of audio and video content (http://www.loudeye.com). Systems Engineer for Loudeye, Aaron Olson, contributed several web mastering tips for this chapter. So if you feel overwhelmed and need professional services, you have options!
4.3.1. Normalization: maximizing the dynamic range
If you are working with prerecorded material, the next step is to normalize your sound files before converting them to web formats. Normalization maximizes the bit-depth information available and provides consistent volume levels across all your web pages. It's important to maintain volume consistency among different sound clips; there's nothing quite as jarring as experiencing dramatic shifts in volume when clicking through a web site. Normalization corrects this problem by raising all sounds to one uniform standard amplification level.
Normalization raises the overall amplitude or loudness level of a sound file to the point where the loudest peak is just below clipping, while also boosting the entire signal evenly, including the noise, as shown in Figure 4-11.

Figure 4-11. A waveform before and after normalization
Normalization makes maximum use of the dynamic range within the bit-depth of a digital audio signal, but it does not effect the dynamic range of the source audio. In other words, the dynamic range between softest and loudest material in the sound file is unaffected after normalizing, but the sound file is louder overall.
Using a compressor or "look-ahead" peak limiter while normalizing your sound files produces better results than simple normalization alone, as shown in Figure 4-12. Compressors and peak limiters reduce the highest peaks or waveforms in your sound files, thereby allowing you to further boost the volume of softer sounds. Increasing the volume of the waveforms within a sound file allows you to maximize the dynamic range when converting to low bit-rate web codecs.
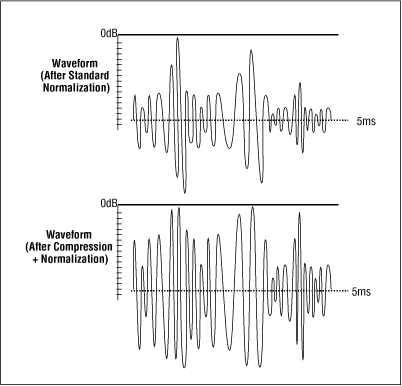
Figure 4-12. A standard normalized waveform (top) and a compressed and normalized waveform (bottom)
Three reasons to normalize your sound files
First, normalization maximizes the bit-depth information available by giving a sound a louder overall presence.
Second, it provides volume consistency across multiple web pages or sound files.
The third reason for normalization is to prevent distortion when encoding a stereo file into a single-channel mono file. If you are converting stereo files into low-bandwidth mono files, you should normalize to roughly 70% of the signal level of your input source. If you do not normalize a stereo file during or prior to its conversion to a mono file, you may experience digital distortion in your output file when the signals are combined and shoot above the maximum 0db level.
To normalize a file, SoundEdit 16 (or the editor you are using) examines the entire waveform, or a selection of the sound file, and finds the highest peak that any one sound makes in the given selection. The normalization dialog box, shown in Figure 4-13, then calculates the distance from that highest peak upwards towards the zero decibel (0dB) level. This distance is known as "headroom." The 0dB level is the highest level that sound can go in the digital world without "peaking the meters" and causing massive distortion in the sound. Remember not to confuse digital distortion with analog distortion. Analog distortion may sound good at times, producing interesting harmonics and tones such as those heard in classic rock-and-roll guitar solos. But digital distortion produces clicks and pops and nearly always sounds terrible.
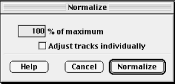
Figure 4-13. In the Normalization window you can select the amount of normalization you want. Generally, 95% is a safe number for encoding to web formats
When normalizing an audio file, SoundEdit 16 knows to avoid digital distortion and therefore will not make any sound greater than the 0dB cut-off point. Once it calculates the distance between the highest waveform peak and the 0dB cut-off point, SoundEdit 16 determines the number between the two and increases the rest of the sound file's waveforms by that amount. The overall effect increases all the levels equally without creating digital distortion at any point in the selection.
You can normalize an entire sound file or just a portion of it. To normalize part of a sound file, highlight only a specific region of the waveform. If no region is highlighted, SoundEdit 16 normalizes the entire file.
You can also set the amount of normalization you want based on a percentage of the maximum (100%). To be safe, you should try normalizing your files at 95% or -3dB below zero to allow for extra headroom, as shown in Figure 4-14. Flash and RealAudio, for example, have a tendency to distort certain sound files or frequencies that are normalized above 95%.
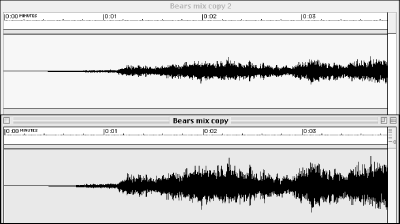
Figure 4-14. The top audio file represents the audio waveform before normalization and the bottom waveform represents the audio file after normalization (set to 95% or -3dB below 0).
Normalization is an important step to achieving high-quality web audio. By maximizing your dynamic range, your audio files will sound dramatically better when they are reduced to 8-bit sounds for the Web, especially for analog modem delivery. The dynamic range of lower bit-depth audio files is extremely limited, so softer sounds and quiet decays cannot be completely reproduced in an 8-bit sound clip. If you want the nuances of your sound design to be heard in low bit-depth audio, they cannot be subtle; faint decays and soft sounds simply will not come through.
4.3.2. Compression: reducing sound peaks and spikes
Using simple normalization alone to maximize the dynamic range has several limitations and drawbacks. Because the normalization process calculates only the available headroom, you are limited by the proximity of the loudest peak to the maximum 0dB cut-off point, as shown in Figure 4-15.
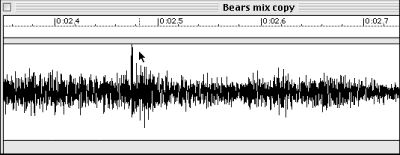
Figure 4-15. A sound file with the amplitude peak going to the 0dB cut-off level
Compressing film sound
When encoding for the web, audio that has either too strong or too weak a signal will have a negative impact on the output quality of the particular file. Some content, especially film content, uses extreme dynamic ranges to accentuate the emotion created by the content. Unfortunately, this dynamic causes negative results when encoded, causing previously unheard noise in the quiet parts and distortion in the loud parts. We suggest using some mild compression in order to help the encoder best deal with the source audio.
Generally, all sound files have a few short volume peaks or spikes, whether they are from a loud guitar solo section or a particular voice passage that is louder than adjacent sounds. Simple normalization is not effective if there is already a peak just under the maximum 0dB cut-off point. You can use a peak limiter or the amplify/gain process in SoundEdit 16 to further maximize the fidelity of audio playback over the web. A peak limiter is a dynamics processor that limits or prevents signals from peaking above a specified amplitude level. The average levels of your sound file can be raised several dB beyond the regular normalization level by using a limiter to compress the highest volume peaks. Likewise, you can use an amplify/gain command to reduce the level of a particular spike in your waveform.
By reducing these identified peaks, the entire level of the file can be raised higher before reaching the 0dB cut-off, resulting in a higher average signal level. You can achieve this function manually, by visually examining the sound file and locating and reducing individual peaks using the amplify/gain command.
You can also use a peak limiter plug-in, such as Wave's L1 Maximizer, to reduce the amplitude peaks in your sound files. The L1 Maximizer works by compressing all sounds that peak above the threshold setting of the dB level that you specify. The lower the threshold point, the more the sound is compressed. Generally 3dB to 9dB of compression adds clarity and brilliance to the sound and produces an overall effect that is pleasing to the ears. However, be careful not to overcompress your sound files. Too much compression (over 12dB) may make your sound files seem unnatural and "harsh" to your listeners' ears.
Warning!
If you want to boost frequencies, you should use equalization before you normalize or compress your sound file. If you normalize or compress your sound up to the maximum 0db cut-off point, and then increase the amplitude of certain frequencies, you will cause distortion.
4.3.3. Equalization: customizing your sound
Equalization is one of the most powerful tools you can use to enhance audio quality. Through the process of equalization, you can increase or amplify any specified range of frequencies within that spectrum. Equalizing files destined for the Web can help compensate for lost or reduced frequencies resulting from the drastic file-size reduction and conversion process used to prepare sound files for analog modem delivery. For instance, sound files formatted for 28.8 or 56 Kbps modems lose most of their high-end frequencies. Most web formats reduce the sample rate, limiting the use of high frequencies.
Figure 4-16 illustrates an EQ boost in the low-end bass frequencies between 75 Hz and 110 Hz and the high-range vocal frequencies between 2,000 Hz and 7,000 Hz to add brightness to a mix and make the vocals more clear after web conversion.
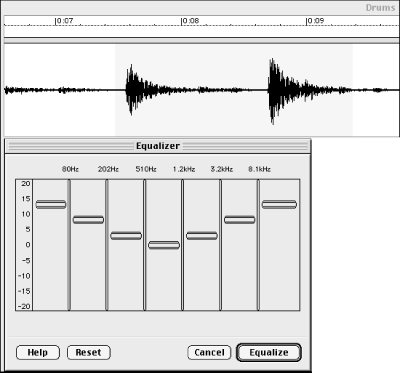
Figure 4-16. Equalization boost of the 75-200 Hz and the 2,000-7,000 Hz ranges
Often your final web audio sounds better if you eliminate high frequencies first. For instance, if you are reducing the sample rate to 22 Kbps, cut the frequencies over 10 Kbps. Frequencies above 10 Kbps create aliasing and other unwanted distortion artifacts when the conversion process tries to represent them and cannot.
There are two parameters you can specify to alter the equalization of a sound: the amplitude level and the bandwidth range of the frequencies. The amplitude level determines the loudness of a given range of frequencies. The bandwidth (usually from 200 to 500 Hz) determines the range of frequencies being amplified or reduced. Generally, you are never boosting or reducing one single frequency but instead a range of frequencies.
You may have used an equalizer on your home or professional sound systems. Equalizers generally have sliding levers, known as faders, that represent the different ranges of frequencies between 20 Hz (low) and 20,000 Hz (high) -- the normal hearing range of a human. Home sound system EQs generally feature five to ten faders or bands of EQ starting at the 50 to 120 Hz range on up to the 8,000 Hz to 10,000 Hz range. A professional equalizer features 20 or more separate bands of EQ starting as low as 20 Hz to 60 Hz and going as high as 16,000 Hz to 20,000 Hz. To increase, or boost, the relative amplitude of each range of the frequency spectrum, select the corresponding fader and move it up until you are satisfied with the relative amplitude or loudness of that frequency range. Likewise, if you want to lower or cut sound in that frequency range, slide the fader down.
Three reasons to equalize your sound files
During the mastering process, equalization can enhance your audio and compensate for unbalanced sound levels in three different ways.
First, equalization can be used to adjust the overall bass, midrange, or treble of a sound file.
Second, it can be used to make the overall bass, midrange, and treble more uniform from song to song or from sound file to sound file.
Third, it can be used to eliminate certain frequencies that cause distortion, or conversely to boost frequencies that get reduced when your audio file is encoded for the web.
There are two types of EQ interfaces: graphic and parametric. A graphic equalizer is commonly featured on home sound systems and "boom" boxes and is the easiest and most popular form of equalization. A graphic equalizer contains multiple sliding levers or faders along a horizontal line that represents the different ranges of frequencies between 20 Hz and 20,000 Hz. To increase or decrease the amplitude of each frequency range, move the fader up or down in a +10dB or -10dB range for best results.
A graphic equalizer is the easiest EQ interface to use especially for beginners, but it's the least flexible for professionals. Unlike a parametric EQ where the frequency bandwidth of each knob can be adjusted, the faders on a graphic EQ affect a predetermined bandwidth. For example, a 300 Hz fader on a five-band home sound system EQ generally boosts the signal along a tapered arch starting at 200 Hz on the low end, 300 Hz at the top, and 400 Hz on the high end. This means that the fader is boosting a 200 Hz-wide range of frequencies. Professionals demand more accuracy for precision adjustments and thus tend to use parametric EQs instead.
Because it requires a fairly deep understanding of audio theory, a parametric equalizer is used primarily in professional applications. Unlike a graphic equalizer, a parametric equalizer allows you to specify the desired bandwidth range (50 Hz, 100 Hz, 500 Hz, etc.) and the exact frequency (256 Hz, 1,350 Hz, 4,560 Hz, etc.) of the EQ setting before boosting or reducing the amount of gain. Parametric equalizers feature several twisting knobs for adjusting bandwidth and gain instead of a horizontal row of faders. Certain applications require boosting or reducing a more narrow or more broad range of frequencies than a graphic equalizer allows for, making a parametric equalizer ideal in these cases.
4.3.4. Using EQ to enhance audio
During the mastering process, equalization can enhance your audio and compensate for unbalanced sound levels in two different ways. First, equalization can be used to adjust the overall bass, mid-range, or treble of a sound file. Second, it can be used to make the overall bass, mid-range, and treble more uniform from song to song or from sound file to sound file.
To apply EQ to a sound file, first listen to it to see if it contains one or more of the three most common EQ imbalances. The first is a "muddy" or muffled sound with too much bass or "low end" in the 100 to 800 Hz range. The second is an irritating or "honky" sound from too much mid-range frequencies in the 1,000 to 5,000 Hz range. The last is a dull sound from not enough bright, high-end frequencies in the 5,000 to 10,000 Hz range.
Use equalization to "fatten" your sound by boosting the low bass frequencies in the 40 to 200 Hz range, or conversely to clean up a "muddy" sound file by reducing the low frequencies in the 300 Hz range. Likewise, you can reduce the harsh or "honky" mid-range tones by reducing sound in the 1,000 to 5,000 Hz range. Lastly, you can increase the brilliance and clarity of a dull sound by boosting its high frequencies in the 5,000 to 10,000 Hz range, or to avoid unpleasant, sharp piercing sounds, reduce super-high frequencies above 8,000 Hz.
4.3.4.1. Removing sibilance
Before you've completed the equalization process, it's a good idea to remove some of the unneeded higher frequencies. For example, you may have noticed that your voice-over contains many "ssss" sounds and short P's and T's. This is referred to as sibilance. The occurrences of sibilance can be lessened by cutting the levels of the higher frequencies, as shown in Figure 4-17, or by using a De-esser effects plug-in.
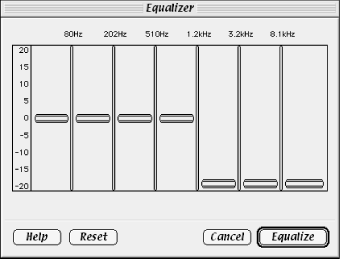
Figure 4-17. The Equalizer window allows you to reduce or cut-off high-end frequencies with the 1.2, 3.2, and 8.1 kHz faders.
Reducing sibilance with EQ by cutting a selected range of high frequencies should be a last resort effort. This technique decreases the selected range of high frequencies across the entire sound file producing a more dull sound. To avoid sibilance problems, deal with the issue during the recording process. Run your incoming signal through a De-esser digital processor or plug-in to remove sibilance before the audio is written to disk or work with your voice talent to produce less sibilance.
Cut the noise: Equalization for low bandwidth
The audio encoding process accentuates background noises that you may not have noticed in the original audio source. Generally, the two areas to focus on are the highest 1/4 and lowest 1/4 of your audio frequencies.
The higher frequencies (above 10,000Hz) tend to carry a lot of the background noise, such as hiss and scratchiness, in an audio file. Meanwhile, the lower audio frequencies (below 75Hz) tend to carry a lot of the rumble that can occur from background noises such as H/VAC systems, or the microphone rumble caused by wind.
To correct this problem, eliminate the low-end frequencies between 20 and 75Hz and the highest frequencies above 10,000Hz, using the equalization faders in your sound editor (i.e., high-pass low-pass filters).
4.3.4.2. Using low-pass and high-pass filters
You may find it useful to use the equalizer as a filter that removes all sound in frequencies above a certain point. This is referred to as a low-pass filter. This process allows all the frequencies lower than a number you specify to "pass" through, while any sound above the target frequency is "filtered" out. Use the low-pass filter to eliminate hiss entirely or to wholly remove sounds in the upper frequencies. You can create a low-pass filter by simply sliding the high-end frequency faders to the -20dB levels.
Alternatively, there may be situations where you need to use a high-pass filter. With a high-pass filter, you effectively remove everything below your specified cut-off frequency and allow anything higher to pass through. This is useful in removing lower bass sounds, such as the rumble of an automobile engine or the sound of a jet plane flying overhead.

Figure 4-18. The Equalizer window allows you to reduce or cut-off low-end frequencies with the 80, 202, and 510 Hz faders.
To remove lower bass sounds, you can create a high-pass filter by taking the sliders below 510 Hz and moving them down to the -20dB level, as shown in Figure 4-18. Again, these are only starting points. You may wish to move some faders to -20db and keep some at -10dB, or whatever combination sounds right to you. As with any process, trial and error is how you find the sound you want. Try boosting or cutting frequencies in order to hear the difference each movement of the fader makes. Just remember to choose undo before you try a new equalization or effect, so that the previous change isn't added onto the new one you're trying out.
Save time: Use all-in-one batch conversion tools
Batch conversion tools save time and prevent human error by automating the mastering and encoding process for multiple audio files. Two of the most popular tools for mastering and batch conversion are Wave Convert Pro and BarbaBatch. Both applications convert multiple audio files into various sample rates, word lengths, channels (stereo/mono), and file types (MP3, RealAudio, QuickTime, Shockwave, AIFF, SDII, and .WAV), while retaining optimal sound quality.
Wave Convert Pro from Waves runs on Macintosh and Windows 98, and can be purchased at http://www.waves.com.
BarbaBatch runs on Macintosh, and can be purchased at http://www.macsourcery.com/web/BarbaBatch/barbabatch.html.
 |  |  |
| 4.2. Digital effects |  | 4.4. Summary |

Copyright © 2002 O'Reilly & Associates. All rights reserved.