
4.2. Digital effects
Digital effects have evolved into highly sophisticated tools. Digital effects editing allows you to easily attach or apply many effects to an audio track, including reverberation or delay, preview it in real-time, make subtle adjustments to the effect, and then output or mix-down the track without permanently altering or changing the original sound file. Digital effects give sound designers more control and power to shape and craft sounds.
Before the advent of digital-editing applications and modern-day effects plug-ins, adding special effects to sound was cumbersome and time-consuming; effects were added by running the original "dry" audio signal through standalone effects boxes and then routing the processed or "wet" sound back to the tape recording device. The other alternative was to first record the original sound to a multitrack recording device and run it through an effects box during the mix-down (the process whereby all the tracks are blended to a stereo master tape). While this method preserved the original sound file, the creative constraints, real-time limitations of adjusting multiple effects devices, and time requirements involved in resetting and configuring the equipment were enormous. Now, however, experimenting with a whole range of digital effects is just a mouseclick away.
Professionals often refer to the process of adding effects to sound as "sweetening" the sound. When applying digital effects, use them sparingly and appropriately. You want to enhance your sound, not overwhelm it. A little bit of reverb or delay added to a sound file creates a nice sense of space and enhances the sound considerably. Too much reverb, on the other hand, can make the passage sound distant and unintelligible.
This caveat applies to all digital effects. A good rule is to always use a little less effect than you think is necessary. In fact, when the effect starts to sound just about right, try reducing it by 50%.
4.2.1. Reverb
Reverberation is the natural return of sound reflecting off the surrounding environment, such as a wall or a hard reflective surface. The returned sound enters the ear just a fraction of a second after the initial sound. Reverb, in the form of hundreds and thousands of small reflections, adds a pleasant warmth and richness to a sound.
Reverberation is analogous to shading in graphic imaging and photography. Adding a drop shadow behind an object gives an image three-dimensional depth and richness. Similarly, adding reverb and delay effects to an audio file give it three-dimensional richness. Reverb and delay create a sense of physical space and simulate the direction and distance for a particular sound source.
Keep the reverb consistent
If you use reverb to simulate the richness of a sound produced in a stairwell or an echo chamber, remember to apply the same type of reverb to all the sounds in your web soundtrack mix. This maintains consistency and realism in the soundtrack. Just as a skilled artist paints shadows that are consistent with the light source's angle, color, and intensity, the web sound designer should apply the same type of reverb to all the sounds in a particular web site environment.
Modern music, as well as film and television audio production, rely heavily on the use of artificial or synthesized reverb to simulate the effect of recording on an old-time sound stage with cathedral-like echoes and reverberation. Besides its use as a "sweetener," artificial reverb is used by sound designers to simulate the natural reverberation of different environments such as a hallway or an underground parking lot.
Generally, when you record a sound file, the recording is captured in a studio environment or a room with little to no reverb of its own. However, our ears are accustomed to hearing artificial reverb in film and television sounds. In such mediums, the effects are colored or enhanced to give the sound the appropriate ambience to match the environment on the screen. For example, a recording engineer might record an actor's voice-over in a studio for a scene filmed in a large stairwell. The sound designer then adds reverberation to the "dry" voice-over before the final soundtrack is mastered to film. Similarly, with web audio, to match the characteristics of real-world environments you may need to add reverb, echo, or other effects to your sound files.
Different software packages allow you to add effects in a variety of ways. For example, SoundEdit Pro has a preset list of effects, including reverb, delay, chorus, and equalization. Professional editing applications allow you to import third-party plug-ins and apply real-time nondestructive effects, such as preview, apply, and mix-down, without permanently altering the original sound file.
To apply an effect using SoundEdit 16, import a sound file and
select the region to be edited. Then choose Effects ![]() Reverb.
What you see is a dialog window with a slider control that allows you
to choose the amount of reverb to add to the selection, as shown in
Figure 4-5. Use the descriptive values, which run
the spectrum from "Empty Room" to "Outer
Space," to get an idea of how much reverb to add.
Reverb.
What you see is a dialog window with a slider control that allows you
to choose the amount of reverb to add to the selection, as shown in
Figure 4-5. Use the descriptive values, which run
the spectrum from "Empty Room" to "Outer
Space," to get an idea of how much reverb to add.
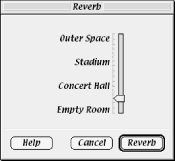
Figure 4-5. The SoundEdit 16 Reverb dialog
4.2.2. Delay
Delay is a useful effect for imitating real-world echos created when sound bounces off of a wall or a hard surface. Delay also is effective in adding an interesting twist to an ordinary sound or piece of music. In a music piece, delay applied to an instrument or vocal track adds rhythmic richness and depth. In fact, most pop tunes contain delay effects at some point, especially on the lead vocal tracks.
There are three parameters you need to adjust to apply delay:
-
Volume of the delay over time
-
Number of times the delay repeats
-
Speed or tempo of the delay
When adjusting the volume of the delay, err on the subtle side by making the echoes much lower in volume than the original sound. The exception to this rule is when you're trying to simulate an echo-heavy environment like a canyon or an alleyway.
Adjusting the number of times an echo repeats is important for simulating real-world sound effects or to prevent a music mix from becoming too cluttered with repetitive delays. Generally, you want to set the delay parameter to repeat between two and three times before it fades to silence.
When adding delay to an instrument track in a piece of music, it is essential to calibrate or adjust the tempo of the delay to match the tempo of the music or beat.
To add delay to your sound using SoundEdit 16, simply choose Effects
![]() Delay. The Delay dialog, shown in Figure 4-6, gives you two options. Apply the option that
sounds best for your particular purpose. Click on the delay button to
process the file. When finished, audition the sound and listen to the
difference.
Delay. The Delay dialog, shown in Figure 4-6, gives you two options. Apply the option that
sounds best for your particular purpose. Click on the delay button to
process the file. When finished, audition the sound and listen to the
difference.

Figure 4-6. The SoundEdit 16 Delay dialog
Audition first and often
All digital processing lets you listen to a modified file and decide whether to keep the changes. It is a good idea to listen to each change before moving on. Audition an altered sound file right after it has been processed, and then choose undo and listen to the old version. Keep toggling between redo and undo to compare versions. If you have added too much reverb, or not enough, it is easy at this point to go back and reprocess the sound file.
Part of becoming a good sound "designer" is listening and learning which sounds are best in which applications. Practice often, until your ears are satisfied with the result. You cannot know which combinations will yield the sound you want until you try them out and listen to the differences firsthand. This is how the ear learns what sounds good and how you learn to recreate the sound the next time.
4.2.3. Pitch shift
The Pitch shift effect alters both the pitch and duration of a sound file by recalculating the length of the sound file, as shown in Figure 4-7. If you raise the pitch of a sound clip, it recalculates the length of the sound file, making the duration and disk size of the sound file smaller. To prevent a sound from changing in duration -- such as when editing a sound clip for a music mix or a film mix where a particular sound is tied to an event -- you can check the "time correction" or "preserve duration" button when pitch-shifting. Most professional editors such as Pro Tools and Sound Forge feature time-corrected pitch shift; SoundEdit 16 does not.
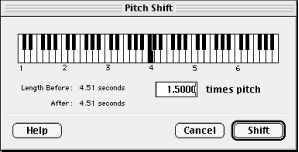
Figure 4-7. Pitch shift condenses or speeds up the selected region to raise the pitch
Pitch shift is a creative tool for altering or transforming a sound to create entirely new sounds; it is also a musical tool to lower or raise a passage of music to another key. Many recording engineers use pitch shift with precision to correct musical passages and vocal or instrument tracks that are slightly off pitch by a note or semi-tone.
Closeup: The B.B. King Sessions
The world of recording and editing presents many unique challenges to sound designers. Many different techniques are used to produce some of the sounds you hear. Consider this question: What do you do when a client hands you a stack of audio tapes recorded over the past thirty years in different studios and in live concert venues and asks you to blend these various recordings to create a consistent feel as if they were recorded at the same place and time? Reid Ridgway, chief sound designer and recording engineer for C.S. Audio Visual (http://www.csaudio.com), conquered this challenge to produce a critically acclaimed soundtrack for MCA Records: On the Road With B.B. King: An Interactive Autobiography with the King of the Blues.
First off, you should know that designing sound for the Web is a lot like designing sound for CD-ROMs. In both mediums sound designers are often faced with the task of integrating mixed quality audio source material into a seamless, digital, highly compressed interactive soundtrack.
During the course of the B. B. King project, Reid was asked to blend a large archive of taped interviews into a seamless interactive audio biography. The project was a great challenge because of the wide range of recording quality between the different audio master tapes. Moreover, the final output stage required a reduction to an 8-bit 22 kHz mono audio format. A few of the taped interviews were in pristine condition but most were not. Most of the interviews were made in less than optimal recording environments, such as impromptu situations. Many were also recorded in an era when recording technology could not match today's sound reproduction. Adding to the challenge, many of the interviews were recorded outside with traffic noise and different equalization and room tone from one recording to the next. For example, Reid had to blend an outdoor interview of B.B. King with traffic and barking noises in the background with an interview recorded in a professional studio with high-quality microphones and sound deadening acoustic foam. The objective was to play the two interviews in consecutive order on the same screen of the CD-ROM and have them sound as if they were recorded in the same environment.
First, Reid tried to improve the quality of the outdoor recording by removing the tape hiss and background noises. However, he quickly realized he couldn't remove enough of the background noise.
After experimenting with several solutions, Reid decided the best option was to degrade the quality of the recording that was made in a professional studio to match the poorer quality recording captured outside. In this case, degrading the quality of one sound to match the other sound produced the best result. You will find that sometimes it's necessary to break the rules and use creative solutions to produce a consistent soundtrack with a unified sound from beginning to end.
Reid started degrading the studio recording by adding background noises of traffic and barking dogs acquired from The Hollywood Edge sound effects collection. Then he played the high-quality version through a speaker placed outside and re-recorded it so the EQ, would have the same characteristic as the outdoor interview. To further match the EQ he placed the mic about the same distance away from the loud speaker as the mic was from B.B. King during the outdoor interview.
After achieving a consistent EQ sound using the outdoor speaker technique, Reid added some foley sound effects such as footsteps, door sounds, and an old plumbing clank and leak for ambiance. Also added were some of B.B. King's live recordings from the era. These where all blended to create a uniform background music to the final audio mix. In the particular scene Reid was working on, B.B. was talking about his experience at the Fillmore concert hall in San Francisco. Reid created a feel as if you were outside the concert hall. Then eventually as the graphics showed B.B. King entering the Fillmore, he switched over to the other recording to make any lingering differences in their sound characteristics less perceptible and the change more plausible.
By transforming a sound with pitch shift you can change the personality of your sound, making it deeper and more ominous, or higher, squeakier, and more comic. Brian Meyers, a former lead sound designer at Living Books in San Francisco, used pitch-shifting to get the professional sound he needed for a particular project. Meyers was working on a multimedia version of the Berenstain Bears books and was able to effectively use pitch shift to achieve authentic character voices. Instead of having the voice-over artists read in childlike voices, the producers recorded the actors' natural voices and performed pitch shift on the recordings to create appropriate voices for the baby bears. This case is a perfect example of using what is necessary and nothing more. In a world of digital effects where millions of possibilities exist, it is tempting to throw lots of effects into a project. "Less is more" is usually a good guideline.
To change the pitch of a sound in SoundEdit 16, select the region of
the sound you want to alter, then select Effects ![]() Pitch Shift.
The Pitch Shift window displays a piano keyboard, the original time
duration of the sound file, versus the previewed length of the sound
file, and the multiple of the pitch shift. To preview and select the
pitch shift of the sound region, click on any key of the piano then
click the Shift button.
Pitch Shift.
The Pitch Shift window displays a piano keyboard, the original time
duration of the sound file, versus the previewed length of the sound
file, and the multiple of the pitch shift. To preview and select the
pitch shift of the sound region, click on any key of the piano then
click the Shift button.
4.2.4. Bender
The bender effect allows you to adjust the pitch of a sound by an amount that can vary over the duration of the sound file. The result is a sound that seems to gradually raise or lower in pitch. Applying this effect also alters the length of the sound. If you want the entire sound file to uniformly shift pitches, it is better to use the pitch-shift effect. However, if you want the sound to alter pitch in a variety of ways over time, experiment with the bender effect.
With SoundEdit 16's bender effect, you can use a pitch adjustment line to represent how the pitch will be altered at each point in time along the waveform (as shown in Figure 4-8). The farther you move a handle away from the zero point, the greater the pitch changes. The scale that lies on the far left of the bender dialog box indicates the relative change in pitch. If you drag the handle in the positive direction, the pitch of the sound will be higher. Drag the handle in the negative direction, and the pitch will be lower. The range selections determine the amount of variation in the pitch shift. The options are 1 whole step, 1 octave, or 2 octaves.
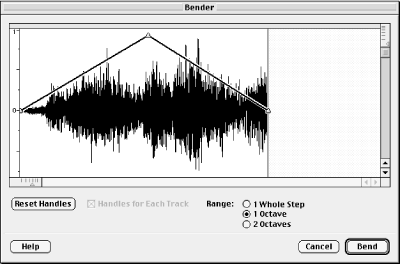
Figure 4-8. The bender effect, often used for cartoon sounds, changes the pitch up then down 1 octave across the selected region.
Use the "1 whole step" option to create a vibrato effect, where the sound alters up and down a small amount between the original pitch. A step is the distance in pitch between successive notes of the diatonic scale, such as the distance between C and D. A half-step is the distance between a note and its sharp, such as the interval from C to C#. Generally, a half-step or whole step difference is a subtle shift in pitch as opposed to a one-octave (12-step) shift.
In Figure 4-9, the bender effect is used to alter the sound between +1/2 step and -1/2 step and create what is referred to as a "vibrato" effect. However, you could use "1 octave" or "2 octaves" to produce a more dynamic effect. Experiment with all three options as you search for the sound you want to achieve.
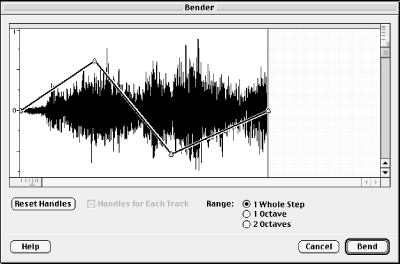
Figure 4-9. Use the bender effect to create a vibrato effect by altering the pitch between +1/2 step and -1/2 step.
4.2.5. Backwards
The backwards, or "reverse," effect is self-explanatory. This effect simply takes the selected waveform and flips it backwards so it plays in reverse, as shown in Figure 4-10. This effect is used by professional sound designers to add a special effect to a soundtrack or to generate new source material from existing sound files in their collection.
Although used infrequently, the backwards effect can result in some pretty wild and interesting sounds. You can use this effect to make voices sound like they are caught in an alternate reality or are in a dream state. You can also use short sound clips of speech or music that are one or two seconds in length and apply the backwards effect to create unusual, original sound effects.
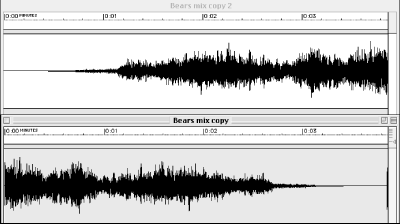
Figure 4-10. The backwards effect simply creates a copy of the waveform and plays it backwards
 |  |  |
| 4. Optimizing Your Sound Files |  | 4.3. Web mastering: optimizing sound files for Internet broadcasting |

Copyright © 2002 O'Reilly & Associates. All rights reserved.