
16.8. Packaging Components as Smart Clips
A Smart Clip is a movie clip that allows some of its variables to be assigned through a special graphical user interface in the Flash authoring tool. Smart Clips allow non-programmers to customize programmatically-controlled movie clips. Smart Clips separate the behavior-determining variables from the code of a clip, which lets people treat them as "black boxes" -- their operation can remain mysterious as long as their inputs, outputs, and behavior are known.
Normally, variable initialization occurs in the source code of a movie clip. For example, here we set up the variables used to control a fireworks effect:
// User-defined variables
var numSparks = 10;           // Number of spark clips in the explosion
var randomDispersion = true;  // Explosion style (true for random,
                              // false for uniform)
var duration = 1300;          // Length of explosion, in milliseconds
Modifying source code of this sort can be intimidating for non-programmers. But if we build our system as a Smart Clip, non-programmers can configure the fireworks effect through a familiar application-style interface. Figure 16-2 shows a Smart Clip interface equivalent to our variable-initialization code.
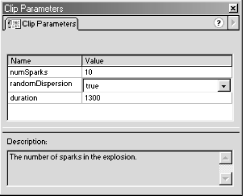
Figure 16-2. A sample Smart Clip -configuration interface
In a Smart Clip interface, each variable appears with its name and value clearly distinguished in separate rows and columns. Variable names cannot be edited, so there's no chance of inadvertent typos breaking the system. Each variable also has its own verbose description explaining exactly what it does and how it should be set. Finally, variables with a limited set of legal values (such as randomDispersion) may be assigned via drop-down menus.
For non-programmers, the interface shown in Figure 16-2 is certainly more approachable than source code. But Smart Clips can actually be made even more user friendly. We may replace the default Smart Clip interface with our own custom interface, such as the one shown in Figure 16-3. Notice how the custom Smart Clip interface hides our system's variables entirely, allowing the non-programmer to tailor each instance of the fireworks effect with text fields and pull-down menus. The interface even provides a live preview of the effect in action!

Figure 16-3. A customized Smart Clip-configuration interface
Let's see how all this works.
16.8.1. Building a Smart Clip with a Standard Interface
As we've just learned, Smart Clips have either the default system interface or a customized interface. We'll learn how to build the standard kind first.
The first step in building any Smart Clip is creating a regular movie clip that is controlled by the value of one or more variables. In the following code, for example, the variables xPos and yPos determine the location of a clip on stage:
_x = xPos;
_y = yPos;
When we build a movie clip as a Smart Clip for ourselves or someone else to use, we expect certain designated variables to be set via the Smart Clip interface when the clip is placed on stage. Those variables are known as clip parameters. Once we've created a clip with behavior dictated by one or more clip parameters, we must give the clip a Smart Clip interface through which those parameters can be set.
16.8.1.1. Adding a standard interface to a Smart Clip
To add a default Smart Clip interface to a movie clip, follow these steps:
Select the clip in the Library.
Choose Options
 Define Clip Parameters. (The Define Clip
Parameters dialog box appears.)
Define Clip Parameters. (The Define Clip
Parameters dialog box appears.)In the Parameters pane, click the plus (+) button to add a clip parameter.
Repeat step 3 for each parameter in the Smart Clip.
Configure the clip parameters, as described in the following section.
16.8.1.2. Configuring standard clip parameters
After we add a clip parameter to a Smart Clip, we must assign the parameter a name and, optionally, a default value. Like variables, clip parameters can contain different types of data. The datatypes supported by clip parameters are, however, not quite the same as those supported by variables. Clip parameters may contain strings, numbers, arrays, objects, and lists. These differ from the datatypes supported by variables in two ways:
Clip parameters support an interface-only type of value called a list. A list is used to limit the assignment of a parameter's value to one of a predetermined set of options. For example, a parameter named difficulty may have its value set to the list: "hard", "normal", "easy". Lists prevent users of a Smart Clip from supplying an invalid value for a clip parameter.
The primitive types Boolean, null, and undefined may not be set directly as the value of a clip parameter. This is a limitation of the Smart Clip interface, not the clip parameter itself; code inside the clip may assign Boolean, null, or undefined values to a variable initialized as a clip parameter. To simulate the Boolean values true and false with clip parameters, we use the numbers 1 and 0, not the strings "true" and "false". The numbers 1 and convert to the Boolean values true and false, respectively, when used in a Boolean context.
To give a clip parameter a name and optional default value, follow these steps:
Double-click the parameter name, and type a legal identifier for the parameter.
Double-click the parameter type, and then select one of the following:
Default for parameters with string or numeric values
Array for parameters with array values
Object for parameters with object values
List for parameters with a predetermined set of possible string or numeric values
Double-click the parameter value, and enter the default value, if one is required. This value will appear in the Smart Clip interface as the initial value for the parameter. The manner in which default values are entered depends on the type of parameter:
For Default parameters, double-click the parameter value and type the string or number.
For Array, Object, and List parameters, double-click the parameter value. In the Values dialog box, add, remove, and arrange items using the plus, minus, and arrow buttons. Click OK to accept your settings.
To add information about the parameter's purpose, enter an explanation in the Description box.
To prevent the parameter's name from being changed by the Smart Clip user, select Lock in Instance.
In the Define Clip Parameters dialog box, click OK to finalize your parameter settings.
16.8.1.3. Removing and reordering standard clip parameters
Sometimes you'll want to remove or rearrange your Smart Clip's parameters.
To remove a clip parameter, follow these steps:
In the Library, select the Smart Clip to modify.
Select Options
Define Clip Parameters.Select the parameter to remove.
Click the minus (-) button.
Click OK.
To rearrange clip parameters, follow these steps:
16.8.2. Building a Smart Clip with a Customized Interface
To build a Smart Clip with a customized interface, we first create a regular movie clip whose behavior is governed by a series of clip parameters as described earlier. Next, we create an independent .swf file (the so-called interface .swf ) that will be used as the Clip Parameters panel interface. We'll typically create a .swf file with a graphical interface that allows the user to enter parameter values (via text boxes, menus, buttons, etc.). Those values are automatically collected and passed to the Smart Clip as parameters.
The Smart Clip communicates with the interface .swf via the xch instance (short for exchange), a specially named instance in the interface .swf. (We'll see how to create the xch instance in a minute.) Figure 16-4 shows how parameter names and values are sent from the interface .swf to the Smart Clip.
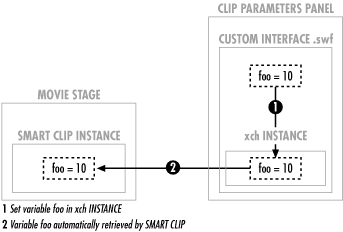
Figure 16-4. Custom Smart Clip communication
Communication between the interface .swf and the Smart Clip occurs in a cycle. When a Smart Clip instance is selected on stage, the corresponding interface .swf loads into the Clip Parameters panel. The current parameters in the Smart Clip instance are then passed to the .swf file's xch instance. The .swf file is expected to retrieve those parameters and set the interface state accordingly. Subsequent variables set in xch by the .swf file are automatically passed to the Smart Clip as parameters. When the Smart Clip instance is unselected, the interface .swf is removed from the Clip Parameters panel. However, the parameter values are not lost, they are retained by the Smart Clip. Each time the Smart Clip instance is selected, it passes its parameters back to the .swf file's xch clip. This cycle allows the interface .swf file to stay synchronized with the Smart Clip parameters.
The following sections explain how to create the custom interface .swf and associate it with a Smart Clip. A sample Smart Clip with a customized user interface is available under "Playhead Control" from the online Code Depot.
16.8.2.1. Creating a custom interface .swf file
To create a .swf file for use as the custom interface of a Smart Clip, follow these steps:
Start a new Flash document.
Create a new layer named xchLayer.
Select Insert
New Symbol to create a blank movie clip symbol.Name the new symbol xchClip.
On the xchLayer layer, place an instance of the xchClip symbol.
Name the instance xch.
Provide a series of buttons, text fields, and other interface elements used to set variable values.
Variables set in the xch instance will automatically be added to the Smart Clip as parameters. For example, here is how you'd set values for two custom parameters:
xch.param1 = value1;  // Values may be of any datatype
xch.param2 = value2;
To read the value of an existing Smart Clip parameter within a custom interface .swf, refer to that parameter as a property of xch. For example, the following initializes the param1Input text field with the value of param1 from the Smart Clip:
param1Input = xch.param1;
Export the .swf file.
16.8.2.2. Adding a custom interface to a Smart Clip
Now that we've seen how to create the interface .swf, let's add it to a Smart Clip as follows:
Close the custom interface .swf and return to the original .fla file containing the Smart Clip.
Select the Smart Clip in the Library.
Choose Options
Define Clip Parameters. The Define Clip
Parameters dialog box appears.In the Link to Custom UI box, type the location of the .swf file to use as the custom interface, relative to the current .fla file. (You may also select the .swf file using the folder button.)
16.8.3. Using Smart Clips
Once clip parameters have been assigned to a
movie clip, the movie clip officially becomes a "Smart
Clip." Smart Clips are identified in the Library with a special
icon,
 .
.
To use a Smart Clip instance in a movie, follow these steps:
Drag the Smart Clip from the Library onto the Stage.
Select Window
Panels Clip Parameters.If the clip has a standard interface, set each parameter value as follows:
For Default parameters, double-click the parameter value and type the string or number.
For Array parameters, double-click the parameter value. In the Values dialog box, double-click each array element value and type a string or number. Click OK to accept your array element values.
For Object parameters, double-click the parameter value. In the Values dialog box, double-click each object property value and type a string or a number. Click OK to accept your Object properties.
For List parameters, double-click the parameter value, and then select an option.
If the clip has a custom interface, use the tools provided in the custom interface to set the clip's parameters.
 |  |  |
| 16.7. Externalizing ActionScript Code |  | 16.9. Onward! |

Copyright © 2002 O'Reilly & Associates. All rights reserved.