
10.6. Creating Event Handlers
To create an event handler, we define the handler and attach it to the appropriate object. We'll begin with the most common handlers -- those attached to buttons and movie clips.
10.6.1. Attaching Event Handlers to Buttons and Movie Clips
To attach an event handler to a button or a movie clip, we must physically place the code of the handler function onto the desired button or clip. We may do so only in the Flash authoring tool, by selecting the object on stage and entering the appropriate code in the Actions panel, shown in Figure 10-1.
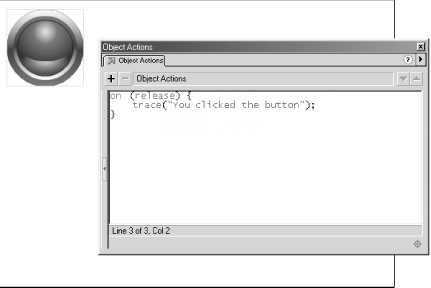
Figure 10-1. Attaching an event handler to a button
Let's try making a simple event handler function for both a button and a movie clip. To create a button event handler, follow these instructions:
Start a new Flash movie.
Create a button and drag an instance of it onto the main Stage.
With the button selected, type the following code in the Actions panel:
on (release) {
  trace("You clicked the button");
}
Select Control
 Test Movie.
Click the button. The message, "You clicked the button," appears in the Output window.
When the movie plays and we press and release the button, the release event is detected by the interpreter and it executes the on (release) event handler. Each time that we press and release the button, the message, "You clicked the button," appears in the Output window.
Now let's try making a slightly more interesting event handler on a movie clip. Once again, follow the instructions:
Start a new Flash movie.
On the main movie Stage, draw a rectangle.
Select Insert
Convert to Symbol.In the Symbol Properties dialog box, name the new symbol rectangle and select Movie Clip as the Behavior.
Click OK to finish creating the rectangle movie clip.
Select the rectangle clip on stage, and then type the following in the Actions panel:
onClipEvent (keyDown) {
  _visible = 0;
}

onClipEvent (keyUp) {
  _visible = 1;
}
Select Control
Test Movie.Click the movie to make sure it has keyboard focus, then press and hold any key. Each time you depress a key, the rectangle movie clip disappears. Each time you release the depressed key, rectangle reappears.
Notice that we don't manually issue any handler-invocation statements -- the interpreter automatically invokes our event handler when the corresponding event occurs.
Flash doesn't support attaching and removing handlers via ActionScript while the movie is playing. Event handlers must be assigned to buttons and movie clips using the Flash authoring tool. The following imaginary syntax, therefore, is not legal:
myClip.onKeyDown = function ( ) { _visible = 0; };We'll see how to work around this shortcoming later under Section 10.16, "Dynamic Movie Clip Event Handlers".
10.6.2. Attaching Event Handlers to Other Objects
In addition to movie clips and buttons, two built-in object classes -- XML and XMLSocket -- support event handlers. For these objects, event handlers are not added to some physical entity in the authoring tool. Rather, they are attached as methods to object instances.
For the XML and XMLsocket objects, ActionScript uses predefined properties to hold the name of the event handlers. For example, the onLoad property holds the name of the handler to be executed when external XML data has loaded.
To set the onLoad property for an XML object, we use the following code:
myDoc = new XML( );
myDoc.onLoad = function ( ) { trace("all done loading!"); };
Alternatively, we can define the handler function first, and then assign it to the onLoad property of our object:
function doneMsg ( ) {
  trace("all done loading!");
}
myDoc.onLoad = doneMsg;
This syntax closely resembles that of JavaScript, where functions may be assigned to event handler properties, as shown in Example 10-1.
Example 10-1. Assigning a JavaScript Event Handler
// Assign a function literal to the onload handler in JavaScript
window.onload = function ( ) { alert("done loading"); };

// Or, alternatively, create and then assign a function to the onload property
function doneMsg ( ) {
  alert("done loading");
}
window.onload = doneMsg;
In the future, more ActionScript objects may support assigning event handlers using object properties, so it's a good idea to get used to this style now. If you're not using the XML or XMLSocket objects, you can still practice making handlers in this way with HTML documents and JavaScript. The beauty of this approach is its flexibility; any event handler function may be easily reassigned or even removed during movie playback.
We'll learn more about attaching functions to objects in Chapter 12, "Objects and Classes". Information about the events supported by the XML and XMLSocket objects may be found in Part III, "Language Reference".
TIP
The lifespan of event handlers is tied to the life of the objects with which they are associated. When a clip or button is removed from the Stage or when an XML or XMLSocket object dies, any event handlers associated with those objects die with them. An object must be present on stage or exist on the timeline for its handlers to remain active.
 |  |  |
| 10.5. Event Handler Syntax |  | 10.7. Event Handler Scope |

Copyright © 2002 O'Reilly & Associates. All rights reserved.